Fireworks have always held a special place in human celebrations. They light up the night sky with dazzling bursts of color and motion, creating moments of awe and wonder. Yet, as beautiful as they are, fireworks are often noisy, expensive, and not always accessible. For young children or families who prefer a quieter evening, the booming sound of fireworks can even be overwhelming. But what if you could capture that same sense of magic indoors, in complete silence, and without any fire at all? That is exactly what the Fireworks in a Jar experiment offers.
This engaging project transforms simple household items into a breathtaking visual display that mimics the beauty of real fireworks. It is safe, easy to set up, inexpensive, and endlessly repeatable. Best of all, it combines entertainment with education, making it an ideal choice for classrooms, family science nights, or just a fun rainy-day activity at home.
Why You’ll Love This Experiment
There are countless reasons why Fireworks in a Jar has become a favorite science activity around the world. Here are some of the highlights:
-
Safe for All Ages: Unlike traditional fireworks, this project involves no flames, no smoke, and no loud noises. Children can participate safely under supervision.
-
Visually Stunning: Watching droplets of color drift downward and burst into delicate tendrils is a mesmerizing experience. The slow unfolding makes it almost meditative.
-
Educational Value: This experiment provides a hands-on demonstration of scientific concepts like density, solubility, and diffusion. Kids learn while being entertained.
-
Inexpensive and Accessible: All of the materials are common household items—warm water, oil, food coloring, and a jar. No need to spend extra money.
-
Creative and Customizable: With different color choices, water temperatures, and oil types, you can design countless variations of your fireworks show.
Whether you want to inspire curiosity, teach basic science concepts, or simply enjoy a quiet display of beauty, this experiment delivers.
Materials You Will Need
To get started, gather the following items:
-
One large clear jar or tall glass – This acts as the stage for your fireworks. Glass is ideal for clarity, but plastic can be used if safety is a concern.
-
Warm water – Fill the jar about three-quarters full. The warmth helps the colors disperse more quickly and dramatically.
-
2–3 tablespoons of vegetable oil – This creates the floating layer that temporarily holds the food coloring.
-
Food coloring – Choose a rainbow of colors for the most stunning results. Classic primary shades like red, yellow, blue, and green work beautifully.
-
One small bowl or cup – This is where the oil and food coloring will be mixed before being added to the jar.
-
One fork – Use this to gently stir the food coloring in the oil, breaking up the drops into smaller droplets.
Optional extras:
-
Black construction paper to place behind the jar and enhance the contrast of the colors.
-
A flashlight or lamp to shine through the jar in a dimly lit room, amplifying the visual effect.
Step-by-Step Instructions
1. Set the Stage
Begin by filling your clear jar about three-quarters full with warm water. Place it in a spot where it will remain still during the experiment. This water represents your “night sky,” a blank backdrop against which the fireworks will unfold.
2. Craft the Color Mixture
In a separate small bowl, pour 2–3 tablespoons of vegetable oil. Carefully add drops of food coloring into the oil. The droplets will not mix with the oil but will remain suspended, forming small, colorful beads. Use multiple colors for the most exciting effect.
3. Gently Stir
With a fork, gently swirl the mixture. Do not whisk or blend it completely; the goal is simply to break up large food coloring drops into smaller ones. These tiny droplets will create multiple bursts of color when they sink through the water.
4. The Grand Pour
Slowly and carefully pour the oil-and-color mixture into the jar of warm water. Allow it to settle naturally on the water’s surface. Avoid stirring the jar, as this would disrupt the separation of oil and water.
5. Watch the Fireworks Display
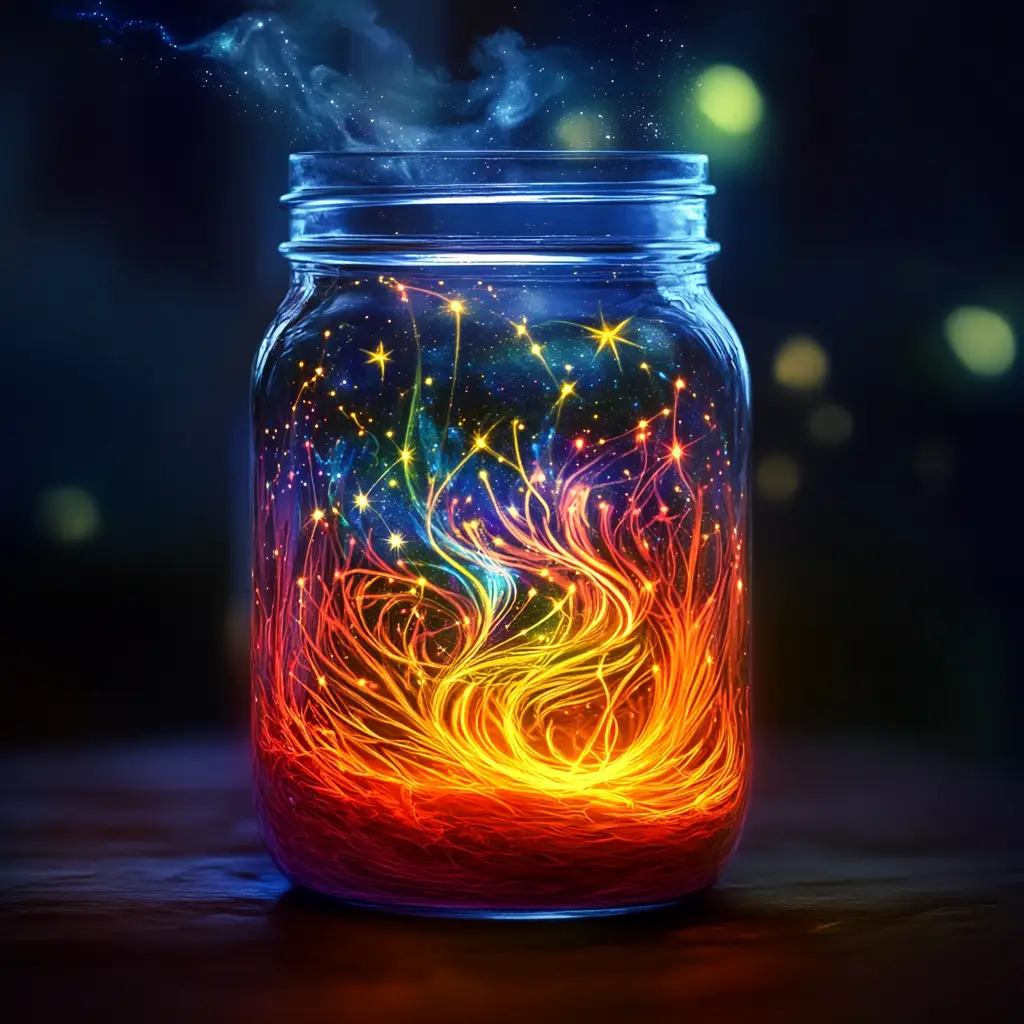
After a few moments, you will see droplets of food coloring begin to slip away from the oil and fall into the water. As they descend, they disperse into wispy, colorful tendrils that resemble fireworks exploding in the night sky. The show unfolds gradually, giving you time to observe each burst as it forms and drifts.
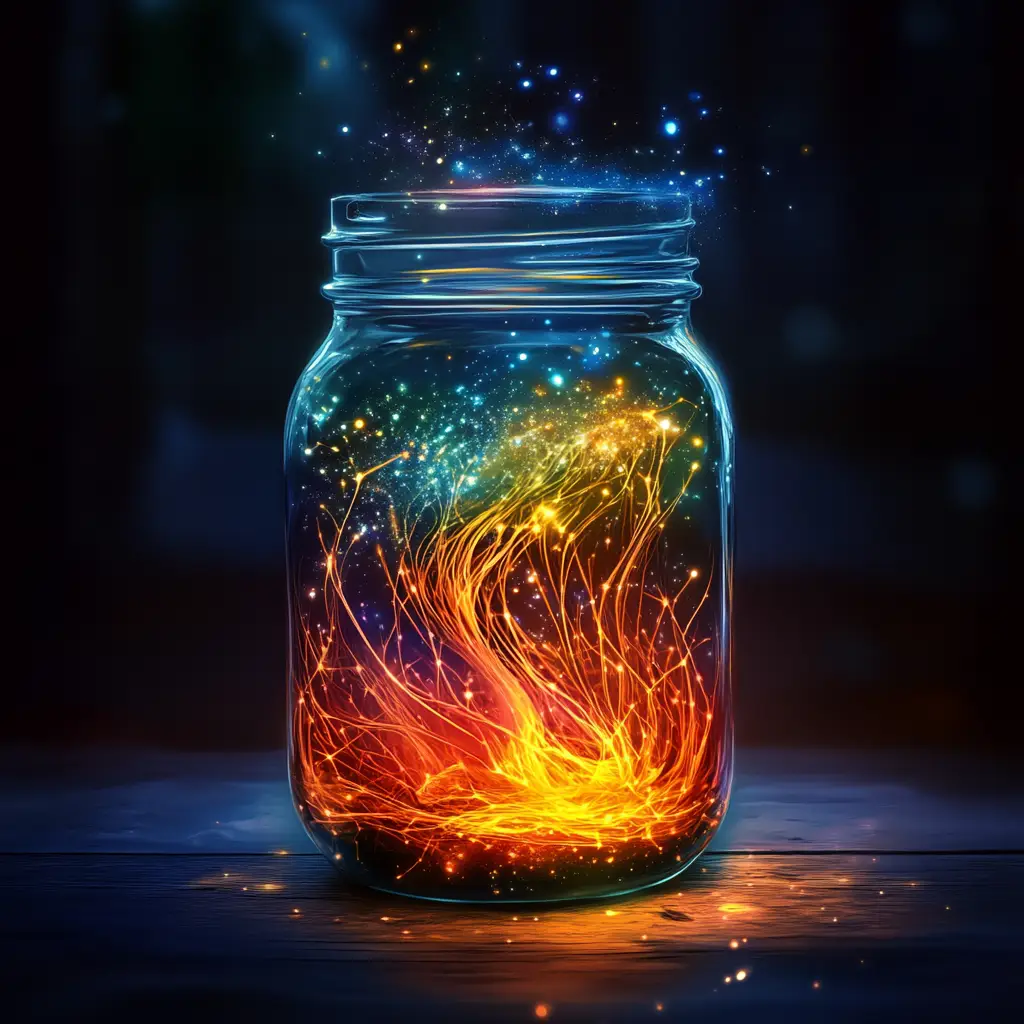
The Science Behind the Magic
While the display is beautiful, the real fascination lies in the science that makes it possible. This experiment illustrates three important scientific principles:
-
Density: Oil is less dense than water, which is why it floats on top. Food coloring, being water-based, is denser than oil and does not dissolve in it. Instead, it clings together in small droplets.
-
Solubility: Food coloring dissolves in water but not in oil. When the droplets eventually break free from the oil layer, they sink into the water and disperse.
-
Diffusion: Once the food coloring enters the water, it begins to spread out, moving from areas of higher concentration to areas of lower concentration. This spreading creates the streaks and bursts that resemble fireworks.
By watching this experiment, children can see density differences in action, understand the concept of solubility, and witness the process of diffusion—all in a visually engaging way.
Tips for the Best Results
To make your fireworks display as stunning as possible, keep these tips in mind:
-
Use warm water – Warmer water speeds up diffusion, resulting in more active bursts of color. Cold water slows the process for a gentler effect.
-
Do not overmix the oil and food coloring – Stir just enough to break large drops into smaller ones. If mixed too vigorously, the effect will be weaker.
-
Create a dark background – Place black paper or cloth behind the jar to mimic the night sky and make the colors stand out vividly.
-
Add light – A flashlight or lamp shining through the jar can transform the display into a glowing, almost magical show.
-
Experiment with amounts – Using more oil will create a thicker layer, which slows the descent of the food coloring, prolonging the show.
Variations to Try
Once you have mastered the basic experiment, you can try different variations to extend the fun and learning:
-
Color Themes: Choose colors that fit a theme, such as red, white, and blue for Independence Day or green and red for Christmas.
-
Layered Fireworks: Pour the oil-and-color mixture in stages, waiting for one round of fireworks to finish before adding another. This creates multiple “shows” in one jar.
-
Temperature Test: Compare how the experiment looks when performed with hot, warm, and cold water. Notice the differences in speed and motion.
-
Oil Comparisons: Try using olive oil, canola oil, or even baby oil to see if the density differences create unique effects.
-
Glow Fireworks: Under a blacklight, UV-reactive or glow-in-the-dark food coloring can turn the experiment into an even more spectacular display.
Educational Applications
This experiment is an excellent tool for teaching science concepts in classrooms or at home. Here are a few learning connections:
-
Density Demonstration: Show students why oil floats on water and how density differences affect layering.
-
Solubility Experiment: Explain why some substances dissolve in certain liquids but not others.
-
Diffusion in Action: Visualize how particles spread out in a solvent over time.
-
Scientific Method Practice: Encourage children to make predictions, test variations (like water temperature or different oils), and record their observations.
Because it combines beauty and science, this experiment is particularly memorable for students and encourages curiosity about everyday materials.
Safety Notes
Although this experiment is very safe, a few precautions will ensure a smooth experience:
-
Food coloring can stain clothing, skin, and surfaces. Protect your workspace with newspaper or use an old tablecloth.
-
If working with young children, consider using a plastic container instead of glass.
-
Remind participants that the mixture is not edible.
Conclusion
The Fireworks in a Jar experiment proves that you don’t need loud bangs or dangerous sparks to experience the wonder of fireworks. Using only a jar, water, oil, and food coloring, you can create a colorful, silent spectacle that rivals any holiday celebration.
This activity is safe, simple, and endlessly fascinating. It encourages scientific thinking, sparks creativity, and brings people together around a shared moment of beauty. Whether you are a parent looking for an educational family activity, a teacher hoping to inspire curiosity in the classroom, or simply someone who loves a good science experiment, Fireworks in a Jar is the perfect project.
So the next time you want to experience fireworks, skip the noise and smoke. Instead, gather your materials, set up your jar, and watch as color bursts silently into motion before your eyes.