Transform Your Space: DIY Plastic Bottle Flower Chandelier Lamp
As the sun dips below the horizon, casting golden light through your windows, your home should feel like a sanctuary of beauty and warmth. Imagine transforming your space into a whimsical wonderland as you hang a bouquet of flowers that never wilts, right from your ceiling. Just picture it: you’ve invited friends over for a cozy dinner, and as they gaze up, their eyes widen in delight at your stunning DIY Plastic Bottle Flower Chandelier Lamp. This enchanting piece isn’t just a lamp; it’s a conversation starter, a testament to your creativity, and a warm embrace of the environment. Let’s guide you through this delightful project that’s perfect for a weekend crafting escape.
Why People Love This Idea
The charm of crafting your own lamp lies not just in the final product, but in the entire experience. There’s something almost meditative about transforming everyday items into something magical and functional. With this DIY project, you’re not merely recycling plastic bottles; you’re creating art. Each flower you create exudes character and individuality, making your chandelier a reflection of your personal style.
Moreover, as eco-conscious living becomes more prevalent, what better way to incorporate sustainability into your home decor? This project lets you make a statement while also showing respect for our planet. The joy of seeing your guests marvel at your artistic ingenuity adds an extra layer of satisfaction.
Benefits and Best Occasions to Use It
This DIY chandelier is particularly versatile. It can brighten up a child’s nursery, add vibrancy to a cozy reading nook, or serve as the centerpiece for a lively garden party. The soft, warm light diffused through colorful petals creates an inviting ambiance, making it perfect for intimate gatherings or celebrations—think birthdays, bridal showers, or even a cozy date night at home.
Beyond aesthetics, creating this lamp nurtures important skills like patience, creativity, and resourcefulness. You might discover a newfound passion for crafting that paves the way for further projects.
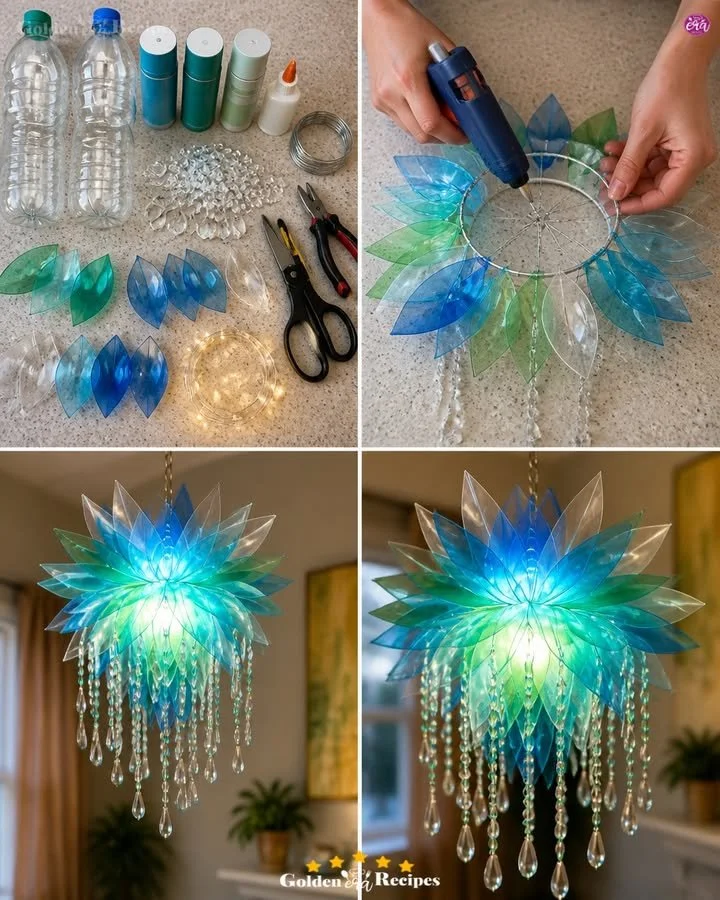
Materials You’ll Need
Let’s gather the magic pieces! To embark on your adventure of crafting a plastic bottle flower chandelier, you’ll need the following materials:
- Plastic bottles (1-5 depending on desired size)
- Scissors or a craft knife: For precise cutting.
- A heat source (like a candle or lighter): Don’t fret; we’ll handle this safely!
- Wire or a sturdy string for hanging.
- LED light kit: Opt for something soft and warm for the best effect.
- Paint (acrylic works wonders) to decorate your flowers.
- Pliers: Handy for manipulating wire.
- Optional embellishments: Think glitter, beads, or anything else that ignites your creativity!
As you gather these materials, imagine the colors and patterns you want to create. Embracing the vision early on will fuel your inspiration as you dive into making your chandelier truly unique!
Step-by-Step Instructions
-
Prepare Your Bottles: Start by thoroughly cleaning your plastic bottles. Once they’re sparkling, grab your scissors or knife and carefully cut the bottles to create flower petals. For a traditional look, you can cut them into five or six petal shapes, or even get creative with different designs!
-
Shape the Petals: Using your heat source, gently hold the edges of your petal pieces near the flame so they ruffle slightly. As the plastic warms, it will curl, resembling delicate petals. (Remember to do this in a well-ventilated area and exercise caution.)
-
Paint Your Flowers: Once the plastic has cooled, it’s time to let your creativity blossom! Use your acrylic paints to color the petals in vibrant hues. Think bold fuchsias, sunny yellows, or tranquil blues—anything that stirs joy in your heart. Allow them to dry completely.
-
Assemble the Flowers: Using your wire or string, thread each petal together in clusters to resemble blooming flowers. Be playful; mix different sizes and colors! You can secure them tightly with additional wire to ensure stability.
-
Create the Chandelier Base: For the chandelier structure, you could use a sturdy piece of cardboard or a pre-made lamp frame. Attach the flowers with additional wire, working from the bottom upwards to create a cascading effect that allows ample light to shine through.
-
Install Your Light: Once the flowers are affixed to the base, install your LED light kit underneath. Check for equal spacing, ensuring that every flower bathes in lovely light.
-
Hang Your Creation: Finally, choose a spot to showcase your beautiful chandelier. Use wire or strong string to securely hang it from the ceiling. Step back and admire your handiwork!
Helpful Tips
- Test Before You Commit: Before permanently securing your flowers, lay them out and pretend they’re hung to ensure the arrangement pleases your eye.
- Explore: Different bottle shapes can yield unique flowers. Experiment with soda bottles, water bottles, or even juice containers in varying sizes.
- Embellishments Galore: Don’t hesitate to sprinkle on glitter or stick-on jewels for added flair!
Beginner Mistakes to Avoid
Remember as you embark on this adventure: less is sometimes more. Avoid overloading your chandelier with too many flowers that can clutter the space. Allow for light to flow through each petal—you want to illuminate your room, not dim it with too much decoration!
Creative Variations
Why not take this project to the next level? Consider:
- Seasonal Themes: Experiment with colors that reflect the seasons—soft pastels for spring, fiery reds and oranges for autumn.
- Mixed Media: Try combining paper flowers, fabric scraps, or even recycled cans to give your chandelier a mixed-media makeover.
- Size Adjustments: Create mini versions for a playful nursery setting, or giant flowers for an impact that’s sure to stun!
Storage and Maintenance Tips
Unlike real flowers, your plastic bottle chandelier is built to last! To keep it looking vibrant, give it a gentle dusting with a soft cloth from time to time. If you find that the colors begin to fade, refreshing the paint with a new layer can reinvigorate your creation.
Frequently Asked Questions
Can I use colored bottles?
Absolutely! Clear, colored, or even gradient bottles can contribute to a unique aesthetic.
How long will the chandelier last?
With proper care, your DIY chandelier can brighten up your space for years to come—making this project a cherished gem rather than a seasonal fling.
Is it safe for indoor use?
Definitely! With an LED light source, there’s no risk of overheating, making it a safe DIY project for any space.
Conclusion
Crafting a plastic bottle flower chandelier lamp is more than just a project; it’s an invitation into a world where sustainability, creativity, and beauty merge into one shiny masterpiece. As you light it up, feel the warmth of your accomplishment envelop you, knowing you’ve breathed new life into discarded materials while crafting something that enhances your home’s charm.
So, gather your materials and unleash your inner artist this weekend. Switching up your home decor doesn’t need to be an overwhelming task—it can bloom beautifully, just like the flowers you will soon create. Share your journey with friends, inspire them to join you, and watch as your home transforms into a serene, radiant escape one flower at a time. Happy crafting!
SEO Meta Description: Discover how to transform plastic bottles into a stunning DIY Flower Chandelier Lamp. Perfect for any occasion, this eco-friendly project is a beautiful addition to your home decor.
SEO Tags: DIY floral chandelier, plastic bottle crafts, eco-friendly home decor, creative lighting projects, sustainable decorating ideas, weekend DIY projects, upcycling tutorials.