Transform Your Garden with DIY Marble Snail Decor
Imagine a sunny afternoon, the air filled with laughter as children and adults alike gather in the garden. The scent of blooming flowers wafts through the air, and the sound of rustling leaves dances at the edges of your ears. You’ve invited friends over for a garden party, but there’s a little something missing in your outdoor oasis – whimsical touches that invite joy and creativity into the environment. While classic garden gnomes abound, have you ever considered the charm that handmade marble snails could bring? Let’s embark on a delightful DIY journey to bring these enchanting creatures to life.
Picture this: A family gathering, with laughter bubbling over as tiny hands mold clay, transform marbles, and create delightful little snails. Crafting with loved ones sparks conversations, stories, and, of course, a sense of accomplishment when each snail finds its unique personality. Engaging in this hands-on project not only enhances your garden space but also crafts lasting memories for everyone involved.
Why People Love This Idea
DIY projects allow for personal expression and creativity. They provide a chance to step away from our screens and reconnect with family and nature, building something together that is unique and meaningful. Every twist in the clay, every color choice in the marbles, becomes a beautiful reflection of your character and taste.
These marble snails are more than just decorations; they are gateways to imagination. Each snail can embody the spirit of its maker, whether it’s a glittery gem representing whimsy or a classic design showcasing simplicity. Parents appreciate these crafts not only for their aesthetic but also for the quiet moments of bonding and shared creativity that unfold during the process. Plus, they are ideal for a variety of occasions—from garden parties to birthdays, or even just as a charming addition to your home decor.
The Benefits of Crafting Your Snails
Creating marble snails offers numerous perks. Firstly, it encourages creativity, allowing everyone to have fun with design choices. Secondly, it’s a fantastic way to recycle materials; large marbles that might have been sitting idly in your drawer can suddenly become beautiful art. These little snails are also a great way to add vibrancy to your garden, bringing an unexpected pop of color and personality to your space.
Whether you’re hoping to start a fairy garden, add some handmade gifts for loved ones, or simply explore a new craft with your children, these adorable snails serve every purpose. Lastly, they can be wonderfully versatile – perfect for desk decorations in the office or even as charming plant pot companions.
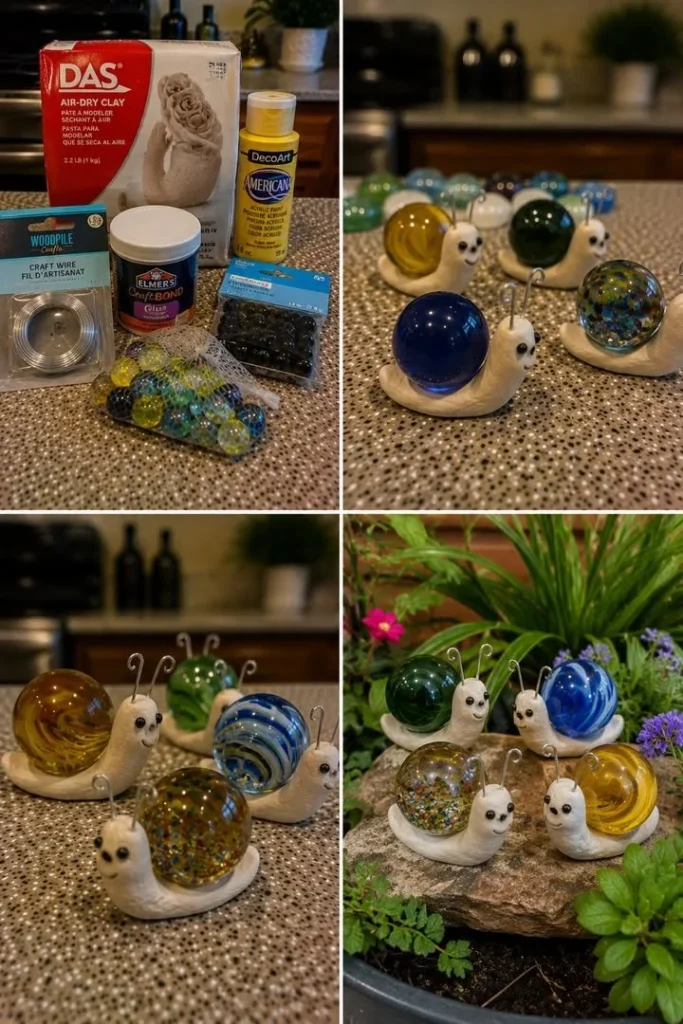
What You’ll Need
Gathering your materials is one of the most exciting steps in this crafting adventure! Here’s what you’ll require:
- Air-dry clay or polymer clay: This is the foundation of your snail. Air-dry clay is easy and simple, while polymer clay allows for a sturdier finish.
- Large marbles or glass gems: These will serve as colorful shells and add a lovely dimension to your snails.
- Black beads or tiny googly eyes: The perfect finishing touch for your snail’s adorable face.
- Thin craft wire: This material will make for charming antennae.
- Toothpick or sculpting tool: These tools will help you with detailing and shaping.
- Yellow acrylic paint (if you choose to add details or a base coat).
- Glue gun or strong craft glue: Essential for securing your marbles and ensuring everything stays in place.
- Clear varnish (optional): A touch for that shiny finish!
Step-by-Step Instructions
1. Make the Snail Body
Begin your creation by rolling a generous portion of clay into a small cylinder shape. You want your snail to be chubby and friendly! Gently curve one end upward to form the head. Take a moment to flatten the bottom slightly, allowing it to sit properly on whatever surface you choose, whether it’s soil, a desk, or a garden path.
2. Add the Shell
This is where the magic happens! Press a large marble gently against the back of the clay body, securing your snail’s shell in place. If you find that it isn’t sticking well enough, a little dab of glue will do the trick. Have some fun here; different marbles can create an array of colors and patterns that reflect your imagination.
3. Create the Face
Now for the details that bring your snail to life. Attach tiny black beads or dots for eyes to enhance those adorable features. Using a toothpick, carve a small smile into the clay; this is where personality shines through.
4. Add Antennae
Cut pieces of thin craft wire into short lengths—around a couple of inches should do. Bend the tips slightly to create a soft curve, emulating the look of real snail antennae. Insert these into the top of your snail’s head; they can be adjusted as needed for the perfect look.
5. Dry or Bake
This step will depend on the type of clay you’ve used. If you’re working with air-dry clay, simply leave your snails out to dry for about 24 hours, allowing them to harden. For polymer clay, you’ll want to follow the baking instructions on the package to ensure they take on a durable structure.
6. Finish the Snails
Once dry or baked, it’s time to give your little friends that final touch. You might choose to add a touch of clear varnish for a shiny, finished look, bringing out the marbles’ beauty even more. If you’ve opted to paint details, this is the time to touch them up, creating tiny flowers or funky designs if a more elaborate look is desired.
Creative Variations
Don’t shy away from exploring different textures and styles! Consider using glitter marbles for added sparkle or painting tiny flower patterns on your mixed clay colors. You might even want to add a small magnet to the bottom of each snail, transforming them into fridge magnets that brighten up your kitchen. Or why not team your snails up with miniature garden scenes that resemble an entire snail community?
Making It Last
For longevity, keep your marble snails in a dry area, away from harsh weather if you’ve decided to showcase them outdoors. If they begin to fade, a quick touch-up paint session will revive their charm. Having a few spare marbles and clay at hand ensures you can create more when inspiration strikes!
Frequently Asked Questions
Can I use other types of clay?
Absolutely! You can explore different types of clay based on your preferences and what you have on hand; air-dry and polymer are simply the most common choices.
What if I don’t have marbles?
If marbles aren’t available, consider using smooth stones or small decorative bowls as shells. The shape can add a unique flair to each snail.
Are they safe for kids?
Yes! These projects are generally safe and full of fun, but be sure to supervise younger children with any sharp tools, like toothpicks or sculpting tools.
Conclusion
As your snails take their place in your garden or on your desk, take a moment to appreciate the joy of crafting that you’ve nurtured within yourself and your loved ones. Each curve, color, and smile on these lovely creations tells a story—your story. It reflects community, creativity, and the simple pleasures that crafting brings.
So here’s to those spontaneous afternoons of crafting with gusto and imagination! Together, let’s fill our spaces with these enchanting little snails that not only add character but also remind us of our creativity, love, and cherished moments spent together. Slime your way into the craft world and enjoy this delightful hobby—it’s a journey worth taking!
SEO Meta Description: Discover how to create charming DIY marble snail garden decor perfect for any occasion! This detailed guide includes materials, step-by-step instructions, and creative variations. Transform your garden space with whimsy!
SEO Tags: DIY crafts, garden decor, marble art project, family activities, snail decor, handmade gifts, creative kids crafts.


