DIY Hanging Butterfly Chandelier: A Juicy Stained-Glass Delight!
Sensory-Rich Introduction with Immediate Craving
Imagine stepping into a sunlit room where vibrant butterflies seem to flutter in mid-air, their translucent wings catching the light and casting colorful reflections on the walls. This DIY hanging butterfly chandelier is not just a decor piece; it’s a whimsical creation that transforms any space into a magical haven. Inspired by childhood memories of chasing butterflies in the garden, this chandelier evokes a sense of nostalgia and joy. Perfect for brightening up a child’s room, adding charm to a garden party, or creating a romantic ambiance for a wedding, this chandelier is a celebration of color and light that invites admiration and wonder.
Why You’ll Love This DIY Hanging Butterfly Chandelier
- Textural Contrast: The combination of smooth, translucent wings and the delicate wire frame creates a stunning visual contrast that captivates the eye.
- Flavor Balance: The vibrant colors of the butterfly wings harmonize beautifully, creating a balanced aesthetic that enhances any decor style.
- Versatility: This chandelier can be customized to fit various themes, from whimsical to elegant, making it suitable for any occasion.
- Ease of Creation: With simple materials and straightforward steps, this project is accessible for crafters of all skill levels, ensuring a rewarding experience.
- Universal Appeal: The enchanting design appeals to both children and adults, making it a delightful addition to any home.
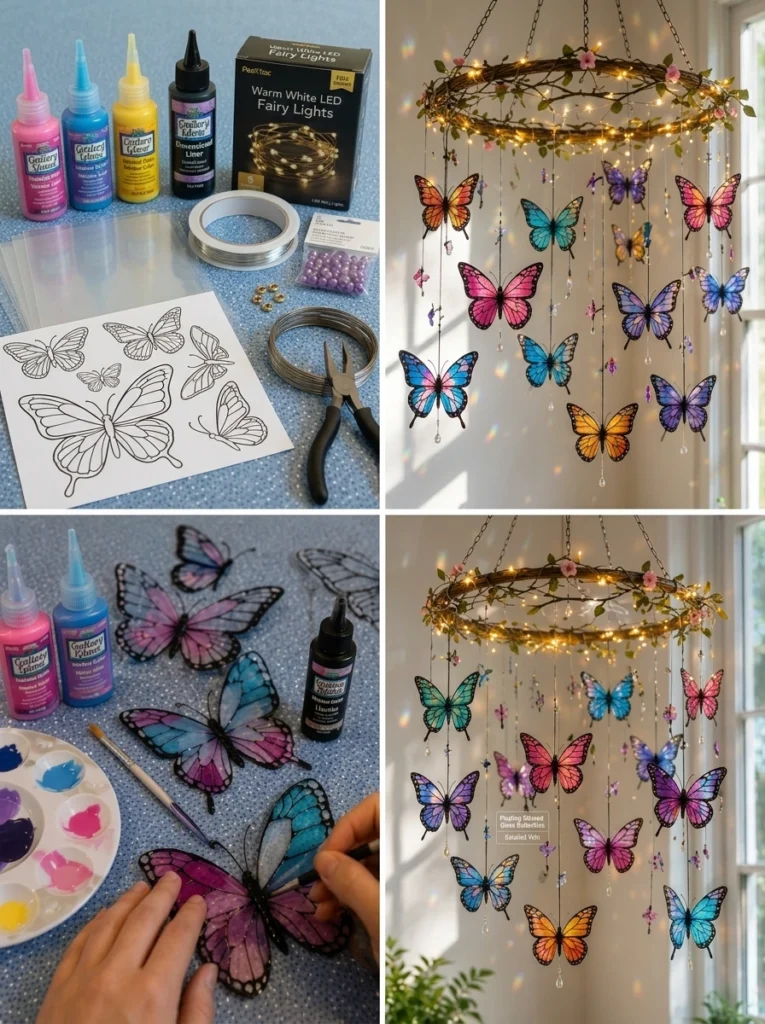
Essential Tools & Preparation Strategy
- Glue Gun: Essential for securely attaching the wings to the butterfly bodies, ensuring durability.
- Scissors: Necessary for cutting out the butterfly shapes from the plastic sheets.
- Paintbrushes: Needed for applying paint and inks smoothly to achieve a professional finish.
- Wire Cutters: Important for trimming jewelry wire or fishing line to the desired lengths.
- Ruler: Useful for measuring lengths of wire for hanging the butterflies evenly.
- Pencil: Needed for tracing templates onto the plastic sheets accurately.
- Metal Ring or Old Chandelier Frame: Serves as the base for your chandelier, providing structure and support.
- Fishing Line or Thin Jewelry Wire: Ideal for hanging the butterflies at varying lengths, creating depth and movement.
Ingredients & Their Roles in This DIY Hanging Butterfly Chandelier
- Transparent Plastic Sheets, Acetate, or Shrink Plastic: The main material for creating the butterfly wings, providing a stained-glass effect.
- Black Outline Paint or Dimensional Liner: Used to outline the wing veins and borders, adding definition and detail.
- Transparent Glass Paints or Alcohol Inks: These vibrant colors fill the wings, creating a beautiful, colorful display.
- Wire Frame or Old Chandelier Frame: The structural base that holds the butterflies and lights, giving the chandelier its shape.
- Thin Jewelry Wire or Fishing Line: Used to hang the butterflies, allowing them to sway gently and catch the light.
- LED Fairy Lights: Provide a warm glow that enhances the chandelier’s magical effect.
- Butterfly Templates: Guides for tracing and cutting out the wings, ensuring uniformity in design.
- Scissors: For cutting the plastic sheets and wire to the appropriate sizes.
Step-by-Step Guide to Perfect DIY Hanging Butterfly Chandelier
- Trace Butterfly Wings: Using a pencil, trace butterfly templates onto clear plastic sheets, ensuring you have enough for your desired design.
- Outline the Design: Apply black liner paint to outline the wing veins and borders, allowing it to dry completely for a crisp finish.
- Add Color: Fill in the sections of the wings with transparent paints in bright colors, letting each layer dry before adding the next for vibrancy.
- Cut and Assemble: Carefully cut out the wings using scissors, then create butterfly bodies from beads, wire, or clay, attaching the wings securely.
- Build the Hanging Structure: Use a metal ring or chandelier frame as the base, ensuring it is clean and ready for assembly.
- Attach Butterflies: Hang the butterflies at varying lengths using fishing line or wire, creating a dynamic and layered effect.
- Add Lights: Wrap warm fairy lights around the structure, ensuring they are evenly distributed for a glowing ambiance.
- Final Touches: Step back and adjust the butterflies and lights as needed to achieve the desired look.
Chef’s Notes & Pro Tips for Flawless Results
- Make-Ahead Instructions: This chandelier can be crafted ahead of time and stored in a cool, dry place until ready to hang.
- Storage Tips: Wrap the chandelier in bubble wrap to prevent damage to the delicate wings during storage.
- Equipment Recommendations: Consider using a hot glue gun with a fine tip for precision when attaching wings.
- Customization Options: Experiment with different colors and sizes of butterflies to create a unique design that reflects your style.
Avoid These Common Cooking Mistakes
- Using Non-Transparent Materials: Results in a dull appearance; always choose clear or translucent options for the wings.
- Not Allowing Paint to Dry Completely: Can cause smudging; ensure each layer is dry before proceeding to the next step.
- Overloading the Chandelier: Too many butterflies can look cluttered; aim for balance and spacing for visual appeal.
- Using Too Heavy a Wire: May not support the butterflies; opt for lightweight fishing line or thin jewelry wire for hanging.
- Not Securing the Lights Properly: Can lead to them falling; ensure they are tightly wrapped and secured to the frame.
- Ignoring Safety Precautions with Hot Glue: Can cause burns; handle with care and allow glue to cool before touching.
- Not Considering Weight Distribution: Can cause the chandelier to tilt; hang butterflies evenly to maintain balance.
Creative Variations & Customizations
- Seasonal Themes: Use autumn colors for a fall-inspired chandelier or pastel shades for spring.
- Different Butterfly Species: Create variations by using templates of different butterfly species for a diverse look.
- Glow-in-the-Dark Paint: Incorporate glow-in-the-dark elements for a magical nighttime effect.
- Themed Colors: Match the chandelier to specific events, such as red and green for Christmas or blue and white for winter.
- Miniature Versions: Create smaller chandeliers for table centerpieces or as gifts.
Perfect Pairings: What to Serve With DIY Hanging Butterfly Chandelier
- Sunlit Room: Hang in a sunlit area to enhance the stained-glass effect and create a vibrant atmosphere.
- Soft LED Bulbs: Pair with soft LED bulbs for a cozy evening glow that complements the chandelier’s design.
- Garden Party Decor: Use as a centerpiece for outdoor events, enhancing the whimsical theme.
- DIY Decor: Combine with other handmade decorations for a cohesive and charming look.
- Children’s Room: Display in a child’s room for a magical touch that inspires creativity.
- Wedding Decor: Incorporate into wedding decor for a romantic ambiance that guests will adore.
- Photoshoot Backdrop: Use as a backdrop for photoshoots or events, adding a unique touch to the setting.
- Floral Arrangements: Pair with floral arrangements for a nature-inspired look that enhances the chandelier’s beauty.
Storage & Meal Prep Instructions
- Fridge/Freezer Storage: This chandelier does not require refrigeration; store it in a cool, dry place.
- Reheating Methods: Not applicable, as this is a decorative item rather than food.
Nutrition Facts & Health Insights
| Serving Size | N/A |
|---|---|
| Calories | 0 |
| Sugar | 0 grams |
| Sodium | 0 milligrams |
| Fat | 0 grams |
| Saturated Fat | 0 grams |
| Unsaturated Fat | 0 grams |
| Trans Fat | 0 grams |
| Carbohydrates | 0 grams |
| Fiber | 0 grams |
| Protein | 0 grams |
| Cholesterol | 0 milligrams |
Frequently Asked Questions
- Can I use regular paint instead of glass paint? Yes, non-toxic acrylics or craft paints can be used as substitutes.
- How long does it take for the paint to dry? Drying times vary, but allow at least 30 minutes between layers for best results.
- What if I don’t have a chandelier frame? A metal ring or even a sturdy branch can serve as an alternative base.
- Can I use this chandelier outdoors? It is best suited for indoor use; if used outdoors, ensure it is protected from the elements.
- How do I clean the chandelier? Gently dust with a soft cloth; avoid using water or cleaning solutions that may damage the paint.
- What if my butterflies are not hanging evenly? Adjust the lengths of the fishing line or wire to balance the butterflies as needed.
- Can I make this chandelier larger? Yes, simply increase the number of butterflies and the size of the frame to create a larger piece.
- How do I secure the lights? Wrap the lights tightly around the frame and use small pieces of tape if necessary to hold them in place.
Final Inspiration & Kitchen Confidence
Creating your own DIY hanging butterfly chandelier is not just a craft; it’s an opportunity to express your creativity and bring a touch of magic into your home. Celebrate your achievements as you watch the colors dance in the light, and let this project inspire you to explore more artistic endeavors. Gather your materials, unleash your imagination, and transform your space into a whimsical wonderland that will leave everyone in awe. Happy crafting!
Print
“DIY Hanging Butterfly Chandelier: A Juicy Stained-Glass Delight!”
- Total Time: 30 minutes
- Yield: 1 chandelier
- Diet: N/A
Description
This DIY hanging butterfly chandelier is a stunning blend of art and light, featuring translucent wings that shimmer like stained glass. The vibrant colors dance in the light, creating a magical ambiance that transforms any space into a whimsical haven.
Ingredients
- Transparent plastic sheets, acetate, or shrink plastic – 5 sheets
- Black outline paint or dimensional liner – 1 tube
- Transparent glass paints or alcohol inks – 6 colors (blue, purple, pink, yellow, teal, green)
- Wire frame or old chandelier frame – 1 unit
- Thin jewelry wire or fishing line – 50 feet
- LED fairy lights – 1 string (20-30 lights)
- Glue gun – 1 unit
- Butterfly templates – 3-5 templates
- Scissors – 1 pair
Instructions
- Trace butterfly templates onto clear plastic sheets using a pencil.
- Use black liner paint to outline the wing veins and borders, allowing it to dry completely.
- Fill in the sections of the wings with transparent paints in bright colors, letting each layer dry before adding the next.
- Carefully cut out the wings using scissors.
- Create butterfly bodies using beads, wire, or clay, and attach the wings securely.
- Use a metal ring or chandelier frame as the base for your chandelier.
- Hang the butterflies at varying lengths using fishing line or wire to create depth.
- Wrap warm fairy lights around the structure, ensuring they are evenly distributed for a glowing effect.
Notes
- This chandelier can be made ahead of time and stored in a cool, dry place.
- To store, wrap the chandelier in bubble wrap to prevent damage to the wings.
- Substitutions for paints can include any non-toxic acrylics or craft paints.
- Prep Time: 30 minutes
- Cook Time: 0 minutes
- Category: Home Decor
- Method: Crafting
- Cuisine: N/A
Nutrition
- Serving Size: N/A
- Calories: 0
- Sugar: 0 grams
- Sodium: 0 milligrams
- Fat: 0 grams
- Saturated Fat: 0 grams
- Unsaturated Fat: 0 grams
- Trans Fat: 0 grams
- Carbohydrates: 0 grams
- Fiber: 0 grams
- Protein: 0 grams
- Cholesterol: 0 milligrams
Keywords: DIY, hanging chandelier, butterfly decor, stained-glass style, suncatcher art, mobile decor, craft project, home decor, LED lights, colorful wings, translucent art, whimsical design, creative lighting