Transform Your Outdoor Space: A DIY CD Mosaic Flower Pot
Imagine a sunny afternoon, the gentle warmth of the sun on your skin, fragrant blooms wafting through the air, and a cozy corner in your garden, waiting to come alive with color and creativity. This is the perfect moment for a delightful crafting adventure that turns outdated CDs into stunning works of art—specifically, a beautiful mosaic flower pot. This DIY project is not just about upcycling; it’s about breathing new life into forgotten materials while expressing your unique style. As we embark on this journey together, you’ll discover how to create a visual masterpiece that will brighten your outdoor space and spark joy every time you see it.
Why This Project Is a Must-Try
The CD mosaic flower pot project is perfect for those who long for a burst of creativity paired with a touch of eco-friendliness. In a world where we accumulate digital media faster than we can keep track, those old CDs or DVDs often end up collecting dust or worse—heading to the landfill. This project not only transforms your clutter into something beautiful, but it also showcases your personality. Each piece of CD you cut becomes a fragment of a story, reflecting your unique aesthetic.
The allure of this DIY project lies not just in its environmental considerations but also in the sheer joy of creation. It’s about the textures and colors dancing together, the moments spent in artistic solitude or with loved ones, and the satisfying finish of a handcrafted item. Whether you’re preparing for a garden party, looking to enhance your home decor, or simply seeking a joyful activity, the CD mosaic flower pot offers a canvas for your creativity to shine.
Benefits of Crafting Your Own Flower Pot
There’s a certain pride that comes from making something with your own hands. Crafting a CD mosaic flower pot allows for personal expression, and the end result is a beautiful piece that adds charm to any setting. Here are some benefits to consider:
- Eco-Friendly: Repurposing old CDs reduces waste and promotes sustainability.
- Customization: Tailor your pot to match your interior or exterior decor with different colors and patterns.
- Therapeutic: Crafting can be a wonderful stress-relieving activity, offering time away from screens.
- Community: Gather friends, family, or children for a creative afternoon filled with laughter and shared memories.
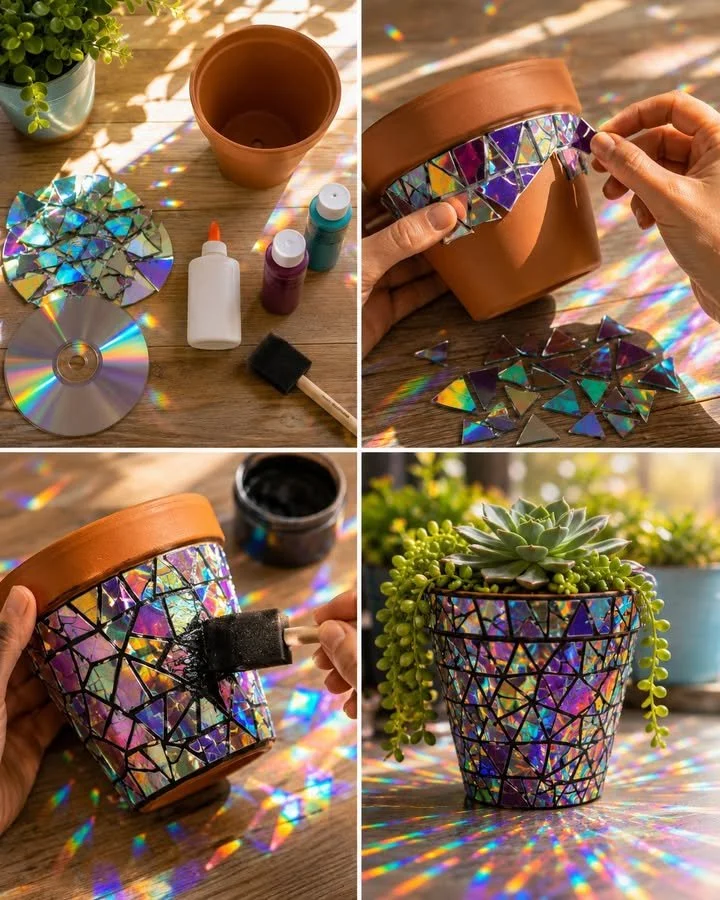
Gathering Your Materials
Before diving into crafting, let’s take a moment to gather everything you’ll need for this mosaic project. The materials are simple yet effective, cleverly transforming mundane items into genuine art.
- Terracotta Flower Pot: This will be the base of your mosaic masterpiece.
- Old CDs or DVDs: The stars of the show. Choose various colors for a dynamic look.
- Strong Craft Scissors: For cutting those CDs with precision.
- School Glue or Mosaic Adhesive: To hold your beautiful pieces together.
- Black and White Acrylic Paint: These will enhance the design and lend it a polished finish.
- Small Paintbrush: For applying the paint delicately.
- Soft Cloth: To wipe away excess paint and reveal your creation.
- Potting Soil: To nurture the plant you’ll place in your new flower pot.
- Plant or Succulent: Choose a lively plant that will thrive in your mosaic pot.
Step-by-Step Instructions to Create Your Mosaic Masterpiece
Now, let’s roll up our sleeves and embark on this exciting journey together. Each step is infused with creativity, opportunity, and a bit of magic.
Step 1: Prepare Your Canvas
Begin by cleaning your terracotta flower pot thoroughly. This preparation is essential, as a clean surface allows for better adhesion. Once you’ve wiped it down, set it aside and allow it to dry completely. In this peaceful moment, you can dream about the colors and patterns that will soon grace your pot.
Step 2: Craft Your Mosaic Pieces
Take your old CDs or DVDs and get ready to cut! Put on safety glasses to protect your eyes; the shards can be sharp. Using your craft scissors, cut the CDs into small triangle and square pieces. Feel the satisfaction as you create your mosaic tiles, each cut representing a tiny piece of your artistic vision.
Step 3: Assemble the Mosaic
With your mosaic pieces ready, it’s time to start gluing them onto the pot! Apply school glue or mosaic adhesive to the back of each piece and stick it firmly onto the surface of the pot, leaving small gaps between each piece. It’s important to embrace the imperfections; this adds a lovely charm to your creation.
Step 4: Let It Dry
Patience is a virtue! Allow the glue to dry fully according to the adhesive instructions—typically about a few hours. While waiting, take this time to admire your handiwork, imagining how gorgeous your pot will look.
Step 5: Add a Touch of Color
Once your mosaic is secure, mix black acrylic paint with a little water. Using your small paintbrush, gently brush the mixture over the mosaic surface. The paint should subtly enhance the gaps between the CD pieces, creating a stunning stained-glass effect, reminiscent of twilight skies or rich jewel tones.
Step 6: Reveal Your Masterpiece
After applying the paint, use your soft cloth to wipe away any excess, allowing the paint to remain primarily in the crevices and gaps. This step is where the magic happens; as you wipe away, your mosaic’s true vibrancy starts to shine.
Step 7: Plant Your Greenery
Once your pot is completely dry, it’s time for the grand finale! Fill your pot with potting soil, burying your chosen plant or succulent with care. Arrange it so that it peeks through the beautiful mosaic, inviting life into your new decorative piece.
Tips for Success
As you embark on this creative adventure, keep these tips in mind:
- Remember to always wear safety glasses while cutting CDs to protect your eyes.
- Don’t hesitate to experiment with different shapes and colors for your mosaic—get whimsical!
- For enhanced durability, consider sealing the finished pot with a clear outdoor sealer.
- If working with kids, supervise closely during the cutting and gluing process for safety.
Creative Variations
Feel free to modify this project to suit your style! Try creating a larger planter for an outdoor herb garden, or go mini with smaller pots for desk succulents. Wanna add more flair? Incorporate beads, buttons, or tiles from other broken pottery for unique designs. The beauty of crafting lies in its flexibility—let your imagination lead the way!
Frequently Asked Questions
How do I keep my flower pot from cracking?
To ensure longevity, consider placing your terracotta pot in a shaded area during extremely hot weather to prevent cracking. Opt for high-quality potting soil to retain moisture without over-saturating.
What plants work best in mosaic pots?
Succulents and small flowering plants like petunias or marigolds are great choices! They require minimal water, thrive well in terracotta, and create vibrant displays with your mosaic pot.
A Lasting Creation
As you sit back and admire your new CD mosaic flower pot, take a moment to reflect on the lovely process. Each step, from cutting the CDs to planting the succulent, becomes a cherished memory. This project is more than just a flower pot; it’s a celebration of creativity, sustainability, and the joy of crafting.
In this busy world, taking the time to create something beautiful brings a little serenity into life. So gather your materials, get your hands a bit messy, and let your soul flourish through art. Embrace the joy of DIY and watch as your once-ordinary pot transforms into a stunning centerpiece for your garden or living space, showcasing not just flowers or succulents, but your unique creative spirit as well.
SEO Meta Description
Create a stunning CD mosaic flower pot with this engaging DIY project. Transform old CDs into a beautiful, eco-friendly planter, perfect for brightening any outdoor space!
SEO Tags
- DIY Projects
- Upcycling Ideas
- Crafting with Kids
- Home Decor
- Garden Crafts
- Sustainable Living
- Mosaic Art