Introduction to Wax Paper Sun Catchers
Welcome to the colorful world of Wax Paper Sun Catchers! This delightful DIY craft is not only a fantastic way to brighten up your home but also a wonderful opportunity to spend quality time with your kids. Imagine the joy of creating vibrant, shimmering decorations that dance in the sunlight, filling your space with warmth and cheer. This project is simple enough for beginners, yet it allows for endless creativity, making it perfect for family bonding or classroom fun. So, gather your materials, and let’s unleash our creativity together!
Why You’ll Love This Wax Paper Sun Catchers
Creating Wax Paper Sun Catchers is a delightful experience that brings joy and creativity into your home. This craft is not only easy and affordable, but it also offers a wonderful way to bond with your kids. As you work together, you’ll share laughter and creativity, making memories that last a lifetime. Plus, the satisfaction of seeing your colorful creations brighten up your windows is simply unbeatable!
Materials and Tools Needed for Wax Paper Sun Catchers
Before we dive into crafting, let’s gather our materials! You’ll need:
- Wax paper: This is the star of the show! It’s essential for creating that beautiful, translucent effect when the sun shines through.
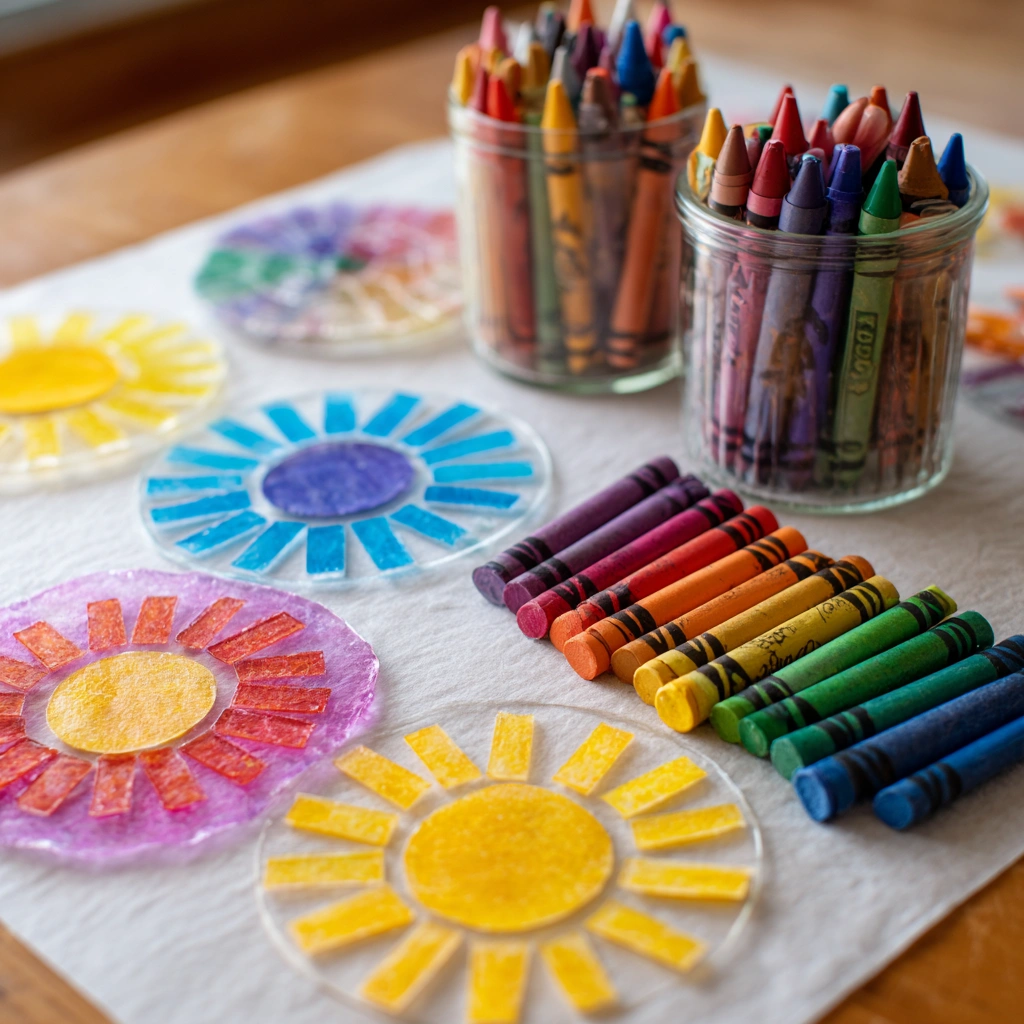
- Crayons (various colors): Choose a rainbow of colors to make your sun catchers pop! You can even use broken crayons—no waste here!
- Iron: A trusty iron is needed to melt the crayon shavings and fuse the wax paper together. Just remember to keep it on low heat!
- Paper towels: These will protect your iron from any crayon mess while you work your magic.
- Scissors: You’ll need these to cut your wax paper into the perfect shapes for your sun catchers.
- String or ribbon (optional for hanging): If you want to hang your creations, a bit of string or ribbon adds a lovely finishing touch!
All these materials are easy to find and budget-friendly, making this a perfect family-friendly craft. Plus, you can often find eco-friendly options for crayons and paper, so you can craft with a clear conscience!
How to Make Wax Paper Sun Catchers
Now that you have your materials ready, let’s dive into the fun part—making your very own Wax Paper Sun Catchers! This project is not only simple but also a fantastic way to bond with your kids or unleash your inner artist. So, roll up your sleeves, and let’s get started!
Step 1: Prepare Your Crayons
First things first, let’s get those crayons ready! Start by peeling the wrappers off your crayons. This is a great task for little hands, and it’s always fun to see which colors you’ll be using. Once they’re naked, grab a cheese grater and start grating them into small shavings. The vibrant colors will make your heart sing, and the smell of the wax will remind you of childhood art projects!
Step 2: Cut the Wax Paper
Next, take your wax paper and cut two pieces to your desired size. You can go for classic rectangles or get creative with fun shapes! Just imagine how beautiful those sun catchers will look hanging in your window, casting colorful shadows all around your room.
Step 3: Add Crayon Shavings
Now comes the exciting part! Sprinkle the crayon shavings evenly between the two pieces of wax paper. Feel free to mix and match colors for a stunning effect. The more colors, the merrier! Just picture the soft shimmer of the melted crayons under the sunlight—it’s going to be magical!
Step 4: Protect Your Iron
Before we melt those shavings, let’s protect our iron. Cover the wax paper with a paper towel. This step is crucial to avoid any mess on your iron and to keep your project safe. Trust me, you don’t want to deal with a sticky iron!
Step 5: Melt the Crayon Shavings
Now, it’s time to bring the heat! Carefully press the iron on low heat over the paper towel for just a few seconds. You’ll see the crayon shavings start to melt and fuse the wax paper together. It’s like watching a colorful magic show right in your kitchen! Just be sure to keep an eye on the kids during this step, as the iron can get hot.
Step 6: Cool and Trim
Once you’ve melted the crayons, let your creation cool for a moment. Then, carefully peel apart the wax paper. You’ll be greeted with a beautiful, colorful masterpiece! Trim any excess edges to give it a polished look. I always feel a sense of accomplishment at this stage—it’s like unwrapping a present!
Step 7: Add Hanging Option
If you want to hang your sun catchers, now’s the time to add a little flair! Punch a hole at the top and thread a string or ribbon through it. This step is optional, but it adds a lovely touch. Imagine how delightful it will be to see your creations dancing in the sunlight!
Step 8: Display Your Creation
Finally, it’s time to show off your hard work! Hang your sun catchers in a sunny window and watch as they come to life with color. The way the light filters through will create a stunning display that brightens up any room. You’ll be amazed at how such a simple project can bring so much joy!
Tips for Best Results
- Experiment with different colors and patterns for unique designs. The more vibrant, the better!
- Make sure to use a low heat setting on the iron to avoid burning the wax paper. Trust me, no one wants a melted mess!
- Try using different shapes by cutting the wax paper into fun forms before adding crayon shavings. Stars, hearts, or even spooky shapes for Halloween!
- Consider using a variety of textures by adding tissue paper or glitter for extra flair. It’s like giving your sun catchers a little sparkle!
Theme and Design Variations
One of the best parts about creating Wax Paper Sun Catchers is the endless possibilities for themes and designs! Here are some fun ideas to inspire your creativity:
- Bright summer colors: Use vibrant yellows, pinks, and greens for a cheerful vibe that captures the essence of sunny days.
- Autumn leaves theme: Embrace the season with warm oranges, reds, and browns to create a cozy fall atmosphere.
- Winter wonderland: Opt for cool blues and whites to evoke the magic of snowy days and frosty nights.
- Rainbow patterns: Mix all the colors of the rainbow for a vibrant display that will brighten any room.
- Kid-friendly shapes: Cut the wax paper into fun forms like stars, hearts, or animals to make the project even more engaging for little ones.
Feel free to mix and match these ideas to create your own unique designs! The only limit is your imagination!
Display and Use Ideas
Now that you’ve created your stunning Wax Paper Sun Catchers, it’s time to think about how to showcase them! Here are some fun and creative ways to display or use your colorful creations:
- Hang them in windows to catch sunlight and create beautiful, colorful reflections that brighten up any room.
- Use them as decorations for birthday parties or seasonal celebrations, adding a splash of color to your festivities.
- Gift them to friends or family as a handmade keepsake that shows off your creativity and thoughtfulness.
- Create a mobile by hanging multiple sun catchers together, turning your colorful art into a delightful display that dances in the breeze.
FAQs about Wax Paper Sun Catchers
As you embark on your crafting journey with Wax Paper Sun Catchers, you might have a few questions. Don’t worry; I’ve got you covered! Here are some common queries and their answers to help you along the way:
- Q: Can I use other types of paper?
A: Wax paper is best for this project as it can withstand heat and allows the crayon to melt properly. Other papers might not give you the same beautiful results! - Q: What age is this craft suitable for?
A: This project is great for ages 5 and up, with adult supervision for the ironing step. It’s a fun way to engage kids in creativity while ensuring safety! - Q: How do I clean up crayon shavings?
A: Use a damp cloth to wipe down surfaces and a vacuum for any stray shavings. It’s a quick clean-up, so you can get back to enjoying your colorful creations! - Q: Can I use broken crayons?
A: Absolutely! Broken crayons work perfectly for this project. In fact, they can add unique textures and patterns to your sun catchers! - Q: How long will my sun catchers last?
A: With proper care, your Wax Paper Sun Catchers can last for several months. Just keep them out of direct sunlight for extended periods to prevent fading.
Final Thoughts
Creating Wax Paper Sun Catchers is not just a craft; it’s a joyful experience that fills your home with color and warmth. The satisfaction of seeing your vibrant creations dance in the sunlight is truly magical! I encourage you to gather your materials, invite your kids to join in, and let your creativity flow. Don’t forget to share your beautiful sun catchers with friends and family—after all, crafting is even more fun when you can inspire others! So, what are you waiting for? Dive into this delightful DIY project and let your imagination shine!
Print
Wax Paper Sun Catchers: Unleash Your Creativity with Fun Crafts!
Description
Create beautiful and colorful sun catchers using wax paper and crayons. This fun craft project is perfect for kids and adults alike, adding a splash of color to your windows.
Instructions
- Begin by peeling the wrappers off the crayons and grating them into small shavings using a cheese grater.
- Cut two pieces of wax paper to your desired size.
- Sprinkle the crayon shavings evenly between the two pieces of wax paper.
- Cover the wax paper with a paper towel to protect your iron.
- Carefully press the iron on low heat over the paper towel for a few seconds until the crayon shavings melt and fuse the wax paper together.
- Once cooled, carefully peel apart the wax paper and trim any excess edges.
- If desired, punch a hole at the top and thread a string or ribbon for hanging.
- Hang your sun catchers in a sunny window and enjoy the colorful display!
- Category: Crafts
Keywords: Wax Paper Sun Catchers, DIY Crafts, Kids Activities, Colorful Decorations