Walking Water Rainbow: Create a Colorful DIY Project!
Introduction to Walking Water Rainbow
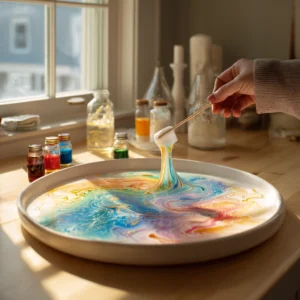
In a world where creativity often takes a backseat to our busy lives, finding simple yet engaging projects can be a breath of fresh air. The Walking Water Rainbow is a delightful DIY activity that not only brings color into your home but also serves as a fun science experiment. Perfect for busy moms and professionals, this project is easy to set up and requires minimal materials. Whether you’re looking to entertain your kids or add a splash of color to your day, this project is sure to brighten your spirits!
Why You’ll Love This Walking Water Rainbow
The Walking Water Rainbow is a fantastic way to explore creativity while being budget-friendly and straightforward. This project allows you to engage with your children or simply enjoy a moment of relaxation as you watch the colors blend. It’s a perfect blend of art and science, making it an educational experience that’s also fun. Plus, the vibrant results are sure to impress!
Materials Needed for Walking Water Rainbow
To create your own Walking Water Rainbow, gather the following materials:
- Clear cups (6): These will hold the water and allow you to see the colors mix.
- Water (2 cups): The main component for this colorful experiment.
- Red food coloring (1 drop): For the first color in your rainbow.
- Blue food coloring (1 drop): For the last color in your rainbow.
- Yellow food coloring (1 drop): Optional for additional color mixing.
- Paper towels (3): These will act as the medium for the water to travel through.
For a printable full list of materials, see below.
Tools Required for Walking Water Rainbow
You will need the following tools to complete your Walking Water Rainbow project:
- Measuring cup: To accurately measure the water for each cup.
- Spoon: For stirring the food coloring into the water.
If you don’t have a measuring cup, any cup can work as a makeshift measuring tool, just ensure you keep the proportions consistent.
How to Make Walking Water Rainbow
Creating your own Walking Water Rainbow is not only simple but also incredibly rewarding. I remember the first time I tried this project with my kids; we were all amazed at how quickly the colors began to travel. Here’s how you can replicate that magic in your own home:
- Arrange 6 clear cups in a row: This will be your workspace for the project. I like to use a bright tablecloth underneath to make the colors pop even more!
- Fill the first cup with water and add a drop of red food coloring: Stir gently to mix. Watching the red swirl into the water is like watching a sunset!
- Fill the last cup with water and add a drop of blue food coloring: Again, stir gently. The blue is so vibrant, it reminds me of a clear summer sky.
- Fill the middle cups with water, leaving them clear: These cups will help the colors travel. It’s like setting the stage for a beautiful performance!
- Take 3 paper towels and fold them lengthwise: This will create a long strip for the water to travel. I always find folding them is a great way to get the kids involved.
- Place one end of each paper towel in the colored water and the other end in the clear water cups: Ensure they are touching the water in both the colored and clear cups. This is where the magic begins!
- Wait and watch: Observe as the water travels up the paper towels and mixes to create a beautiful rainbow effect. It’s like watching a painting come to life!
As you embark on this colorful journey, remember to take a moment to appreciate the process. It’s not just about the end result; it’s about the joy of creating together. I often find that the best memories are made during these simple, shared experiences.
Why You’ll Love This Walking Water Rainbow
The Walking Water Rainbow is not just a craft; it’s an experience that brings joy and learning into your home. As a busy mom, I often find myself juggling multiple tasks, but this project allows me to pause and enjoy a moment of creativity with my kids. It’s budget-friendly, requiring only a few simple materials, which is a huge plus for anyone looking to keep costs down.
What I love most about this project is how it seamlessly combines art and science. Watching the colors blend and travel through the paper towels is mesmerizing! It’s like a mini science experiment right in your kitchen. I remember the first time we did this, my kids were in awe as they saw the water move. It sparked their curiosity, leading to questions about capillary action and how plants drink water. It’s amazing how a simple DIY project can turn into a learning opportunity!
Moreover, the vibrant results are sure to impress not just your kids but anyone who sees it. I often set it up as a centerpiece during family gatherings, and it never fails to catch the eye. The colors are so bright and cheerful, they instantly lift the mood of any room. Plus, it’s a great conversation starter!
So, if you’re looking for a way to engage with your children, unwind after a long day, or simply add a splash of color to your life, the Walking Water Rainbow is the perfect project. It’s easy, fun, and a wonderful reminder that creativity can thrive even in our busiest moments.
Materials Needed for Walking Water Rainbow
To create your own Walking Water Rainbow, gather the following materials:
- Clear cups (6): These will hold the water and allow you to see the colors mix. I love using clear cups because it feels like watching a magic show unfold right before your eyes!
- Water (2 cups): The main component for this colorful experiment. It’s amazing how something so simple can create such vibrant results.
- Red food coloring (1 drop): For the first color in your rainbow. Just a drop can transform the water into a beautiful hue!
- Blue food coloring (1 drop): For the last color in your rainbow. This color always reminds me of the ocean on a sunny day.
- Yellow food coloring (1 drop): Optional for additional color mixing. Adding yellow can create a sunny effect that brightens the whole project!
- Paper towels (3): These will act as the medium for the water to travel through. I find that using good quality paper towels makes a difference in how well the water moves.
For a printable full list of materials, see below.
Tools Required for Walking Water Rainbow
You will need the following tools to complete your Walking Water Rainbow project:
- Measuring cup: To accurately measure the water for each cup. I find that having a dedicated measuring cup makes the process smoother and more precise, especially when working with kids.
- Spoon: For stirring the food coloring into the water. A simple spoon can be a great tool for mixing, and it’s always fun to let the kids take turns stirring!
If you don’t have a measuring cup, any cup can work as a makeshift measuring tool, just ensure you keep the proportions consistent. I’ve used everything from coffee mugs to small bowls in a pinch, and it always turns out just fine!
How to Make Walking Water Rainbow
Creating your own Walking Water Rainbow is not only simple but also incredibly rewarding. I remember the first time I tried this project with my kids; we were all amazed at how quickly the colors began to travel. Here’s how you can replicate that magic in your own home:
- Arrange 6 clear cups in a row: This will be your workspace for the project. I like to use a bright tablecloth underneath to make the colors pop even more!
- Fill the first cup with water and add a drop of red food coloring: Stir gently to mix. Watching the red swirl into the water is like watching a sunset!
- Fill the last cup with water and add a drop of blue food coloring: Again, stir gently. The blue is so vibrant, it reminds me of a clear summer sky.
- Fill the middle cups with water, leaving them clear: These cups will help the colors travel. It’s like setting the stage for a beautiful performance!
- Take 3 paper towels and fold them lengthwise: This will create a long strip for the water to travel. I always find folding them is a great way to get the kids involved.
- Place one end of each paper towel in the colored water and the other end in the clear water cups: Ensure they are touching the water in both the colored and clear cups. This is where the magic begins!
- Wait and watch: Observe as the water travels up the paper towels and mixes to create a beautiful rainbow effect. It’s like watching a painting come to life!
As you embark on this colorful journey, remember to take a moment to appreciate the process. It’s not just about the end result; it’s about the joy of creating together. I often find that the best memories are made during these simple, shared experiences.
Tips for Best Results
To ensure your Walking Water Rainbow turns out beautifully, consider these helpful tips that I’ve learned from my own crafting adventures:
- Use different colors to create unique combinations: Don’t be afraid to mix it up! I’ve experimented with colors like green and purple, and the results were stunning. Each combination brings a new vibrancy to the project, making it even more exciting for the kids.
- Make sure the paper towels are touching the water in both the colored and clear cups: This is crucial for the capillary action to work effectively. I’ve had moments where I thought I set it up perfectly, only to realize the paper towels weren’t submerged enough. A little adjustment can make all the difference!
- Experiment with different cup arrangements for varied effects: Try arranging the cups in a circle or a zigzag pattern. I once set them up in a spiral, and it created a mesmerizing effect as the colors blended. It’s a fun way to keep the project fresh and engaging!
Remember, crafting is all about exploration and creativity. Don’t stress if things don’t go perfectly the first time. Each attempt is a chance to learn and enjoy the process. I often find that the best memories come from the little mishaps along the way!
Project Variations
Feel free to get creative with your Walking Water Rainbow! This project is all about exploration and fun, so don’t hesitate to try out different ideas. Here are some variations that I’ve enjoyed and think you will too:
- Color Combinations: Use different food coloring combinations like green and purple for a unique twist. I once mixed orange and blue, and the results were surprisingly beautiful! Each combination can create a different mood and aesthetic, making it a fun experiment.
- Seasonal Themes: Adapt the colors for different seasons or holidays. For instance, you can use pastels for spring, warm colors for fall, or even red and green for Christmas. I love setting up a festive Walking Water Rainbow during the holidays; it adds a cheerful touch to our home!
- Cup Arrangements: Try arranging the cups in a circle or a zigzag pattern for different visual effects. I’ve found that a circular arrangement creates a stunning centerpiece, while a zigzag can add a playful touch to the display. It’s amazing how a simple change in layout can transform the entire project!
Remember, the beauty of crafting lies in the freedom to experiment. Don’t be afraid to let your creativity shine! Each variation can lead to new discoveries and delightful surprises. I often find that the most memorable moments come from trying something new and unexpected.
Decoration and Usage Ideas
Once your Walking Water Rainbow is complete, the fun doesn’t have to stop there! I love finding creative ways to display our colorful creation, and I’m excited to share some ideas that have worked wonderfully for me:
- Centerpiece: Use it as a colorful centerpiece for a table. Whether it’s a family dinner or a casual gathering with friends, the vibrant colors of the Walking Water Rainbow can brighten up any space. I often place it in the middle of our dining table, and it never fails to spark conversation!
- Educational Display: Set it up as a fun science experiment for kids to learn about capillary action. I’ve found that kids are naturally curious, and this project is a fantastic way to engage them in learning. You can even create a little sign explaining the science behind it, turning it into an interactive educational experience!
- Photography: Capture the vibrant colors for social media or family albums. I love taking photos of our Walking Water Rainbow to share with friends and family. The colors are so striking that they make for beautiful pictures. Plus, it’s a great way to document our crafting adventures!
These ideas not only enhance the enjoyment of your Walking Water Rainbow but also allow you to share the joy of creativity with others. I often find that displaying our crafts brings a sense of pride and accomplishment, reminding us of the fun we had creating them together. So, get creative with your displays and let your colorful masterpiece shine!
FAQs about Walking Water Rainbow
Q: How long does it take for the colors to mix?
A: It usually takes about 30 minutes to see the full effect, but you can check periodically. I remember the first time we did this, we were so excited to see the colors blend that we kept peeking in to watch the magic unfold!
Q: Can I use other liquids instead of water?
A: Water works best for this project, but you can experiment with other clear liquids. I’ve tried using flavored sparkling water just for fun, and while it added a little fizz, the colors still traveled beautifully. Just keep in mind that the results may vary!
Q: Is this project safe for young children?
A: Yes, but supervision is recommended to avoid spills and stains from food coloring. I always make sure to cover the workspace with an old tablecloth or newspaper to catch any drips. It’s a great way to keep the mess contained while still having fun!
Final Thoughts
The Walking Water Rainbow is more than just a colorful DIY project; it’s an opportunity to bond with your children, explore creativity, and learn about science in a fun way. As I reflect on the times I’ve shared this project with my kids, I realize it’s not just about the vibrant colors that emerge, but the laughter and joy that fill our home during the process.
Watching the colors blend and travel through the paper towels is a mesmerizing experience. It reminds me to appreciate the beauty of simple things, like the way water moves and how it can create such stunning visuals. This project is a gentle reminder that even in our busy lives, we can find joy in creativity and connection.
So gather your materials, invite your kids, and let the magic of the Walking Water Rainbow brighten your day! Whether you’re a busy mom looking for a quick activity or a professional seeking a moment of relaxation, this project is sure to bring a smile to your face. Embrace the mess, enjoy the process, and celebrate the colorful memories you create together!
Print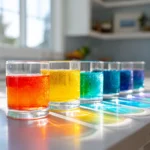
Walking Water Rainbow: Create a Colorful DIY Project!
Description
The Walking Water Rainbow project is a fun and colorful DIY activity that demonstrates capillary action using water and food coloring to create a vibrant rainbow effect.
Instructions
- Arrange 6 clear cups in a row.
- Fill the first cup with water and add a drop of red food coloring.
- Fill the last cup with water and add a drop of blue food coloring.
- Fill the middle cups with water, leaving them clear.
- Take 3 paper towels and fold them lengthwise.
- Place one end of each paper towel in the colored water and the other end in the clear water cups.
- Wait and watch as the water travels up the paper towels and mixes to create a rainbow effect.
Keywords: Walking Water Rainbow, DIY project, capillary action, colorful craft