
Introduction to Vibrant DIY Bioplastic Suncatchers for Eco
In a world where sustainability is becoming increasingly important, finding creative ways to incorporate eco-friendly materials into our homes can be both fulfilling and fun. Vibrant DIY bioplastic suncatchers are a perfect project for busy moms and professionals looking to add a splash of color to their decor while being kind to the planet.
As I embarked on this crafting adventure, I was amazed at how simple yet impactful these suncatchers can be. They not only brighten up your space but also serve as a wonderful opportunity to engage with your family in a creative activity. I remember the first time I made these suncatchers with my kids; we laughed, experimented with colors, and created memories that I cherish to this day.
Let’s dive into the world of vibrant DIY bioplastic suncatchers and discover how easy it is to make beautiful, eco-friendly decor! Whether you’re a seasoned crafter or just starting out, this project is designed to fit into your busy schedule while allowing you to express your creativity. So grab your materials, and let’s get started on this colorful journey!
Why You’ll Love This Vibrant DIY Bioplastic Suncatchers for Eco
Creating vibrant DIY bioplastic suncatchers is a delightful way to express your creativity while being environmentally conscious. I can’t tell you how rewarding it feels to craft something beautiful that also benefits the planet. These suncatchers are not only affordable but also simple to make, making them perfect for busy schedules like ours.
One of the things I love most about this project is the customization. You can tailor your suncatchers to match your home’s aesthetic or seasonal themes. For instance, I made a set of pastel-colored suncatchers for spring, and they instantly brightened up my living room. It’s like bringing a piece of the garden indoors! You can also switch them out for warm tones in the fall, creating a cozy atmosphere.
But the best part? This project provides a fantastic opportunity to involve your kids in a fun and educational crafting experience! I remember the joy on my children’s faces as they mixed the natural dyes and painted their own designs. It turned into a wonderful bonding moment, filled with laughter and creativity. Plus, it’s a great way to teach them about eco-friendly practices and the importance of sustainability.
So, if you’re looking for a craft that’s not only enjoyable but also meaningful, vibrant DIY bioplastic suncatchers are the way to go. They allow you to unleash your creativity while making a positive impact on the environment. Let’s get crafting!
Materials Needed for Vibrant DIY Bioplastic Suncatchers for Eco
To create your vibrant DIY bioplastic suncatchers, you will need the following materials:
- Bioplastic sheets (2): These serve as the base for your suncatchers and are eco-friendly. I love how they feel in my hands—smooth and ready to be transformed into something beautiful!
- Natural dyes (5 colors): Use these to add vibrant colors to your suncatchers. I often find myself mesmerized by the rich hues that emerge when mixing these dyes. It’s like painting with nature!
- String or fishing line (1 roll): This will be used to hang your finished suncatchers. I prefer fishing line for its durability and invisibility, making the suncatchers appear to float in the sunlight.
- Scissors (1): For cutting the bioplastic sheets into desired shapes. I always keep a pair of sharp scissors handy, as they make the cutting process smooth and enjoyable.
- Paintbrush (1): To apply the natural dyes onto the bioplastic. A good paintbrush can make all the difference in achieving those vibrant, even strokes!
- Hole punch (1): To create a hole for hanging. If you don’t have a hole punch, don’t worry! A sharp object can work in a pinch, but be careful!
*For a printable full list of materials, see below.*
Tools Required for Vibrant DIY Bioplastic Suncatchers for Eco
To successfully create your vibrant DIY bioplastic suncatchers, you will need the following tools:
- Scissors: These are essential for cutting the bioplastic sheets into your desired shapes. I always keep a pair of sharp scissors handy, as they make the cutting process smooth and enjoyable. Trust me, a good pair of scissors can make all the difference!
- Paintbrush: This tool is used for applying the natural dyes evenly. I love using a brush with soft bristles, as it allows for a gentle touch and helps create beautiful, blended colors on the bioplastic.
- Hole punch: This is necessary for creating holes for hanging your suncatchers. If you don’t have a hole punch, don’t worry! A sharp object can work in a pinch, but be cautious to avoid any accidents.
- Mixing bowl: You’ll need this to mix your natural dyes and create those vibrant colors. I often use a bowl that I don’t mind getting a little messy, as crafting can sometimes lead to unexpected splashes of color!
Gathering these tools ahead of time will help streamline your crafting experience. I remember the first time I attempted this project; I was so excited that I rushed in without preparing my tools. It turned into a bit of a chaotic adventure! So, take a moment to set everything up, and you’ll find the process much more enjoyable.
How to Make Vibrant DIY Bioplastic Suncatchers for Eco
Creating vibrant DIY bioplastic suncatchers is a delightful process that I always look forward to. It’s not just about the end result; it’s about the joy of crafting and the memories made along the way. Here’s how you can make your own beautiful suncatchers step by step:
Step 1: Prepare Your Workspace
First things first, I always lay down newspaper or a protective covering on my table. This keeps everything tidy and makes cleanup a breeze. Trust me, a little preparation goes a long way!
Step 2: Cut the Bioplastic Sheets
Using scissors, cut the bioplastic sheets into your desired shapes for the suncatchers. I love to think outside the box—stars, hearts, or even whimsical flowers! The possibilities are endless, and it’s so much fun to see how each shape will turn out.
Step 3: Mix Natural Dyes
In a mixing bowl, combine your natural dyes to create vibrant colors. This is where the magic happens! I often find myself experimenting with different combinations, and it’s amazing how a little mixing can lead to stunning new shades. Don’t be afraid to get creative!
Step 4: Apply the Dye
Using a paintbrush, apply the dye onto the bioplastic shapes. I love to use different techniques, like dabbing or swirling, to create unique effects. It’s like painting with sunshine, and watching the colors come to life is truly rewarding!
Step 5: Allow to Dry
Once you’ve applied the dye, let the shapes dry completely. This usually takes about 30 minutes. I often take this time to clean up my workspace or plan where I want to hang my suncatchers later.
Step 6: Punch Holes
Once dry, use a hole punch to create a hole at the top of each suncatcher for hanging. If you don’t have a hole punch, a sharp object can work too, but be careful! I’ve learned the hard way that safety comes first.
Step 7: Thread the String
Cut a length of string or fishing line and thread it through the hole you just created. I prefer fishing line because it’s strong and nearly invisible, making the suncatchers look like they’re floating in the air!
Step 8: Hang Your Suncatchers
Finally, find a sunny window or outdoor space to hang your suncatchers and enjoy the colorful display! Watching the sunlight filter through the vibrant colors is such a joyful experience. It’s like bringing a piece of art into your home that changes with the light.
And there you have it! Your vibrant DIY bioplastic suncatchers are ready to brighten up your space. I hope you enjoy this crafting journey as much as I do!
Tips for Best Results
As I embarked on my journey to create vibrant DIY bioplastic suncatchers, I learned a few tips that made the process even more enjoyable and rewarding. Here are some insights that I hope will help you achieve the best results:
- Experiment with Different Dye Combinations: One of the most exciting aspects of this project is the opportunity to mix and match colors. I found that blending natural dyes can lead to stunning, unique shades. Don’t be afraid to try out unexpected combinations; you might just discover a new favorite color!
- Use a Clear Sealant: If you plan to hang your suncatchers outdoors, consider applying a clear sealant once they are dry. This extra step can help protect your creations from the elements, ensuring they remain vibrant and beautiful for longer.
- Involve Kids in the Dyeing Process: Crafting is a wonderful way to bond with family, and I’ve found that involving my kids in the dyeing process adds an extra layer of fun. They love getting their hands messy and seeing the colors come to life. Plus, it’s a great way to teach them about eco-friendly practices!
Remember, crafting is all about enjoying the process and learning along the way. If you make a mistake, embrace it! Sometimes those little imperfections can lead to the most charming results. Happy crafting!
Project Variations
One of the things I love most about crafting vibrant DIY bioplastic suncatchers is the endless possibilities for creativity. Once you get the hang of the basic process, you can easily adapt and modify your project to suit your style or the season. Here are some fun variations to consider:
- Style Variations: Why not experiment with different shapes? Geometric patterns like triangles and circles can add a modern touch, while animal silhouettes like butterflies or birds can bring a whimsical feel to your decor. I once made a series of fish-shaped suncatchers for a beach-themed room, and they turned out beautifully!
- Color Changes: Seasonal colors can really enhance the vibe of your suncatchers. For spring, think soft pastels like lavender and mint green. In the fall, warm tones like deep oranges and rich reds can create a cozy atmosphere. I love switching out my suncatchers with the seasons; it’s like giving my home a fresh look without much effort!
- Seasonal Adaptations: Get festive by creating themed suncatchers for holidays! For Halloween, you could make spooky shapes like pumpkins or ghosts, while Christmas could inspire you to craft stars or snowflakes. I remember making a set of heart-shaped suncatchers for Valentine’s Day, and they added such a lovely touch to my windows!
These variations not only keep the crafting experience exciting but also allow you to personalize your suncatchers to reflect your style and the changing seasons. So, gather your materials and let your imagination run wild! Happy crafting!
Decoration and Usage Ideas
Once you’ve created your vibrant DIY bioplastic suncatchers, the fun doesn’t stop there! I love finding creative ways to display them, and I’m excited to share some ideas that can help you showcase your beautiful creations:
- Hang Them in Windows: This is my favorite way to enjoy the suncatchers! When sunlight filters through the vibrant colors, it creates a stunning display of light and shadow. I often hang them in my kitchen window, where they brighten up my mornings and make the space feel cheerful.
- Use Them as Garden Decorations: If you have a garden or outdoor space, consider using your suncatchers as colorful decorations. I’ve placed mine among flowers and plants, and they add a delightful pop of color that catches the eye. Just remember to use a clear sealant to protect them from the elements!
- Create a Mobile: For a whimsical touch, you can create a mobile by hanging multiple suncatchers together. I once made a colorful mobile for my daughter’s room, and it swayed gently in the breeze, creating a magical atmosphere. It’s a wonderful way to display your creations while adding movement to your decor.
- Gift Them to Friends or Family: Handmade gifts are always special, and your vibrant suncatchers make for thoughtful presents. I love gifting them to friends during the holidays or for housewarming parties. It’s a personal touch that shows you care, and everyone appreciates a little handmade charm!
These ideas not only enhance your home decor but also allow you to share the joy of crafting with others. I hope you find inspiration in these suggestions and enjoy showcasing your vibrant DIY bioplastic suncatchers in creative ways. Happy decorating!
FAQs about Vibrant DIY Bioplastic Suncatchers for Eco
As I’ve shared my journey of creating vibrant DIY bioplastic suncatchers, I often get questions from fellow crafters eager to dive into this eco-friendly project. Here are some frequently asked questions that I hope will help you on your crafting adventure:
Q: Can I use regular plastic instead of bioplastic?
A: While it’s best to use bioplastic for an eco-friendly project, I understand that sometimes it’s not readily available. If you don’t have access to bioplastic, regular plastic can be used as a last resort. Just keep in mind that it won’t have the same environmental benefits.
Q: How long will the suncatchers last?
A: With proper care, your suncatchers can last for several months, especially if kept indoors. I’ve had some of mine hanging in my kitchen for over a year, and they still look vibrant! Just be mindful of exposure to harsh weather if you choose to hang them outside.
Q: Are the natural dyes safe for kids?
A: Yes, natural dyes are generally safe, which is one of the reasons I love using them! However, it’s always a good idea to supervise young children during the crafting process. This way, you can ensure they’re having fun while staying safe!
Crafting is all about exploration and learning, so don’t hesitate to reach out if you have more questions. I’m here to support you on your vibrant DIY bioplastic suncatcher journey!
Final Thoughts
Creating vibrant DIY bioplastic suncatchers is not just a fun craft; it’s a meaningful way to bring color and joy into your home while being environmentally conscious. I can’t emphasize enough how rewarding it feels to craft something beautiful that also benefits the planet. Each suncatcher becomes a little piece of art that reflects your creativity and care for the environment.
This project allows you to express your creativity, bond with your family, and contribute to a more sustainable world. I remember the laughter and excitement shared with my kids as we mixed colors and painted our designs. Those moments are what crafting is all about—making memories while creating something special.
So gather your materials, unleash your imagination, and let the sunlight shine through your beautiful creations! Whether you hang them in your windows, gift them to loved ones, or use them to brighten up your garden, these suncatchers will surely bring a smile to your face. Happy crafting!
Print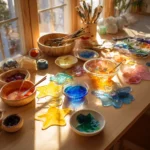
Vibrant DIY Bioplastic Suncatchers for Eco-Friendly Decor
Description
Create beautiful and vibrant suncatchers using bioplastic materials that are eco-friendly and perfect for decorating your home or garden.
Instructions
- Prepare your workspace by laying down newspaper or a protective covering.
- Cut the bioplastic sheets into desired shapes for your suncatchers.
- Mix natural dyes in a bowl to create vibrant colors.
- Use a paintbrush to apply the dye onto the bioplastic shapes.
- Allow the dyed shapes to dry completely.
- Once dry, use a hole punch to create a hole at the top of each suncatcher.
- Cut a length of string or fishing line and thread it through the hole.
- Hang your suncatchers in a sunny window or outdoors to enjoy the colorful display.
Keywords: DIY, bioplastic, suncatchers, eco-friendly, home decor


