Introduction to Tropical Pineapple Icebox Cake Recipe
As a passionate home cook, I find joy in creating desserts that transport me to sun-soaked beaches and warm summer days. One of my all-time favorites is the Tropical Pineapple Icebox Cake. This delightful treat is not just a cake; it’s a slice of paradise on a plate! The moment I take a bite, I can almost hear the gentle waves lapping at the shore and feel the soft breeze on my skin.
What I love most about this recipe is its simplicity. It requires no baking, making it perfect for those hot days when the last thing I want to do is turn on the oven. Instead, I can whip up this cake in no time, layering creamy goodness with the sweet, tangy flavor of pineapple. It’s like a mini-vacation in my kitchen!
Every time I make this cake, I’m reminded of family gatherings and summer barbecues. I can still picture my grandmother, her apron dusted with flour, as she taught me the art of layering flavors. She always said, “Cooking is about love and memories.” And that’s exactly what this Tropical Pineapple Icebox Cake embodies for me—love, laughter, and cherished moments shared with family and friends.
So, whether you’re planning a summer party or just want to treat yourself, this recipe is sure to impress. Let’s dive into the ingredients and get started on this delicious journey together!
Ingredients for Tropical Pineapple Icebox Cake Recipe
Before we embark on this delicious adventure, let’s gather our ingredients! I always believe that quality matters, especially when it comes to desserts. Using fresh and flavorful ingredients can elevate your Tropical Pineapple Icebox Cake to a whole new level. Here’s what you’ll need:
Main Ingredients
- 1 package (14 oz) of graham crackers – These will form the base of our cake, providing a delightful crunch.
- 1 can (20 oz) of crushed pineapple, drained – The star of our show! Make sure to choose a brand that uses real fruit for the best flavor.
- 1 cup of heavy whipping cream – This will give our cake a rich and creamy texture.
- 1 cup of powdered sugar – Sweetness is key! This will help balance the tanginess of the pineapple.
- 1 teaspoon of vanilla extract – A splash of vanilla adds warmth and depth to the flavor.
- 8 oz of cream cheese, softened – This adds a luscious creaminess that pairs perfectly with pineapple.
Optional Add-ons
- 1/2 cup of shredded coconut – For a tropical twist, sprinkle some coconut on top or mix it into the filling.
- Fresh fruit slices (like bananas or strawberries) – These can be layered in for added flavor and a pop of color.
- Chopped nuts (like pecans or walnuts) – If you enjoy a bit of crunch, these can be sprinkled between layers.
- Chocolate shavings – For those who love a sweet contrast, a sprinkle of chocolate can be a delightful addition.
When I make this cake, I often opt for organic ingredients whenever possible. It’s a small change that makes a big difference in taste. Plus, it feels good to know I’m using wholesome products. Now that we have our ingredients ready, let’s move on to the fun part—preparing our Tropical Pineapple Icebox Cake!
How to Prepare Tropical Pineapple Icebox Cake Recipe
Now that we have our ingredients ready, it’s time to roll up our sleeves and dive into the preparation! Making the Tropical Pineapple Icebox Cake is a delightful process that fills your kitchen with sweet aromas and anticipation. Let’s break it down step by step!
Step 1: Prepare the Crust
First things first, we need to create a sturdy base for our cake. The graham crackers will be our foundation, and they add a lovely crunch that contrasts beautifully with the creamy filling.
- Start by crushing the graham crackers into fine crumbs. You can do this by placing them in a zip-top bag and using a rolling pin, or you can use a food processor for a quicker method.
- Once crushed, mix the crumbs with a bit of melted butter (about 1/4 cup) until the mixture resembles wet sand.
- Press the mixture firmly into the bottom of a 9×13 inch baking dish to form an even layer.
Tips for Step 1
Make sure to pack the crust tightly. This will help it hold together when you slice the cake later. If you want an extra touch, you can toast the graham cracker crust in the oven at 350°F for about 10 minutes. This adds a nice depth of flavor!
Step 2: Make the Pineapple Filling
Next up is the star of the show—the pineapple filling! This is where the magic happens, and the flavors start to come together.
- In a large mixing bowl, beat the softened cream cheese until smooth. I like to use an electric mixer for this, as it makes the process quick and easy.
- Add in the powdered sugar, vanilla extract, and the drained crushed pineapple. Mix until everything is well combined.
- In another bowl, whip the heavy cream until stiff peaks form. This will give our filling a light and airy texture.
- Gently fold the whipped cream into the pineapple mixture. Be careful not to deflate the whipped cream; we want to keep that fluffiness!
Tips for Step 2
For an extra burst of flavor, consider adding a splash of pineapple juice to the filling. It enhances the tropical taste and makes it even more refreshing!
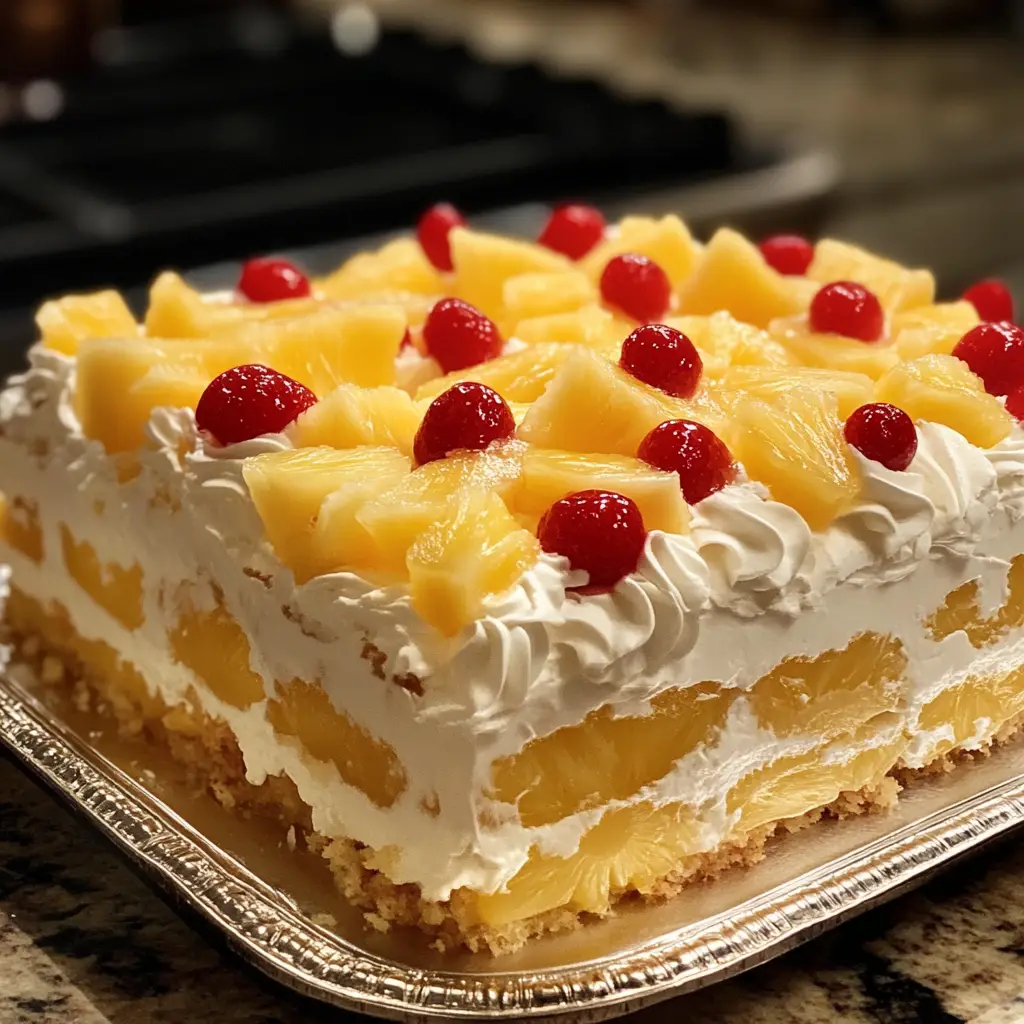
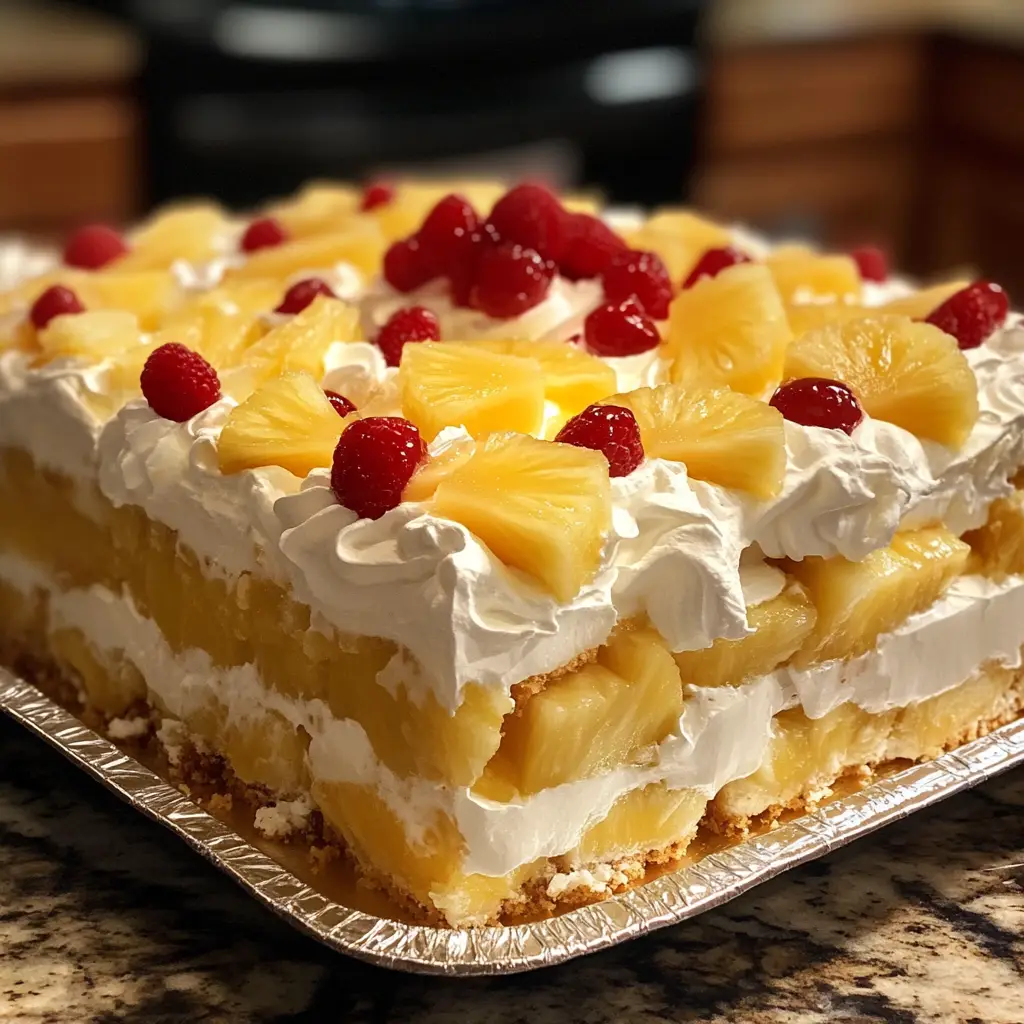
Step 3: Assemble the Cake Layers
Now comes the fun part—layering! This is where you can get creative and make your cake visually appealing.
- Start by spreading a layer of the pineapple filling over the graham cracker crust.
- Next, add another layer of graham crackers on top of the filling. You can dip the crackers in pineapple juice for added flavor if you like!
- Repeat the layering process until you run out of filling, finishing with a layer of the pineapple mixture on top.
Tips for Step 3
Don’t be afraid to mix in some of those optional add-ons, like shredded coconut or fresh fruit, between the layers. It adds a delightful surprise in every bite!
Step 4: Chill the Cake
Once your cake is assembled, it’s time to let it chill. This step is crucial for the flavors to meld together and for the cake to set properly.
- Cover the baking dish with plastic wrap or aluminum foil.
- Place it in the refrigerator for at least 4 hours, or overnight if you can wait! The longer it chills, the better the flavors will be.
Tips for Step 4
If you’re in a hurry, you can place the cake in the freezer for about 1 hour. Just be sure to keep an eye on it so it doesn’t freeze solid!
And there you have it! The preparation of the Tropical Pineapple Icebox Cake is complete. I can already imagine the smiles on my family’s faces when I serve this delightful dessert. Now, let’s move on to the equipment we’ll need to make this cake a reality!
Equipment Needed for Tropical Pineapple Icebox Cake Recipe
Before we dive into the deliciousness of the Tropical Pineapple Icebox Cake, let’s make sure we have the right tools at our disposal. Having the right equipment can make the process smoother and more enjoyable. Here’s what you’ll need:
- 9×13 inch baking dish: This is the perfect size for our cake. If you don’t have one, a similar-sized dish will work just fine.
- Mixing bowls: I recommend having at least two—one for the pineapple filling and another for whipping the cream. If you’re short on bowls, you can always wash and reuse one.
- Electric mixer: This makes beating the cream cheese and whipping the cream a breeze. If you don’t have one, a whisk will do, but it may take a bit more elbow grease!
- Spatula: A rubber spatula is great for folding the whipped cream into the filling without losing that airy texture.
- Zip-top bags or food processor: These are handy for crushing the graham crackers. If you don’t have either, you can use a rolling pin and a clean kitchen towel to crush them manually.
With these tools in hand, you’re all set to create your Tropical Pineapple Icebox Cake! Remember, cooking is all about improvisation, so feel free to adapt as needed. Now, let’s explore some fun variations of this delightful dessert!
Variations of Tropical Pineapple Icebox Cake Recipe
As I’ve experimented with the Tropical Pineapple Icebox Cake, I’ve discovered that there are so many delightful variations to try! Each twist brings a new flavor profile and a unique experience. Here are a few of my favorites that I think you’ll enjoy:
- Coconut Pineapple Delight: Add a generous amount of shredded coconut to the filling and sprinkle some on top for a tropical flair. It’s like a mini vacation in every bite!
- Berry Bliss: Layer in fresh berries like strawberries or blueberries between the graham crackers. The tartness of the berries complements the sweetness of the pineapple beautifully.
- Chocolate Lovers: For a decadent twist, mix in chocolate chips with the pineapple filling or top the cake with chocolate shavings. The combination of chocolate and pineapple is surprisingly delightful!
- Banana Cream Twist: Add sliced bananas between the layers for a creamy, fruity addition. The bananas add a lovely texture and flavor that pairs perfectly with the pineapple.
These variations not only keep things exciting but also allow you to tailor the cake to your taste preferences or the season. I love how versatile this recipe is, making it a go-to for any occasion. So, don’t hesitate to get creative and make it your own!
Cooking Notes for Tropical Pineapple Icebox Cake Recipe
As I’ve made the Tropical Pineapple Icebox Cake over the years, I’ve picked up a few cooking notes that can help ensure your cake turns out perfectly every time. Here are some tips that I find particularly useful:
- Fresh Ingredients: Always opt for fresh, high-quality ingredients. Using ripe pineapples or organic cream can elevate the flavor significantly. If you can, try to use fresh pineapple instead of canned for a burst of natural sweetness.
- Chilling Time: Patience is key! Allowing the cake to chill for a longer period enhances the flavors and helps the layers meld together beautifully. If you can, let it sit overnight for the best results.
- Serving Temperature: Serve the cake chilled, but not too cold. Let it sit at room temperature for about 10-15 minutes before serving. This way, the flavors will be more pronounced, and the texture will be just right.
- Storage: If you have leftovers (which is rare in my house!), store the cake covered in the refrigerator. It should last for about 3-4 days, but I doubt it will stick around that long!
- Layering Technique: When layering, be gentle. You want to maintain the lightness of the whipped cream. Use a spatula to spread the filling evenly without deflating it.
These cooking notes have helped me refine my technique and make the Tropical Pineapple Icebox Cake a family favorite. I hope they help you too as you embark on your own delicious journey with this recipe!
Serving Suggestions for Tropical Pineapple Icebox Cake Recipe
When it comes to serving the Tropical Pineapple Icebox Cake, I love to make it a special occasion! Here are some delightful serving suggestions that can elevate your dessert experience:
- Garnish with Fresh Fruit: Top each slice with a few slices of fresh pineapple or a handful of berries. The vibrant colors make the cake even more inviting!
- Whipped Cream Clouds: A dollop of freshly whipped cream on top adds an extra layer of creaminess. You can even sprinkle a bit of toasted coconut for that tropical touch.
- Serve with Ice Cream: Pairing a slice of cake with a scoop of vanilla or coconut ice cream creates a delightful contrast in textures and flavors.
- Drizzle with Pineapple Sauce: A light drizzle of homemade or store-bought pineapple sauce can enhance the tropical flavor and add a touch of sweetness.
- Presentation Matters: Consider serving the cake on a beautiful platter or individual dessert plates. A little presentation goes a long way in making your dessert feel special!
These serving suggestions not only enhance the visual appeal but also add layers of flavor that make each bite a little more exciting. I always find that a well-presented dessert brings smiles and compliments, making the effort all the more worthwhile!
Tips for Making Tropical Pineapple Icebox Cake Recipe
As I’ve whipped up the Tropical Pineapple Icebox Cake time and again, I’ve gathered a treasure trove of tips that can help you create the perfect dessert. Here are some of my favorite nuggets of wisdom:
- Prep Ahead: This cake is perfect for making ahead of time. Prepare it a day in advance and let it chill overnight. The flavors will deepen, and the cake will be even more delicious!
- Experiment with Flavors: Don’t hesitate to play around with different flavors. Adding a splash of coconut milk or a hint of lime juice can give your cake a unique twist.
- Use Quality Cream: When whipping the cream, opt for heavy whipping cream. It whips up beautifully and holds its shape, ensuring a luscious texture in your filling.
- Layering with Love: Take your time when layering the cake. A little patience goes a long way in creating a beautiful presentation. Each layer should be even and well-distributed.
- Chill Before Serving: For the best experience, serve the cake chilled but not too cold. Let it sit for a few minutes at room temperature before slicing. This enhances the flavors and makes it easier to cut.
These tips have helped me refine my Tropical Pineapple Icebox Cake over the years. I hope they inspire you to create your own delicious masterpiece!
Breakdown of Time for Tropical Pineapple Icebox Cake Recipe
When it comes to making the Tropical Pineapple Icebox Cake, timing is everything! I always find it helpful to have a clear idea of how long each step will take. This way, I can plan my day and ensure everything runs smoothly. Here’s a quick breakdown of the time involved:
- Prep Time: Approximately 30 minutes. This includes gathering your ingredients, preparing the crust, and making the pineapple filling. It’s a fun and engaging process that flies by!
- Chilling Time: At least 4 hours. This is crucial for the flavors to meld and the cake to set properly. If you can, I recommend letting it chill overnight for the best results.
- Total Time: About 4 hours and 30 minutes (including chilling time). While it may seem like a long wait, the anticipation makes the first bite even sweeter!
By keeping track of these times, I can easily plan when to serve this delightful dessert. Whether it’s for a family gathering or a casual weeknight treat, knowing the timing helps me create a stress-free cooking experience. So, let’s get ready to enjoy this tropical delight!
Nutritional Information for Tropical Pineapple Icebox Cake Recipe
As a home cook, I always find it helpful to know the nutritional information of the dishes I prepare. It allows me to enjoy my creations while being mindful of what I’m eating. Here’s a general breakdown of the nutritional content for a serving of Tropical Pineapple Icebox Cake, based on the ingredients listed:
- Calories: Approximately 250 calories per slice (1/12 of the cake).
- Fat: About 12 grams, primarily from the heavy cream and cream cheese.
- Saturated Fat: Roughly 7 grams, which comes from the dairy ingredients.
- Carbohydrates: Around 35 grams, mainly from the graham crackers and sugar.
- Fiber: Approximately 1 gram, depending on the type of graham crackers used.
- Sugar: About 20 grams, which includes both added sugars and natural sugars from the pineapple.
- Protein: Roughly 3 grams, thanks to the cream cheese and heavy cream.
Keep in mind that these values can vary based on the specific brands and quantities of ingredients you use. If you’re looking to lighten up the recipe, consider using reduced-fat cream cheese or a sugar substitute. Regardless, this Tropical Pineapple Icebox Cake is a delightful treat that can be enjoyed in moderation. After all, life is all about balance, and a slice of this cake is worth every bite!
Frequently Asked Questions about Tropical Pineapple Icebox Cake Recipe
As I’ve shared my Tropical Pineapple Icebox Cake with friends and family, I’ve noticed a few common questions pop up. It’s always great to clarify any doubts and help others enjoy this delightful dessert as much as I do! Here are some frequently asked questions about the recipe:
Can I use fresh pineapple instead of canned?
Absolutely! Fresh pineapple can add a vibrant flavor to your cake. Just make sure to chop it finely and drain any excess juice before mixing it into the filling. It’s a great way to enhance the tropical taste!
How long can I store the cake?
The Tropical Pineapple Icebox Cake can be stored in the refrigerator for about 3-4 days. Just make sure to cover it well to keep it fresh. However, I doubt it will last that long in my house!
Can I make this cake gluten-free?
Yes! You can easily make a gluten-free version by using gluten-free graham crackers. There are many brands available now that taste just as good as the traditional ones. It’s a great way to accommodate dietary needs without sacrificing flavor!
What can I substitute for heavy cream?
If you’re looking for a lighter option, you can use whipped coconut cream or a non-dairy whipped topping. Just keep in mind that the texture and flavor may vary slightly, but it will still be delicious!
Is it necessary to chill the cake overnight?
While it’s not strictly necessary, chilling the cake overnight allows the flavors to meld beautifully and helps the layers set properly. If you’re in a hurry, chilling for at least 4 hours will still yield a tasty result!
Can I freeze the Tropical Pineapple Icebox Cake?
Yes, you can freeze the cake! Just make sure to wrap it tightly in plastic wrap and then in aluminum foil. It can be frozen for up to a month. When you’re ready to enjoy it, let it thaw in the refrigerator overnight before serving.
These questions often come up, and I love being able to share my insights! If you have any other queries or need further clarification, feel free to reach out. Now, let’s wrap up our delicious journey with the Tropical Pineapple Icebox Cake!
Conclusion on Tropical Pineapple Icebox Cake Recipe
As I reflect on my culinary journey with the Tropical Pineapple Icebox Cake, I can’t help but smile. This dessert is more than just a recipe; it’s a celebration of flavors, memories, and the joy of sharing with loved ones. The combination of creamy filling, crunchy graham cracker crust, and the sweet tang of pineapple creates a delightful harmony that dances on the palate.
What I adore most about this cake is its versatility. Whether you’re hosting a summer barbecue, celebrating a birthday, or simply indulging in a sweet treat after dinner, this cake fits the occasion perfectly. Plus, with no baking required, it’s a breeze to prepare, allowing you to spend more time enjoying the company of friends and family.
So, if you’re looking for a dessert that brings a taste of the tropics to your table, look no further than the Tropical Pineapple Icebox Cake. It’s a slice of sunshine that’s sure to brighten any day. I encourage you to give it a try and make it your own—experiment with flavors, add your favorite toppings, and create your own delicious memories. Happy cooking!


