Introduction to Tissue Paper Flower Window Art
Welcome to the colorful world of Tissue Paper Flower Window Art! This delightful DIY craft is not only a fantastic way to brighten your home but also a wonderful opportunity to bond with your kids or unleash your own creativity. I remember the joy of crafting these vibrant flowers with my little ones, their laughter filling the air as we transformed simple tissue paper into stunning window displays. It’s a fun, simple, and rewarding project that anyone can enjoy, making it perfect for all ages. Let’s dive into this colorful adventure together!
Why You’ll Love This Tissue Paper Flower Window Art
This Tissue Paper Flower Window Art project is a breath of fresh air for your home decor! It’s incredibly easy and affordable, making it perfect for busy moms and teachers alike. Plus, it’s a fantastic way to unleash your creativity while spending quality time with your kids. I find that crafting together not only relaxes us but also strengthens our bond, creating memories that will last a lifetime. What’s not to love?
Materials and Tools Needed for Tissue Paper Flower Window Art
Gathering your materials is the first step to creating beautiful Tissue Paper Flower Window Art! Here’s what you’ll need:
- Tissue paper in various colors: This is the star of the show! Choose vibrant hues to make your flowers pop. You can find tissue paper at craft stores or even repurpose old gift wrap for an eco-friendly twist.
- Scissors: A trusty pair of scissors is essential for cutting out your flower shapes. If you’re crafting with little ones, consider using safety scissors to keep those tiny fingers safe.
- Clear contact paper or adhesive: This will serve as your canvas! Clear contact paper allows sunlight to shine through, illuminating your artwork. If you don’t have contact paper, any clear adhesive that’s safe for glass will work.
- Pencil: Use a pencil to sketch your flower placements on the window. It’s a simple tool that helps you visualize your design before committing.
- Marker: A marker can be handy for adding details or outlines to your flowers, giving them a fun, personalized touch.
- Window or glass surface: Choose a window or glass surface that you want to decorate. This project is perfect for any room in your home, adding a splash of color wherever you choose!
With these materials in hand, you’re ready to embark on your colorful crafting adventure! Each item plays a vital role in bringing your Tissue Paper Flower Window Art to life, so let’s get started!
How to Make Tissue Paper Flower Window Art
Creating your own Tissue Paper Flower Window Art is not just a craft; it’s a delightful journey into color and creativity! I remember the first time I made these with my kids. The excitement in their eyes as we transformed plain tissue paper into vibrant flowers was simply magical. Let’s dive into the steps to bring your window to life with this fun and easy DIY craft!
Step 1: Cut the Tissue Paper
Start by selecting your favorite colors of tissue paper. I love to mix and match vibrant hues to create a stunning effect. Cut the tissue paper into flower shapes or simple circles. You can layer different colors to make your flowers pop even more! Think of it like painting with paper—each layer adds depth and dimension. Just be careful with those scissors, especially if little hands are helping!
Step 2: Sketch the Outline
Next, grab a pencil and lightly sketch the outline of where you want to place your flowers on the window. This step is like creating a roadmap for your art! I often let my kids take the lead here, encouraging them to choose where each flower should bloom. It’s a great way to spark their creativity and get them involved in the process.
Step 3: Apply the Contact Paper
Now, it’s time to bring your vision to life! Peel the backing off the clear contact paper and stick it to the window where you sketched your outline. This is where the magic begins! The clear contact paper acts as a canvas for your flowers, allowing the sunlight to shine through and illuminate your artwork. Make sure to smooth out any bubbles for a clean look.
Step 4: Arrange the Flowers
Carefully place the tissue paper flowers onto the contact paper, arranging them as desired. This is the fun part! You can create a garden of flowers or a whimsical bouquet—whatever your heart desires. I love to let my kids experiment with different arrangements, and it’s always a joy to see their unique designs come to life.
Step 5: Secure the Flowers
Once all your flowers are in place, cover them with another piece of clear contact paper to secure them. This step ensures that your beautiful creations stay put and can withstand the test of time. It’s like giving your flowers a protective shield! Smooth it out gently to avoid any wrinkles.
Step 6: Trim for a Clean Finish
Now, take a moment to trim any excess contact paper around the edges for a neat finish. This little detail makes a big difference! I always find that a clean edge gives the artwork a polished look, making it feel more professional. Plus, it’s a great way to teach kids about the importance of finishing touches!
Step 7: Admire Your Artwork
Finally, step back and admire your colorful window art! The soft shimmer of the tissue paper in the sunlight feels magical, doesn’t it? I love watching my kids beam with pride as they see their hard work transform our home. This Tissue Paper Flower Window Art not only brightens up our space but also fills it with love and creativity. I encourage you to try this project and share your results with friends and family!
Tips for Best Results
- Experiment with different flower shapes and sizes: Don’t be afraid to get creative! Mixing various shapes can give your Tissue Paper Flower Window Art a unique and playful look.
- Use seasonal colors: Match your flowers to the current season or upcoming holidays. Think warm oranges and browns for fall or bright pastels for spring!
- Involve kids: Let your little ones help with cutting and arranging the flowers. It’s a fantastic way to bond and make memories while crafting together.
- Add leaves or other shapes: Consider incorporating leaves or fun shapes like stars or hearts to enhance your design and add extra flair!
Theme and Design Variations
One of the best parts about creating Tissue Paper Flower Window Art is the endless possibilities for themes and designs! Here are some fun ideas to inspire your creativity:
- Spring: Embrace the season with pastel colors and floral patterns. Think soft pinks, light blues, and gentle yellows to create a fresh, blooming look.
- Summer: Go bold with bright colors and sun motifs! Vibrant reds, yellows, and greens can bring a sunny vibe to your windows, perfect for those warm summer days.
- Fall: Capture the essence of autumn with warm tones like orange, red, and yellow. Add leaf shapes to your design for a cozy, seasonal touch.
- Winter: Create a winter wonderland with cool colors like blue and white. Snowflake shapes can add a magical feel to your window art.
- Kid-friendly: Let your little ones’ imaginations run wild! Use cartoon characters or fun shapes like stars and hearts to make their artwork truly unique.
With these variations, you can change your Tissue Paper Flower Window Art to match any occasion or season, keeping your home decor fresh and exciting!
Display and Use Ideas
Now that you’ve created your stunning Tissue Paper Flower Window Art, it’s time to showcase your colorful creations! Here are some fun and creative ways to display and use your artwork:
- Hang in windows: Brighten up any room by placing your artwork in windows where sunlight can illuminate the colors.
- Backdrop for parties: Use your vibrant flowers as a beautiful backdrop for birthday parties or seasonal celebrations, adding a festive touch to your events.
- Gift to loved ones: Share the joy by gifting your artwork to friends or family as a personalized decoration that they can cherish.
- Seasonal displays: Create a rotating display that changes with the seasons, keeping your home decor fresh and exciting throughout the year.
With these ideas, your Tissue Paper Flower Window Art will not only brighten your home but also spread joy to others!
FAQs about Tissue Paper Flower Window Art
Here are some common questions you might have about creating your own Tissue Paper Flower Window Art. I hope these answers help you on your crafting journey!
- Q: How long does it take to make this art?
A: The estimated time is about 1-2 hours, depending on your design complexity. It’s a perfect weekend project that you can enjoy with your family! - Q: Can kids participate in this project?
A: Yes! This craft is suitable for all ages, but adult supervision is recommended for younger children. It’s a fantastic way to bond and unleash creativity together! - Q: What if I don’t have contact paper?
A: You can use any clear adhesive or tape that is safe for glass surfaces. Just make sure it won’t damage your window when removed! - Q: Can I use other materials besides tissue paper?
A: Absolutely! You can experiment with other lightweight papers, like wrapping paper or even old magazines, to create unique designs. - Q: How do I clean the window after removing the art?
A: Simply use a glass cleaner and a soft cloth to wipe away any residue left by the adhesive. Your window will be sparkling clean!
Final Thoughts
Creating your own Tissue Paper Flower Window Art is not just a craft; it’s a joyful experience filled with color and creativity! I hope you feel inspired to gather your materials and dive into this fun project. The satisfaction of seeing your vibrant flowers brighten up your home is truly rewarding. Plus, it’s a wonderful way to bond with your kids or unleash your own artistic flair. So, grab those scissors and tissue paper, and let your imagination bloom! Don’t forget to share your beautiful creations with friends and family—I can’t wait to see what you come up with!
Print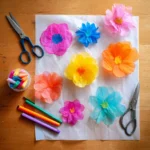
Tissue Paper Flower Window Art: Brighten Your Home with Colorful Crafts!
Description
Create vibrant tissue paper flower window art to add a splash of color to your home decor. This fun and easy craft project is perfect for all ages and can be customized to fit any season or occasion.
Instructions
- Cut the tissue paper into flower shapes or circles. You can layer different colors for a more vibrant effect.
- Using a pencil, lightly sketch the outline of your flowers on the clear contact paper or adhesive.
- Peel off the backing of the contact paper and carefully place your tissue paper flowers onto the sticky side, arranging them as desired.
- Once all flowers are placed, cover them with another piece of clear contact paper to seal them in.
- Trim any excess contact paper around the edges to create a clean finish.
- Display your colorful window art by placing it in a frame or directly on a window.
- Category: Home Decor
Keywords: Tissue Paper, Flower Art, Window Decor, DIY Crafts, Colorful Crafts