Taco Pinwheels: Crispy, Creamy Bites That Wow!
Sensory-Rich Introduction with Immediate Craving
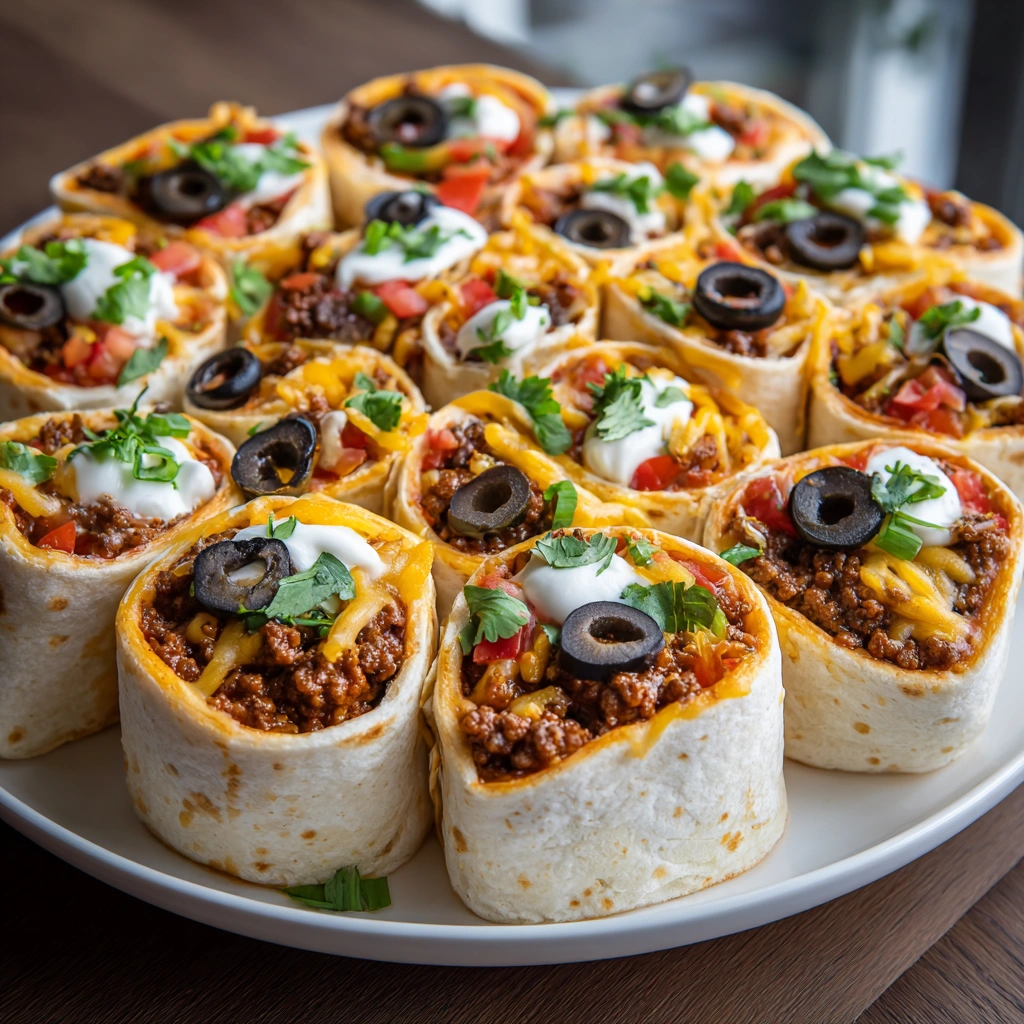
Imagine biting into a perfectly crisp tortilla, the satisfying crunch giving way to a creamy, zesty filling that dances on your taste buds. Taco Pinwheels are not just a dish; they are an experience that evokes memories of lively gatherings, family celebrations, and cozy nights in. Picture a vibrant platter of these colorful pinwheels at your next party, enticing guests with their inviting aroma and eye-catching presentation. Whether it’s game day, a holiday gathering, or a simple family dinner, these pinwheels are the perfect addition to any occasion, bringing joy and flavor to every bite.
Why You’ll Love This Taco Pinwheels
- Texture Contrast: The crispy exterior of the baked tortilla perfectly contrasts with the creamy filling, creating a delightful mouthfeel that keeps you reaching for more.
- Flavor Balance: The combination of savory ground meat, tangy cream cheese, and fresh vegetables results in a harmonious blend of flavors that appeals to all palates.
- Versatility: Taco Pinwheels can be customized with various fillings, making them suitable for different dietary preferences and occasions.
- Ease of Preparation: With minimal ingredients and straightforward steps, these pinwheels are quick to prepare, making them an ideal choice for busy cooks.
- Universal Appeal: Loved by both kids and adults, these pinwheels are a guaranteed crowd-pleaser, perfect for parties, potlucks, or as a fun family snack.
Essential Tools & Preparation Strategy
- Mixing Bowl: Essential for combining the filling ingredients smoothly; a large bowl allows for easy mixing.
- Spatula: Useful for spreading the filling evenly on the tortillas, ensuring every bite is packed with flavor.
- Plastic Wrap: Helps to firm up the rolled tortillas in the refrigerator, making slicing easier and cleaner.
- Baking Sheet: Necessary for baking the pinwheels to achieve a crispy texture; a rimmed sheet prevents spills.
- Parchment Paper: Prevents sticking and makes cleanup easier, ensuring your pinwheels come off the sheet effortlessly.
- Sharp Knife: Important for slicing the pinwheels cleanly without squishing them, maintaining their beautiful presentation.
- Microwave (optional): For warming tortillas slightly before rolling, making them more pliable and less likely to crack.
Ingredients & Their Roles in This Taco Pinwheels
- Tortillas: The base of the pinwheels; large flour tortillas provide a sturdy wrap for the filling.
- Filling:
- Cream Cheese: Adds creaminess and acts as a binder for the other ingredients.
- Shredded Cheddar Cheese: Provides a rich, cheesy flavor that complements the other ingredients.
- Cooked Ground Beef or Turkey: The protein source, seasoned with taco spices for a savory kick.
- Diced Tomatoes: Adds freshness and moisture to the filling.
- Sliced Black Olives: Introduces a briny flavor that enhances the overall taste.
- Chopped Green Onions: Offers a mild onion flavor and a pop of color.
- Garnish:
- Fresh Cilantro: Adds a burst of freshness and a vibrant touch.
- Sour Cream: A creamy dip that balances the flavors and adds richness.
Step-by-Step Guide to Perfect Taco Pinwheels
- In a mixing bowl, combine the softened cream cheese, shredded cheddar cheese, cooked ground meat, diced tomatoes, black olives, and green onions until well blended.
- Spread an even layer of the filling mixture over each tortilla, leaving a small border around the edges to prevent overflow.
- Starting from one end, tightly roll each tortilla into a log shape, ensuring the filling is secure.
- Wrap each rolled tortilla in plastic wrap and refrigerate for at least 30 minutes to firm up, making slicing easier.
- Preheat your oven to 375°F (190°C) while the pinwheels chill.
- Remove the plastic wrap and slice each log into 1-inch pinwheels using a sharp knife for clean cuts.
- Place the pinwheels on a baking sheet lined with parchment paper, ensuring they are spaced apart for even cooking.
- Bake for 10-12 minutes, or until golden and crispy, then serve warm, garnished with fresh cilantro and a side of sour cream.
Chef’s Notes & Pro Tips for Flawless Results
- Make-ahead: These pinwheels can be prepared a day in advance and stored in the refrigerator until ready to bake, making them a convenient option for entertaining.
- Storage: Store leftovers in an airtight container in the refrigerator for up to 3 days; they can be enjoyed cold or reheated.
- Equipment Recommendations: A food processor can be used to blend the filling quickly if you prefer a smoother texture.
- Customization Options: Feel free to swap out the meat for black beans or additional vegetables for a vegetarian version, or experiment with different cheeses and spices to suit your taste.
Avoid These Common Cooking Mistakes
- Not softening the cream cheese: This can lead to a lumpy filling. Always let it sit at room temperature before mixing.
- Overfilling the tortillas: This can make rolling difficult. Use a thin layer of filling to ensure easy rolling.
- Not refrigerating before slicing: This can cause the pinwheels to fall apart. Chill for at least 30 minutes.
- Using cold tortillas: Cold tortillas can crack when rolled. Warm them slightly in the microwave for flexibility.
- Not baking long enough: Undercooked pinwheels will be soggy. Bake until golden brown and crispy.
- Skipping the parchment paper: This can lead to sticking. Always line your baking sheet for easy removal.
- Using stale tortillas: Fresh tortillas yield the best texture. Check the expiration date before use.
Creative Variations & Customizations
- Vegetarian Taco Pinwheels: Replace the meat with black beans, corn, and diced bell peppers for a hearty vegetarian option.
- Spicy Pinwheels: Add diced jalapeños or a splash of hot sauce to the filling for a spicy kick.
- Southwestern Style: Incorporate roasted red peppers and a sprinkle of cumin for a Southwestern twist.
- Breakfast Pinwheels: Use scrambled eggs, cheese, and diced bell peppers for a breakfast version.
- Seasonal Variations: In the fall, add pumpkin puree and spices for a seasonal twist; in summer, include fresh corn and avocado.
Perfect Pairings: What to Serve With Taco Pinwheels
- Guacamole: A creamy, rich contrast that complements the flavors of the pinwheels.
- Salsa: A fresh, tangy kick that enhances the overall taste experience.
- Mixed Green Salad: A light, refreshing side that balances the richness of the pinwheels.
- Refried Beans: Adds protein and a hearty element to the meal.
- Cold Beer or Margarita: A festive touch that pairs perfectly with the flavors of the pinwheels.
- Jalapeño Poppers: For a spicy appetizer spread, these add an extra layer of flavor.
- Fruit Platter: A sweet contrast that refreshes the palate between bites.
- Variety of Dips: Offer ranch or buffalo sauce for added flavor options.
Storage & Meal Prep Instructions
- Refrigerator: Store pinwheels in an airtight container for up to 3 days. They can be enjoyed cold or reheated.
- Freezer: For longer storage, freeze unbaked pinwheels wrapped tightly in plastic wrap and foil for up to 2 months. Bake from frozen, adding a few extra minutes to the cooking time.
- Reheating: To reheat, place pinwheels in a preheated oven at 350°F (175°C) for about 5-7 minutes until warmed through.
Nutrition Facts & Health Insights
| Nutrient | Amount per Serving (3 pinwheels) |
|---|---|
| Calories | 250 |
| Sugar | 2 grams |
| Sodium | 450 milligrams |
| Fat | 15 grams |
| Saturated Fat | 8 grams |
| Unsaturated Fat | 5 grams |
| Trans Fat | 0 grams |
| Carbohydrates | 20 grams |
| Fiber | 1 gram |
| Protein | 10 grams |
| Cholesterol | 30 milligrams |
Health Insights: Taco Pinwheels provide a good source of protein from the meat and cheese, while the addition of vegetables contributes vitamins and minerals. Opting for whole wheat tortillas can increase fiber content.
Frequently Asked Questions
- Can I use corn tortillas instead of flour?Yes, corn tortillas can be used, but they may require careful handling to prevent cracking.
- What can I substitute for cream cheese?Greek yogurt or a dairy-free cream cheese alternative can be used for a lighter option.
- How long can I store leftovers?Leftovers can be stored in the refrigerator for up to 3 days.
- Can I freeze the pinwheels?Yes, freeze unbaked pinwheels for up to 2 months. Bake from frozen.
- What if I don’t have taco seasoning?You can make your own using chili powder, cumin, garlic powder, and onion powder.
- Can I make these pinwheels gluten-free?Yes, use gluten-free tortillas to accommodate dietary restrictions.
- How do I prevent the pinwheels from falling apart?Ensure they are tightly rolled and chilled before slicing.
- Can I add more vegetables?Absolutely! Feel free to include any of your favorite vegetables in the filling.
Final Inspiration & Kitchen Confidence
As you prepare these Taco Pinwheels, remember that cooking is not just about following a recipe; it’s about creating memories and sharing joy with those you love. Celebrate your culinary achievements, no matter how small, and take pride in the delicious bites you serve. So roll up your sleeves, gather your ingredients, and let the kitchen be your playground. Your Taco Pinwheels are sure to impress and delight, making every occasion a little more special. Enjoy the process, and happy cooking!
Print
Taco Pinwheels: Crispy, Creamy Bites That Wow!
- Total Time: 32 minutes
- Yield: 24 pinwheels 1x
- Diet: Gluten-Free option available
Description
Taco Pinwheels are a delightful fusion of crispy tortillas and creamy, zesty fillings that burst with flavor in every bite. The contrast of the crunchy exterior and the smooth, savory interior creates a satisfying texture that keeps you coming back for more.
Ingredients
- Tortillas: 4 large flour tortillas
- Filling:
- 8 oz cream cheese, softened
- 1 cup shredded cheddar cheese
- 1 cup cooked ground beef or turkey, seasoned with taco seasoning
- 1/2 cup diced tomatoes
- 1/4 cup sliced black olives
- 1/4 cup chopped green onions
- Garnish:
- Fresh cilantro, chopped
- Sour cream, for dipping
Instructions
- In a mixing bowl, combine the softened cream cheese, shredded cheddar cheese, cooked ground meat, diced tomatoes, black olives, and green onions until well blended.
- Spread an even layer of the filling mixture over each tortilla, leaving a small border around the edges.
- Starting from one end, tightly roll each tortilla into a log shape.
- Wrap each rolled tortilla in plastic wrap and refrigerate for at least 30 minutes to firm up.
- Preheat your oven to 375°F (190°C).
- Remove the plastic wrap and slice each log into 1-inch pinwheels.
- Place the pinwheels on a baking sheet lined with parchment paper and bake for 10-12 minutes, or until golden and crispy.
- Serve warm, garnished with fresh cilantro and a side of sour cream.
Notes
- Make-ahead: These pinwheels can be prepared a day in advance and stored in the refrigerator until ready to bake.
- Storage: Store leftovers in an airtight container in the refrigerator for up to 3 days.
- Substitutions: For a vegetarian option, replace the meat with black beans or additional vegetables.
- Prep Time: 20 minutes
- Cook Time: 12 minutes
- Category: appetizers
- Method: baking
- Cuisine: Mexican
Nutrition
- Serving Size: 3 pinwheels
- Calories: 250
- Sugar: 2 grams
- Sodium: 450 milligrams
- Fat: 15 grams
- Saturated Fat: 8 grams
- Unsaturated Fat: 5 grams
- Trans Fat: 0 grams
- Carbohydrates: 20 grams
- Fiber: 1 gram
- Protein: 10 grams
- Cholesterol: 30 milligrams
Keywords: Taco Pinwheels, appetizer, easy recipe, party food, Mexican cuisine, creamy filling, crispy tortillas, make-ahead, finger food, savory snacks, quick bites, festive appetizers, crowd-pleaser


