There’s something undeniably special about a rainy day. The soft sound of raindrops tapping against the window, the cozy atmosphere indoors, and the slower pace of life all create the perfect setting for creativity to flourish. When kids are stuck inside and energy starts to build, finding an activity that is both engaging and calming can feel like a challenge. That’s where Stained Glass Glue Window Art comes in—a simple, colorful craft that transforms ordinary materials into something truly magical.
This delightful activity is more than just a way to pass the time. It’s an opportunity for children to explore creativity, experiment with colors, and feel a genuine sense of pride in what they create. Best of all, it requires minimal setup, uses affordable materials, and results in beautiful window decorations that catch the sunlight in the most enchanting way.
Let’s dive into everything you need to know about this fun and rewarding craft.
Why This Craft Is Perfect for Rainy Days
Rainy days often call for indoor activities that strike the perfect balance between fun and focus. Stained Glass Glue Window Art checks all the boxes:
- Simple to set up: No complicated instructions or special tools required
- Budget-friendly: Uses common household or school supplies
- Creative freedom: Kids can design anything they imagine
- Visually rewarding: The finished result looks stunning in sunlight
- Calming activity: Encourages patience and concentration
Unlike high-energy activities that can leave your home feeling chaotic, this craft invites kids to slow down and enjoy the process. It’s a peaceful yet exciting way to turn a gray, rainy afternoon into a colorful creative session.
What You’ll Need
One of the best things about this craft is how accessible it is. You likely already have most of the materials at home.
Ingredients (Materials)
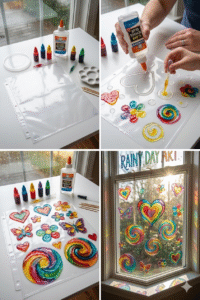
- Plastic sheet protector or a clear plastic lid
- Clear school glue
- Food coloring or liquid watercolor
That’s it—just three simple items that come together to create something beautiful.
Step-by-Step Directions
This craft is easy enough for younger kids with a bit of supervision, while older children can enjoy it independently.
1. Prepare Your Workspace
Start by laying your plastic sheet protector or clear plastic lid flat on a table. It’s a good idea to cover the table with newspaper or a washable mat, just in case things get a little messy—which is part of the fun!
Make sure the surface is clean and smooth so the glue designs will form nicely.
2. Create Your Design with Glue
Using the clear school glue, begin squeezing out shapes directly onto the plastic surface. Encourage kids to get creative here. Some ideas include:
- Hearts
- Flowers
- Stars
- Butterflies
- Simple geometric patterns
- Abstract swirls
The glue lines should be thick enough to hold their shape but not overly heavy. Think of it like drawing with glue instead of a pencil.
This step is where imagination really shines. There’s no right or wrong design—just pure creativity.
3. Add Color
Once the glue shapes are ready, it’s time to bring them to life with color.
Add a few drops of food coloring or liquid watercolor directly into the glue. You can use one color per shape or mix multiple colors for a more vibrant effect.
This is where the magic begins.
4. Swirl and Blend
Using a small stick, toothpick, or even a fingertip, gently swirl the colors inside the glue shapes. Watch as the colors blend together, creating a stained glass effect.
Encourage kids to experiment with different techniques:
- Light swirling for a marbled look
- Mixing colors for new shades
- Creating patterns within the shapes
This step is both fun and mesmerizing, as the colors move and transform right before your eyes.
5. Let It Dry
Now comes the hardest part—waiting.
Allow the glue designs to dry completely. This can take anywhere from 24 to 48 hours, depending on how thick the glue is.
It’s important not to rush this step. Fully dried designs will peel off easily and hold their shape beautifully.
6. Peel and Display
Once everything is completely dry, carefully peel the designs off the plastic surface.
You’ll be left with flexible, colorful shapes that resemble stained glass.
Place them on a window, and watch what happens when sunlight shines through.
The colors glow, the designs come alive, and the whole room feels just a little more magical.
The Joy of Seeing the Final Result
There’s something incredibly satisfying about seeing a craft go from simple materials to a finished piece of art. When kids place their creations on a window and sunlight filters through, it creates a moment of wonder.
The colors appear brighter, the designs look more intricate, and the entire room is filled with a warm, artistic glow.
It’s not just a craft—it’s an experience.
Creative Variations to Try
Once you’ve mastered the basic technique, there are plenty of ways to take this craft to the next level.
Layered Designs
Create multiple layers of glue and color for a more dimensional look.
Themed Creations
Design shapes based on seasons or holidays:
- Spring flowers
- Summer suns
- Autumn leaves
- Winter snowflakes
Name Art
Spell out names or initials using glue and decorate them with color.
Sun Catcher Mobiles
Attach finished pieces to string and hang them near a window for a moving light display.
Tips for Success
To make the experience even smoother and more enjoyable, keep these tips in mind:
- Use clear glue only for the best stained glass effect
- Avoid adding too much food coloring, as it can make the glue too runny
- Keep glue lines thick enough so they don’t break when peeled
- Be patient with drying time—this step is key to success
- Encourage creativity without worrying about perfection
Educational Benefits of This Craft
While it may seem like simple fun, this activity also offers valuable learning opportunities:
Fine Motor Skills
Squeezing glue and swirling colors helps develop hand control and coordination.
Color Mixing
Kids learn how colors blend and interact with each other.
Creativity and Expression
Designing their own shapes allows children to express individuality.
Patience and Focus
Waiting for the project to dry teaches delayed gratification and persistence.
Making Memories Through Creativity
Beyond the colors and designs, what makes this craft truly special is the experience it creates.
Sitting together at the table, choosing colors, laughing at unexpected patterns, and admiring the final results—these are the moments that stick.
It’s not just about keeping kids busy. It’s about giving them a chance to create something meaningful, to feel proud of their work, and to enjoy the simple joy of making art.
A Little Bit of Magic on a Rainy Day
Rainy days don’t have to feel dull or limiting. With a little creativity and a few simple materials, they can become opportunities for discovery and fun.
Stained Glass Glue Window Art turns an ordinary afternoon into something memorable. It fills your home with color, encourages imagination, and leaves behind beautiful decorations that brighten even the cloudiest days.
And when the rain finally stops and the sun comes out, those colorful creations shining in the window will remind you that sometimes, the best moments happen indoors.
Final Thoughts
If you’re looking for an easy, affordable, and truly delightful activity, this craft is a perfect choice. It brings together creativity, learning, and fun in a way that feels effortless and rewarding.
So the next time the rain starts to fall, gather your supplies, clear a space at the table, and let the creativity flow.
Because with just a little glue and color, you can turn a quiet day into something magical.