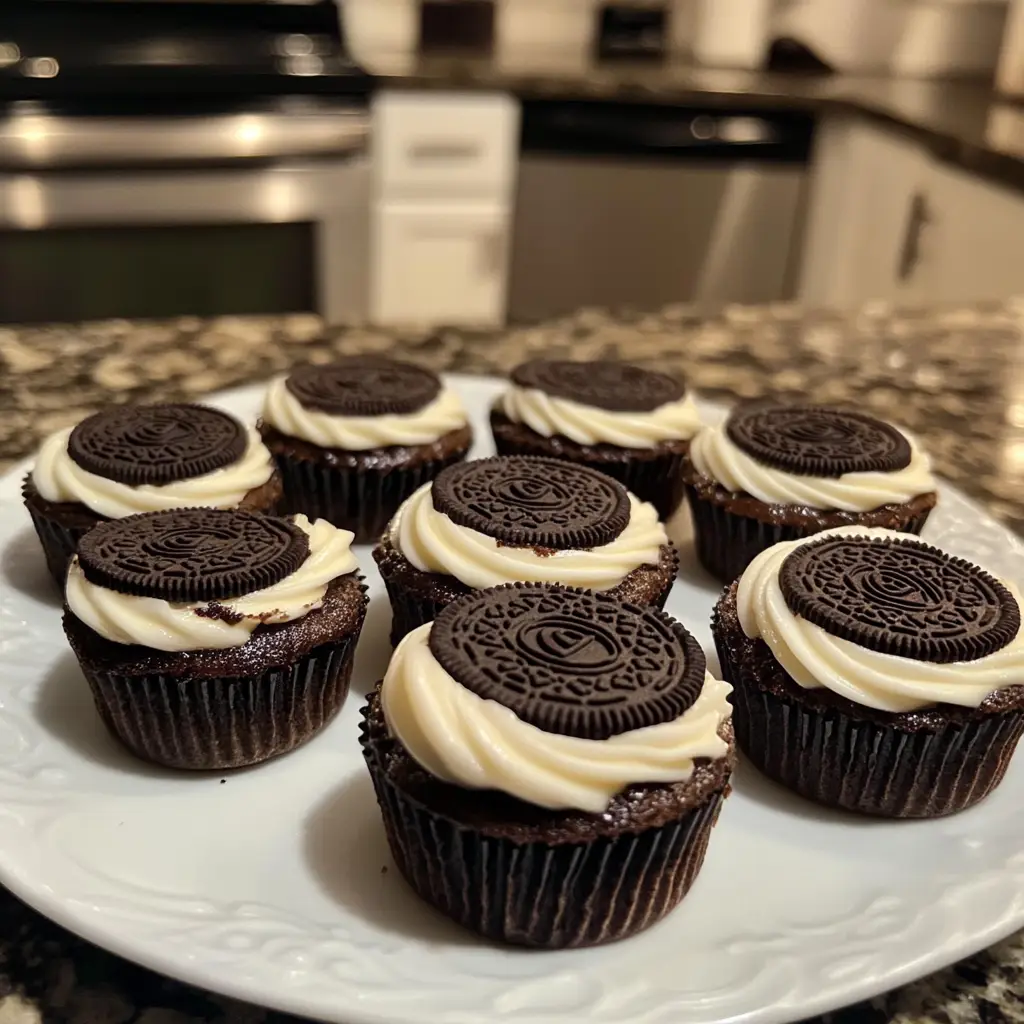
Introduction to Spring Oreo Cheesecake Bites
As the flowers bloom and the sun shines brighter, I find myself drawn to the kitchen, eager to whip up something delightful that captures the essence of spring. One of my favorite treats to make during this vibrant season is Spring Oreo Cheesecake Bites. These little bites of joy are not just a dessert; they are a celebration of flavors and textures that dance on your palate like a gentle spring breeze.
Let me take you back to a sunny afternoon last spring. I was hosting a small gathering for friends, and I wanted to create something that would not only impress but also evoke the cheerful spirit of the season. That’s when I stumbled upon the idea of combining two of my favorite things: creamy cheesecake and the beloved Oreo cookie. The result? A bite-sized dessert that was a hit from the first taste!
What I love most about these cheesecake bites is their versatility. You can dress them up for a fancy occasion or keep them simple for a cozy family night. Plus, they are incredibly easy to make! With just a handful of ingredients, you can create a dessert that looks as good as it tastes. Each bite is a perfect balance of rich creaminess and the delightful crunch of Oreo, making them irresistible.
So, whether you’re planning a spring picnic, a birthday party, or just a sweet treat for yourself, these Spring Oreo Cheesecake Bites are sure to bring smiles all around. Let’s dive into the ingredients and get started on this delicious journey together!
Ingredients for Spring Oreo Cheesecake Bites
Before we embark on our culinary adventure, let’s gather all the ingredients we need for these delightful Spring Oreo Cheesecake Bites. I always believe that quality ingredients make a world of difference in the final product. So, let’s make sure we have everything ready to go!
Main Ingredients
- 24 Oreo cookies, crushed into fine crumbs
- 5 tablespoons unsalted butter, melted
- 16 ounces cream cheese, softened to room temperature
- ½ cup granulated sugar
- 1 teaspoon vanilla extract
- 2 large eggs
- ½ cup sour cream
When choosing your cream cheese, I recommend going for a full-fat version. It gives the cheesecake that rich, creamy texture we all love. Also, make sure your eggs are at room temperature; this helps them blend smoothly into the mixture.
Optional Add-ons
- 1 cup mini chocolate chips (for extra chocolatey goodness)
- Fresh fruit (like strawberries or raspberries, for a fruity twist)
- Whipped cream (for topping, if you want to make them extra special)
- Additional crushed Oreos (for garnish)
Feel free to get creative with these optional add-ons! I often toss in mini chocolate chips for a delightful surprise in every bite. And if you’re feeling fancy, a dollop of whipped cream on top adds a lovely touch. The fresh fruit not only looks beautiful but also adds a refreshing burst of flavor that pairs wonderfully with the cheesecake.
Now that we have our ingredients lined up, let’s move on to the fun part—preparing our Spring Oreo Cheesecake Bites!
How to Prepare Spring Oreo Cheesecake Bites
Now that we have our ingredients ready, it’s time to roll up our sleeves and dive into the preparation of these delightful Spring Oreo Cheesecake Bites. I promise, the process is as enjoyable as the final product! Let’s take it step by step.
Step 1: Prepare the Oreo Crust
First things first, we need to create that delicious Oreo crust that will serve as the foundation for our cheesecake bites. In a mixing bowl, combine the crushed Oreo cookies with the melted butter. Stir until the crumbs are evenly coated and resemble wet sand.
Tips for Achieving the Perfect Crust
- Make sure to crush the Oreos into fine crumbs. I find that using a food processor makes this task a breeze!
- Press the mixture firmly into the bottom of your baking dish. This helps create a sturdy base that won’t crumble when you take a bite.
- For an extra touch, you can bake the crust at 350°F (175°C) for about 10 minutes. This step enhances the flavor and gives it a nice crunch.
Step 2: Make the Cheesecake Filling
Next up is the creamy cheesecake filling! In a large mixing bowl, beat the softened cream cheese until it’s smooth and fluffy. Gradually add in the granulated sugar, vanilla extract, and eggs, mixing well after each addition. Finally, fold in the sour cream until everything is well combined.
Tips for Creamy Cheesecake Filling
- Ensure your cream cheese is at room temperature. This helps it blend smoothly without lumps.
- Don’t overmix the batter once you add the eggs. Overmixing can introduce too much air, leading to cracks in your cheesecake.
- If you’re adding mini chocolate chips or fruit, gently fold them in at the end to keep the filling light and airy.
Step 3: Assemble the Cheesecake Bites
Now comes the fun part—assembling our cheesecake bites! Pour the cheesecake filling over the prepared Oreo crust, spreading it evenly with a spatula. Make sure to leave a little space at the top, as the filling will puff up slightly while baking.
Tips for Neat Assembly
- Use a spatula to smooth the top of the filling. A smooth surface makes for a prettier presentation!
- If you’re using a muffin tin, consider lining it with cupcake liners for easy removal.
- For a decorative touch, sprinkle some crushed Oreos on top before baking.
Step 4: Chill and Set
Once your cheesecake bites are assembled, it’s time to chill! Place them in the refrigerator for at least 4 hours, or overnight if you can wait. This step is crucial for the flavors to meld and for the cheesecake to set properly.
Tips for Proper Chilling
- Cover the cheesecake bites with plastic wrap to prevent them from absorbing any odors from the fridge.
- For the best texture, let them sit at room temperature for about 10 minutes before serving. This makes them easier to cut and enhances the flavor.
- If you’re in a hurry, you can place them in the freezer for about 1 hour, but keep an eye on them to avoid freezing!
And there you have it! With these simple steps, you’re well on your way to creating the most delightful Spring Oreo Cheesecake Bites. I can already imagine the smiles on everyone’s faces when they take that first bite!
Equipment Needed for Spring Oreo Cheesecake Bites
Before we dive into the kitchen, let’s make sure we have all the necessary tools at our fingertips. Having the right equipment can make the process smoother and more enjoyable. Here’s what you’ll need to whip up those delightful Spring Oreo Cheesecake Bites:
- Mixing Bowls: A couple of medium-sized mixing bowls will do the trick. I love using glass bowls because they’re easy to clean and you can see the ingredients mixing!
- Electric Mixer: A hand mixer or stand mixer is perfect for achieving that creamy cheesecake filling. If you don’t have one, a whisk will work, but it’ll take a bit more elbow grease!
- Spatula: A rubber spatula is essential for scraping down the sides of the bowl and smoothing out the cheesecake filling.
- Measuring Cups and Spoons: Accurate measurements are key to a successful recipe, so make sure you have these handy.
- 9×9-inch Baking Dish or Muffin Tin: Depending on how you want to shape your cheesecake bites, either will work. If you’re using a muffin tin, don’t forget the cupcake liners for easy removal!
- Food Processor or Ziplock Bag and Rolling Pin: If you don’t have a food processor to crush the Oreos, you can place them in a Ziplock bag and crush them with a rolling pin. It’s a fun way to release some stress, too!
With these tools in hand, you’re all set to create your Spring Oreo Cheesecake Bites. Remember, the right equipment can make your cooking experience more enjoyable, so gather everything before you start. Let’s keep the momentum going and get ready for the next steps!
Variations of Spring Oreo Cheesecake Bites
One of the things I adore about Spring Oreo Cheesecake Bites is their flexibility. You can easily switch things up to suit your taste or the occasion. Here are a few fun variations that I’ve tried and loved:
- Mint Chocolate Oreo Cheesecake Bites: Swap out regular Oreos for mint-flavored ones. The refreshing mint adds a delightful twist that’s perfect for spring!
- Peanut Butter Oreo Cheesecake Bites: Mix in some creamy peanut butter into the cheesecake filling. The combination of chocolate and peanut butter is simply irresistible!
- Fruit-Infused Cheesecake Bites: Add a layer of fresh fruit puree, like strawberry or raspberry, between the crust and the filling. It not only looks beautiful but also adds a burst of fruity flavor.
- Chocolate Drizzle: After chilling, drizzle some melted chocolate over the top for an extra touch of decadence. It’s a simple way to elevate the presentation!
These variations are just the tip of the iceberg! Feel free to experiment and let your creativity shine. Each twist brings a new flavor profile, making these Spring Oreo Cheesecake Bites a delightful treat for any palate. I can’t wait to hear about your own delicious creations!
Cooking Notes for Spring Oreo Cheesecake Bites
As I’ve journeyed through the delightful world of baking these Spring Oreo Cheesecake Bites, I’ve gathered a few cooking notes that can help you achieve the best results. These little nuggets of wisdom can make a big difference in your baking experience!
- Room Temperature Ingredients: Always remember to let your cream cheese and eggs come to room temperature before mixing. This simple step ensures a smooth and creamy filling without any lumps.
- Don’t Rush the Chilling: Patience is key! Allowing the cheesecake bites to chill for the recommended time helps them set properly. Trust me, the wait is worth it for that perfect texture!
- Check for Doneness: When baking, keep an eye on your cheesecake bites. They should be set around the edges but slightly jiggly in the center. They will firm up as they cool.
- Storage Tips: If you have leftovers (which is rare!), store them in an airtight container in the fridge. They can last up to a week, but I doubt they’ll last that long!
- Serving Temperature: For the best flavor, let your cheesecake bites sit at room temperature for about 10 minutes before serving. This little trick enhances the taste and makes them easier to enjoy!
With these cooking notes in your back pocket, you’re well-equipped to create the most scrumptious Spring Oreo Cheesecake Bites. Happy baking, and may your kitchen be filled with joy and delicious aromas!
Serving Suggestions for Spring Oreo Cheesecake Bites
Now that we’ve crafted these delightful Spring Oreo Cheesecake Bites, it’s time to think about how to serve them up! Presentation can elevate your dessert from simple to spectacular, and I love to get a little creative when it comes to serving. Here are some of my favorite ideas:
- On a Colorful Platter: Arrange the cheesecake bites on a vibrant serving platter. Add some fresh mint leaves or edible flowers around them for a pop of color that screams spring!
- With Fresh Fruit: Serve the bites alongside a medley of fresh berries—strawberries, blueberries, and raspberries. The fruity contrast not only looks beautiful but also complements the rich cheesecake perfectly.
- Drizzled with Sauce: A drizzle of chocolate or caramel sauce over the cheesecake bites adds a touch of decadence. It’s a simple way to make them feel extra special!
- In Individual Cups: For a fun twist, serve each cheesecake bite in mini dessert cups. This makes for a cute presentation and is perfect for parties or gatherings.
- With Whipped Cream: Top each bite with a dollop of whipped cream and a sprinkle of crushed Oreos. It adds a delightful texture and makes each bite even more indulgent!
These serving suggestions can turn your Spring Oreo Cheesecake Bites into the star of any gathering. Whether it’s a picnic, a birthday party, or just a cozy night in, these bites are sure to impress. Enjoy sharing them with friends and family, and watch as they disappear in no time!
Tips for Perfecting Spring Oreo Cheesecake Bites
As I’ve baked these Spring Oreo Cheesecake Bites time and time again, I’ve gathered a treasure trove of tips that can help you achieve perfection. These little nuggets of wisdom can elevate your cheesecake bites from good to absolutely divine!
- Use Quality Ingredients: The better the ingredients, the better the flavor! Opt for high-quality cream cheese and fresh eggs. It truly makes a difference in taste and texture.
- Don’t Overbake: Keep a close eye on your cheesecake bites while they bake. They should be set around the edges but still slightly jiggly in the center. Overbaking can lead to a dry texture.
- Experiment with Flavors: Don’t be afraid to get creative! Try adding different extracts, like almond or lemon, to the filling for a unique twist. Each flavor can bring a new dimension to your bites.
- Chill Thoroughly: Patience is key! Allow your cheesecake bites to chill for the full recommended time. This helps them set properly and enhances the flavors.
- Garnish with Love: A simple garnish can elevate your dessert. Consider adding fresh fruit, a sprinkle of crushed Oreos, or a drizzle of chocolate sauce for that extra touch of elegance.
With these tips in your back pocket, you’re well on your way to creating the most delightful Spring Oreo Cheesecake Bites. I can’t wait for you to experience the joy of sharing these treats with your loved ones!
Breakdown of Time for Spring Oreo Cheesecake Bites
As a passionate home cook, I know that timing is everything in the kitchen. When it comes to making Spring Oreo Cheesecake Bites, having a clear understanding of the time involved can help you plan your baking adventure. Here’s a quick breakdown of the time you’ll need:
- Prep Time: 20 minutes – This includes gathering your ingredients, preparing the Oreo crust, and mixing the cheesecake filling. It’s a fun and creative time where you can let your culinary spirit shine!
- Cooking Time: 25 minutes – This is the time it takes for your cheesecake bites to bake to perfection. Keep an eye on them to ensure they’re just right!
- Chilling Time: 4 hours (or overnight) – This is the most important step! Allowing your cheesecake bites to chill ensures they set properly and the flavors meld beautifully. Patience is key here!
Total Time: Approximately 4 hours and 45 minutes (or overnight if you choose to chill them longer). While the active time is relatively short, the chilling time is essential for achieving that perfect texture and flavor.
With this time breakdown, you can easily plan your baking session. Whether you’re making these delightful Spring Oreo Cheesecake Bites for a special occasion or just for yourself, knowing the timeline will help you enjoy the process even more. Happy baking!
Nutritional Information for Spring Oreo Cheesecake Bites
As a passionate home cook, I always find it helpful to know the nutritional content of the treats I whip up. While Spring Oreo Cheesecake Bites are undeniably delicious, they also come with a few calories. Here’s a quick overview of the nutritional information per serving, assuming you cut the bites into 16 pieces:
- Calories: Approximately 150
- Fat: 10g (Saturated Fat: 5g)
- Carbohydrates: 15g (Sugars: 8g)
- Protein: 2g
- Sodium: 150mg
Keep in mind that these values can vary based on the specific brands of ingredients you use and any optional add-ons you choose to include. If you’re looking to lighten things up a bit, consider using reduced-fat cream cheese or a sugar substitute. Regardless of the nutritional content, I believe that enjoying a sweet treat like these Spring Oreo Cheesecake Bites in moderation is part of the joy of cooking and sharing with loved ones!
Frequently Asked Questions about Spring Oreo Cheesecake Bites
As I’ve shared my love for Spring Oreo Cheesecake Bites, I often get questions from fellow home cooks eager to try their hand at this delightful treat. I love connecting with others through our shared culinary adventures, so I’ve compiled some of the most frequently asked questions to help you on your journey. Let’s dive in!
Can I make these cheesecake bites ahead of time?
Absolutely! In fact, making them a day in advance is a great idea. The flavors have time to meld, and they set beautifully in the fridge. Just be sure to cover them well to keep them fresh!
Can I freeze Spring Oreo Cheesecake Bites?
Yes, you can! These bites freeze wonderfully. Just wrap them tightly in plastic wrap and then place them in an airtight container. They can last up to three months in the freezer. When you’re ready to enjoy them, let them thaw in the fridge overnight.
What if I don’t have a food processor to crush the Oreos?
No worries at all! You can place the Oreos in a Ziplock bag and crush them with a rolling pin. It’s a fun way to relieve some stress, and you’ll still get those fine crumbs you need for the crust!
Can I use a different type of cookie for the crust?
Definitely! While Oreos are a classic choice, you can experiment with other cookies like chocolate chip, graham crackers, or even gluten-free options. Just make sure they’re crushed finely to create a solid crust.
How do I know when the cheesecake bites are done baking?
Great question! The edges should be set, but the center will still have a slight jiggle. They will firm up as they cool, so don’t worry if they look a bit soft when you take them out of the oven!
Can I add more flavors to the cheesecake filling?
Absolutely! Feel free to get creative. You can add different extracts like almond or lemon, or even mix in some fruit puree for a fruity twist. Each variation can bring a new and exciting flavor to your cheesecake bites!
With these answers, I hope you feel more confident in making your own Spring Oreo Cheesecake Bites. Remember, cooking is all about experimenting and having fun, so don’t hesitate to make this recipe your own. Happy baking, and enjoy every delicious bite!
Conclusion on Spring Oreo Cheesecake Bites
As we wrap up our delightful journey through the world of Spring Oreo Cheesecake Bites, I can’t help but feel a sense of joy and satisfaction. These little treats are more than just a dessert; they are a celebration of spring, bringing together the rich creaminess of cheesecake and the beloved crunch of Oreos in a bite-sized delight.
What makes these cheesecake bites truly special is their versatility. Whether you’re hosting a gathering, enjoying a cozy night in, or simply treating yourself, they fit every occasion perfectly. Plus, with the option to customize flavors and toppings, you can make them uniquely yours!
So, as you step into your kitchen to create these scrumptious bites, remember that cooking is about sharing love and joy with those around you. I hope you find as much happiness in making and sharing Spring Oreo Cheesecake Bites as I do. Happy baking, and may your kitchen always be filled with laughter and delicious aromas!