Introduction to Snow Foam Sensory Play
Welcome to the magical world of Snow Foam Sensory Play! If you’re looking for a fun and engaging way to spark creativity in your little ones, you’ve come to the right place. This DIY project is not only simple to make but also incredibly rewarding for both kids and parents. Imagine the joy on their faces as they dive into a fluffy, snow-like concoction that feels like a winter wonderland right in your living room! Plus, it’s a fantastic opportunity for sensory exploration, making it a perfect activity for chilly days indoors.
Why You’ll Love This Snow Foam Sensory Play
This Snow Foam Sensory Play project is a delightful blend of creativity and fun that you and your kids will cherish. It’s incredibly easy to whip up, using affordable ingredients you likely already have at home. Not only does it provide a fantastic outlet for your little ones’ imaginations, but it also offers a wonderful bonding experience. Plus, the calming texture of the foam can be surprisingly relaxing for both kids and parents alike!
Materials and Tools Needed for Snow Foam Sensory Play
To create your own enchanting Snow Foam Sensory Play, you’ll need a few simple materials that are easy to find and budget-friendly. Here’s what you’ll need:
- Shaving cream: This is the star of the show! It provides that delightful fluffy texture that makes the foam feel like real snow.
- Cornstarch: Acting as a thickening agent, cornstarch helps achieve the perfect consistency for your snow foam.
- Mixing bowl: An essential tool for combining your ingredients. Choose a bowl that’s large enough for little hands to mix without spilling.
- Food coloring (optional): If you want to add a splash of color, food coloring can transform your snow foam into a vibrant masterpiece.
- Plastic containers or trays: These are perfect for easy access and play. They also help contain the fun, making cleanup a breeze!
- Measuring cups and spoons: While you don’t need exact measurements, having these on hand can help you get the right texture and consistency.
These materials are not only easy to gather but also safe for kids, making this a fantastic family-friendly craft to enjoy together!
How to Make Snow Foam Sensory Play
Now that you have all your materials ready, let’s dive into the fun part—making your very own Snow Foam Sensory Play! This step-by-step guide will help you create a fluffy, magical experience that your kids will adore. Remember, the key to a smooth crafting experience is to have everything organized and within reach. So, let’s get started!
Step 1: Gather Your Ingredients
Before we mix anything, let’s make sure we have all our ingredients at hand. You’ll need shaving cream, cornstarch, a mixing bowl, food coloring (if you want to add some flair), and plastic containers or trays. Having everything ready not only makes the process smoother but also builds excitement for the kids. Trust me, it’s much easier to create when you’re not scrambling to find that elusive bottle of food coloring!
Step 2: Mix the Shaving Cream and Cornstarch
Now, grab your mixing bowl and add the shaving cream and cornstarch. I usually go for a 1:1 ratio, but feel free to adjust based on the texture you want. As you mix, you’ll notice the ingredients start to fluff up, transforming into a delightful, snow-like consistency. It’s like magic watching it come together! Aim for a light, airy texture that feels soft and fluffy to the touch. You want it to be moldable but not too sticky—think of the perfect snowball!
Step 3: Add Color (Optional)
If you want to add a splash of color to your snow foam, now’s the time! A few drops of food coloring can turn your white foam into a vibrant winter wonderland. As you mix in the color, watch how it swirls and blends, creating beautiful patterns. It’s a feast for the eyes and adds an extra layer of fun to the sensory experience! You can even create different colors for a rainbow effect, which is sure to delight your little ones.
Step 4: Transfer to Containers
Once your snow foam is ready, it’s time to transfer it into plastic containers or trays. This step is perfect for little hands to dive right in! You can use different shapes or sizes of containers to make it even more exciting. Think about how much fun it will be for the kids to explore their snowy creations in their own little play areas! Plus, having it in containers makes it easier to store any leftovers for another day of fun.
Step 5: Explore and Play
Now comes the best part—let the kids explore! Encourage them to mold shapes, create winter scenes, or even build tiny snowmen. The texture of the snow foam is so inviting; it’s hard to resist! I love watching their imaginations run wild as they play. You might even find them creating their own stories with the foam, which is a wonderful way to spark creativity and storytelling skills. Don’t be surprised if they start asking for little toys or figurines to add to their snowy landscapes!
Safety Tips
While this Snow Foam Sensory Play is safe and fun, it’s essential to supervise young children during playtime. Make sure they understand not to put the foam in their mouths. Keeping the play area clean is also a good idea, as it can get a bit messy—after all, what’s a sensory play experience without a little fun chaos? A quick cleanup afterward can be a great way to teach kids about tidying up after playtime!
In the end, making snow foam sensory play is a simple yet rewarding project that brings joy and creativity to your home. I can’t wait for you to try it out and see the smiles on your kids’ faces!
Tips for Best Results
- For added fun, include small toys or figurines for kids to play with in the snow foam. It makes the experience even more engaging!
- Consider adding scents like vanilla or peppermint to enhance the sensory experience. The delightful aromas can transport your little ones to a winter wonderland!
- Always supervise young children to ensure they do not ingest the materials. Safety first, so everyone can enjoy the fun worry-free!
Theme and Design Variations
One of the best parts of Snow Foam Sensory Play is how you can customize it to fit different themes and occasions! Here are some fun ideas to inspire your creativity:
- Winter Wonderland: Use white foam and sprinkle in some silver glitter for a magical, snowy effect.
- Holiday Cheer: Add red and green food coloring to create a festive touch that’s perfect for the holiday season.
- Ocean Adventure: Mix in blue food coloring and toss in some seashells for a beach-themed sensory experience.
- Rainbow Fun: Create multiple batches in different colors for a vibrant sensory experience that will delight kids of all ages!
These variations not only make the playtime more exciting but also encourage kids to explore different textures and colors, enhancing their sensory play experience!
Display and Use Ideas
Once you’ve created your delightful Snow Foam Sensory Play, the fun doesn’t have to stop there! Here are some creative ways to use, display, or even gift your fluffy creation:
- Set up a sensory play station for kids to explore, allowing them to dive into their snowy adventure whenever they like.
- Use it as a fun winter-themed activity for classrooms, encouraging kids to engage in imaginative play while learning about winter.
- Gift it to friends or family as a unique, homemade sensory play kit that’s sure to bring joy to their little ones.
- Create a winter scene display with figurines and snow foam, turning your living room into a magical winter wonderland!
FAQs about Snow Foam Sensory Play
As you embark on this delightful journey of Snow Foam Sensory Play, you might have a few questions. Don’t worry; I’ve got you covered! Here are some common queries that parents often ask, along with helpful answers to guide you through this fun crafting experience.
- Q: Is snow foam safe for young children?
A: Yes, it is safe, but always supervise playtime to prevent ingestion. It’s important to remind kids not to put the foam in their mouths, ensuring a worry-free experience! - Q: How long does the snow foam last?
A: If stored in an airtight container, your snow foam can last for a few days. Just make sure to keep it sealed to maintain its fluffy texture! - Q: Can I use other colors besides white?
A: Absolutely! Feel free to experiment with different food coloring to create vibrant shades. The more colors, the more fun your sensory play will be! - Q: What if my snow foam is too sticky?
A: If your foam turns out too sticky, try adding a bit more cornstarch to achieve the desired fluffy consistency. It’s all about finding that perfect balance! - Q: Can I add scents to the snow foam?
A: Yes! Adding scents like vanilla or peppermint can enhance the sensory experience, making it even more enjoyable for your little ones.
These FAQs should help you feel more confident as you dive into the world of Snow Foam Sensory Play. Enjoy the creativity and fun that comes with this engaging project!
Final Thoughts
Creating your own Snow Foam Sensory Play is not just a fun project; it’s a wonderful way to bond with your kids and spark their creativity. The joy of watching them explore and play with the fluffy foam is truly heartwarming. I encourage you to give this delightful craft a try and see the smiles it brings to your little ones’ faces. Don’t forget to share your experiences and any unique variations you come up with! Let’s spread the joy of sensory play together—happy crafting!
Print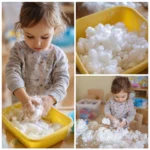
Snow Foam Sensory Play: Unleash Creative Fun for Kids Today!
Description
Create a fun and engaging snow foam sensory play experience for kids using simple ingredients. This project encourages creativity and sensory exploration.
Instructions
- In a mixing bowl, combine 1 cup of shaving cream with 1 cup of cornstarch.
- Mix the ingredients together until you achieve a fluffy, snow-like consistency.
- If desired, add a few drops of food coloring to create colored snow foam and mix well.
- Transfer the snow foam into plastic containers or trays for easy access.
- Encourage kids to explore the texture, mold shapes, and create their own winter scenes with the snow foam.
- Category: Kids Craft
Keywords: Snow Foam, Sensory Play, Kids Activities, Winter Crafts