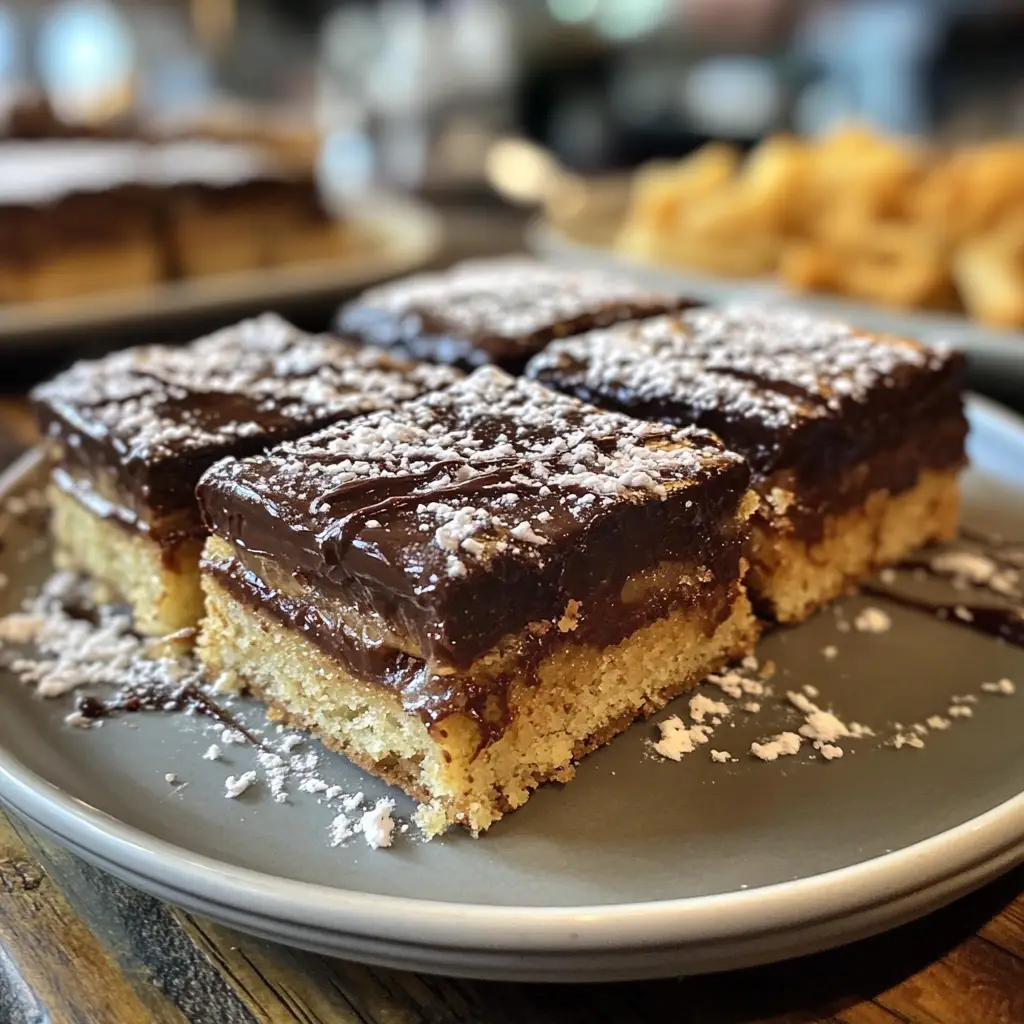
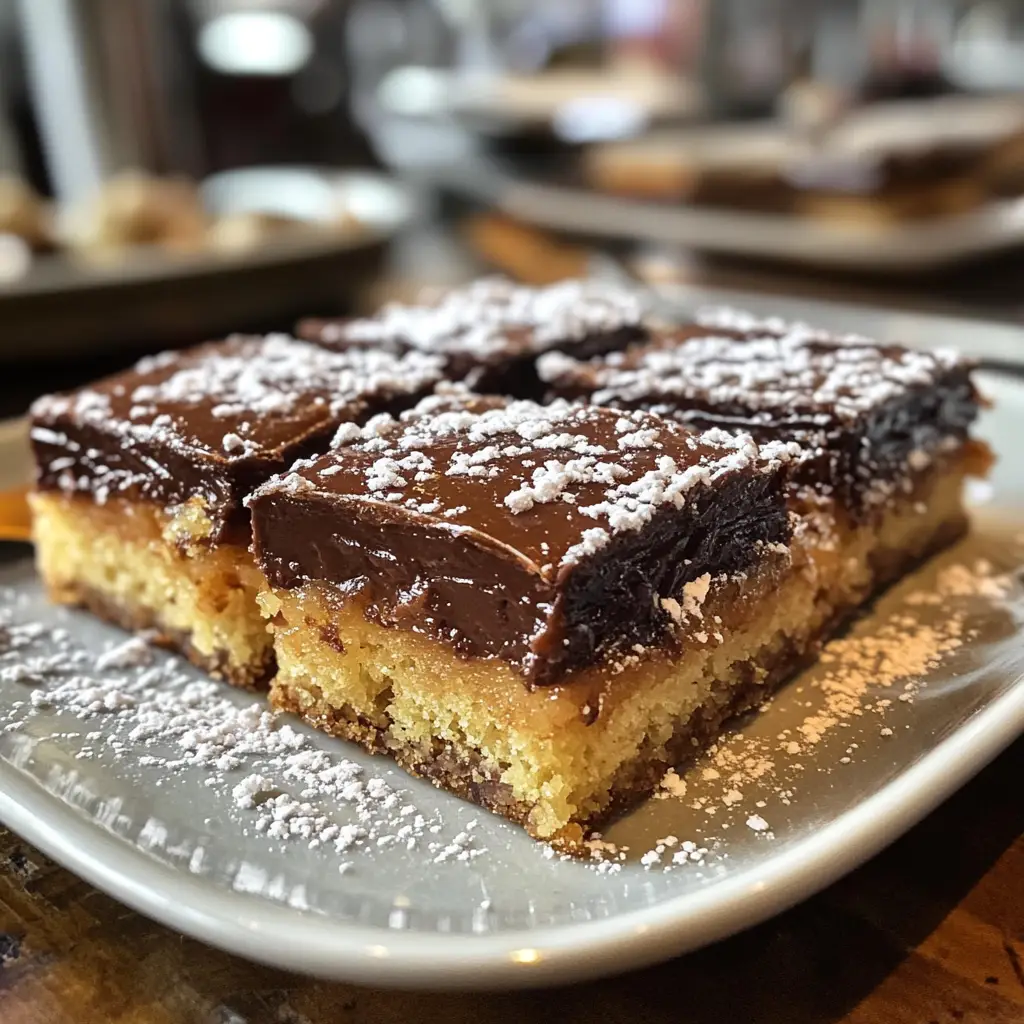
Introduction to Salt River Bars Guide
As a passionate home cook, I find joy in creating recipes that not only satisfy my sweet tooth but also bring a smile to the faces of my loved ones. One such delightful treat that has become a staple in my kitchen is the Salt River Bars. These bars are a perfect blend of sweet and salty, with a texture that’s both chewy and crunchy. They remind me of sunny days spent by the river, where laughter and good food go hand in hand.
My journey with Salt River Bars began during a family picnic. I remember the first time I tasted them; the combination of flavors danced on my palate like a joyful melody. I was instantly hooked! Since then, I’ve experimented with various ingredients and techniques to perfect this recipe. Each time I make them, I’m reminded of those carefree moments by the water, surrounded by family and friends.
What I love most about Salt River Bars is their versatility. You can enjoy them as a snack, dessert, or even a breakfast treat. They’re perfect for sharing at gatherings or simply indulging in during a quiet evening at home. Plus, they’re easy to make, which means you can whip them up in no time!
In this guide, I’ll walk you through everything you need to know to create your own batch of Salt River Bars. From the ingredients to the baking process, I’ll share my personal tips and tricks to ensure your bars turn out perfectly every time. So, grab your apron, and let’s dive into the delicious world of Salt River Bars!
Ingredients for Salt River Bars Guide
Before we embark on our culinary adventure, let’s gather all the ingredients needed to create these delightful Salt River Bars. I always believe that the quality of ingredients can make or break a recipe, so I’ll share some tips on sourcing the best items. Here’s what you’ll need:
Main Ingredients
- 1 cup of unsalted butter, softened
- 1 cup of brown sugar, packed
- 1 cup of granulated sugar
- 2 large eggs
- 2 teaspoons of vanilla extract
- 2 cups of all-purpose flour
- 1 teaspoon of baking powder
- 1/2 teaspoon of baking soda
- 1/2 teaspoon of salt
- 2 cups of rolled oats
- 1 cup of chocolate chips (I prefer semi-sweet for that perfect balance)
When it comes to butter, I always opt for unsalted. This way, I can control the saltiness of my bars. As for the sugars, using brown sugar adds a lovely depth of flavor, while granulated sugar gives that delightful sweetness. And don’t skimp on the vanilla extract; it’s the secret ingredient that elevates the taste!
Optional Add-ons
- 1/2 cup of chopped nuts (walnuts or pecans work beautifully)
- 1/2 cup of dried fruit (like cranberries or raisins for a chewy texture)
- 1/2 teaspoon of cinnamon (for a warm, cozy flavor)
- Flaky sea salt (to sprinkle on top for that extra salty kick)
These optional add-ons can take your Salt River Bars to the next level. I love adding nuts for a delightful crunch, and a sprinkle of flaky sea salt on top creates a beautiful contrast with the sweetness. Feel free to mix and match based on your preferences or what you have on hand!

How to Prepare Salt River Bars Guide
Now that we have our ingredients ready, it’s time to roll up our sleeves and get cooking! Making Salt River Bars is a delightful process that fills your kitchen with warm, inviting aromas. I promise, the end result will be worth every moment spent. Let’s dive into the steps!
Step 1: Gather Your Ingredients
First things first, let’s make sure we have everything we need. I like to lay out all my ingredients on the counter. This way, I can see what I have and what I might need to grab. It also makes the cooking process smoother and more enjoyable!
Tips for Ingredient Quality
When gathering your ingredients, always choose the freshest options. For butter, look for a brand that uses high-quality cream. Fresh eggs are a must, too! If you can, buy organic or free-range eggs for the best flavor. And don’t forget to check the expiration dates on your baking powder and soda; fresh ingredients make a world of difference!
Step 2: Prepare the Base
Next, we’ll create the base for our bars. In a large mixing bowl, cream together the softened butter, brown sugar, and granulated sugar until it’s light and fluffy. This step is crucial because it helps to incorporate air into the mixture, giving your bars that lovely texture.
Tips for Achieving the Perfect Texture
Make sure your butter is at room temperature; this makes it easier to cream. If you’re in a hurry, you can cut the butter into small pieces and let it sit for a few minutes. Also, don’t rush this step! Creaming the butter and sugars properly will lead to a lighter, fluffier bar.
Step 3: Mix the Filling
Once your base is ready, it’s time to add the eggs and vanilla extract. Mix them in one at a time, ensuring they’re fully incorporated before adding the next. Then, in a separate bowl, whisk together the flour, baking powder, baking soda, and salt. Gradually add this dry mixture to your wet ingredients, mixing until just combined. Finally, fold in the rolled oats and chocolate chips.
Tips for Flavor Enhancement
For an extra burst of flavor, consider adding a splash of almond extract along with the vanilla. It adds a lovely depth that pairs beautifully with the chocolate. If you’re using any optional add-ons, like nuts or dried fruit, now’s the time to mix them in!
Step 4: Assemble the Bars
Now comes the fun part—assembling the bars! Line a baking dish with parchment paper for easy removal later. Pour half of the mixture into the dish and spread it evenly. Then, sprinkle the remaining mixture on top, creating a beautiful layered effect.
Tips for Even Layering
To achieve even layering, I like to use a spatula to gently spread the mixture. If it’s too sticky, you can lightly wet your hands to help smooth it out. This ensures that every bite has that perfect balance of flavors!
Step 5: Bake to Perfection
Preheat your oven to 350°F (175°C) and bake the bars for about 25-30 minutes. You’ll know they’re done when the edges are golden brown, and a toothpick inserted in the center comes out clean. Let them cool in the pan for a few minutes before transferring them to a wire rack.
Tips for Monitoring Baking Time
Keep an eye on your bars as they bake! Ovens can vary, so check them a few minutes before the timer goes off. If the top is browning too quickly, you can cover it loosely with aluminum foil to prevent burning. Trust me, you want to catch them at just the right moment for that perfect chewy texture!
Equipment Needed for Salt River Bars Guide
Before we dive into the baking process, let’s make sure we have all the right tools at our fingertips. Having the right equipment can make a world of difference in your cooking experience. Here’s what you’ll need to whip up those delicious Salt River Bars:
- Mixing Bowls: A large mixing bowl for combining your ingredients is essential. I often use a glass or stainless steel bowl, as they’re easy to clean and durable.
- Measuring Cups and Spoons: Accurate measurements are key to baking success! A set of measuring cups and spoons will help you get it just right.
- Electric Mixer: While you can mix by hand, an electric mixer makes creaming the butter and sugars a breeze. If you don’t have one, a sturdy whisk will do the trick, but it may take a bit more elbow grease!
- Spatula: A rubber spatula is perfect for folding in ingredients and scraping down the sides of your bowl. It’s a must-have for ensuring everything is well combined.
- Baking Dish: A 9×13 inch baking dish is ideal for these bars. If you don’t have one, a similar-sized pan will work, but be mindful of the baking time, as it may vary.
- Parchment Paper: Lining your baking dish with parchment paper makes for easy removal of the bars. If you’re out of parchment, you can grease the pan with butter or cooking spray, but parchment is my go-to for a clean release.
- Cooling Rack: Once baked, transferring the bars to a cooling rack helps them cool evenly. If you don’t have one, a plate will work in a pinch!
With these tools in hand, you’re all set to create your Salt River Bars. Remember, the right equipment not only makes the process smoother but also adds to the joy of cooking. Happy baking!
Variations of Salt River Bars Guide
One of the things I adore about Salt River Bars is their adaptability. You can easily switch up the ingredients to create a new flavor experience each time you bake. Here are a few variations that I’ve tried and loved:
- Peanut Butter Swirl: Add 1/2 cup of creamy peanut butter to the base mixture. Swirl it in before baking for a nutty twist that pairs beautifully with chocolate.
- Caramel Delight: Drizzle some caramel sauce over the top layer before baking. The gooey caramel adds a rich sweetness that’s simply irresistible!
- Fruit Fusion: Swap out the chocolate chips for 1 cup of fresh berries or chopped apples. This variation gives a refreshing burst of flavor and a lovely fruity aroma.
- Spiced Pumpkin: In the fall, I love adding 1 cup of pumpkin puree and 1 teaspoon of pumpkin spice to the mixture. It transforms the bars into a cozy autumn treat!
Feel free to experiment with these variations or come up with your own! The beauty of Salt River Bars lies in their versatility, allowing you to tailor them to your taste preferences or seasonal ingredients. Each variation tells a different story, just like the memories we create while enjoying them.
Cooking Notes for Salt River Bars Guide
As I’ve baked my fair share of Salt River Bars, I’ve gathered a few cooking notes that can help you achieve the best results. These little nuggets of wisdom can make a big difference in your baking journey!
- Room Temperature Ingredients: Always remember to bring your butter and eggs to room temperature before starting. This helps them blend more easily, creating a smoother batter.
- Don’t Overmix: When combining your dry and wet ingredients, mix until just combined. Overmixing can lead to tough bars, and nobody wants that!
- Cooling Time: Patience is key! Allow the bars to cool completely in the pan before cutting them. This helps them set and makes for cleaner slices.
- Storage Tips: Store your Salt River Bars in an airtight container at room temperature for up to a week. If you want to keep them longer, you can freeze them for up to three months. Just make sure to wrap them tightly!
- Experiment with Toppings: Feel free to get creative with toppings! A drizzle of melted chocolate or a sprinkle of powdered sugar can elevate your bars to a whole new level.
These cooking notes are like little breadcrumbs leading you to baking success. With each batch, you’ll learn something new, and soon enough, you’ll be a Salt River Bars pro! Happy baking!
Serving Suggestions for Salt River Bars Guide
Now that your Salt River Bars are baked to perfection, it’s time to think about how to serve them! I love to get creative with presentation, as it adds an extra touch of joy to the experience. Here are some of my favorite serving suggestions:
- Classic Slice: Simply cut the bars into squares and serve them on a beautiful platter. A sprinkle of powdered sugar on top adds a lovely finishing touch.
- À la Mode: For a decadent treat, serve warm bars with a scoop of vanilla ice cream. The creamy ice cream melts into the chewy bars, creating a delightful contrast.
- With Fresh Fruit: Pair your bars with a side of fresh berries or sliced apples. The fruity freshness complements the rich flavors of the bars beautifully.
- Drizzle of Chocolate: For an extra indulgent touch, drizzle melted chocolate over the top of the bars before serving. It adds a luxurious finish that’s hard to resist!
- Pack for Picnics: These bars are perfect for on-the-go snacking! Wrap them individually in parchment paper and pack them for a picnic or a day out by the river.
Each serving suggestion brings its own charm to the table, making your Salt River Bars even more enjoyable. Whether you’re sharing them with friends or savoring them solo, these bars are sure to delight. So, gather your loved ones, and let the sweet moments unfold!
Tips for Perfecting Salt River Bars Guide
As I’ve baked my fair share of Salt River Bars, I’ve picked up a few tips that can help you elevate your baking game. These little nuggets of wisdom can make a big difference in achieving that perfect batch every time!
- Measure Accurately: Baking is a science, so precise measurements are crucial. I always use a kitchen scale for the best results, especially for flour and sugar.
- Chill the Dough: If you find your mixture too sticky, pop it in the fridge for about 30 minutes. Chilling helps the bars hold their shape better while baking.
- Use Quality Chocolate: The chocolate chips can make or break your bars. I recommend using high-quality chocolate for a richer flavor that melts beautifully.
- Experiment with Textures: For added crunch, consider mixing in some crushed pretzels or toffee bits. The contrast of textures can take your bars to the next level!
- Don’t Rush the Cooling: Allow your bars to cool completely in the pan before cutting. This helps them set properly and makes for cleaner, more appealing slices.
With these tips in your back pocket, you’ll be well on your way to creating Salt River Bars that are not only delicious but also visually stunning. Happy baking, and may your kitchen be filled with sweet aromas and joyful memories!
Breakdown of Time for Salt River Bars Guide
As a home cook, I know that time management is key in the kitchen. When I’m whipping up a batch of Salt River Bars, I like to keep track of my time to ensure everything runs smoothly. Here’s a quick breakdown of the time you’ll need for this delightful recipe:
- Prep Time: 15 minutes
- Cooking Time: 25-30 minutes
- Total Time: 40-45 minutes
With just a little over half an hour, you can have these scrumptious bars ready to enjoy! The prep time includes gathering your ingredients and mixing everything together, while the cooking time is when the magic happens in the oven. I always find it helpful to set a timer, so I can focus on other tasks while the bars bake. Trust me, the aroma wafting through your kitchen will be worth every second!
Nutritional Information for Salt River Bars Guide
As a passionate home cook, I believe that enjoying delicious treats like Salt River Bars can be part of a balanced lifestyle. While these bars are undeniably indulgent, it’s good to know what you’re savoring. Here’s a general breakdown of the nutritional information for one serving (assuming you cut the batch into 16 squares):
- Calories: Approximately 200
- Protein: 2g
- Fat: 10g
- Carbohydrates: 28g
- Fiber: 1g
- Sugar: 12g
- Sodium: 100mg
Keep in mind that these values can vary based on the specific ingredients you use and any optional add-ons you choose to include. For instance, adding nuts or dried fruits will increase the protein and healthy fats, while using less sugar can lower the overall calorie count. I always encourage my fellow home cooks to enjoy these bars in moderation and to feel free to make adjustments that suit their dietary needs. After all, cooking is all about finding that perfect balance!
Frequently Asked Questions about Salt River Bars Guide
As I’ve shared my love for Salt River Bars, I often get questions from fellow home cooks eager to try their hand at this delightful recipe. I love answering these queries because it shows just how much excitement there is around baking! Here are some of the most frequently asked questions I receive, along with my personal insights:
Can I make Salt River Bars gluten-free?
Absolutely! To make these bars gluten-free, simply substitute the all-purpose flour with a gluten-free flour blend. I’ve had great success using almond flour or a store-bought gluten-free mix. Just keep an eye on the texture, as it may vary slightly!
How do I store leftover Salt River Bars?
Storing your bars properly is key to keeping them fresh. I recommend placing them in an airtight container at room temperature for up to a week. If you want to keep them longer, you can freeze them! Just wrap them tightly in plastic wrap and then place them in a freezer-safe bag. They’ll stay delicious for up to three months!
Can I use different types of chocolate chips?
Of course! While I love semi-sweet chocolate chips, you can use milk chocolate, dark chocolate, or even white chocolate chips. Each type brings its own unique flavor to the bars. Feel free to mix and match for a fun twist!
What if I don’t have rolled oats?
If you find yourself without rolled oats, you can substitute them with quick oats. Just keep in mind that the texture may be slightly different. If you’re looking for a grain-free option, you could also try using crushed nuts or seeds for added crunch!
Can I add more ingredients to the bars?
Absolutely! The beauty of Salt River Bars is their versatility. You can add in your favorite mix-ins, like shredded coconut, toffee bits, or even a swirl of Nutella. Just be mindful of the overall balance of wet and dry ingredients to ensure the bars bake properly.
These questions reflect the curiosity and creativity that come with baking. I love how each inquiry opens the door to new possibilities in the kitchen. So, don’t hesitate to experiment and make this recipe your own! Happy baking, and may your Salt River Bars bring joy to your table!
Conclusion on Salt River Bars Guide
As I wrap up this Salt River Bars Guide, I can’t help but feel a sense of warmth and nostalgia. These bars are more than just a delicious treat; they’re a canvas for creativity and a bridge to cherished memories. Whether you’re baking them for a family gathering, a picnic by the river, or simply to enjoy at home, they bring a delightful blend of flavors and textures that everyone loves.
What I adore most about Salt River Bars is their versatility. You can customize them to suit your taste, making them a perfect fit for any occasion. Plus, they’re easy to whip up, allowing you to share sweet moments with loved ones without spending hours in the kitchen. Each bite is a reminder of the joy that comes from cooking and sharing food with those we care about.
So, I encourage you to gather your ingredients, roll up your sleeves, and embark on this baking adventure. With the tips and tricks I’ve shared, I’m confident you’ll create a batch of Salt River Bars that will not only satisfy your cravings but also create lasting memories. Happy baking, and may your kitchen always be filled with love and laughter!