Sensory-Rich Introduction with Immediate Craving
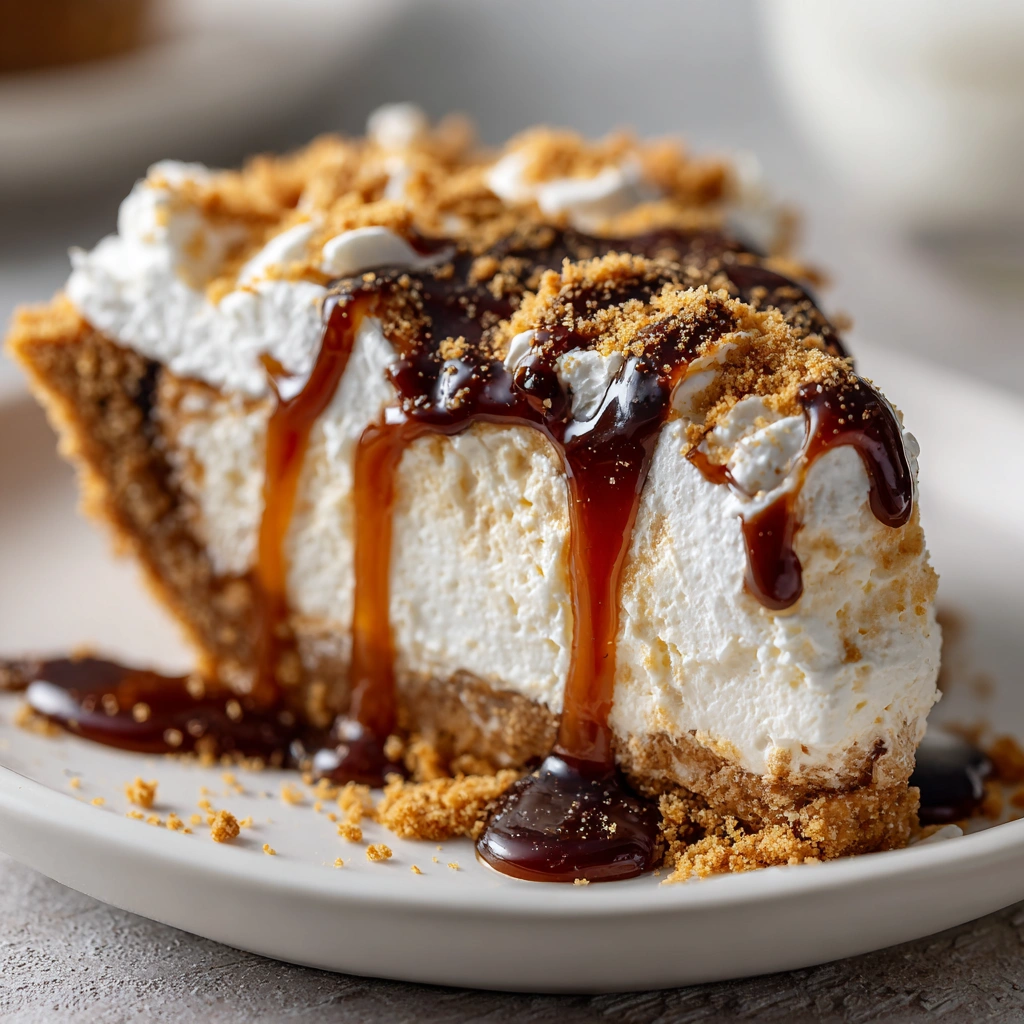
Imagine a pie that captures the essence of summer in every slice—a Root Beer Float Pie that beckons with its creamy layers, golden graham cracker crust, and a fluffy topping that looks like a cloud of sweet delight. The moment you lay eyes on it, you can’t help but feel a rush of nostalgia, as if you’ve been transported back to sun-soaked afternoons spent sipping root beer floats with family and friends.
As you take your first bite, the fizzy root beer flavor dances on your tongue, mingling effortlessly with the smooth creaminess of the filling. It’s a delightful contrast that sends your taste buds into a joyful frenzy. The crunch of the crust adds a satisfying texture, while the whipped cream topping provides a light, airy finish that makes each mouthful feel like a celebration.
This pie isn’t just a dessert; it’s a vessel of cherished memories. I remember my grandmother making root beer floats for us on hot summer days, her laughter mingling with the sound of fizzing soda as she poured it over scoops of vanilla ice cream. Those moments were filled with joy, and now, as I recreate that experience in pie form, I feel a deep connection to my roots and the love that went into those simple pleasures.
Whether you’re hosting a summer barbecue or simply looking to indulge in a sweet treat, this Root Beer Float Pie is the perfect addition to any gathering. It brings people together, sparking conversations and laughter, and reminding us of the joy found in shared experiences. So, let’s dive into this creamy bliss and create new memories, one slice at a time!
Why You’ll Love This Root Beer Float Pie
Let me tell you, this Root Beer Float Pie is not just another dessert; it’s a delightful experience that will have you coming back for seconds (and maybe thirds!). Here’s why you’ll absolutely adore it:
- Texture Contrast: The moment you sink your fork into this pie, you’ll be greeted by the satisfying crunch of the graham cracker crust. It’s the perfect foundation for the creamy filling that follows, creating a delightful mouthfeel that keeps each bite interesting.
- Flavor Balance: The sweetness of root beer shines through, harmonizing beautifully with the richness of cream cheese and the lightness of whipped cream. It’s a flavor symphony that dances on your palate, making it hard to resist.
- Versatility: Whether you’re hosting a summer barbecue, celebrating a birthday, or simply enjoying a cozy night in, this pie fits right in. It’s suitable for various occasions, bringing a touch of nostalgia to any gathering.
- Ease of Preparation: Don’t worry if you’re not a seasoned baker! The simple steps in this recipe make it accessible for bakers of all skill levels. You’ll feel like a pro in no time, impressing friends and family with minimal effort.
- Universal Appeal: This pie is a nostalgic dessert that resonates with both kids and adults alike. It’s a crowd-pleaser that sparks joy and brings smiles, making it the perfect sweet treat for any occasion.
So, whether you’re reminiscing about childhood summers or creating new memories, this Root Beer Float Pie is sure to be a hit. Let’s get started on making this creamy bliss a reality!
Essential Tools & Preparation Strategy
Before diving into the delightful world of Root Beer Float Pie, let’s gather our essential tools and set the stage for a smooth baking experience. Trust me, having the right equipment makes all the difference!
- Mixing Bowls: Necessary for combining ingredients smoothly; opt for glass or stainless steel for durability.
- Electric Mixer: Essential for whipping cream and achieving the right texture in the filling. A hand mixer works just fine, but a stand mixer can save you some elbow grease!
- Measuring Cups and Spoons: Ensure precise measurements for consistent results. I can’t stress enough how important it is to measure accurately—your taste buds will thank you!
- 9-inch Pie Pan: Ideal size for even baking and setting; consider a glass pan for easy monitoring of the crust’s golden perfection.
- Rubber Spatula: Perfect for folding whipped cream into the filling without deflating it. This tool is a game-changer for achieving that light, airy texture.
- Whisk: Handy for mixing dry ingredients and ensuring a smooth filling. Plus, it’s great for channeling your inner chef!
- Cooling Rack: Useful for cooling the crust completely before adding the filling. Trust me, a warm crust can lead to a melty mess!
With these tools at your side, you’re well on your way to creating a Root Beer Float Pie that will impress family and friends alike. Now, let’s get those ingredients ready and prepare for a delicious adventure!
Ingredients & Their Roles in This Root Beer Float Pie
Every ingredient in this Root Beer Float Pie plays a crucial role in creating that perfect balance of flavors and textures. Let’s break down the components and see how they contribute to this delightful dessert!
Crust:
- Graham Cracker Crumbs: These little gems provide a sweet, crunchy base that contrasts beautifully with the creamy filling. Their slight caramel notes evoke memories of summer picnics and backyard barbecues.
- Unsalted Butter: This rich ingredient binds the crumbs together, creating a sturdy yet tender crust. It adds a luscious mouthfeel that enhances the overall experience of each bite.
- Granulated Sugar: A touch of sweetness that enhances the flavor of the crust, making it irresistible. It’s the secret ingredient that elevates the graham cracker base from ordinary to extraordinary!
Filling:
- Root Beer: The star ingredient! This fizzy beverage infuses the pie with its signature flavor, bringing a nostalgic taste that transports you back to childhood. It’s the essence of a root beer float, captured in pie form.
- Heavy Whipping Cream: This ingredient adds lightness and creaminess to the filling, creating a velvety texture that melts in your mouth. Whipping it to stiff peaks ensures that the filling remains airy and delightful.
- Cream Cheese: Providing a rich, tangy base, cream cheese balances the sweetness of the root beer and powdered sugar. It’s the backbone of the filling, giving it structure and depth of flavor.
- Powdered Sugar: This finely milled sugar sweetens the filling without any grittiness, allowing for a smooth and creamy texture. It’s the perfect complement to the tangy cream cheese.
- Vanilla Extract: A splash of vanilla enhances the overall flavor profile, adding warmth and depth. It’s like a hug for your taste buds, rounding out the sweetness beautifully.
Topping:
- Whipped Cream: The crowning glory of this pie! It adds a light, airy finish that contrasts with the creamy filling. Plus, who can resist a dollop of whipped cream on top?
- Root Beer Float Candies (optional): For an extra nostalgic touch, sprinkle these candies on top. They not only add a pop of color but also enhance the root beer flavor, making each slice even more special.
With these carefully selected ingredients, you’re well on your way to creating a Root Beer Float Pie that’s not just a dessert, but a delightful experience filled with memories and joy. Let’s move on to the next step and bring this pie to life!
Step-by-Step Guide to Perfect Root Beer Float Pie
Now that we have our ingredients and tools ready, it’s time to embark on the delightful journey of creating the perfect Root Beer Float Pie! Follow these simple steps, and you’ll be rewarded with a creamy, fizzy dessert that’s sure to impress.
- Preheat the oven: Start by preheating your oven to 350°F (175°C). This ensures that your crust bakes evenly and achieves that perfect golden color.
- Prepare the crust: In a mixing bowl, combine 1 ½ cups graham cracker crumbs, ½ cup unsalted butter (melted), and ¼ cup granulated sugar until well mixed. The mixture should resemble wet sand, holding together when pressed.
- Form the crust: Press the graham cracker mixture firmly into the bottom and up the sides of a 9-inch pie pan. Make sure it’s evenly distributed for a consistent texture. Bake for 10 minutes, then let it cool completely on a cooling rack. This step is crucial—if the crust is warm, it can cause the filling to melt!
- Make the filling: In a separate bowl, beat 8 oz cream cheese (softened) until smooth. Gradually add 1 cup powdered sugar and 1 tsp vanilla extract, mixing until creamy and well combined. The mixture should be velvety and free of lumps.
- Add the root beer: Slowly pour in 1 cup root beer while mixing continuously until fully incorporated. The fizzy bubbles will add a delightful lightness to the filling, so don’t rush this step!
- Whip the cream: In another bowl, whip 1 cup heavy whipping cream until stiff peaks form. This means that when you lift the whisk, the cream should hold its shape without collapsing. Be careful not to overmix, or you’ll end up with butter!
- Fold it all together: Gently fold the whipped cream into the root beer mixture using a rubber spatula. This step is key to maintaining the airy texture of the filling—be gentle to avoid deflating the whipped cream.
- Assemble the pie: Pour the filling into the cooled crust and smooth the top with your spatula. Refrigerate for at least 4 hours or until set. Patience is a virtue here; the longer it chills, the better the flavors meld together!
- Final touches: Before serving, top with 1 cup whipped cream and sprinkle with root beer float candies if desired. This adds a fun, nostalgic touch that will have everyone reminiscing about their favorite summer treats!
And there you have it! A step-by-step guide to creating a Root Beer Float Pie that’s not only delicious but also a joy to make. Now, let’s move on to some chef’s notes and pro tips to ensure your pie turns out flawless!
Chef’s Notes & Pro Tips for Flawless Results
As you embark on your journey to create the perfect Root Beer Float Pie, here are some invaluable tips and tricks that I’ve gathered over the years. These insights will help you achieve a pie that not only looks stunning but also tastes divine!
- Make-ahead instructions: For optimal flavor and texture, prepare the pie a day in advance. This allows the filling to set properly and the flavors to meld beautifully. Trust me, the wait is worth it!
- Storage tips: Keep any leftovers in an airtight container in the fridge for up to 3 days. However, I doubt there will be much left after everyone gets a taste!
- Equipment recommendations: If you have a stand mixer, use it for whipping the cream. It makes the process so much easier and saves your arm from a workout. Plus, you can multitask while it does the heavy lifting!
- Customization options: Don’t be afraid to get creative! Experiment with flavored whipped cream—think chocolate or even a hint of cinnamon. You can also try different crusts, like chocolate or Oreo, for a fun twist on the classic.
With these pro tips in your back pocket, you’re well-equipped to create a Root Beer Float Pie that will impress everyone at your gathering. Now, let’s move on to avoiding common cooking mistakes to ensure your pie is a resounding success!
Avoid These Common Cooking Mistakes
Even the most seasoned bakers can run into a few hiccups when making a Root Beer Float Pie. To help you avoid any potential pitfalls, I’ve compiled a list of common mistakes and how to steer clear of them. Trust me, learning from these will save you time and frustration!
- Not letting the crust cool completely: This is a biggie! If you add the filling to a warm crust, it can cause the filling to melt and create a soupy mess. Always allow the crust to cool completely on a cooling rack before adding the filling.
- Overmixing the whipped cream: While it’s tempting to keep mixing, overdoing it can lead to a grainy texture. Stop mixing as soon as you see stiff peaks form—this is the sweet spot for that light, airy finish!
- Using warm ingredients: For a smooth and creamy filling, ensure all your ingredients are at room temperature. Cold cream cheese or heavy cream can lead to lumps that are hard to incorporate.
- Not refrigerating long enough: Patience is key! The pie needs at least 4 hours in the fridge to set properly. If you’re in a rush, you might end up with a filling that doesn’t hold its shape.
- Skipping the folding step: This step is crucial for maintaining the lightness of the whipped cream. Gently fold it into the root beer mixture to keep that airy texture intact—no one wants a dense pie!
- Using low-fat cream cheese: While it may seem like a healthier option, low-fat cream cheese can affect both the texture and flavor of your pie. Opt for full-fat cream cheese for the best results.
- Not measuring ingredients accurately: Baking is a science, and precise measurements are essential for achieving the right balance of flavors. Use proper measuring tools to ensure your pie turns out just right!
By keeping these common mistakes in mind, you’ll be well on your way to creating a Root Beer Float Pie that’s not only delicious but also a true showstopper. Now, let’s explore some creative variations and customizations to make this pie your own!
Creative Variations & Customizations
One of the best things about the Root Beer Float Pie is its versatility! You can easily adapt this recipe to suit different dietary needs or to simply switch things up a bit. Here are some creative variations and customizations that will keep your taste buds excited:
- Gluten-Free Option: If you or your guests are gluten-sensitive, simply substitute gluten-free graham crackers for the crust. This way, everyone can enjoy a slice of this nostalgic dessert without worry!
- Chocolate Root Beer Float Pie: For all the chocolate lovers out there, why not add a twist? Incorporate 2 tablespoons of cocoa powder into the filling for a rich chocolate flavor that pairs beautifully with the root beer. It’s a match made in dessert heaven!
- Vegan Version: Want to make this pie plant-based? Use 1 cup of coconut cream in place of heavy whipping cream and dairy-free cream cheese for the filling. You’ll still get that creamy texture and delicious flavor, but in a vegan-friendly way!
- Seasonal Flavors: Embrace the changing seasons by incorporating spices like 1 teaspoon of cinnamon or 1/2 teaspoon of nutmeg into the filling for a fall-inspired pie. These warm spices will add a cozy touch that’s perfect for autumn gatherings.
- Mini Pies: For a fun twist, create individual servings using muffin tins. Simply press the graham cracker mixture into the bottom of each cup and fill with the root beer mixture. These mini pies are perfect for parties or gatherings, allowing everyone to have their own little slice of joy!
With these creative variations, you can make the Root Beer Float Pie your own and cater to different tastes and dietary preferences. So, don’t hesitate to experiment and have fun in the kitchen—after all, that’s what cooking is all about!
Perfect Pairings: What to Serve With Root Beer Float Pie
When it comes to enjoying your Root Beer Float Pie, the right accompaniments can elevate the experience to new heights. Here are some delightful pairings that will complement the creamy, fizzy goodness of this nostalgic dessert:
- Vanilla Ice Cream: A scoop of creamy vanilla ice cream enhances the overall richness and complements the root beer flavor beautifully. It’s like a classic float in pie form!
- Chilled Root Beer: Nothing beats the classic pairing of a cold glass of root beer. It amplifies the nostalgic experience and brings back memories of summer days spent sipping floats.
- Chocolate Shavings: For those who love a touch of decadence, adding chocolate shavings on top of the whipped cream not only enhances the visual appeal but also adds a rich flavor contrast.
- Fruit Salad: A refreshing fruit salad provides a light, zesty contrast to the sweetness of the pie. The bright flavors of seasonal fruits can cleanse the palate and balance the richness.
- Chocolate Cake: For a dessert platter that satisfies chocolate lovers, serve a slice of chocolate cake alongside the pie. The combination of flavors will delight any sweet tooth!
- Citrusy Salad: A light, citrusy salad can balance the sweetness of the pie with its bright, zesty flavors. Think oranges, grapefruits, and a hint of mint for a refreshing twist.
- Coffee or Iced Tea: Pairing your pie with a cup of coffee or a glass of iced tea makes for a perfect afternoon treat. The slight bitterness of coffee or the refreshing nature of iced tea complements the sweetness of the pie.
- Summer Barbecues: This pie is a nostalgic dessert option that fits perfectly with grilled foods. Serve it at your next barbecue, and watch it disappear in no time!
With these perfect pairings, you can create a delightful dessert experience that will leave everyone craving more. So, gather your loved ones, serve up some Root Beer Float Pie, and enjoy the sweet moments together!
Storage & Meal Prep Instructions
Once you’ve created your delicious Root Beer Float Pie, you’ll want to ensure it stays fresh and tasty for as long as possible. Here are some handy storage and meal prep tips to keep your pie in perfect condition:
- Fridge Storage: Keep the pie in an airtight container to maintain its creamy texture and flavor. It will last up to 3 days in the refrigerator, but I doubt it will last that long with how delicious it is!
- Freezer Storage: If you want to save some for later, wrap the pie tightly in plastic wrap and then in foil. This method helps prevent freezer burn and keeps it fresh. It can be frozen for up to one month—perfect for those unexpected dessert cravings!
- Reheating Methods: When you’re ready to enjoy your frozen pie, simply thaw it in the fridge overnight before serving. This gentle thawing method helps maintain the pie’s texture and flavor. Remember, once thawed, do not refreeze the pie, as it can affect the quality.
With these storage and meal prep instructions, you can enjoy your Root Beer Float Pie at your leisure, savoring each creamy, fizzy bite whenever the mood strikes. Now, let’s dive into the nutrition facts and health insights to round out our delicious journey!
Nutrition Facts & Health Insights
As we indulge in the creamy bliss of Root Beer Float Pie, it’s essential to understand the nutritional aspects of this delightful dessert. Here’s a closer look at the nutrition facts, so you can enjoy each slice with confidence!
| Nutrient | Amount per Serving (1 slice, 1/8 of pie) |
|---|---|
| Calories | 320 |
| Sugar | 25 grams |
| Sodium | 150 milligrams |
| Fat | 20 grams |
| Saturated Fat | 10 grams |
| Unsaturated Fat | 8 grams |
| Trans Fat | 0 grams |
| Carbohydrates | 30 grams |
| Fiber | 1 gram |
| Protein | 3 grams |
| Cholesterol | 40 milligrams |
Now, let’s talk about some of the health benefits of key ingredients in this pie:
- Cream Cheese: This creamy delight is not just delicious; it’s also a source of calcium, which is essential for strong bones and teeth. Plus, it adds a rich texture that makes the filling irresistible!
- Root Beer: While it’s a sweet treat, root beer contains antioxidants that can help combat oxidative stress in the body. It’s a fun way to enjoy a nostalgic flavor while reaping some health benefits!
- Heavy Whipping Cream: Although it’s rich in fat, heavy cream provides a good source of vitamins A and D, which are important for maintaining healthy skin and vision.
While Root Beer Float Pie is certainly a treat, it’s also a reminder that desserts can be enjoyed in moderation as part of a balanced diet. So go ahead, savor each creamy bite, and relish the joy it brings!
Frequently Asked Questions
As you embark on your journey to create the perfect Root Beer Float Pie, you may have a few questions along the way. Here are some common queries I’ve encountered, along with helpful answers to guide you through the process:
- Can I use diet root beer for a lower-calorie version?
Absolutely! Using diet root beer can reduce the calorie count of your pie. Just keep in mind that the flavor may be slightly different, but it will still capture that nostalgic essence! - How long can I store leftovers?
Leftovers can be stored in an airtight container in the refrigerator for up to 3 days. However, I doubt there will be much left after everyone gets a taste! - What can I substitute for cream cheese?
If you’re looking for a substitute, you can use mascarpone cheese or a dairy-free cream cheese alternative. Just ensure it has a similar creamy texture to maintain the pie’s consistency. - Can I make this pie without baking?
Yes! The crust can be made without baking by simply mixing the graham cracker crumbs, melted butter, and sugar, then pressing it into the pie pan. Just chill it in the fridge for about 30 minutes to firm up before adding the filling. - How do I know when the pie is set?
The pie is set when the filling is firm to the touch and holds its shape when sliced. It should have a slight jiggle but not be liquidy. Refrigerating for at least 4 hours is key to achieving this! - Is it possible to use a different type of crust?
Absolutely! Feel free to experiment with different crusts, such as chocolate cookie crusts or even a nut-based crust for a gluten-free option. Each variation will bring a unique flavor to the pie! - Can I add alcohol to the filling for an adult version?
Yes, you can! Adding a splash of whiskey or rum can enhance the flavor profile and give it a fun adult twist. Just be sure to adjust the amount of root beer slightly to maintain the right consistency. - What if I don’t have heavy cream?
If you’re out of heavy cream, you can use coconut cream or a non-dairy whipped topping as a substitute. Just ensure it’s well-chilled for the best results when whipping! - How can I make this pie more chocolatey?
To add a chocolatey twist, incorporate 2 tablespoons of cocoa powder into the filling. You can also use a chocolate cookie crust for an extra layer of flavor! - Can I use a different soda flavor?
Definitely! Feel free to experiment with other soda flavors like cream soda or even orange soda for a fun twist. Just keep in mind that the flavor profile will change, but it can lead to delicious results!
With these FAQs answered, you’re well-equipped to tackle any challenges that may arise while making your Root Beer Float Pie. Now, let’s dive into the final inspiration and kitchen confidence to wrap up this delightful journey!
Final Inspiration & Kitchen Confidence
As you take a moment to admire your beautifully crafted Root Beer Float Pie, let’s celebrate the joy of creating this nostalgic dessert together! There’s something truly special about bringing a beloved childhood treat to life in your own kitchen. Each slice is not just a delicious indulgence; it’s a reminder of the sweet memories we hold dear and the love we share with family and friends.
Mastering this unique recipe is no small feat, and you should feel incredibly proud of your accomplishment! You’ve navigated through the steps, embraced the flavors, and created a pie that’s sure to bring smiles and laughter to any gathering. Remember, cooking is an art, and you’ve just painted a masterpiece that will be cherished by those who get to enjoy it.
Now, I invite you to share your creations and experiences with Root Beer Float Pie! Whether it’s a photo of your finished pie, a story about the memories it evokes, or a twist you added to the recipe, I’d love to hear from you. Let’s foster a sense of community and connection through our shared love of cooking. So grab your forks, dig in, and let the deliciousness inspire you to create even more culinary magic in your kitchen!
Print
Root Beer Float Pie: Creamy Bliss in Every Bite!
- Total Time: 4 hours 40 minutes
- Yield: 8 servings 1x
- Diet: Vegetarian
Description
Indulge in the creamy, fizzy delight of Root Beer Float Pie, where the smooth texture of whipped cream meets the nostalgic flavor of root beer. Each bite is a refreshing explosion of sweetness, reminiscent of summer days spent sipping on classic root beer floats.
Ingredients
- Crust:
- 1 ½ cups graham cracker crumbs
- ½ cup unsalted butter, melted
- ¼ cup granulated sugar
- Filling:
- 1 cup root beer
- 1 cup heavy whipping cream
- 8 oz cream cheese, softened
- 1 cup powdered sugar
- 1 tsp vanilla extract
- Topping:
- 1 cup whipped cream
- Root beer float candies (optional)
Instructions
- Preheat the oven to 350°F (175°C).
- In a mixing bowl, combine graham cracker crumbs, melted butter, and granulated sugar. Mix until well combined.
- Press the mixture into the bottom and up the sides of a 9-inch pie pan. Bake for 10 minutes, then let cool.
- In a separate bowl, beat the softened cream cheese until smooth. Gradually add powdered sugar and vanilla extract, mixing until creamy.
- Slowly pour in the root beer while mixing until fully incorporated.
- In another bowl, whip the heavy cream until stiff peaks form, then gently fold it into the root beer mixture.
- Pour the filling into the cooled crust and smooth the top. Refrigerate for at least 4 hours or until set.
- Before serving, top with whipped cream and sprinkle with root beer float candies if desired.
Notes
- This pie can be made a day in advance and stored in the refrigerator.
- Store leftovers in an airtight container in the fridge for up to 3 days.
- For a gluten-free option, use gluten-free graham crackers for the crust.
- Prep Time: 30 minutes
- Cook Time: 10 minutes
- Category: desserts
- Method: baking
- Cuisine: American
Nutrition
- Serving Size: 1 slice (1/8 of pie)
- Calories: 320
- Sugar: 25 grams
- Sodium: 150 milligrams
- Fat: 20 grams
- Saturated Fat: 10 grams
- Unsaturated Fat: 8 grams
- Trans Fat: 0 grams
- Carbohydrates: 30 grams
- Fiber: 1 gram
- Protein: 3 grams
- Cholesterol: 40 milligrams
Keywords: Root Beer Float Pie, dessert, creamy pie, summer dessert, root beer, easy pie recipe, no-bake pie, nostalgic dessert, American cuisine, sweet treats, party dessert, chilled dessert, whipped cream


