Sensory-Rich Introduction with Immediate Craving
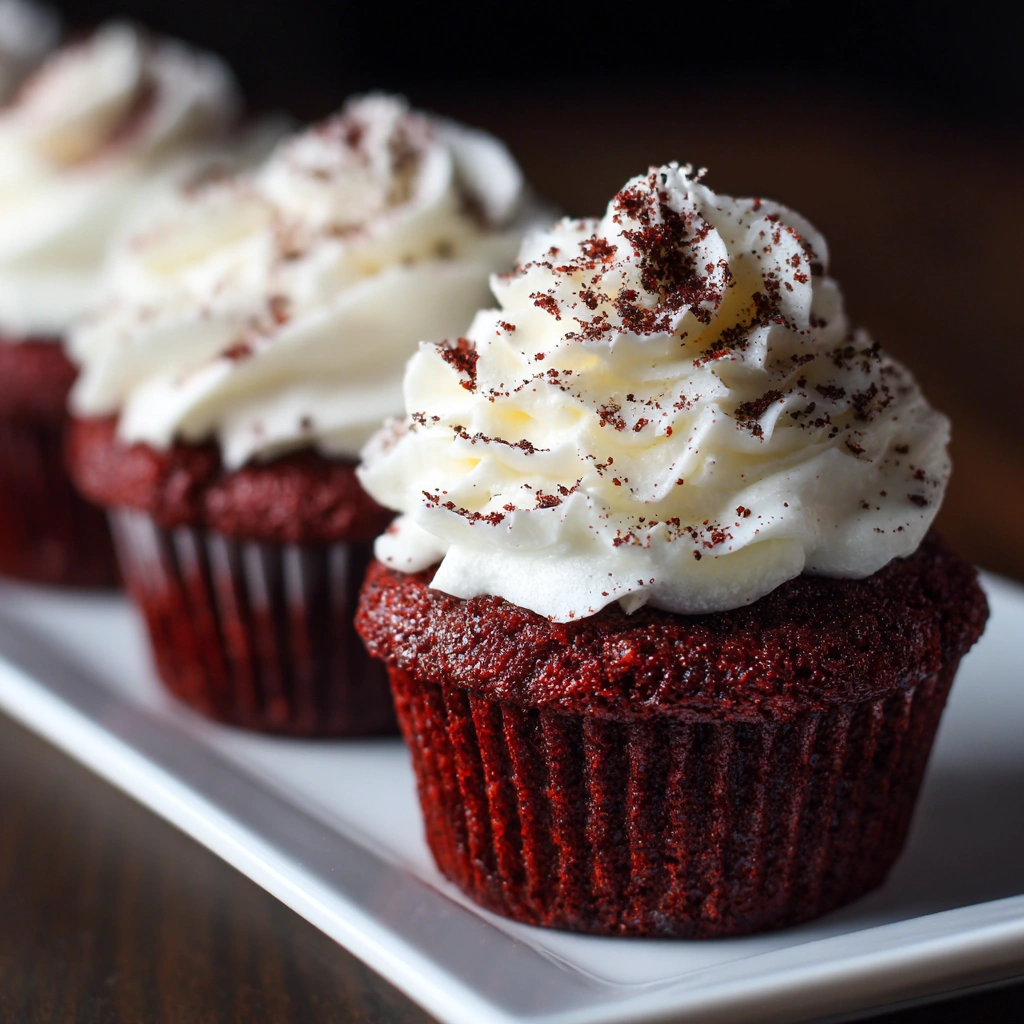
Imagine pulling a tray of red velvet cupcakes from the oven, their rich crimson hue glowing against the backdrop of your kitchen. As you take a moment to admire their velvety texture, the sweet aroma of cocoa and vanilla fills the air, wrapping around you like a warm hug. Each cupcake is crowned with a generous swirl of creamy cream cheese frosting, inviting you to indulge in a bite of pure bliss.
These cupcakes hold a special place in my heart, as they remind me of the countless afternoons spent in my grandmother’s kitchen. I can still hear her laughter as we mixed the batter together, her hands guiding mine as we added the vibrant red food coloring. It was a cherished ritual, one that brought us closer and filled our home with love and deliciousness. Every time I bake these cupcakes, I feel her spirit with me, encouraging me to share the joy of baking with others.
There’s something magical about sharing these delightful treats during special occasions. Whether it’s a birthday celebration, a holiday gathering, or just a casual get-together with friends, red velvet cupcakes have a way of bringing people together. The moment someone takes a bite, their eyes light up, and you can almost hear the collective “Mmm!” echoing around the room. It’s a simple pleasure that transcends generations, creating memories that linger long after the last crumb has been devoured.
So, whether you’re celebrating a milestone or simply treating yourself on a Tuesday, these cupcakes are the perfect addition to any occasion. Get ready to create not just a dessert, but a heartfelt experience that will leave everyone craving more!
Why You’ll Love This Red Velvet Cupcakes
Let me tell you, there’s a reason why red velvet cupcakes have become a beloved classic in the world of desserts. Each bite is a delightful experience that tantalizes your taste buds and leaves you wanting more. Here’s why you’ll fall head over heels for these scrumptious treats:
- Texture Contrast: The moment you sink your teeth into a cupcake, you’ll notice the moist, velvety base that practically melts in your mouth. Paired with the creamy, luscious frosting, it creates a delightful mouthfeel that’s simply irresistible.
- Flavor Balance: The subtle cocoa flavor in the cupcake is perfectly complemented by the sweetness of the cream cheese frosting. It’s a harmonious blend that strikes the right balance between sweet and tangy, making each bite a flavor explosion.
- Versatility: These cupcakes are not just for special occasions; they shine at casual get-togethers, elegant celebrations, and everything in between. Whether it’s a birthday party or a cozy afternoon tea, they fit right in!
- Ease of Preparation: Don’t worry if you’re a novice baker! The simple steps in this recipe make it accessible for bakers of all skill levels. You’ll feel like a pro in no time, impressing friends and family with your baking prowess.
- Universal Appeal: Loved by both children and adults alike, these cupcakes are a true crowd-pleaser. Their vibrant color and delicious flavor make them a hit at any gathering, ensuring smiles all around.
So, whether you’re baking for a special occasion or just because, these red velvet cupcakes are sure to bring joy and satisfaction to everyone who takes a bite. Trust me, once you try them, you’ll understand why they hold a special place in the hearts of so many!
Essential Tools & Preparation Strategy
Before we embark on this delightful baking journey, let’s gather the essential tools that will make your experience smooth and enjoyable. Trust me, having the right equipment can make all the difference between a baking triumph and a kitchen disaster!
- Mixing Bowls: You’ll need a couple of these to keep your dry and wet ingredients separate. I recommend using glass or stainless steel bowls, as they’re sturdy and easy to clean.
- Whisk: A good whisk is crucial for achieving a smooth batter without lumps. If you don’t have one, a fork can work in a pinch, but I promise, a whisk will make your life easier!
- Cupcake Pan: This is where the magic happens! A standard 12-cup cupcake pan will hold your batter perfectly while it bakes into those beautiful, fluffy cupcakes.
- Measuring Cups and Spoons: Accurate measurements are key to baking success. Invest in a set of dry and liquid measuring cups, as well as measuring spoons, to ensure your ingredients are spot on.
- Cooling Rack: Once your cupcakes are out of the oven, they need to cool properly. A cooling rack allows air to circulate around them, preventing sogginess and ensuring they stay light and fluffy.
- Electric Mixer: This tool is a game-changer for making your cream cheese frosting. It saves time and effort, giving you that light, fluffy texture we all crave. If you don’t have one, a hand mixer will do just fine!
- Spatula: A good spatula is essential for transferring batter into the cupcake liners and frosting your cupcakes smoothly. Silicone spatulas are my favorite because they’re flexible and easy to clean.
And if you’re looking for alternatives, don’t fret! You can always mix by hand if you’re feeling adventurous, just be prepared for a bit of a workout. Also, consider using silicone baking mats for easy cleanup and to prevent sticking.
With these tools in hand, you’re well on your way to creating a batch of stunning red velvet cupcakes that will impress everyone. Let’s get baking!
Ingredients & Their Roles in This Red Velvet Cupcakes
Understanding the ingredients that go into your red velvet cupcakes is key to mastering this delightful recipe. Each component plays a vital role in creating that perfect balance of flavor and texture. Let’s break it down:
Cupcake Base
- All-purpose flour: This is the backbone of your cupcakes, providing the necessary structure to hold everything together. It gives the cupcakes their delightful crumb.
- Granulated sugar: Not only does it add sweetness, but it also contributes to the moisture of the cupcakes, ensuring they stay tender and delicious.
- Baking soda: This leavening agent is crucial for helping your cupcakes rise. It reacts with the acidic ingredients, creating bubbles that make the cupcakes light and fluffy.
- Salt: A pinch of salt enhances the overall flavor, balancing the sweetness and bringing out the richness of the cocoa.
- Cocoa powder: This ingredient adds a subtle chocolate flavor that complements the sweetness of the frosting, making each bite a delightful experience.
- Vegetable oil: Using oil instead of butter keeps the cupcakes moist and tender. It also helps to create that velvety texture we all love.
- Buttermilk: This ingredient not only adds a tangy flavor but also contributes to the tenderness of the cupcakes, making them melt in your mouth.
- Eggs: Eggs bind the ingredients together and add richness, contributing to the overall structure and moisture of the cupcakes.
- Red food coloring: The star of the show! This gives the cupcakes their signature vibrant red hue, making them visually stunning.
- Vanilla extract: A splash of vanilla adds depth and warmth to the flavor profile, enhancing the overall taste of the cupcakes.
- White vinegar: This may seem unusual, but vinegar reacts with the baking soda to create a light texture and also helps to intensify the red color.
Cream Cheese Frosting
- Cream cheese: The base of the frosting, cream cheese provides a tangy flavor and creamy texture that pairs perfectly with the sweetness of the cupcakes.
- Unsalted butter: Adds richness and a smooth texture to the frosting, making it easy to spread and deliciously indulgent.
- Powdered sugar: This sweetens and thickens the frosting, giving it that perfect consistency for spreading and decorating.
- Vanilla extract: Just like in the cupcake base, vanilla enhances the flavor of the frosting, making it even more irresistible.
Substitutions
If you have dietary restrictions or preferences, don’t worry! Here are some substitutions you can make:
- Gluten-free option: Use a gluten-free all-purpose flour blend to make these cupcakes suitable for those with gluten sensitivities.
- Dairy-free alternative: Substitute buttermilk with almond milk mixed with a teaspoon of vinegar or lemon juice for a dairy-free version.
With these ingredients and their roles in mind, you’re well on your way to creating a batch of stunning red velvet cupcakes that will impress everyone. Let’s keep the momentum going!
Step-by-Step Guide to Perfect Red Velvet Cupcakes
Now that you’re all set with your ingredients and tools, let’s dive into the delightful process of creating these red velvet cupcakes. I promise, the aroma wafting through your kitchen will be enough to make your mouth water!
- Preheat your oven to 350°F (175°C) and line a cupcake pan with paper liners. This is the first step to ensuring your cupcakes bake evenly and don’t stick.
- In a large bowl, whisk together the flour, sugar, baking soda, salt, and cocoa powder until well combined. The dry ingredients should be mixed thoroughly to avoid any lumps.
- In another bowl, mix the wet ingredients: vegetable oil, buttermilk, eggs, red food coloring, vanilla extract, and vinegar until smooth. The vibrant red hue will start to emerge, and it’s a sight to behold!
- Gradually add the wet ingredients to the dry ingredients, mixing until just combined. Be careful not to overmix; we want our cupcakes to be light and fluffy, not dense.
- Fill each cupcake liner about 2/3 full with the batter. This allows room for the cupcakes to rise beautifully without overflowing.
- Bake for 18-20 minutes, or until a toothpick inserted into the center comes out clean. The smell of chocolate and vanilla will fill your kitchen, making it hard to resist sneaking a taste!
- Allow the cupcakes to cool in the pan for 5 minutes, then transfer them to a wire rack to cool completely. This step is crucial; frosting warm cupcakes can lead to a melty mess.
- While the cupcakes cool, prepare the cream cheese frosting by beating the cream cheese and butter together until smooth. Gradually add the powdered sugar and vanilla extract, mixing until fluffy. The frosting should be light and creamy, perfect for spreading.
- Once the cupcakes are completely cool, frost them generously with the cream cheese frosting. Don’t be shy—this is where you can really let your creativity shine!
And there you have it! A batch of gorgeous, moist red velvet cupcakes that are sure to impress. Just remember, the key to success lies in the details—measure accurately, mix gently, and most importantly, enjoy the process!
Chef’s Notes & Pro Tips for Flawless Results
As you embark on your baking adventure with these red velvet cupcakes, I want to share some invaluable tips that I’ve gathered over the years. These insights will help you achieve the best results and make your baking experience even more enjoyable!
- Make-ahead instructions: If you’re planning for a special occasion, you can bake the cupcakes a day in advance. Just store them in an airtight container at room temperature. This not only saves you time but also allows the flavors to meld beautifully!
- Storage: Once frosted, these cupcakes can be stored in the refrigerator for up to 3 days. Just make sure they’re in an airtight container to keep them fresh and delicious. Trust me, they won’t last long!
- Equipment recommendations: For the best results with your cream cheese frosting, I highly recommend using a stand mixer. It makes the process quick and easy, ensuring your frosting is light and fluffy. If you don’t have one, a hand mixer will work just fine—just be prepared for a little extra elbow grease!
- Customization options: Feel free to get creative! You can add chocolate chips or chopped nuts to the batter for an extra layer of flavor and texture. Just fold them in gently after mixing the wet and dry ingredients. It’s a fun way to make these cupcakes your own!
With these tips in your back pocket, you’re well-equipped to create a batch of stunning red velvet cupcakes that will impress everyone. Remember, baking is all about having fun and experimenting, so don’t be afraid to make it your own!
Avoid These Common Cooking Mistakes
Baking can be a delightful experience, but it’s also easy to make a few missteps along the way. As someone who has had my fair share of baking blunders, I’m here to help you avoid those pitfalls and ensure your red velvet cupcakes turn out perfectly every time. Here are some common mistakes to watch out for:
- Overmixing the batter: This is a classic mistake that can lead to dense, heavy cupcakes. Remember, mix until just combined! A few lumps are perfectly fine.
- Not measuring ingredients accurately: Baking is a science, and precise measurements are crucial. Use proper measuring tools for best results—trust me, your cupcakes will thank you!
- Underbaking: Cupcakes should spring back when lightly touched. If they feel too soft, give them a few more minutes in the oven. Adjust baking time as needed to avoid gooey centers.
- Using cold ingredients: Cold eggs and buttermilk can hinder emulsification, leading to uneven texture. Make sure they’re at room temperature for the best results.
- Skipping the cooling step: I know it’s tempting to frost warm cupcakes, but this can cause your frosting to melt into a puddle. Patience is key—allow them to cool completely!
- Not using enough food coloring: For that vibrant red hue, ensure you use the right amount of food coloring. A lackluster color can make your cupcakes less appealing.
- Frosting too early: Wait until your cupcakes are completely cool before frosting. This will prevent the frosting from sliding off and ensure a beautiful presentation.
By keeping these common mistakes in mind, you’ll be well on your way to creating a batch of stunning red velvet cupcakes that are sure to impress. Happy baking!
Creative Variations & Customizations
One of the best things about baking red velvet cupcakes is the opportunity to get creative! Whether you have dietary restrictions or just want to try something new, here are some fun variations and customizations to elevate your baking game:
- Gluten-Free Version: If you or your guests are gluten-sensitive, simply swap out the all-purpose flour for a gluten-free all-purpose flour blend. This will allow everyone to enjoy these delicious cupcakes without worry!
- Chocolate Red Velvet: For those who crave a deeper chocolate flavor, increase the cocoa powder to 2 tablespoons. This will give your cupcakes a richer taste while still maintaining that classic red velvet essence.
- Nutty Addition: Fold in chopped walnuts or pecans into the batter for a delightful crunch. The nuts add texture and a lovely contrast to the moist cupcakes, making each bite even more satisfying.
- Seasonal Twist: Embrace the flavors of the season by adding a teaspoon of pumpkin spice to the batter. This will give your cupcakes a warm, cozy flavor that’s perfect for fall gatherings.
- Mini Cupcakes: Want to create bite-sized treats? Use a mini cupcake pan and adjust the baking time to about 12-15 minutes. These adorable mini versions are perfect for parties and make for a fun, shareable dessert!
With these creative variations, you can make your red velvet cupcakes uniquely yours. Don’t be afraid to experiment and have fun in the kitchen—after all, that’s what baking is all about!
Perfect Pairings: What to Serve With Red Velvet Cupcakes
Now that you’ve baked a batch of stunning red velvet cupcakes, it’s time to think about how to elevate your dessert experience even further. The right pairings can enhance the flavors and create a delightful balance that will leave your guests raving. Here are some of my favorite accompaniments that perfectly complement these luscious treats:
- Cold Milk: There’s nothing quite like a glass of cold milk to wash down the sweetness of your cupcakes. The creamy texture and coolness provide a classic pairing that never goes out of style.
- Vanilla Ice Cream: For an indulgent twist, serve your cupcakes alongside a scoop of vanilla ice cream. The creaminess of the ice cream balances the rich flavors of the cupcakes, creating a heavenly combination.
- Fresh Berries: Add a pop of color and a refreshing contrast with fresh berries. Strawberries, raspberries, or blueberries not only look beautiful on the plate but also provide a tartness that cuts through the sweetness.
- Coffee or Espresso: If you’re looking for a sophisticated pairing, a cup of coffee or a shot of espresso is the way to go. The bitter notes of coffee balance the sweetness of the cupcakes, making for a delightful after-dinner treat.
- Holiday Gatherings: These cupcakes are perfect for festive dessert tables. Their vibrant color and delicious flavor make them a standout choice for birthdays, holidays, or any celebration.
- Chocolate Sauce: For those who crave extra indulgence, drizzle some chocolate sauce over your cupcakes. It adds a rich, decadent touch that chocolate lovers will adore.
- Fruit Tart: Create a beautiful dessert platter by pairing your cupcakes with a fruit tart. The combination of textures and flavors will impress your guests and make for a stunning presentation.
- Sweet Red Wine: For a more sophisticated touch, consider serving your cupcakes with a glass of sweet red wine. The fruity notes in the wine complement the flavors of the cupcakes beautifully.
With these delightful pairings, your red velvet cupcakes will shine even brighter. Whether you’re hosting a gathering or enjoying a quiet evening at home, these accompaniments will elevate your dessert experience to new heights. So go ahead, indulge and enjoy every delicious bite!
Storage & Meal Prep Instructions
Now that you’ve created a batch of those irresistible red velvet cupcakes, it’s important to know how to store them properly to maintain their freshness and flavor. Here are some handy tips for storage and meal prep that will keep your cupcakes delicious for days to come:
- Fridge Storage: If you have any frosted cupcakes left (which is rare, I know!), store them in an airtight container in the refrigerator. They will stay fresh for up to 3 days. Just be sure to separate layers with parchment paper to prevent sticking!
- Freezer Storage: For those who want to prepare ahead, unfrosted cupcakes can be frozen for up to 3 months. Simply place them in an airtight container or a freezer bag, and make sure to label them with the date. When you’re ready to enjoy, just thaw them at room temperature before frosting.
- Reheating Methods: If you’ve frozen your cupcakes, allow them to come to room temperature before serving. This will help restore their moist texture. If you prefer them warm, you can pop them in the microwave for about 10-15 seconds—just be careful not to overdo it, or you’ll end up with a dry cupcake!
With these storage and meal prep tips, you can enjoy your red velvet cupcakes at your leisure, whether it’s a spontaneous treat or a planned dessert for a special occasion. Happy baking and storing!
Nutrition Facts & Health Insights
As we indulge in these delightful red velvet cupcakes, it’s important to be mindful of their nutritional content. Here’s a detailed breakdown of what you’re enjoying with each scrumptious cupcake:
| Nutrient | Per Cupcake |
|---|---|
| Calories | 320 |
| Sugar | 30 grams |
| Sodium | 250 milligrams |
| Fat | 15 grams |
| Saturated Fat | 8 grams |
| Unsaturated Fat | 5 grams |
| Trans Fat | 0 grams |
| Carbohydrates | 40 grams |
| Fiber | 1 gram |
| Protein | 3 grams |
| Cholesterol | 40 milligrams |
Now, let’s talk about some of the health benefits of key ingredients in our red velvet cupcakes:
- Buttermilk: This tangy ingredient is not only a key player in achieving that moist texture, but it also contains probiotics that can aid digestion. Plus, it’s lower in fat than regular milk, making it a healthier choice!
- Cocoa Powder: Rich in antioxidants, cocoa powder can help improve heart health and lower blood pressure. It also contains flavonoids that may enhance brain function and mood—so you can feel good about indulging in these cupcakes!
- Eggs: A great source of protein, eggs help to build and repair tissues in the body. They also provide essential vitamins and minerals, including vitamin D and B12, which are important for overall health.
While these red velvet cupcakes are certainly a treat, they also offer some nutritional benefits that can make your indulgence feel a little less guilty. So go ahead, enjoy a cupcake (or two) and savor every delicious bite!
Frequently Asked Questions
As you embark on your baking journey with these delightful red velvet cupcakes, you may have a few questions along the way. Don’t worry—I’ve got you covered! Here are some of the most common queries I receive, along with helpful answers to guide you:
- Can I substitute the buttermilk?
Absolutely! If you don’t have buttermilk on hand, you can easily make a substitute by mixing 1 cup of milk (whole or low-fat) with 1 tablespoon of white vinegar or lemon juice. Let it sit for about 5-10 minutes until it thickens slightly. This will give you a similar tangy flavor and acidity that buttermilk provides. - How do I make these cupcakes dairy-free?
To make your red velvet cupcakes dairy-free, simply replace the buttermilk with a non-dairy milk, such as almond milk or soy milk, mixed with a tablespoon of vinegar or lemon juice. For the cream cheese frosting, you can use a dairy-free cream cheese alternative and dairy-free butter to achieve a similar creamy texture. - What can I use instead of red food coloring?
If you prefer to avoid artificial food coloring, you can use natural alternatives like beet juice or pomegranate juice to achieve a lovely red hue. Keep in mind that the color may not be as vibrant, but it will still add a beautiful touch to your cupcakes! - How do I know when the cupcakes are done baking?
The best way to check if your cupcakes are done is to perform the toothpick test. Insert a toothpick into the center of a cupcake; if it comes out clean or with a few moist crumbs, they’re ready! If it comes out with wet batter, give them a few more minutes in the oven. - Can I use a different frosting?
Of course! While cream cheese frosting is a classic pairing for red velvet cupcakes, you can experiment with other frostings like vanilla buttercream, chocolate ganache, or even a whipped cream topping. Just make sure the frosting complements the flavors of the cupcakes! - How do I store leftover cupcakes?
To keep your leftover cupcakes fresh, store them in an airtight container at room temperature for up to 3 days. If they’re frosted, it’s best to refrigerate them to maintain the frosting’s texture. Just remember to bring them back to room temperature before serving for the best flavor! - Can I make these cupcakes in advance?
Yes! You can bake the cupcakes a day in advance and store them in an airtight container at room temperature. If you want to prepare them even further ahead, you can freeze the unfrosted cupcakes for up to 3 months. Just thaw them before frosting and serving! - What should I do if my cupcakes sink in the middle?
If your cupcakes sink in the middle, it could be due to a few reasons: they may have been underbaked, or the batter was overmixed. To prevent this, make sure to bake them until they spring back when lightly touched, and mix the batter just until combined. If they do sink, don’t worry—just frost them generously, and no one will be the wiser!
With these FAQs answered, you’re well-equipped to tackle any challenges that may arise while baking your red velvet cupcakes. Remember, baking is all about having fun and learning along the way, so don’t hesitate to experiment and enjoy the process!
Final Inspiration & Kitchen Confidence
As you stand in your kitchen, surrounded by the delightful aroma of freshly baked red velvet cupcakes, take a moment to celebrate the joy of baking. There’s something truly magical about transforming simple ingredients into a beautiful, delicious treat that brings smiles to faces and warmth to hearts. Each cupcake you create is not just a dessert; it’s a token of love and care that you share with family and friends.
Remember, every time you step into the kitchen, you’re honing your skills and embracing your creativity. Whether you’re a seasoned baker or just starting out, each batch of cupcakes is a testament to your dedication and passion. So, give yourself a pat on the back! You’ve taken the time to create something special, and that’s an achievement worth celebrating.
Now, I encourage you to dive into this red velvet cupcake recipe with confidence. Don’t be afraid to experiment, make it your own, and most importantly, enjoy the process! Once you’ve baked your batch, I’d love to hear about your experience. Share your results, your triumphs, and even your little mishaps—because every story adds to the joy of baking. So, roll up your sleeves, grab your mixing bowls, and let’s create some delicious memories together!
Print
“Red Velvet Cupcakes: Juicy, Creamy Bites of Bliss!”
- Total Time: 40 minutes
- Yield: 12 servings 1x
- Diet: Vegetarian
Description
These red velvet cupcakes are a delightful combination of moist, velvety texture and a rich, cocoa flavor, topped with a luscious cream cheese frosting. Each bite melts in your mouth, offering a perfect balance of sweetness and tanginess that will leave you craving more.
Ingredients
- Cupcake Base:
- 1 ½ cups all-purpose flour
- 1 cup granulated sugar
- 1 teaspoon baking soda
- 1 teaspoon salt
- 1 teaspoon cocoa powder
- 1 cup vegetable oil
- 1 cup buttermilk, room temperature
- 2 large eggs, room temperature
- 2 tablespoons red food coloring
- 1 teaspoon vanilla extract
- 1 teaspoon white vinegar
- Cream Cheese Frosting:
- 8 oz cream cheese, softened
- ½ cup unsalted butter, softened
- 4 cups powdered sugar
- 1 teaspoon vanilla extract
Instructions
- Preheat your oven to 350°F (175°C) and line a cupcake pan with paper liners.
- In a large bowl, whisk together the flour, sugar, baking soda, salt, and cocoa powder until well combined.
- In another bowl, mix the vegetable oil, buttermilk, eggs, red food coloring, vanilla extract, and vinegar until smooth.
- Gradually add the wet ingredients to the dry ingredients, mixing until just combined.
- Fill each cupcake liner about 2/3 full with the batter.
- Bake for 18-20 minutes, or until a toothpick inserted into the center comes out clean.
- Allow the cupcakes to cool in the pan for 5 minutes, then transfer to a wire rack to cool completely.
- While the cupcakes cool, prepare the cream cheese frosting by beating the cream cheese and butter together until smooth. Gradually add the powdered sugar and vanilla extract, mixing until fluffy.
- Once the cupcakes are completely cool, frost them generously with the cream cheese frosting.
Notes
- Make-ahead: Cupcakes can be baked a day in advance and stored in an airtight container at room temperature.
- Storage: Store frosted cupcakes in the refrigerator for up to 3 days.
- Substitutions: For a gluten-free version, use a gluten-free all-purpose flour blend.
- Prep Time: 20 minutes
- Cook Time: 20 minutes
- Category: desserts
- Method: baking
- Cuisine: American
Nutrition
- Serving Size: 1 cupcake with frosting
- Calories: 320
- Sugar: 30 grams
- Sodium: 250 milligrams
- Fat: 15 grams
- Saturated Fat: 8 grams
- Unsaturated Fat: 5 grams
- Trans Fat: 0 grams
- Carbohydrates: 40 grams
- Fiber: 1 gram
- Protein: 3 grams
- Cholesterol: 40 milligrams
Keywords: red velvet cupcakes, cream cheese frosting, dessert recipes, baking, American cuisine, holiday treats, moist cupcakes, easy cupcake recipe, festive desserts, sweet treats, homemade cupcakes, party desserts, chocolate flavor


