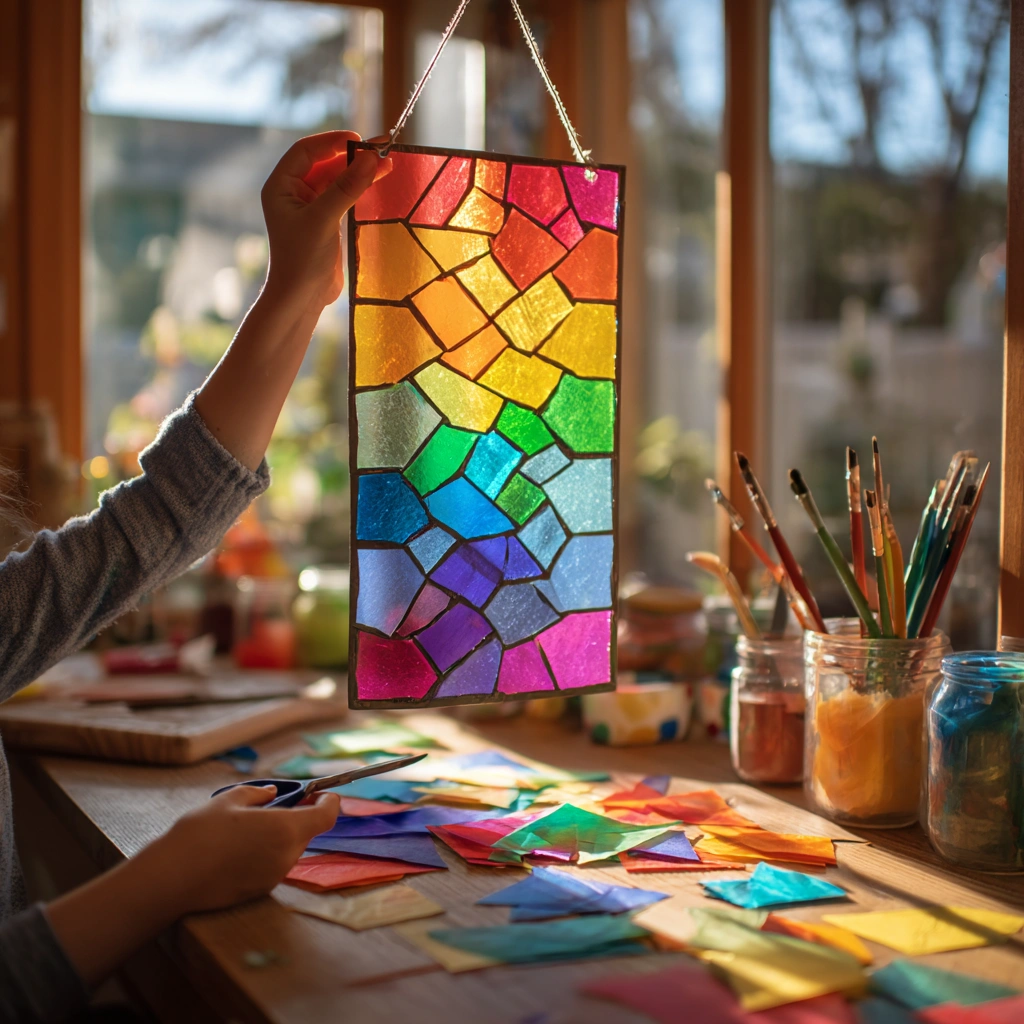
Introduction to Rainbow Mosaic Suncatcher Craft
Welcome to the colorful world of the Rainbow Mosaic Suncatcher Craft! This delightful DIY project is not only a feast for the eyes but also a wonderful way to spend time with your loved ones. Imagine the joy of creating a stunning piece of art that brightens your home and fills your heart with happiness. It’s simple, fun, and incredibly rewarding! Whether you’re a seasoned crafter or just starting out, this project is perfect for all ages. So, grab your materials, and let’s bring a splash of color into your life with this enchanting suncatcher!
Why You’ll Love This Rainbow Mosaic Suncatcher Craft
This Rainbow Mosaic Suncatcher Craft is a delightful blend of creativity and connection! It’s an easy and affordable way to spend quality time with your kids or friends, allowing everyone to express their artistic flair. As you cut, glue, and arrange colorful pieces, you’ll find relaxation in the process. Plus, the joy of seeing your vibrant creation hanging in the window is simply magical, bringing smiles to all who pass by!
Materials and Tools Needed for Rainbow Mosaic Suncatcher Craft
To create your stunning Rainbow Mosaic Suncatcher, you’ll need a few essential materials that are easy to find and budget-friendly. Start with a clear plastic or glass panel, which serves as the canvas for your colorful masterpiece. Colored tissue paper or cellophane adds that vibrant touch, while scissors are necessary for cutting your pieces into fun shapes. Glue or Mod Podge will hold everything together, and a paintbrush is handy for applying the Mod Podge smoothly. Don’t forget black construction paper for outlining your design and string or fishing line for hanging your finished suncatcher. If you’re looking for eco-friendly options, consider using recycled materials like old plastic containers or scrap paper for your colorful pieces!
How to Make Rainbow Mosaic Suncatcher Craft
Creating your very own Rainbow Mosaic Suncatcher is not just a craft; it’s an adventure filled with color and creativity! I love how this project allows you to express your artistic side while spending quality time with family or friends. So, let’s dive into the steps to make this stunning piece of art that will brighten up any window!
Step 1: Prepare Your Materials
First things first, gather all your materials and set up a clean workspace. This will help streamline the crafting process and keep the mess to a minimum. Trust me, a tidy area makes for a happy crafter! Lay out your clear plastic or glass panel, colored tissue paper or cellophane, scissors, glue or Mod Podge, a paintbrush, black construction paper, and string or fishing line. Having everything at your fingertips will make the crafting flow smoothly.
Step 2: Cut Your Colored Pieces
Now, it’s time to unleash your creativity! Cut the colored tissue paper or cellophane into small squares or fun shapes. The beauty of this step is that there are no rules—mix and match colors, and let your imagination run wild! I often find that the more vibrant the colors, the more magical the final product feels. Plus, this is a great way for kids to practice their fine motor skills while having fun!
Step 3: Outline Your Design
Next, take your clear plastic or glass panel and outline your desired design on the black construction paper. This step is crucial because it serves as your roadmap for the mosaic. Whether you want a classic rainbow arc or a whimsical sun, planning your design will help you visualize the final product. I like to sketch out a few ideas before committing to one—this way, I can play around with different shapes and patterns!
Step 4: Apply Glue
Once your design is ready, it’s time to apply a thin layer of glue or Mod Podge onto the panel. This layer acts as the adhesive that will hold your colorful pieces in place. If you’re using Mod Podge, a paintbrush works wonders for spreading it evenly. Remember, a little goes a long way! This step is like laying the foundation for a beautiful home—everything else will build on top of it.
Step 5: Create Your Mosaic
Now comes the fun part! Start placing the colored pieces onto the panel, following your design. Overlap them slightly for that gorgeous mosaic effect. I love to experiment with different arrangements, sometimes even letting the kids choose where each piece goes. It’s fascinating to see how their choices can create a unique masterpiece! Don’t be afraid to mix textures and colors; the more variety, the more stunning your suncatcher will be.
Step 6: Seal Your Design
Once all your pieces are in place, it’s time to seal your design. Apply another layer of glue or Mod Podge over the top to protect your artwork. This step is essential for ensuring that your suncatcher lasts through the seasons. Be sure to follow the drying times indicated on your glue or Mod Podge instructions. I usually set mine aside and enjoy a cup of tea while I wait—patience is key!
Step 7: Hang Your Suncatcher
Finally, let your masterpiece dry completely. Once it’s ready, attach a string or fishing line to the top for hanging. Choose a sunny spot in your home where the light can dance through the colors, creating a beautiful display. I love hanging mine in the kitchen window, where it catches the morning sun and fills the room with a warm, cheerful glow. It’s like having a little piece of rainbow magic in my home!
Tips for Best Results
- Always supervise younger children when using scissors and glue to ensure safety.
- If you accidentally tear a piece of tissue paper, don’t worry! You can always layer another piece over it for a creative fix.
- For a unique twist, try using patterned tissue paper or adding glitter for extra sparkle!
- Experiment with different shapes and sizes for your colored pieces to create a more dynamic mosaic.
Theme and Design Variations
- For a spring vibe, use pastel colors like soft pinks, yellows, and greens to create a floral design.
- Incorporate autumn hues such as oranges, browns, and deep reds for a cozy fall-themed suncatcher.
- Try a winter wonderland theme with icy blues, whites, and silvers, perfect for the holiday season.
- Let kids choose their favorite colors to create a personalized suncatcher that reflects their unique style.
- Mix in some glow-in-the-dark elements for a fun twist that shines at night!
Display and Use Ideas
Your Rainbow Mosaic Suncatcher is not just a beautiful piece of art; it’s a versatile decoration that can brighten up any space! Here are some fun ways to display or use your creation:
- Hang it in a sunny window to create a colorful light display that dances across your room.
- Use it as a cheerful decoration for a classroom, adding a splash of color to the learning environment.
- Gift it to friends or family as a heartfelt handmade present for special occasions.
- Incorporate it into seasonal decor by changing the colors to match holidays or themes.
FAQs about Rainbow Mosaic Suncatcher Craft
As you embark on your Rainbow Mosaic Suncatcher Craft journey, you might have a few questions. Don’t worry; I’ve got you covered! Here are some common queries and their answers to help you along the way.
Can I use other materials besides tissue paper or cellophane?
Absolutely! You can experiment with other materials like colored plastic bags, old magazines, or even fabric scraps. Just make sure they are translucent enough to let the light shine through for that beautiful suncatcher effect!
How do I clean my suncatcher once it’s finished?
To keep your suncatcher looking vibrant, gently wipe it with a damp cloth. Avoid using harsh chemicals, as they can damage the glue or the colors. A little TLC goes a long way!
What if my glue or Mod Podge doesn’t dry clear?
Sometimes, glue can dry with a cloudy appearance, especially if applied too thickly. To avoid this, apply thin layers and allow adequate drying time. If it still looks cloudy, don’t fret! It can add a unique texture to your suncatcher.
Is this craft safe for young children?
Yes, this craft is generally safe for kids aged 5 and up, especially with adult supervision. Just be cautious with scissors and ensure that the glue is non-toxic. It’s a fantastic way for kids to develop their creativity and fine motor skills!
Can I make this suncatcher for different seasons or holidays?
Definitely! You can customize your suncatcher for any season or holiday by changing the color scheme. Think warm autumn tones for fall or bright pastels for spring. The possibilities are endless, making it a fun year-round project!
Final Thoughts
Creating your Rainbow Mosaic Suncatcher is not just about the final product; it’s about the joy and laughter shared during the crafting process. I hope you feel inspired to gather your loved ones and dive into this colorful adventure! The satisfaction of seeing your vibrant creation hanging in your window, catching the light and brightening your space, is truly magical. So, grab those materials, unleash your creativity, and let your imagination run wild! I can’t wait to see your beautiful suncatchers—don’t forget to share your results and spread the rainbow magic!
Print
Rainbow Mosaic Suncatcher Craft: Create Stunning Art for Your Window!
Description
Create a beautiful rainbow mosaic suncatcher that will brighten up your window and add a splash of color to your home decor.
Instructions
- Cut the colored tissue paper or cellophane into small squares or shapes.
- Take the clear plastic or glass panel and outline your desired design on the black construction paper.
- Apply a thin layer of glue or Mod Podge onto the panel.
- Start placing the colored pieces onto the panel, following your design. Overlap them slightly for a mosaic effect.
- Once all pieces are in place, apply another layer of glue or Mod Podge over the top to seal them.
- Let it dry completely, following the glue or Mod Podge instructions.
- Once dry, attach a string or fishing line to the top for hanging.
- Category: Home Decor
Keywords: Rainbow, Mosaic, Suncatcher, Craft, DIY, Home Decor


