Rain Cloud in a Jar: Create Your Own DIY Craft Today!
Introduction to Rain Cloud in a Jar
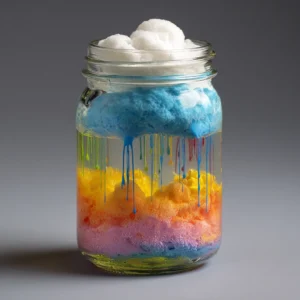
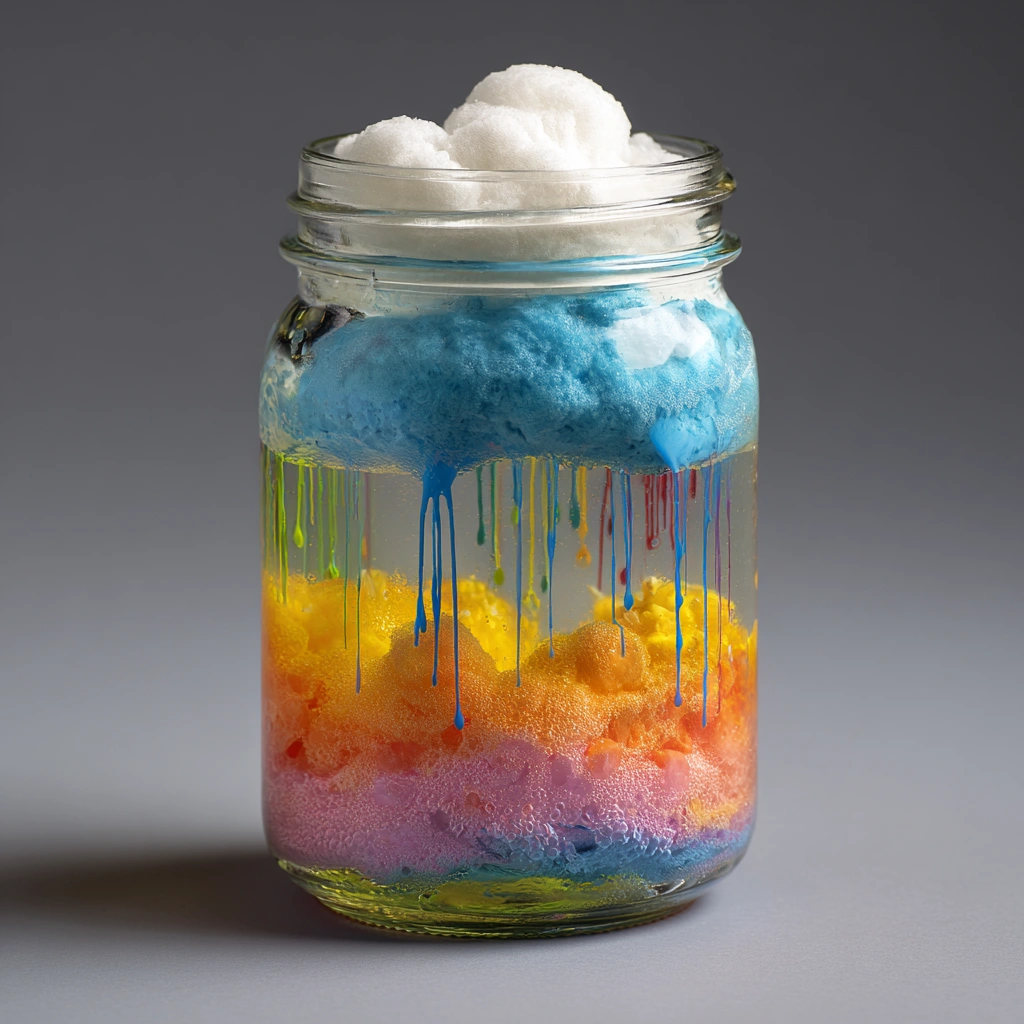
In a world where creativity often takes a backseat to busy schedules, finding simple yet engaging projects can be a breath of fresh air. The “Rain Cloud in a Jar” is not just a fun DIY craft; it’s an educational experience that can spark curiosity in both children and adults. This project is perfect for busy moms and professionals looking to spend quality time with their kids while also exploring the wonders of science. With just a few materials, you can create a captivating visual that demonstrates how clouds form and rain falls, all from the comfort of your home.
Why You’ll Love This Rain Cloud in a Jar
This DIY craft is a delightful blend of creativity, affordability, and simplicity. It allows you to engage with your children in a hands-on activity that is both fun and educational. Plus, it requires minimal materials and can be completed in just 20 minutes, making it an ideal project for busy schedules. You’ll love how easy it is to set up and how much joy it brings to your family!
Materials Needed for Rain Cloud in a Jar
To create your own Rain Cloud in a Jar, gather the following materials:
- Clear jar (1): This will serve as the base for your rain cloud.
- Shaving cream (1 can): This creates the cloud effect.
- Food coloring (various colors): To simulate rain.
- Water (enough to fill the jar): The foundation for your project.
*For a printable full list of materials, see below.*
Tools Required for Rain Cloud in a Jar
You will need the following tools to complete your Rain Cloud in a Jar project:
- Dropper or pipette (1): This will help you add drops of colored water onto the shaving cream.
- Spoon (1): Useful for mixing food coloring with water.
If you don’t have a dropper, you can use a small cup to pour the colored water gently.
How to Make Rain Cloud in a Jar
Follow these simple steps to create your Rain Cloud in a Jar:
- Fill the clear jar with water, leaving some space at the top.
- Shake the can of shaving cream and squirt a layer on top of the water to create the cloud.
- In a separate container, mix food coloring with a small amount of water.
- Using the dropper, add drops of the colored water onto the shaving cream cloud.
- Watch as the colored water seeps through the shaving cream and falls into the water below, simulating rain.
Tips for Best Results
To ensure your Rain Cloud in a Jar turns out beautifully, consider these practical tips:
- Experiment with different colors of food coloring for a more vibrant effect.
- Use a clear jar to better observe the rain cloud effect.
- Try using different amounts of shaving cream to see how it affects the rain.
Project Variations
Get creative with your Rain Cloud in a Jar by trying these variations:
- Style Variations: Use different types of jars, such as mason jars or decorative glass containers.
- Color Changes: Mix food coloring to create unique shades or use seasonal colors (like pastels for spring).
- Seasonal Adaptations: Create themed jars for holidays, such as red and green for Christmas or orange and black for Halloween.
Decoration and Usage Ideas
Once you’ve completed your Rain Cloud in a Jar, consider these decoration and usage ideas:
- Display it on a shelf as a fun conversation starter.
- Use it as a teaching tool to explain weather concepts to children.
- Create a series of jars to represent different weather patterns (e.g., sunny, stormy).
FAQs about Rain Cloud in a Jar
Q: Can I use other types of cream instead of shaving cream?
A: Shaving cream works best for this project due to its texture, but you can experiment with whipped cream for a different effect.
Q: Is this project safe for young children?
A: Yes, but adult supervision is recommended, especially when using food coloring.
Q: How long will the rain cloud effect last?
A: The effect can last for several hours, but it may need to be refreshed with more colored water.
Final Thoughts
Creating a Rain Cloud in a Jar is more than just a fun craft; it’s an opportunity to bond with your children and ignite their curiosity about the world around them. This simple project can lead to discussions about weather, science, and creativity, making it a valuable addition to your family activities. So gather your materials, set aside some time, and enjoy the magic of crafting together. You’ll create not just a beautiful jar, but lasting memories as well!
Introduction to Rain Cloud in a Jar
In a world where creativity often takes a backseat to busy schedules, finding simple yet engaging projects can be a breath of fresh air. The “Rain Cloud in a Jar” is not just a fun DIY craft; it’s an educational experience that can spark curiosity in both children and adults. This project is perfect for busy moms and professionals looking to spend quality time with their kids while also exploring the wonders of science.
With just a few materials, you can create a captivating visual that demonstrates how clouds form and rain falls, all from the comfort of your home. I remember the first time I made this with my kids; their eyes lit up as they watched the colored water trickle down like rain. It was a moment of pure joy and discovery, reminding me of the beauty of simple science.
This craft not only fosters creativity but also provides a wonderful opportunity to discuss weather patterns and the science behind them. As a busy mom, I often find it challenging to carve out time for educational activities, but this project is quick and easy, taking only about 20 minutes from start to finish.
So, if you’re looking for a delightful way to engage your children while sneaking in a bit of learning, the Rain Cloud in a Jar is the perfect solution. Let’s dive into the materials and tools you’ll need to get started on this delightful journey!
Why You’ll Love This Rain Cloud in a Jar
This DIY craft is a delightful blend of creativity, affordability, and simplicity. I can’t tell you how many times I’ve found myself searching for a project that fits into our busy lives, and the Rain Cloud in a Jar has become a go-to favorite. It allows you to engage with your children in a hands-on activity that is both fun and educational.
What I love most about this project is how it transforms a few simple materials into a captivating science experiment. Watching my kids’ faces light up as they see the colored water trickle down like rain is priceless. It’s a moment that sparks curiosity and encourages them to ask questions about weather and science.
Plus, it requires minimal materials and can be completed in just 20 minutes, making it an ideal project for busy schedules. I often find myself juggling work, household chores, and family time, so having a quick and engaging craft like this is a lifesaver. You’ll love how easy it is to set up and how much joy it brings to your family!
Whether you’re a seasoned crafter or just starting out, this project is accessible to everyone. It’s a wonderful way to create lasting memories while sneaking in a bit of learning. So gather your materials, and let’s make some rain clouds together!
Materials Needed for Rain Cloud in a Jar
To create your own Rain Cloud in a Jar, gather the following materials:
- Clear jar (1): This will serve as the base for your rain cloud. I love using mason jars because they’re sturdy and give a lovely view of the colors inside.
- Shaving cream (1 can): This creates the cloud effect. Make sure to choose a brand that has a nice fluffy texture for the best results!
- Food coloring (various colors): To simulate rain. I often use blue and yellow for a classic look, but feel free to get creative with your color choices!
- Water (enough to fill the jar): The foundation for your project. Tap water works perfectly, and it’s always fun to see how the colors mix with it.
*For a printable full list of materials, see below.*
Tools Required for Rain Cloud in a Jar
You will need the following tools to complete your Rain Cloud in a Jar project:
- Dropper or pipette (1): This will help you add drops of colored water onto the shaving cream. I find that using a dropper makes it easier to control the amount of water you’re adding, which is key to creating that beautiful rain effect.
- Spoon (1): Useful for mixing food coloring with water. A simple spoon can do wonders, and it’s something you probably already have in your kitchen!
If you don’t have a dropper, don’t worry! You can use a small cup to pour the colored water gently. I’ve done this before when I was in a pinch, and it still worked out beautifully. Just take your time, and enjoy the process of creating your rain cloud. Remember, crafting is all about having fun and experimenting, so don’t stress if you don’t have all the exact tools. Let your creativity flow!
How to Make Rain Cloud in a Jar
Creating your very own Rain Cloud in a Jar is a delightful experience that’s as simple as it is magical. I remember the first time I did this with my kids; it felt like we were conducting our own little science experiment right in our kitchen! Follow these simple steps to create your Rain Cloud in a Jar:
- Fill the clear jar with water, leaving some space at the top. This is the base of your rain cloud, and I like to fill it about three-quarters full. It gives enough room for the cloud to float above the water.
- Shake the can of shaving cream and squirt a layer on top of the water to create the cloud. The fluffy texture of the shaving cream is what makes this project so fun! It’s like making a little cloud right in your jar.
- In a separate container, mix food coloring with a small amount of water. I usually use about a tablespoon of water with a few drops of food coloring. This is where you can get creative! Try mixing colors to see what unique shades you can create.
- Using the dropper, add drops of the colored water onto the shaving cream cloud. This part is so exciting! As you drop the colored water onto the cloud, you’ll see it start to seep through, just like rain falling from a cloud.
- Watch as the colored water seeps through the shaving cream and falls into the water below, simulating rain. It’s a mesmerizing sight! My kids love to watch the colors swirl and mix in the water, and it often leads to discussions about how real rain works.
This project is not only a fun craft but also a wonderful way to introduce your children to the science of weather. I encourage you to take your time and enjoy each step. Remember, crafting is about the journey, not just the destination!
Tips for Best Results
To ensure your Rain Cloud in a Jar turns out beautifully, consider these practical tips:
- Experiment with different colors of food coloring for a more vibrant effect. I love mixing colors to create unique shades; it adds an extra layer of fun to the project! You might find that a combination of blue and green creates a stunning effect that looks just like a summer rain.
- Use a clear jar to better observe the rain cloud effect. The transparency of the jar allows you to see the colors swirl and mix, making the experience even more magical. I often use mason jars because they’re sturdy and provide a great view of the colorful rain.
- Try using different amounts of shaving cream to see how it affects the rain. I’ve found that a thicker layer of shaving cream creates a more dramatic cloud effect, while a thinner layer allows the colored water to seep through more quickly. It’s all about experimenting and finding what works best for you!
Remember, crafting is all about having fun and exploring your creativity. Don’t be afraid to make mistakes or try new things. Each attempt will teach you something new, and that’s part of the joy of crafting together with your kids. Enjoy the process, and let your imagination soar!
Project Variations
Get creative with your Rain Cloud in a Jar by trying these fun variations that can add a personal touch to your project:
- Style Variations: Use different types of jars, such as mason jars or decorative glass containers. I love using vintage jars I find at thrift stores; they add a unique charm to the project. You can even decorate the jars with ribbons or stickers to make them more festive!
- Color Changes: Mix food coloring to create unique shades or use seasonal colors (like pastels for spring). I often let my kids choose their favorite colors, and it’s amazing to see how their creativity shines through. You could even create a rainbow effect by layering different colors!
- Seasonal Adaptations: Create themed jars for holidays, such as red and green for Christmas or orange and black for Halloween. This not only makes the project more festive but also allows for discussions about the seasons and celebrations. I remember making a spooky Halloween jar with my kids, and it became a fun decoration for our home!
These variations not only enhance the visual appeal of your Rain Cloud in a Jar but also provide opportunities for learning and creativity. Each time you make a new jar, you can explore different themes, colors, and styles, making it a project that never gets old. So gather your materials, let your imagination run wild, and enjoy the process of crafting together!
Decoration and Usage Ideas
Once you’ve completed your Rain Cloud in a Jar, the fun doesn’t have to stop there! There are so many creative ways to display and use your beautiful creation. Here are some ideas that I’ve found to be both enjoyable and educational:
- Display it on a shelf as a fun conversation starter. I love placing our jars on a prominent shelf in the living room. They not only brighten up the space but also spark curiosity in guests who ask about them. It’s a great way to share a little science with friends and family!
- Use it as a teaching tool to explain weather concepts to children. This project is perfect for discussing how clouds form and how rain occurs. I often use our Rain Cloud in a Jar during homeschooling sessions or family discussions about weather. It’s a hands-on way to make learning more engaging and memorable.
- Create a series of jars to represent different weather patterns (e.g., sunny, stormy). I’ve had so much fun making multiple jars to showcase various weather conditions. For instance, a sunny jar could have yellow and orange colors, while a stormy jar could feature dark blues and grays. This not only enhances the visual appeal but also provides a comprehensive learning experience about different weather phenomena.
These decoration and usage ideas can transform your Rain Cloud in a Jar into more than just a craft; they become a part of your home’s decor and a valuable educational tool. I encourage you to get creative and think of new ways to incorporate your jars into your daily life. Each jar tells a story, and the memories you create while crafting together will last a lifetime!
FAQs about Rain Cloud in a Jar
Q: Can I use other types of cream instead of shaving cream?
A: Shaving cream works best for this project due to its texture, but you can experiment with whipped cream for a different effect. I’ve tried both, and while shaving cream gives a fluffier cloud, whipped cream can create a fun, edible version of the project if you’re looking for a tasty twist!
Q: Is this project safe for young children?
A: Yes, but adult supervision is recommended, especially when using food coloring. I always make sure to keep an eye on my kids during the crafting process, just to ensure they don’t accidentally spill or get the food coloring on their clothes. It’s a good idea to wear old clothes or an apron to avoid any stains!
Q: How long will the rain cloud effect last?
A: The effect can last for several hours, but it may need to be refreshed with more colored water. I’ve found that after a while, the colors start to blend and lose their vibrancy, so it’s fun to add more drops and watch the magic happen again. Plus, it’s a great excuse to revisit the project and keep the learning going!
Final Thoughts
Creating a Rain Cloud in a Jar is more than just a fun craft; it’s an opportunity to bond with your children and ignite their curiosity about the world around them. I can’t tell you how many wonderful conversations have sprung from this simple project. As we watched the colors swirl and mix, my kids would ask questions about how rain forms and why clouds look different on sunny versus stormy days. It’s these moments of discovery that make crafting so special.
This simple project can lead to discussions about weather, science, and creativity, making it a valuable addition to your family activities. I often find that the best learning happens when we least expect it, and this craft is a perfect example. It’s not just about making a beautiful jar; it’s about fostering a love for learning and exploration in our children.
So gather your materials, set aside some time, and enjoy the magic of crafting together. Whether you’re a busy mom or a professional juggling multiple responsibilities, this project is quick and easy to fit into your schedule. You’ll create not just a beautiful jar, but lasting memories as well! I encourage you to embrace the messiness of crafting and the joy of spending time with your loved ones. Happy crafting!
Print
Rain Cloud in a Jar: Create Your Own DIY Craft Today!
Description
Create a fun and educational rain cloud in a jar using simple materials to demonstrate how clouds form and rain falls.
Instructions
- Fill the clear jar with water, leaving some space at the top.
- Shake the can of shaving cream and squirt a layer on top of the water to create the cloud.
- In a separate container, mix food coloring with a small amount of water.
- Using the dropper, add drops of the colored water onto the shaving cream cloud.
- Watch as the colored water seeps through the shaving cream and falls into the water below, simulating rain.
Keywords: Rain Cloud in a Jar, DIY Craft, Kids Science Project