Introduction to Purple Crayon Suncatchers
Welcome to the colorful world of Purple Crayon Suncatchers! If you’re looking for a fun and simple DIY craft that the whole family can enjoy, you’ve come to the right place. I remember the joy of crafting these suncatchers with my kids, their laughter filling the room as we watched the crayons melt into vibrant designs. This project is not only a fantastic way to brighten up your home but also a wonderful opportunity to bond with your little ones. Let’s unleash our creativity and make something magical together!
Why You’ll Love This Purple Crayon Suncatcher
You’re going to adore making Purple Crayon Suncatchers for so many reasons! First, it’s an incredibly easy and affordable craft that requires just a few materials. Plus, it’s a fantastic way to spark creativity and relax while spending quality time with your kids. Watching their faces light up as they create something beautiful is truly heartwarming. This project is not just about crafting; it’s about making memories together!
Materials and Tools Needed for Purple Crayon Suncatchers
To create your stunning Purple Crayon Suncatchers, you’ll need just a few simple materials that are easy to find. Here’s what you’ll need:
- Purple crayons: The star of the show! Choose your favorite shades of purple to create vibrant designs.
- Wax paper: This is essential for melting the crayon shavings without making a mess. It’s also easy to find at any grocery store.
- Iron: A low-heat iron is necessary to melt the crayon shavings. Make sure to supervise kids during this step!
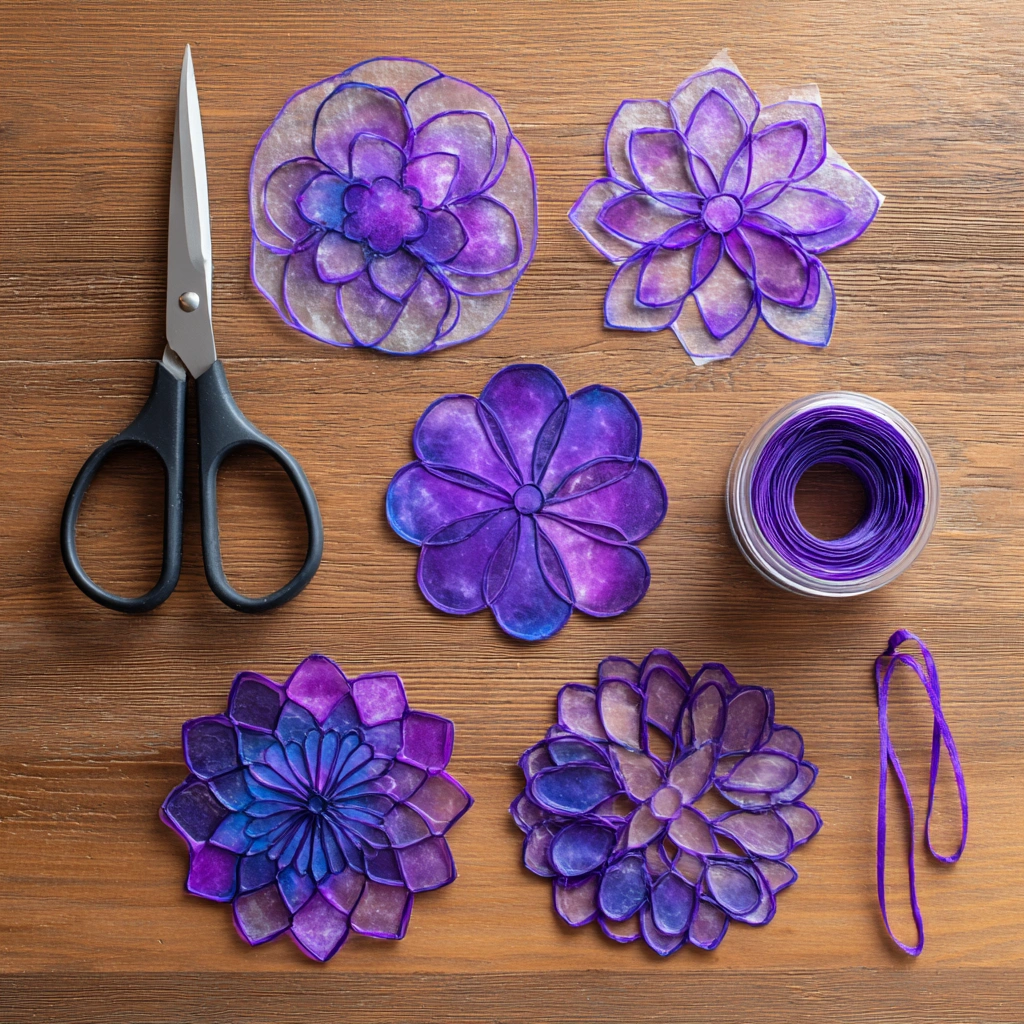
- Scissors: You’ll need these to cut out your beautiful shapes once the suncatcher cools.
- String or ribbon: This is for hanging your suncatcher in a sunny spot, allowing it to shine bright!
- Optional: hole punch: If you want to make hanging easier, a hole punch is a handy tool to have.
These materials are not only budget-friendly but also eco-conscious. You can even use broken crayons or leftover bits from previous projects, making this a great way to recycle and create at the same time!
How to Make Purple Crayon Suncatchers
Creating your own Purple Crayon Suncatchers is not just a craft; it’s a delightful experience that brings a splash of color and joy into your home. I remember the first time I made these with my kids; the excitement in their eyes as they watched the crayon shavings melt was priceless! Let’s dive into the steps to make these beautiful suncatchers together.
Step 1: Preheat Your Iron
First things first, we need to get that iron ready! Set it to a low temperature without steam. This is crucial because too much heat can burn the wax paper and ruin our project. Plus, always keep an eye on the kids during this step—safety first! I like to remind my little ones that the iron is hot, just like a dragon’s breath, so we need to be careful!
Step 2: Prepare the Crayons
Now, let’s get creative! Grab your purple crayons and either shave or grate them into small pieces. I love using a cheese grater for this, but you can also use a sharp knife if you’re careful. The kids can help with this part, too, as long as they’re supervised. The more colorful the shavings, the more vibrant your suncatcher will be! It’s like creating a rainbow of purple right in your kitchen!
Step 3: Set Up Your Workspace
Next, let’s create a clean and organized workspace. Lay a sheet of wax paper flat on your table. This is where the magic happens! Make sure it’s smooth and free of any wrinkles, so our crayon shavings can melt evenly. I like to put down a tablecloth or some newspaper to catch any stray shavings—trust me, it makes cleanup a breeze!
Step 4: Create Your Design
Time to sprinkle those crayon shavings! Evenly distribute the purple shavings over half of the wax paper. You can create patterns or just let the shavings fall where they may. This is where your creativity shines! Encourage the kids to think about how they want their suncatcher to look. Maybe they want to make a heart for a loved one or a star for a magical touch. The possibilities are endless!
Step 5: Fold and Iron
Once you’re happy with your design, fold the other half of the wax paper over the crayon shavings. Now, carefully press the iron over the folded wax paper for a few seconds. You’ll see the crayon melt and fuse the two layers together. Remember to use a protective cloth between the iron and the wax paper to avoid any mess! It’s like sealing a treasure chest of color!
Step 6: Cut Out Shapes
After a minute of cooling, it’s time to cut out your desired shapes! Whether you choose circles, hearts, or even spooky Halloween shapes, let your imagination run wild. This is the fun part where you can really personalize your suncatcher! I often find myself making a few extra shapes just for fun—who doesn’t love a little extra sparkle in their window?
Step 7: Add a Hanging Option
Finally, let’s make it easy to hang your beautiful creation. Use a hole punch to make a hole at the top of your suncatcher, then thread a string or ribbon through it. Now, you’re ready to display your masterpiece in a sunny window where it can catch the light and shine! Watching the colors dance in the sunlight is like having a little piece of magic in your home.
Tips for Best Results
- Always supervise children when using the iron to ensure safety.
- If the crayon shavings don’t melt completely, try increasing the heat slightly, but be cautious!
- For a unique twist, mix in other colors of crayon shavings for a multi-colored effect.
- Use a protective cloth between the iron and wax paper to prevent any mess.
- Hang your suncatchers in different windows to see how the light changes their appearance throughout the day!
Theme and Design Variations
Get creative with your Purple Crayon Suncatchers by exploring different themes and designs! Here are some fun ideas to inspire you:
- Rainbow Suncatchers: Use a mix of purple and other crayon colors to create a vibrant rainbow effect.
- Seasonal Themes: For fall, incorporate orange and yellow shavings for a warm autumn vibe; for winter, try blues and whites for a frosty look.
- Kid-Friendly Shapes: Let the kids choose their favorite shapes—stars, flowers, or even animals!
- Holiday Decor: Create spooky shapes like bats and pumpkins for Halloween or hearts for Valentine’s Day.
These variations not only add a personal touch but also make crafting even more exciting!
Display and Use Ideas
Once you’ve created your stunning Purple Crayon Suncatchers, it’s time to show them off! Here are some fun ways to use and display your colorful creations:
- Window Displays: Hang them in sunny windows to let the light shine through, creating a beautiful glow.
- Gift Ideas: These make lovely gifts for friends or family—just add a personal note!
- Classroom Decor: Brighten up your classroom by hanging them around the room for a cheerful atmosphere.
- Seasonal Decorations: Change them out with the seasons or holidays for a fresh look all year round!
FAQs about Purple Crayon Suncatchers
Can I use other colors of crayons for my suncatchers?
Absolutely! While purple is the star of this project, feel free to mix in other colors for a vibrant, multi-colored effect. It’s a great way to get creative and make unique designs!
Is this craft safe for young children?
Yes, Purple Crayon Suncatchers are a safe and fun craft for kids aged 5 and up, as long as they are supervised during the ironing step. Just make sure to keep the iron out of reach when not in use!
What if my crayon shavings don’t melt completely?
If the shavings aren’t melting well, try increasing the heat slightly, but be cautious! Always use a protective cloth to prevent any mess and ensure even melting.
How do I clean up after making suncatchers?
Cleanup is a breeze! Just gather any leftover crayon shavings and dispose of them. If any wax paper sticks to the iron, let it cool and gently wipe it off with a cloth. Easy peasy!
Can I hang my suncatchers outside?
While it’s best to hang your Purple Crayon Suncatchers indoors where they can catch the light, avoid direct sunlight for long periods, as it may cause the colors to fade over time. They’re perfect for brightening up your home decor!
Final Thoughts
Creating Purple Crayon Suncatchers is not just a craft; it’s a joyful journey filled with laughter, creativity, and colorful memories. I hope you feel inspired to gather your materials and dive into this delightful project with your family. The satisfaction of seeing your beautiful suncatchers hanging in the sunlight is truly magical! Don’t forget to share your creations with friends and family—let’s spread the joy of crafting together! I can’t wait to hear about your colorful adventures and see how your suncatchers light up your home!
Print
Purple Crayon Suncatchers: Brighten Your Home with Easy DIY Crafts!
Description
Create beautiful purple crayon suncatchers that will add a splash of color to your windows and brighten up your home.
Instructions
- Preheat your iron to a low setting without steam.
- Shave or grate the purple crayons into small pieces.
- Place a sheet of wax paper on a flat surface.
- Sprinkle the crayon shavings evenly over half of the wax paper.
- Fold the other half of the wax paper over the crayon shavings.
- Carefully press the iron over the folded wax paper for a few seconds until the crayon melts and fuses the two layers together.
- Let it cool for a minute, then cut out your desired shapes (like circles or hearts).
- If desired, use a hole punch to make a hole at the top of your suncatcher and thread a string or ribbon through it for hanging.
- Category: Crafts
Keywords: Purple Crayon Suncatchers, DIY Crafts, Home Decor, Kids Craft


