Introduction to Pressed Flower Jar
Welcome to the enchanting world of crafting with nature! Today, I’m excited to share how to create a stunning Pressed Flower Jar that will not only brighten your home but also capture the beauty of the outdoors. This DIY project is perfect for all ages, making it a fantastic way to bond with your kids or even spark creativity in the classroom. It’s simple, rewarding, and allows you to express your artistic flair. Plus, there’s something magical about seeing those vibrant flowers preserved in a jar, reminding us of the beauty that surrounds us every day!
Why You’ll Love This Pressed Flower Jar
This Pressed Flower Jar project is a delightful blend of creativity and relaxation. It’s incredibly easy to do, making it perfect for busy moms or teachers looking for a fun classroom activity. Plus, it’s budget-friendly! Crafting together with your kids not only strengthens your bond but also sparks their imagination. Watching their faces light up as they create something beautiful is truly priceless. You’ll cherish these moments forever!
Materials and Tools Needed for Pressed Flower Jar
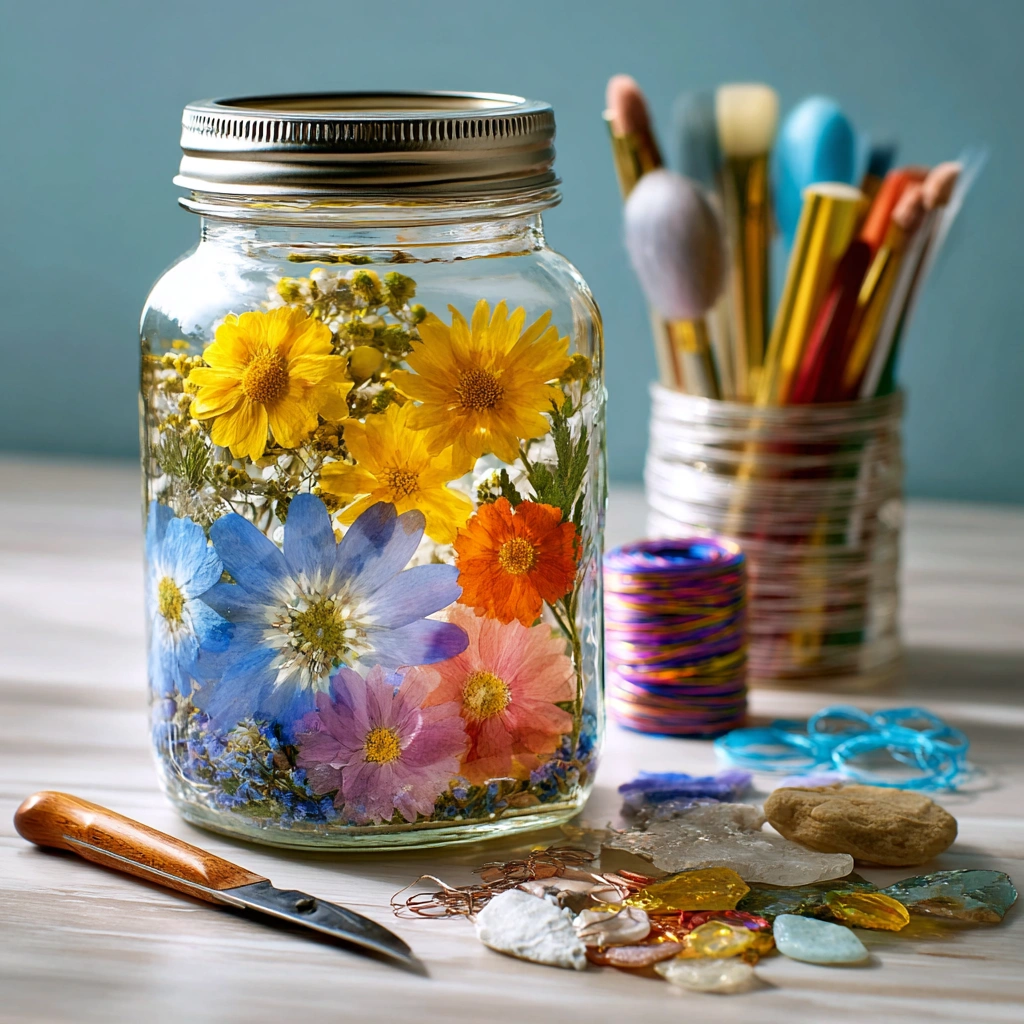
To create your beautiful Pressed Flower Jar, you’ll need a few essential materials that are easy to find and often budget-friendly. Here’s what you’ll need:
- Glass jar with lid: This is the heart of your project! A clear jar allows the vibrant colors of the flowers to shine through. You can repurpose an old jar or pick one up at a thrift store for a unique touch.
- Pressed flowers (dried): Choose flowers that have been dried and pressed to retain their beauty. You can press your own flowers or buy them from craft stores. Look for varieties that hold their color well!
- Floral wire or twine: This is optional but helpful for securing your flowers in place. Twine adds a rustic charm, while floral wire provides a sturdy hold.
- Scissors: A must-have for trimming any excess stems or twine. Just be careful when handling them, especially with little ones around!
- Glue (optional): If you want to add extra stability to your arrangement, a little glue can go a long way. Just make sure it’s safe for use with flowers.
- Decorative stones or sand (optional): These add texture and visual interest to your jar. You can use colorful stones or natural sand to create a lovely base for your flowers.
Gathering these materials is part of the fun! Plus, many of them can be found around your home or at local craft stores, making this project both accessible and enjoyable.
How to Make a Pressed Flower Jar
Creating a Pressed Flower Jar is not just a craft; it’s a delightful journey into the world of nature’s beauty. I remember the first time I made one with my kids. We giggled as we carefully arranged the flowers, and the soft shimmer of the glow paint under the lamp felt magical. Let’s dive into the steps to make your own stunning jar!
Step 1: Gather Your Pressed Flowers
Start by selecting your pressed flowers. You can use flowers you’ve pressed yourself or purchase dried ones from a craft store. Lay them out on a flat surface and play around with different arrangements in your glass jar. This is where the fun begins! Visualizing how they’ll look together is key. I often find that mixing colors and shapes creates a more dynamic display. Remember, the goal is to showcase nature’s beauty, so choose flowers that speak to you!
Step 2: Add Decorative Elements
Next, let’s add some flair! If you want to give your jar a little extra texture, consider adding a layer of decorative stones or sand at the bottom. This not only looks great but also helps to stabilize the flowers. I love using colorful stones that complement the flowers. It’s like giving your jar a cozy little bed! Just pour in a small amount, and you’re ready for the next step.
Step 3: Position the Flowers
Now comes the delicate part—placing the pressed flowers inside the jar. Gently position them, adjusting as needed to create a balanced look. I often find myself rearranging them a few times until it feels just right. Don’t be afraid to get creative! You can layer flowers or even create a little scene. Just remember to handle them with care, as they can be fragile.
Step 4: Secure the Flowers
If you feel your flowers need a little extra support, you can use floral wire or twine to secure them in place. This step is optional, but it can help keep everything looking neat. I usually wrap the wire around the stems and twist it gently. It’s a simple way to ensure your beautiful arrangement stays just as you envisioned it!
Step 5: Seal and Display
Finally, it’s time to seal your masterpiece! Close the jar with the lid, and voilà! Your Pressed Flower Jar is ready to shine. Now, think about where you want to display it. I love placing mine on a sunny windowsill or as a centerpiece on the dining table. It’s a lovely way to bring a touch of nature indoors. Plus, it makes for a great conversation starter!
In the end, making a Pressed Flower Jar is a rewarding experience that combines creativity and nature. Whether you’re crafting alone or with your kids, it’s a wonderful way to bond and create something beautiful together. So gather your materials and let your imagination bloom!
Tips for Best Results
- Choose flowers wisely: Opt for flowers that retain their color and shape well when pressed, like pansies or daisies.
- Get creative with jars: Experiment with different jar sizes and shapes for unique displays that catch the eye.
- Add an educational touch: Consider including a small note or tag with the flower names to spark curiosity and learning.
- Let the beauty shine: Use a clear jar to allow the vibrant colors of the flowers to truly stand out.
Theme and Design Variations
One of the best parts about creating a Pressed Flower Jar is the endless possibilities for themes and designs! Here are some fun ideas to inspire your creativity:
- Spring theme: Use pastel-colored flowers like baby’s breath and light pink roses for a soft, delicate look that captures the essence of blooming gardens.
- Summer theme: Bright, vibrant flowers such as sunflowers and zinnias can create a cheerful display that radiates warmth and joy.
- Fall theme: Incorporate dried leaves and warm-toned flowers like marigolds and chrysanthemums for a cozy, seasonal touch that celebrates autumn.
- Kid-friendly: Use colorful paper flowers or stickers to create a fun twist that’s perfect for little hands and big imaginations!
These variations not only add a personal touch but also make your Pressed Flower Jar a unique piece of art that reflects the season or occasion!
Display and Use Ideas
Your beautiful Pressed Flower Jar is not just a craft; it’s a versatile piece of decor that can brighten any space! Here are some creative ways to use and display your stunning creation:
- Centerpiece magic: Use it as a centerpiece on dining tables to spark conversation and add a touch of nature to your meals.
- Thoughtful gifts: Gift your jars to friends or family for special occasions like birthdays or housewarmings. They make heartfelt, personalized presents!
- Brighten up spaces: Display your jars on shelves or windowsills to bring a splash of color and cheer to any room.
- Themed displays: Create a series of jars for a themed display, showcasing different flowers for each season or occasion. It’s a delightful way to celebrate nature year-round!
With these ideas, your Pressed Flower Jar will not only be a beautiful addition to your home but also a cherished piece that brings joy to those around you!
FAQs about Pressed Flower Jar
As you embark on your journey to create a stunning Pressed Flower Jar, you might have a few questions. Don’t worry; I’ve got you covered! Here are some common queries that fellow crafters often ask:
- Q: How long do pressed flowers last?
A: Pressed flowers can last for years if kept in a dry, dark place. Just make sure to avoid direct sunlight to preserve their vibrant colors! - Q: Can I use fresh flowers?
A: No, fresh flowers need to be dried and pressed before using them in the jar. You can easily press them yourself or buy pre-pressed flowers from craft stores. - Q: What types of flowers work best?
A: Flowers like pansies, daisies, and lavender retain their color and shape well when pressed. They make for beautiful additions to your Pressed Flower Jar. - Q: Can I add other elements to my jar?
A: Absolutely! You can include decorative stones, sand, or even small notes about the flowers to enhance the visual appeal and educational value of your jar. - Q: Is this project safe for kids?
A: Yes! This project is family-friendly, but be sure to supervise younger children when using scissors or handling glass jars.
With these answers in mind, you’re all set to create your own beautiful Pressed Flower Jar. Happy crafting!
Final Thoughts
Creating a Pressed Flower Jar is not just about crafting; it’s about capturing moments of joy and beauty. I hope you feel inspired to dive into this project and let your creativity bloom! Whether you’re crafting solo or with your kids, the satisfaction of seeing your finished jar is truly rewarding. Don’t forget to share your results with friends and family—there’s nothing quite like the joy of showing off your handiwork! So gather your materials, unleash your imagination, and let’s celebrate the beauty of nature together!
Print
Pressed Flower Jar: Create Stunning Decor with Easy Steps!
Description
Create a beautiful pressed flower jar that showcases nature’s beauty and adds a touch of elegance to your home decor.
Instructions
- Gather your pressed flowers and arrange them in the glass jar to see how they fit.
- If desired, add a layer of decorative stones or sand at the bottom of the jar for added texture.
- Carefully place the pressed flowers inside the jar, adjusting their position as needed.
- Use floral wire or twine to secure the flowers in place if necessary.
- Close the jar with the lid and display it in your desired location.
- Category: Home Decor
Keywords: Pressed Flower Jar, DIY Decor, Flower Preservation, Home Decoration