Introduction to Preserving Some Dandelions
Have you ever thought about preserving some dandelions to create stunning summer keepsakes? This delightful DIY project is not only simple but also a wonderful way to capture the essence of those sunny days spent outdoors. As a passionate crafter, I find joy in transforming nature’s beauty into lasting memories. Plus, it’s a fantastic activity to share with kids or friends, sparking creativity and laughter along the way. With just a few materials and a sprinkle of patience, you’ll have beautiful keepsakes that remind you of summer’s warmth every time you see them!
Why You’ll Love This Preserving Some Dandelions
Preserving some dandelions is a delightful way to embrace creativity while enjoying the great outdoors. This project is not only easy on the wallet, but it also offers a relaxing escape from our busy lives. Crafting together with kids or friends fosters bonding and laughter, making it a memorable experience. Plus, the satisfaction of creating something beautiful from nature is truly rewarding, reminding us of summer’s simple joys!
Materials and Tools Needed for Preserving Some Dandelions
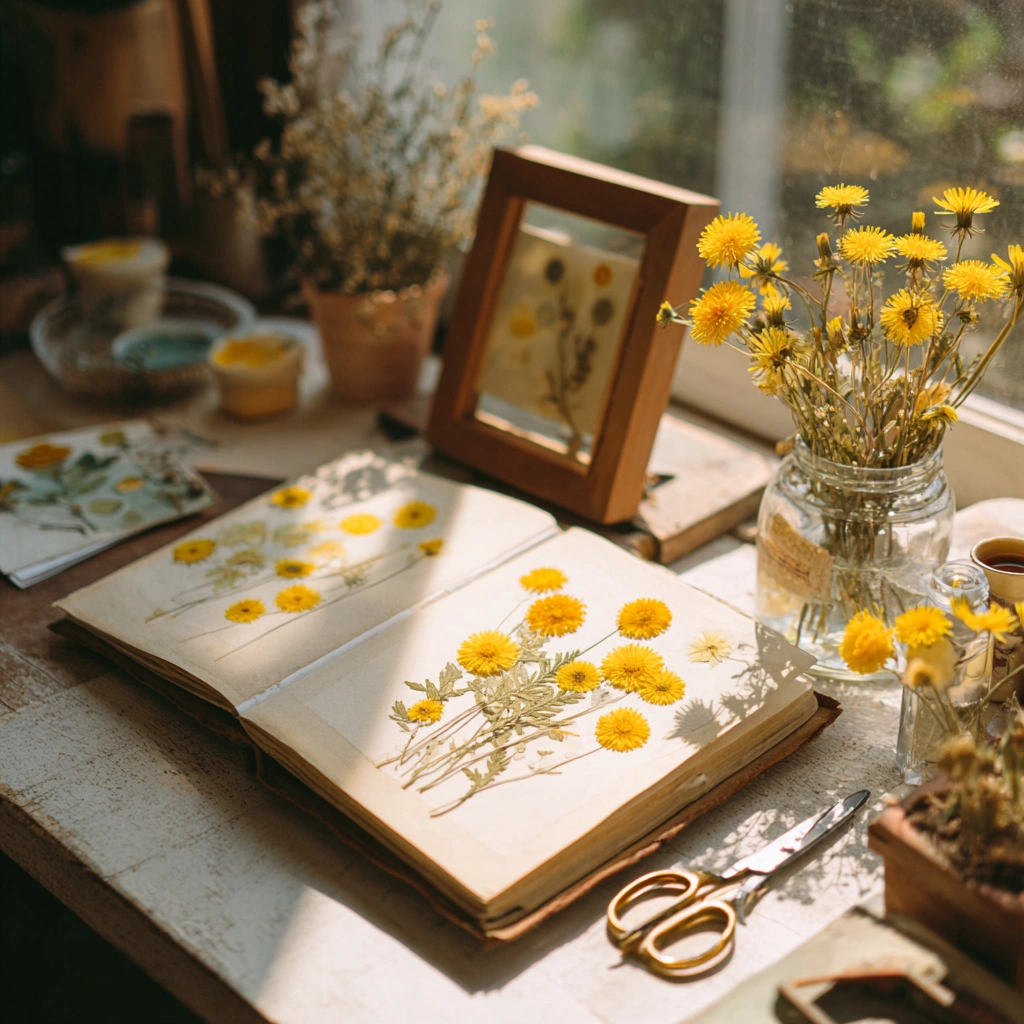
To embark on your journey of preserving some dandelions, you’ll need a few simple materials that are easy to find and budget-friendly. Here’s what you’ll need:
- Fresh dandelions: These are the stars of your project! Look for vibrant, fully open flowers that are free from blemishes. They’ll provide the best color and shape for your keepsakes.
- Pressing book or flower press: This is essential for drying your dandelions flat. If you don’t have a flower press, a heavy book will work just fine—just make sure it’s something you don’t mind getting a little sticky!
- Cardstock or heavy paper: This will serve as the base for your keepsake. Choose a color that complements your dandelions, and feel free to use recycled paper for an eco-friendly touch.
- Scissors: You’ll need these to trim your cardstock to the perfect size and to prepare your dandelions.
- Glue: A good craft glue will help secure your dried flowers in place. Look for a non-toxic option to keep it safe for kids.
- Picture frame (optional): Framing your finished piece adds a polished touch and protects your creation. You can find affordable frames at thrift stores or use one you already have at home!
Gathering these materials will set you up for a fun and creative crafting session, allowing you to preserve some dandelions and create beautiful summer keepsakes!
How to Make Preserving Some Dandelions
Now that you’re excited about preserving some dandelions, let’s dive into the fun part! This step-by-step guide will walk you through the process, ensuring you create beautiful keepsakes that capture the essence of summer. Grab your materials, and let’s get started!
Step 1: Gather Your Dandelions
The best time to gather fresh dandelions is on a dry day, preferably in the morning when they are fully open and bursting with sunshine. Look for vibrant yellow blooms that are free from blemishes. As you stroll through your yard or a nearby park, the soft, sweet scent of summer will fill the air, making this a delightful adventure. Remember, the fresher the dandelions, the better your keepsakes will turn out!
Step 2: Prepare the Dandelions
Once you’ve gathered your dandelions, it’s time to prepare them for pressing. Start by removing any excess leaves, as they can make your keepsake look cluttered. Trim the stems to about 2 inches long—this helps them fit nicely in your pressing book or flower press. The preparation is crucial; it’s like giving your dandelions a little spa treatment before their big moment!
Step 3: Press the Dandelions
Now comes the exciting part! Place your dandelions between the pages of a pressing book or in a flower press. Make sure they are flat and not overlapping, as this will ensure they dry evenly and maintain their beautiful shape. As you close the book or press, you might feel a sense of anticipation—like waiting for a surprise gift to be unwrapped!
Step 4: Drying Time
Patience is key here! Leave your dandelions in the press for about 1-2 weeks. During this time, they will dry and transform into stunning keepsakes. I know waiting can be tough, but trust me, the soft shimmer of the dried flowers will be worth it. You’ll be amazed at how they retain their vibrant color and delicate beauty!
Step 5: Create Your Keepsake
Once your dandelions are fully dried, it’s time to get creative! Cut your cardstock or heavy paper to your desired size—this will be the canvas for your masterpiece. Arrange the dried dandelions on the cardstock, playing with different layouts until you find one that feels just right. When you’re happy with the arrangement, glue them in place. This is where your creativity shines, and you can let your imagination run wild!
Step 6: Optional Framing
If you want to take your keepsake to the next level, consider framing it! Choose a frame that complements your design—something simple to let the dandelions shine or a colorful one to add a pop of fun. Framing not only protects your creation but also makes it a beautiful piece of home decor. Hang it in a sunny spot, and watch as it brightens your space!
Tips for Best Results
- Choose dandelions that are fully open and free from blemishes for the best results.
- Experiment with different arrangements and layering for a unique look that reflects your style.
- Consider adding a label with the date and location where you picked the dandelions for a personal touch that tells your story.
- Use a clear sealant spray to protect your finished piece if displaying it without glass, ensuring it stays beautiful for years to come.
Theme and Design Variations
Once you’ve mastered the art of preserving some dandelions, why not get creative with different themes and designs? Here are some fun ideas to inspire your next project:
- Pastel Colors: Use soft, pastel cardstock for a gentle, spring-inspired look that evokes the freshness of new blooms.
- Vibrant Summer Display: Opt for bright, bold cardstock to create a lively summer keepsake that captures the essence of sunny days.
- Mixed Bouquet Effect: Incorporate other pressed flowers alongside your dandelions for a beautiful, eclectic arrangement that showcases nature’s diversity.
- Seasonal Themes: Create themed keepsakes for holidays, like a fall version with colorful autumn leaves, to celebrate the changing seasons.
These variations not only add a personal touch but also make your keepsakes even more special and unique!
Display and Use Ideas
Now that you’ve created your stunning keepsake by preserving some dandelions, it’s time to showcase your beautiful work! Here are some creative ways to use, display, or gift your final product:
- Hang your framed keepsake in a sunny spot to brighten your home and bring a touch of nature indoors.
- Use it as a unique gift for friends or family, sharing a piece of summer with them that they can cherish.
- Create a seasonal display by rotating different pressed flowers throughout the year, keeping your decor fresh and vibrant.
- Incorporate your keepsake into a scrapbook or memory book, adding a personal touch to your cherished memories.
FAQs about Preserving Some Dandelions
As you embark on your journey of preserving some dandelions, you might have a few questions. Here are some common queries that fellow crafters often ask, along with helpful answers to guide you through the process!
- Q: How long do dandelions last when preserved?
A: Properly preserved dandelions can last for years if kept away from moisture and direct sunlight. They make lovely keepsakes that can brighten your home for a long time! - Q: Can I use other flowers for pressing?
A: Yes! Many flowers can be pressed, but ensure they have a flat shape for best results. Experimenting with different blooms can lead to stunning combinations! - Q: What if my dandelions turn brown?
A: This can happen if they are not dried properly. Ensure they are fully dry before removing from the press. If they do turn brown, don’t be discouraged—every crafting experience is a learning opportunity! - Q: Can I preserve dandelions in a microwave?
A: Yes, you can use a microwave flower press for quicker results! Just be sure to follow the instructions carefully to avoid damaging the flowers. - Q: What’s the best way to display my pressed dandelions?
A: Framing is a popular option, but you can also create greeting cards or bookmarks. Get creative and find a display method that suits your style!
Final Thoughts
Preserving some dandelions is not just a craft; it’s a joyful journey that captures the essence of summer in a beautiful keepsake. The satisfaction of transforming simple flowers into stunning art is truly rewarding. I encourage you to gather your dandelions, unleash your creativity, and enjoy the process with family or friends. Don’t forget to share your results! I’d love to see how your unique creations turn out. Let’s celebrate the beauty of nature together, one dandelion at a time!
Print
Preserving some dandelions: Create stunning summer keepsakes!
Description
Learn how to preserve dandelions to create beautiful keepsakes that capture the essence of summer.
Instructions
- Gather fresh dandelions on a dry day, preferably in the morning when they are fully open.
- Remove any excess leaves and trim the stems to about 2 inches long.
- Place the dandelions between the pages of a pressing book or in a flower press, ensuring they are flat and not overlapping.
- Close the book or press and leave it for about 1-2 weeks to fully dry and preserve the flowers.
- Once dried, carefully remove the dandelions from the press.
- Cut cardstock or heavy paper to your desired size for the keepsake.
- Arrange the dried dandelions on the cardstock and glue them in place.
- If desired, frame your creation for display.
- Category: Crafts
Keywords: dandelion preservation, summer crafts, flower pressing, keepsakes


