Preschool Science Experiments at Home for Creative Fun!
As a busy mom, I know how challenging it can be to find activities that are both fun and educational for our little ones. That’s why I absolutely love conducting preschool science experiments at home. They are not only simple to set up but also provide a wonderful opportunity for bonding with my kids while sparking their curiosity about the world around them.
One of my favorite experiments involves the classic combination of vinegar and baking soda. I remember the first time I did this with my children; their eyes lit up with excitement as they watched the fizzing reaction unfold. It was a moment of pure joy, and I realized that these fun science activities could easily fit into our busy schedule. With just a few materials and a little bit of time, we were able to create a memorable experience that combined learning with laughter.
What I love most about these home science projects is how they encourage creativity. For instance, after the initial fizzing experiment, we started experimenting with different food coloring combinations. Watching the colors swirl and mix was like creating our own little science art project! It reminded me that science doesn’t have to be intimidating; it can be a playful exploration of colors and reactions.
Of course, there are challenges. Sometimes, the mess can be overwhelming, especially when you’re juggling multiple tasks as a mom. But I’ve learned to embrace the chaos. Using a large tray to catch spills has been a game-changer, allowing us to focus on the fun rather than worrying about the cleanup. Plus, discussing the science behind the reactions in simple terms has turned our experiments into valuable learning moments.
So, if you’re looking for a way to engage your preschoolers while also fitting into your busy life, I encourage you to try these educational crafts for kids. You might just find that the joy of discovery is as rewarding for you as it is for them!
Introduction to Preschool Science Experiments at Home
As a busy mom, I completely understand the struggle of finding engaging activities for our little ones. Between juggling work, household chores, and family time, it can feel overwhelming to come up with creative ideas that also educate. That’s where preschool science experiments at home come into play! They are not only simple and affordable but also a wonderful way to nurture your child’s curiosity and creativity.
I remember the first time I introduced my kids to science at home. We gathered in the kitchen, armed with just a few basic materials, and embarked on a fun adventure of discovery. Watching their eyes widen with excitement as they mixed ingredients and observed the reactions was truly magical. These fun science activities are perfect for busy families like ours, as they can be completed in a short amount of time while still providing valuable learning experiences.
What I love most about these experiments is how they spark interest in the world around us. Each fizz, bubble, and color change opens up a conversation about science, nature, and even art! It’s amazing how a simple combination of vinegar and baking soda can lead to discussions about chemical reactions and the properties of different substances. These home science projects not only entertain but also educate, making them a win-win for both kids and parents.
So, if you’re looking for a way to engage your preschoolers while fitting into your busy life, I encourage you to dive into the exciting world of educational crafts for kids. Together, you can explore, experiment, and create lasting memories that will inspire a love for learning!
Why You’ll Love This Preschool Science Experiments at Home
One of the things I cherish most about preschool science experiments at home is how they seamlessly blend creativity, affordability, and simplicity. As a busy mom, I often find myself searching for activities that can engage my children without requiring a trip to the store or hours of preparation. These experiments fit the bill perfectly!
With just a few common household items, I can transform our kitchen into a mini science lab. I remember one rainy afternoon when we decided to experiment with vinegar and baking soda. It was a spontaneous decision, and I was amazed at how quickly we could set everything up. Within minutes, we were mixing ingredients and watching the delightful fizzing reaction unfold. The joy on my kids’ faces was priceless!
These fun science activities not only keep my children entertained but also encourage hands-on learning. I love how they allow my kids to explore and discover the world around them. Each experiment becomes a little adventure, filled with questions and excitement. For instance, after our fizzing experiment, my children were eager to know why the reaction happened. This curiosity led to a simple yet meaningful discussion about chemical reactions, making the experience educational as well.
Moreover, these home science projects are a fantastic way to break up the daily routine. Whether it’s a weekend or a weekday afternoon, adding a splash of science to our day brings a sense of excitement and wonder. I often find that these moments of exploration not only strengthen our bond but also create lasting memories that we cherish together.
So, if you’re looking for a way to engage your preschoolers while fitting into your busy life, I wholeheartedly encourage you to dive into the world of educational crafts for kids. You might just discover that the joy of science is as rewarding for you as it is for them!
Materials Needed for Preschool Science Experiments at Home
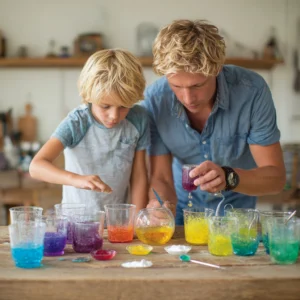
To embark on your exciting journey of preschool science experiments at home, you’ll need to gather a few simple materials. I love how these items are often already in my kitchen, making it easy to dive into fun science activities without a lot of fuss!
- Vinegar – 1 cup (reacts with baking soda)
- Baking soda – 1/2 cup (creates fizzing reaction)
- Food coloring – a few drops (adds visual fun)
- Clear plastic cups – 2 (for mixing)
- Water – 1 cup (used in the experiment)
- Dish soap – 1 tablespoon (enhances fizzing)
As I gathered these materials for our first experiment, I felt a wave of excitement. It was amazing to think that with just a few common household items, we could create a mini science lab right in our home! The anticipation of watching the fizz and bubbles come to life was palpable.
*For a printable full list of materials, see below.*
Tools Required for Preschool Science Experiments at Home
To successfully conduct your preschool science experiments at home, you’ll need a few basic tools that are likely already in your kitchen. I love how these tools make the process smooth and enjoyable, allowing us to focus on the fun of discovery rather than searching for what we need!
- Measuring cups – These are essential for accurate ingredient measurements. I always involve my kids in this step, letting them scoop and pour, which adds to the excitement!
- Spoons – A simple yet vital tool for mixing and pouring. I often use different sizes to keep things interesting, and my kids love choosing their favorite spoon for the task.
- Stirring stick or spoon – This is used to combine ingredients thoroughly. I find that letting my children take turns stirring not only keeps them engaged but also teaches them about teamwork.
- Tray or large dish – This is a must-have to catch spills and keep the area tidy. I learned this the hard way during our first experiment when we had a bit of an overflow! Now, we always set up on a tray, which makes cleanup a breeze.
Having these tools ready makes our fun science activities feel more like a special event rather than just another chore. It’s amazing how a little preparation can lead to a world of exploration and learning. So gather your tools, and let the science adventures begin!
How to Make Preschool Science Experiments at Home
Conducting preschool science experiments at home is a delightful way to engage your little ones in learning while having fun. I remember the first time we tried this experiment; it was a whirlwind of excitement and discovery! Here’s how you can create your own memorable science adventure with just a few simple steps:
- Gather all materials and tools on a flat surface. I like to set everything up on our kitchen table, making it feel like a special science lab.
- In one cup, mix vinegar and a few drops of food coloring. This will be your colorful reaction base. Watching the colors swirl together is always a hit with my kids!
- In the second cup, combine baking soda and dish soap. This mixture will create the fizz. I often let my children take turns measuring and pouring, which adds to their excitement.
- Slowly pour the vinegar mixture into the cup with baking soda. This is the moment we all wait for! The anticipation builds as we watch the ingredients come together.
- Observe the reaction as it fizzes and bubbles! Encourage your child to describe what they see. I love hearing their imaginative explanations and questions about the science behind it.
- For more fun, try adding different colors or additional ingredients like glitter to enhance the experience. We once added some sparkly glitter, and it turned our experiment into a magical science show!
These steps are not just about the experiment; they are about creating a shared experience filled with laughter and learning. I encourage you to embrace the mess and enjoy the process together. After all, the joy of science is in the journey, not just the outcome!
Tips for Best Results
To ensure a successful and enjoyable experience with your preschool science experiments at home, I’ve gathered some practical tips that have worked wonders for my family. These little nuggets of wisdom can help you navigate the fun while keeping the chaos to a minimum!
- Always supervise children during experiments. This is crucial for safety and ensures that everyone is engaged in the process. I find that being right there with my kids not only keeps them safe but also allows me to share in their excitement and curiosity.
- Encourage kids to predict what will happen before starting. This simple step adds an element of anticipation and makes the experiment even more engaging. I love hearing my children’s wild guesses; sometimes they’re spot on, and other times, they’re hilariously off-base!
- Use a large tray to contain any mess. Trust me, this tip is a lifesaver! I learned this the hard way during our first experiment when we had a bit of an overflow. Now, we always set up on a tray, which makes cleanup a breeze and allows us to focus on the fun.
- Discuss the science behind the reactions in simple terms to enhance understanding. I often find that my kids are eager to learn more about what they’re observing. Explaining concepts like chemical reactions in a fun and relatable way turns our experiments into valuable learning moments.
By following these tips, you can create a memorable and educational experience for your preschoolers. Remember, the goal is to have fun while learning, so embrace the mess and enjoy the journey together!
Project Variations
One of the most exciting aspects of preschool science experiments at home is the opportunity to get creative and try out different variations! I love how a simple experiment can be transformed into something new and exciting with just a few tweaks. Here are some fun ideas to inspire your next science adventure:
- Color Mixing: This is one of my favorite variations! Use different food coloring combinations to see what new colors can be created. My kids are always amazed when they mix red and blue to make purple or yellow and blue to create green. It’s a fantastic way to teach them about color theory while having fun!
- Seasonal Themes: Adapt the experiment for holidays by using themed colors. For example, during Christmas, we love to use red and green food coloring to create a festive fizz. It adds a special touch to our experiments and makes them feel even more exciting. You can also try orange and black for Halloween or pastel colors for Easter!
- Add Glitter: Incorporating glitter into your experiments can create a sparkly effect that will delight your child. I remember the first time we added glitter to our fizzing reaction; it felt like a mini science party! The glitter swirled around in the colorful fizz, and my kids were absolutely enchanted. It’s a simple addition that takes the fun to the next level!
These variations not only keep the experiments fresh and exciting but also encourage your children to think creatively and explore new ideas. I encourage you to experiment with these suggestions and see what unique twists you can come up with together. The joy of discovery is limitless, and every experiment is a chance to learn something new!
Decoration and Usage Ideas
Once your preschool science experiments at home are complete, the fun doesn’t have to end there! I love finding creative ways to display our results and extend the learning experience. Here are some delightful ideas that can turn your experiments into lasting memories:
- Display the results in a clear container to showcase the fizzing reaction. After our experiments, I often transfer the colorful mixtures into glass jars or clear plastic containers. It’s a beautiful way to highlight the vibrant colors and bubbling action, and my kids love showing them off to family and friends!
- Use the experiment as a teaching moment about chemical reactions. I find that discussing what happened during the experiment helps reinforce the concepts we explored. We talk about why the vinegar and baking soda reacted the way they did, and I encourage my children to ask questions. This not only deepens their understanding but also fosters a love for science!
- Create a science journal where your child can draw or write about their experiments. I started this with my kids, and it has become a cherished keepsake. They love to illustrate their experiments, jot down their observations, and even make predictions for future experiments. It’s a wonderful way to document their learning journey and encourages them to reflect on their experiences.
These decoration and usage ideas not only enhance the fun of your fun science activities but also provide opportunities for further learning and creativity. I encourage you to embrace these suggestions and watch as your children’s excitement for science continues to grow!
FAQs about Preschool Science Experiments at Home
Q: Are these experiments safe for preschoolers?
A: Yes, as long as you supervise and ensure children do not ingest any materials. I always make it a point to explain the importance of safety to my kids before we start. This way, they understand the boundaries while still having fun!
Q: How long do these experiments take?
A: The total time for the experiment is about 25 minutes, including prep and clean-up. I find that this timeframe fits perfectly into our busy schedule, allowing us to enjoy a quick science adventure without feeling rushed.
Q: Can I do these experiments indoors?
A: Yes, but make sure to conduct them in a well-ventilated area and protect surfaces from spills. I usually set up our experiments in the kitchen, where I can easily clean up any mess. Just remember to have fun and embrace the little spills that come with the excitement of discovery!
Final Thoughts
Engaging in preschool science experiments at home is not just about the fun; it’s about fostering a love for learning and exploration in your child. I’ve seen firsthand how these simple activities can create lasting memories and inspire curiosity about the world around us. Each experiment we conduct together becomes a cherished moment, filled with laughter and discovery.
As a busy mom, I understand the importance of making the most of our time together. These fun science activities fit seamlessly into our hectic schedules, allowing us to bond while nurturing my children’s inquisitive minds. I encourage you to gather your materials, roll up your sleeves, and embark on this exciting journey of discovery together. The anticipation of watching the fizz and bubbles come to life is a joy that never gets old!
Remember, the joy of science is in the experience, and every experiment is a step towards nurturing your child’s creativity and intellect. So, don’t hesitate to dive into the world of home science projects. You might just find that the excitement of exploration is as rewarding for you as it is for your little ones. Happy experimenting!
Print
Preschool Science Experiments at Home for Creative Fun!
Description
This project involves conducting simple and fun science experiments at home that are perfect for preschoolers, encouraging creativity and curiosity about the world around them.
Instructions
- Gather all materials and tools on a flat surface.
- In one cup, mix vinegar and a few drops of food coloring.
- In the second cup, combine baking soda and dish soap.
- Slowly pour the vinegar mixture into the cup with baking soda.
- Observe the reaction as it fizzes and bubbles!
- For more fun, try adding different colors or additional ingredients like glitter.
Keywords: Preschool Science Experiments, Fun Science Activities, Home Science Projects, Educational Crafts for Kids