Introduction to Pony Bead Suncatchers
Welcome to the colorful world of Pony Bead Suncatchers! If you’re looking for a fun and simple DIY craft that the whole family can enjoy, you’ve come to the right place. These delightful suncatchers not only brighten up your windows but also spark creativity and joy in your home. I remember the first time my kids and I made these together; the laughter and excitement filled the room as we arranged the beads. It’s a rewarding project that brings a splash of color and a sense of accomplishment, making it perfect for moms, teachers, and creative hobbyists alike!
Why You’ll Love This Pony Bead Suncatchers
Pony Bead Suncatchers are not just a craft; they’re a delightful way to bond with your kids while unleashing your creativity! This project is incredibly easy and affordable, making it perfect for busy moms and teachers. As you create, you’ll find relaxation in the colorful patterns and the joy of seeing your little ones’ imaginations come to life. Plus, the end result is a beautiful piece of art that brightens your home!
Materials and Tools Needed for Pony Bead Suncatchers
Gathering your materials is the first step to creating stunning Pony Bead Suncatchers! Here’s what you’ll need:
- Pony beads (various colors): These vibrant beads are the stars of the show! Choose a mix of colors to create eye-catching designs that will brighten any window.
- Clear plastic or metal cookie cutters: These will shape your suncatchers. Opt for fun shapes like stars, hearts, or seasonal themes to add a personal touch.
- String or fishing line: This is essential for hanging your suncatcher. Fishing line is a great choice as it’s nearly invisible, allowing your creation to shine.
- Oven or toaster oven: You’ll need this to melt the beads. A toaster oven is a handy alternative if you’re short on space.
- Parchment paper: This makes cleanup a breeze and prevents the beads from sticking to the baking sheet.
- Scissors: You’ll need these to cut the string or fishing line for hanging.
- Optional: Paint or glitter for decoration: If you want to add a little extra flair, these are perfect for personalizing your suncatchers!
Each of these materials plays a vital role in your crafting adventure. Plus, many of them can be found at local craft stores or even in your home, making this project budget-friendly and accessible!
How to Make Pony Bead Suncatchers
Creating your own Pony Bead Suncatchers is not just a craft; it’s a delightful journey filled with color and creativity! I remember the first time I made these with my kids. The excitement in their eyes as they arranged the beads was priceless. Let’s dive into the step-by-step process of making these beautiful pieces of window art that will brighten up your home.
Step 1: Preheat Your Oven
First things first, let’s get that oven ready! Preheating your oven to 400°F (200°C) is crucial. This ensures that the pony beads melt evenly, creating a smooth and beautiful suncatcher. The anticipation builds as the oven warms up, and you can almost feel the magic about to happen!
Step 2: Prepare Your Baking Sheet
Next, line a baking sheet with parchment paper. This step is essential for easy cleanup later on. Trust me, you’ll thank yourself when it’s time to remove the suncatchers! The parchment paper acts as a barrier, preventing the melted beads from sticking to the baking sheet. It’s like giving your suncatchers a cozy little bed to rest on while they bake!
Step 3: Fill the Cookie Cutters
Now comes the fun part—filling the cookie cutters with pony beads! Let your creativity run wild as you arrange the beads in colorful patterns. You can create a rainbow effect, a gradient, or even a fun shape like a star or heart. I love to mix and match colors, and sometimes I even let my kids choose their favorite combinations. The soft shimmer of the beads is so inviting, and it’s a joy to see their imaginations come to life!
Step 4: Bake the Beads
Carefully place the baking sheet in the oven and let the beads bake for about 20 minutes. Keep an eye on them, as you want to ensure they melt but don’t burn. The aroma of melting plastic fills the air, and it’s a reminder of the colorful creations that are about to emerge. Remember, safety first! Use oven mitts when handling the hot baking sheet.
Step 5: Cool and Remove
Once the beads have melted together, it’s time to take them out of the oven. Let them cool completely before attempting to remove the suncatcher from the cookie cutter. This is the moment of truth! As you gently pop them out, you’ll be greeted with a stunning piece of art that sparkles in the light. It’s like unwrapping a present you made yourself!
Step 6: Hang Your Suncatcher
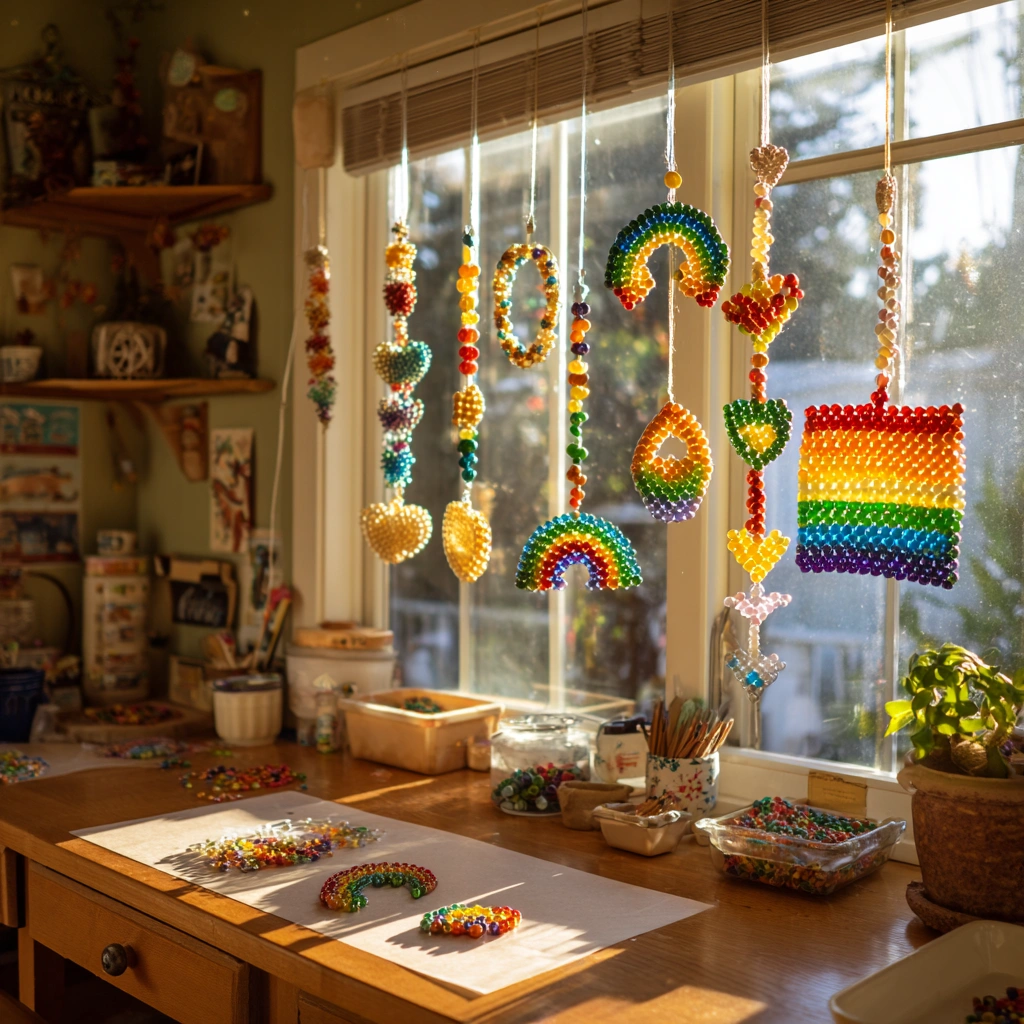
Now that your suncatcher is ready, it’s time to hang it up! Use string or fishing line to suspend your creation in a sunny window. Watching the sunlight filter through the colorful beads is pure magic. It creates a beautiful display of colors dancing on your walls, and it’s a perfect way to brighten up any room in your home.
Optional: Add Decorative Touches
If you want to take your suncatcher to the next level, consider adding some paint or glitter for extra flair. A touch of sparkle can make your creation even more enchanting! Let your kids help with this part; it’s a great way to bond and unleash their creativity. The possibilities are endless, and each suncatcher can be as unique as the person who made it!
Tips for Best Results
- Experiment with different shapes and colors for unique designs. The more creative, the better!
- Always supervise children when using the oven to ensure safety during the baking process.
- Consider using a variety of bead sizes for added texture and visual interest in your suncatchers.
- Try layering different colors for a stunning gradient effect that will catch the light beautifully.
Theme and Design Variations
One of the best parts about making Pony Bead Suncatchers is the endless possibilities for themes and designs! Here are some fun ideas to inspire your creativity:
- Bright summer colors: Use vibrant shades of pink, yellow, and turquoise for a cheerful vibe that captures the essence of sunny days.
- Autumn hues: Embrace the season with warm colors like orange, red, and yellow, perfect for celebrating fall.
- Winter themes: Create a frosty look with cool blues and whites, reminiscent of snowy landscapes and winter wonderlands.
- Kid-friendly designs: Let your little ones choose their favorite characters or animals to inspire their suncatcher creations, making it a personal and fun project!
Display and Use Ideas
Once you’ve crafted your stunning Pony Bead Suncatchers, it’s time to showcase them! Here are some delightful ways to use and display your colorful creations:
- Hang in windows: Let the sunlight filter through to create beautiful, colorful reflections that brighten up any room.
- Gift them: These suncatchers make perfect gifts for friends or family during holidays, spreading joy and creativity.
- Create a mobile: Combine multiple suncatchers to make a whimsical mobile that dances in the breeze, adding charm to any space.
- Classroom decorations: Incorporate them into classroom decor for a fun and vibrant learning environment that inspires creativity in students.
FAQs about Pony Bead Suncatchers
As you embark on your crafting adventure with Pony Bead Suncatchers, you might have a few questions. Don’t worry; I’ve got you covered! Here are some common queries that fellow crafters often ask:
- Q: Can I use other types of beads?
A: While pony beads work best for this project, you can certainly experiment with other plastic beads. Just keep in mind that melting times may vary, so watch them closely! - Q: How do I clean my suncatchers?
A: Cleaning your suncatchers is a breeze! Simply wipe them with a damp cloth to remove any dust and keep them looking vibrant and fresh. - Q: Are pony bead suncatchers safe for kids?
A: Absolutely! Pony bead suncatchers are safe for kids aged 5 and up. Just remember that adult supervision is required when using the oven to ensure safety during the melting process. - Q: How long do the suncatchers last?
A: With proper care, your suncatchers can last for years! Just keep them out of direct sunlight for extended periods to prevent fading. - Q: Can I make suncatchers without an oven?
A: While the oven method is the most common, you can also use a heat gun or a toaster oven if you prefer. Just be cautious and follow safety guidelines!
Final Thoughts
Creating Pony Bead Suncatchers is not just a craft; it’s a joyful experience that brings families together and fills your home with color and warmth. I can’t help but smile every time I see our suncatchers dancing in the sunlight, casting vibrant reflections on the walls. I encourage you to gather your materials, unleash your creativity, and dive into this fun project! Don’t forget to share your beautiful creations with friends and family. Let’s spread the joy of crafting and brighten up our homes together!
Print
Pony Bead Suncatchers: Create Colorful Window Art Today!
Description
Create beautiful and colorful suncatchers using pony beads that will brighten up any window in your home.
Instructions
- Preheat your oven to 400°F (200°C).
- Place parchment paper on a baking sheet.
- Fill the cookie cutters with pony beads, arranging them in a colorful pattern.
- Carefully place the baking sheet in the oven and bake for about 20 minutes, or until the beads have melted together.
- Remove from the oven and let cool completely before removing the suncatcher from the cookie cutter.
- Use string or fishing line to hang your suncatcher in a sunny window.
- Optional: Add paint or glitter for extra decoration.
- Category: Crafts
Keywords: Pony Bead Suncatchers, DIY Suncatchers, Colorful Window Art, Kids Crafts


