Introduction to Painting Ice Experiment
Are you ready to dive into a world of color and creativity? The Painting Ice Experiment is the perfect way to unleash your kids’ artistic flair while exploring the fascinating properties of ice and water. This hands-on project is not only fun and simple, but it also combines art and science in a way that will captivate your little ones. Imagine the joy on their faces as they watch vibrant colors dance and blend on a chilly canvas! It’s a rewarding experience that fosters creativity and learning, making it an ideal activity for family bonding or classroom fun.
Why You’ll Love This Painting Ice Experiment
You’ll absolutely adore the Painting Ice Experiment for its simplicity and the joy it brings! It’s an affordable way to spark creativity while spending quality time with your kids. This project is not only a fun escape from routine but also a relaxing way to bond. Watching their imaginations run wild as they paint on ice is a heartwarming experience that creates lasting memories. Plus, it’s a fantastic blend of art and science!
Materials and Tools Needed for Painting Ice Experiment
To embark on this colorful journey, you’ll need a few simple materials that are easy to gather. Start with ice cubes or a large block of ice, which serves as your canvas. Next, grab some food coloring or liquid watercolors—these vibrant hues will bring your icy masterpiece to life! You’ll also need paintbrushes or droppers for applying the colors. A shallow tray or baking sheet will help contain the melting ice and any spills. Don’t forget paper towels for quick cleanup and protective clothing or aprons to keep those little artists stain-free. These materials are not only budget-friendly but also eco-conscious, making this project a win-win for creativity and the environment!
How to Make Painting Ice Experiment
Step 1: Prepare Your Workspace
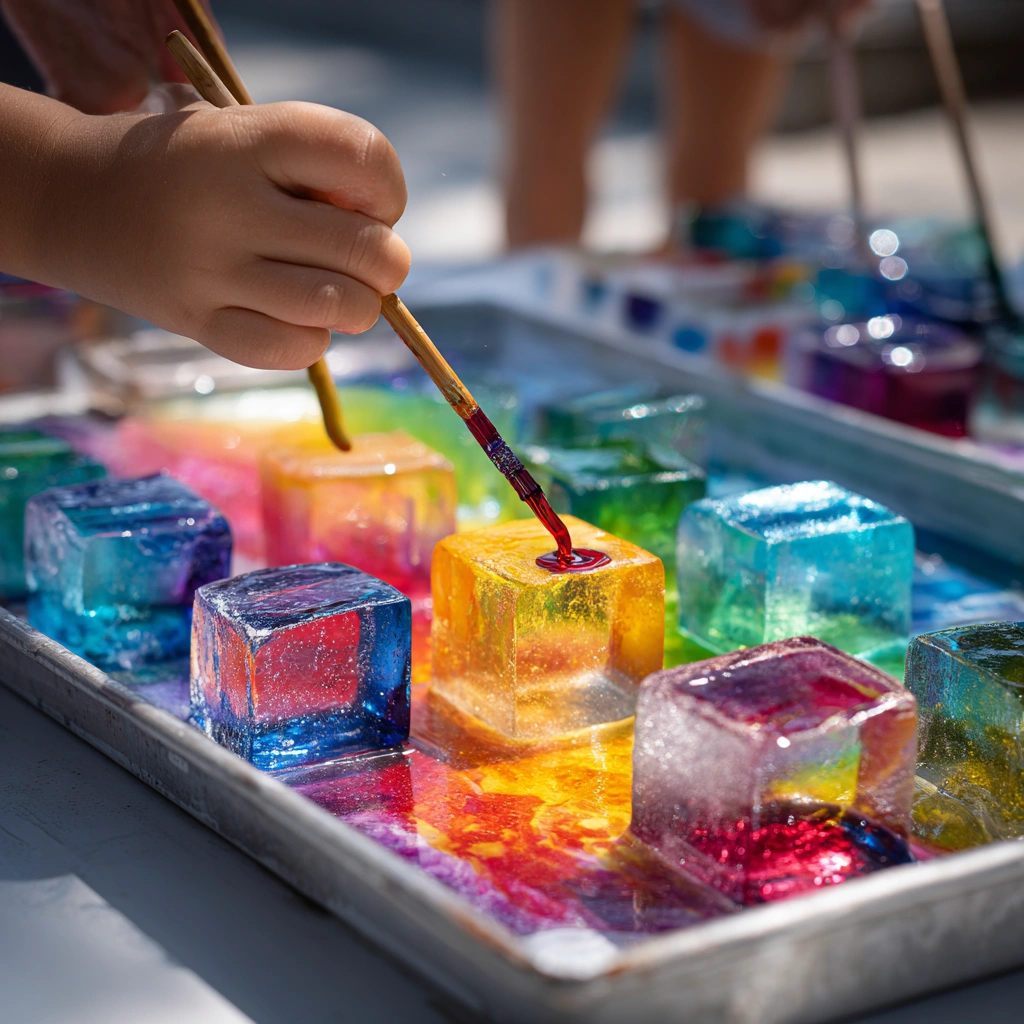
To kick off this colorful adventure, start by preparing your workspace. Lay down a plastic sheet or some old newspaper to catch any spills. Trust me, this will save you from a colorful mess later! I love setting up outside on a warm day, where the sun can shine down and add to the magic of the moment. Just imagine the laughter and excitement as your kids dive into this creative project! Make sure to have a table or flat surface where everyone can comfortably reach the ice and colors.
Step 2: Set Up the Ice
Next, it’s time to set up the ice! You can fill shallow trays with ice cubes or place a large block of ice in the center of your workspace. If you’re feeling adventurous, try freezing some fun shapes in your ice cubes, like stars or hearts! This adds an extra layer of excitement for the kids. Watching them eagerly anticipate the colorful transformation is a joy in itself. If you’re using a block of ice, consider placing it on a tray to catch the melting water.
Step 3: Prepare Your Colors
Now, let’s get those colors ready! Pour different shades of food coloring or liquid watercolors into small cups. I like to use a rainbow of colors to spark creativity. The vibrant hues will pop against the icy canvas, creating a stunning visual experience. Plus, it’s a great opportunity to talk about color mixing with your little ones. They’ll be amazed at how blue and yellow can create green! Make sure to have a variety of colors available, as this will inspire your kids to experiment and create their own unique designs.
Step 4: Start Painting!
Here comes the fun part—painting on the ice! Hand your kids some paintbrushes or droppers and let them unleash their creativity. Encourage them to experiment with different techniques: dripping, swirling, or layering colors. I often join in, creating my own icy masterpiece alongside them. The soft shimmer of the glow paint under the sun feels magical, and the kids love seeing how the colors mix and spread across the ice.
As they paint, remind them to observe how the colors interact with the ice. It’s fascinating to see how the ice melts and the colors blend together, creating a beautiful display. This is not just a craft; it’s a delightful science lesson in action! You might even want to grab your camera to capture those priceless moments of joy and creativity. If they want to add more texture, suggest using sponges or even their fingers to create different effects. The possibilities are endless, and the joy of creation is what makes this project so special!
Step 5: Observe the Melting Process
Once the painting is done, take a moment to watch the magic unfold. As the ice melts, the colors will swirl and blend, creating a stunning work of art. Encourage your kids to discuss what they see—how the colors change and how the ice transforms. This is a perfect opportunity to talk about the properties of ice and water, making it a fun and educational experience. Plus, it’s a great way to wind down after all that excitement! You can even set a timer and see how long it takes for the ice to melt completely, turning this into a fun science experiment as well.
Tips for Best Results
- For a more vibrant effect, opt for liquid watercolors instead of food coloring.
- If colors are too light, add more food coloring to intensify the hues.
- To avoid staining, ensure kids wear old clothes or aprons.
- Experiment with adding salt to the ice before painting to see how it speeds up melting.
- Consider doing this project outside for easy cleanup and to enjoy the fresh air!
Theme and Design Variations
- Seasonal Themes: Create ice art inspired by the seasons—think pastel colors for spring, vibrant hues for summer, warm tones for fall, and icy blues and whites for winter.
- Holiday Designs: Use colors that represent upcoming holidays, like red and green for Christmas or orange and black for Halloween, to make festive decorations.
- Nature-Inspired: Encourage kids to use colors found in nature, like greens and browns for a forest theme or blues and whites for an ocean scene.
- Rainbow Explosion: Challenge your kids to create a rainbow on their ice canvas, mixing colors to see how they blend together.
- Glow-in-the-Dark: For a fun twist, use glow-in-the-dark paint to create a magical nighttime effect!
Display and Use Ideas
- Home Decor: Use the finished ice art as a unique centerpiece for your dining table or as a colorful addition to your living room.
- School Crafts: Encourage kids to showcase their creations in the classroom, turning their artwork into a fun science display.
- Gift Ideas: Package the ice art in clear containers as thoughtful gifts for family and friends during the holidays.
- Seasonal Displays: Rotate the artwork based on the season, creating a vibrant gallery that reflects the changing colors of nature.
FAQs about Painting Ice Experiment
Q: What age is this project suitable for?
A: The Painting Ice Experiment is perfect for kids aged 3 and up! Younger children may need some assistance, but it’s a great way for them to explore colors and textures safely.
Q: Can I use regular paint instead of food coloring?
A: While you can use regular paint, I recommend sticking with food coloring or liquid watercolors. They are safer for kids and will create vibrant effects on the ice!
Q: How do I clean up after the experiment?
A: Cleanup is a breeze! Just use paper towels to wipe up any spills, and if you set up outside, the melting ice will take care of most of the mess. Just be sure to have a bucket handy for any leftover ice!
Q: What if the colors aren’t vibrant enough?
A: If the colors seem too light, simply add more food coloring or use liquid watercolors for a bolder effect. Experimenting with different amounts can lead to some stunning results!
Q: Can I do this project indoors?
A: Absolutely! Just be sure to lay down protective coverings to catch any spills. However, doing it outside on a warm day can make cleanup even easier and adds to the fun!
Final Thoughts
The Painting Ice Experiment is not just a craft; it’s a delightful journey of creativity and discovery! Watching your kids express themselves through colors while learning about the science of ice is truly rewarding. I encourage you to gather your materials, set up your workspace, and dive into this colorful adventure together. Don’t forget to capture those magical moments on camera! I can’t wait to hear about your experiences and see the beautiful creations your little artists come up with. So, roll up those sleeves and let the fun begin—happy crafting!
Print
Painting Ice Experiment: Unleash Your Kids’ Creativity Today!
Description
The Painting Ice Experiment is a fun and creative activity that allows kids to explore colors and textures while learning about the properties of ice and water. This hands-on project combines art and science, making it an engaging way for children to express their creativity.
Instructions
- Prepare your workspace by laying down a plastic sheet or newspaper to catch any spills.
- Fill shallow trays with ice cubes or place a large block of ice in the center of the workspace.
- Pour different colors of food coloring or liquid watercolors into small cups.
- Using paintbrushes or droppers, let your kids paint directly onto the ice, observing how the colors mix and spread.
- Encourage them to experiment with different techniques, such as dripping, swirling, or layering colors.
- Once they are done, watch as the ice melts and the colors blend together, creating a beautiful display.
- Category: Art & Science
Keywords: Painting Ice Experiment, Kids Art, Creative Activities, Science Fun


