Introduction to Paint Drip Ornaments
Welcome to the colorful world of Paint Drip Ornaments! If you’re looking for a fun and creative way to brighten up your holiday decor, you’ve come to the right place. This DIY craft project is not only simple but also incredibly rewarding, allowing you to unleash your inner artist. Imagine the joy of creating vibrant ornaments that reflect your unique style, all while spending quality time with family or friends. Whether you’re a seasoned crafter or just starting out, these ornaments are sure to bring a splash of color and cheer to your home this holiday season!
Why You’ll Love This Paint Drip Ornaments
Creating Paint Drip Ornaments is a delightful way to express your creativity while enjoying quality time with loved ones. This craft is not only easy and affordable, but it also offers a relaxing escape from the holiday hustle and bustle. Plus, the joy of seeing your kids’ faces light up as they create their own colorful masterpieces is priceless. It’s a perfect blend of fun, creativity, and family bonding!
Materials and Tools Needed for Paint Drip Ornaments
To create your stunning Paint Drip Ornaments, you’ll need a few essential materials that are easy to find and budget-friendly. Here’s what you’ll need:
- Clear glass or plastic ornaments: These are the canvas for your creativity! Choose clear ones to let the colors shine through.
- Acrylic paint in various colors: This is where the magic happens! Pick vibrant shades that match your holiday theme.
- Plastic cups or containers for paint: Perfect for mixing and pouring your paint without any mess.
- Paintbrushes (optional): Use these if you want to add details or touch up areas inside the ornament.
- Glitter (optional): For that extra sparkle, sprinkle some inside your ornaments!
- Paper towels: Handy for quick clean-ups and to catch any drips.
- Protective covering for your workspace: This is crucial to keep your crafting area clean and free from paint splatters.
These materials are not only easy to gather but also allow for endless creativity. You can even opt for eco-friendly paint options if you’re looking to be more sustainable. Let’s get crafting!
How to Make Paint Drip Ornaments
Creating your own Paint Drip Ornaments is not just a craft; it’s an experience filled with color, creativity, and a sprinkle of holiday magic! Let’s dive into the fun, step-by-step process that will have you and your loved ones crafting beautiful decorations in no time. Grab your materials, and let’s get started!
Step 1: Prepare Your Workspace
First things first, let’s set the stage for our crafting adventure! Lay down a protective covering on your table or workspace. This could be an old tablecloth, newspaper, or even a roll of craft paper. Trust me, you’ll thank yourself later when those vibrant paint drips start to flow! Make sure you have all your materials within reach, so you can focus on the fun without any interruptions. A clean and organized space not only keeps your area tidy but also helps you feel more relaxed and ready to create!
Step 2: Remove the Ornament Top
Next, gently remove the top of your ornament. This part is super easy—just twist and pull it off. Set it aside carefully so it doesn’t roll away. You’ll want to keep it safe until we’re ready to put it back on later!
Step 3: Pour the Paint
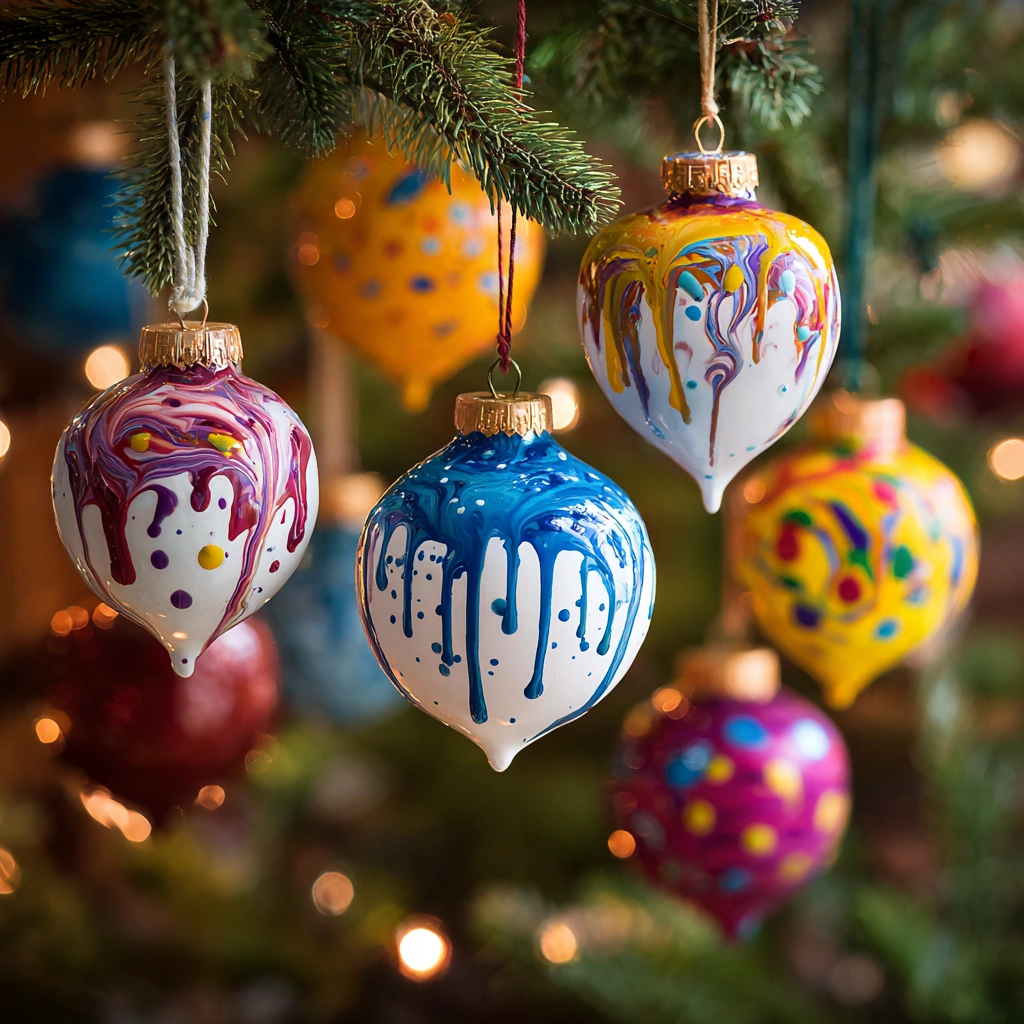
Now, let’s get colorful! Pour a small amount of your chosen acrylic paint into a plastic cup. You can mix colors to create your own unique shades—think of it as your own little color palette! Once you have your paint ready, carefully pour it into the ornament. Swirl the ornament around to let the paint coat the inside. This is where the magic begins, as you watch the colors blend and dance together! If you’re feeling adventurous, try mixing complementary colors for a stunning effect.
Step 4: Create the Drip Effect
Here comes the fun part! Hold the ornament over your protective covering and let the excess paint drip out. Rotate the ornament slowly to ensure the paint covers every inch of the inside. If you’re feeling adventurous, try using multiple colors for a layered effect. Just imagine the soft shimmer of those colors blending together—it’s like a mini masterpiece waiting to happen! Don’t rush this step; let the paint do its thing and create those beautiful drips!
Step 5: Add Glitter (Optional)
If you want to add a little extra sparkle, now’s the time! Sprinkle some glitter inside the ornament while the paint is still wet. This will give your Paint Drip Ornaments a dazzling finish that catches the light beautifully. Who doesn’t love a bit of bling during the holidays? Just a pinch will do, and you can mix different colors of glitter for a fun twist!
Step 6: Final Touches
Once you’re satisfied with your paint and glitter, set the ornament aside to dry completely. When it’s dry, carefully replace the top of the ornament. This is the moment when your creation starts to come together, and you can already envision it hanging on your tree!
Step 7: Hang and Enjoy
Finally, it’s time to show off your beautiful Paint Drip Ornaments! Hang them on your tree, or use them as festive decorations around your home. Each ornament tells a story of creativity and joy, making your holiday decor truly special. Enjoy the compliments from family and friends as they admire your colorful creations!
Tips for Best Results
- Don’t rush the drying process; let your paint drip ornaments dry completely to avoid smudging.
- If you accidentally spill paint, clean it up immediately with a damp cloth to prevent staining.
- For a unique twist, try using metallic or glow-in-the-dark paints for a festive flair.
- Supervise young children closely, especially when using glitter or paint.
- Experiment with different pouring techniques to create various drip patterns!
Theme and Design Variations
- Classic Holiday Colors: Use red, green, and gold for a traditional festive look that screams Christmas cheer!
- Winter Wonderland: Opt for icy blues, whites, and silvers to create a serene winter theme that sparkles like fresh snow.
- Rainbow Delight: Let your creativity run wild with a mix of bright colors for a fun, kid-friendly version that’s sure to bring smiles.
- Pastel Perfection: Soft pinks, lavenders, and mint greens create a charming, whimsical feel perfect for spring celebrations.
- Glow-in-the-Dark: Use glow-in-the-dark paint for a spooky twist, making your ornaments shine during Halloween night!
Display and Use Ideas
- Tree Ornaments: Hang your Paint Drip Ornaments on your holiday tree for a vibrant and personalized touch.
- Gift Tags: Attach them to gifts as unique tags that add a special flair to your presents.
- Table Centerpieces: Place them in a decorative bowl or vase as a colorful centerpiece for your holiday gatherings.
- Classroom Crafts: Use them as a fun project for kids in school, encouraging creativity and teamwork.
- Seasonal Decor: Display them year-round by hanging them in windows or from ceiling hooks for a playful touch!
FAQs about Paint Drip Ornaments
1. Can I use any type of paint for my ornaments?
It’s best to use non-toxic acrylic paint for your Paint Drip Ornaments. This type of paint is safe, easy to work with, and dries quickly, making it perfect for this project!
2. How long do the ornaments take to dry?
Drying time can vary depending on the thickness of the paint, but generally, allow at least 1-2 hours for your Paint Drip Ornaments to dry completely. If you’re in a hurry, a hairdryer on a low setting can speed things up!
3. Can I make these ornaments with kids?
Absolutely! This craft is perfect for all ages. Just be sure to supervise young children, especially when using glitter or paint, to keep the experience safe and fun!
4. What if I make a mistake while pouring the paint?
No worries! If you spill paint, clean it up immediately with a damp cloth. You can also adjust your design by adding more paint or glitter to cover any mishaps. Crafting is all about creativity!
5. How can I store my paint drip ornaments after the holidays?
To keep your Paint Drip Ornaments safe, store them in a sturdy box with tissue paper or bubble wrap to prevent breakage. This way, you can enjoy them for many holiday seasons to come!
Final Thoughts
Creating your own Paint Drip Ornaments is not just about the final product; it’s about the joy of crafting and the memories made along the way. Each colorful ornament tells a story of creativity, laughter, and family bonding. I encourage you to gather your loved ones, unleash your imagination, and dive into this delightful project. Don’t forget to share your beautiful creations with friends and family—after all, the holiday spirit is all about spreading joy! Happy crafting, and may your ornaments shine bright this season!
Print
Paint Drip Ornaments: Create Colorful Holiday Cheer with Ease!
Description
Create vibrant and unique paint drip ornaments to add a splash of color to your holiday decor. This fun and easy craft project is perfect for all ages and can be customized to match your holiday theme.
Instructions
- Prepare your workspace by laying down protective covering to catch any drips.
- Remove the top of the ornament and set it aside.
- Pour a small amount of acrylic paint into a plastic cup.
- Carefully pour the paint into the ornament, rotating it to cover the inside surface.
- Allow the paint to drip out of the ornament to create a drip effect. You can use multiple colors for a layered look.
- If desired, sprinkle glitter inside the ornament for added sparkle.
- Once the paint has dried, replace the top of the ornament.
- Hang your beautiful paint drip ornaments on the tree or use them as festive decorations around your home.
- Category: Crafts
Keywords: Paint Drip Ornaments, Holiday Crafts, DIY Ornaments, Colorful Decorations