
Oreo Chocolate Mousse Cups: Indulge in Creamy Bliss!
Sensory-Rich Introduction with Immediate Craving
Imagine a dessert that tantalizes your taste buds with every spoonful—a rich, velvety chocolate mousse cradled in a crunchy Oreo crust. As you take your first bite, the smoothness of the mousse melts in your mouth, while the delightful crunch of the Oreo base adds a satisfying contrast. This is not just any dessert; it’s an experience that evokes memories of childhood treats and special celebrations. Picture serving these Oreo Chocolate Mousse Cups at a family gathering, where laughter fills the air and everyone is eager to indulge in a sweet moment of bliss. Whether it’s a birthday party, a holiday feast, or simply a cozy night in, these mousse cups are the perfect way to elevate any occasion.
Why You’ll Love This Oreo Chocolate Mousse Cups
- Texture Contrast: The combination of creamy mousse and crunchy Oreo crust creates a delightful textural experience that keeps each bite interesting.
- Flavor Balance: The sweetness of the mousse is perfectly balanced by the slight bitterness of the chocolate, making it a treat that appeals to all palates.
- Versatility: These mousse cups can be customized with various toppings and flavors, making them suitable for any season or celebration.
- Ease of Preparation: With simple ingredients and straightforward steps, even novice bakers can create this impressive dessert with minimal effort.
- Universal Appeal: Chocolate lovers of all ages will adore these mousse cups, making them a hit at any gathering.
Essential Tools & Preparation Strategy
- Mixing Bowls: Essential for combining ingredients without mess; opt for glass or stainless steel for durability.
- Whisk: Needed for whipping cream to the right consistency; a hand mixer can also be used for ease.
- Spatula: Useful for gently folding ingredients to maintain airiness in the mousse.
- Measuring Cups and Spoons: Ensure accurate ingredient quantities for best results; consider using a kitchen scale for precision.
- Oven: Required for baking the Oreo crust to achieve the right texture; preheat to ensure even baking.
- Serving Cups: Ideal for presenting the mousse attractively; clear cups allow guests to see the beautiful layers.
- Food Processor: An alternative for crushing Oreos quickly and evenly, saving time and effort.
- Refrigerator: Essential for chilling the mousse to achieve the perfect set before serving.
Ingredients & Their Roles in This Oreo Chocolate Mousse Cups
Chocolate Mousse
- Heavy Cream: Provides the rich, creamy base for the mousse.
- Semi-Sweet Chocolate Chips: Adds depth of flavor and richness; can be substituted with dark chocolate for a more intense taste.
- Granulated Sugar: Sweetens the mousse; adjust to taste if using sweeter chocolate.
- Vanilla Extract: Enhances the overall flavor profile; can be replaced with almond extract for a different twist.
Oreo Crust
- Oreo Cookies: The star ingredient for the crust, providing both flavor and texture; gluten-free Oreos can be used for a gluten-free version.
- Unsalted Butter: Binds the crushed cookies together; melted butter should be warm but not hot to avoid greasiness.
Garnish
- Whipped Cream: Adds a light, airy finish to the mousse; can be homemade or store-bought.
- Chocolate Shavings: Provides an elegant touch and extra chocolate flavor.
- Whole Oreo Cookies: Used for decoration and an extra treat on top.
Step-by-Step Guide to Perfect Oreo Chocolate Mousse Cups
- Preheat the Oven: Set your oven to 350°F (175°C) to prepare for baking the crust.
- Prepare the Oreo Crust: In a bowl, combine crushed Oreo cookies and melted butter, mixing until well combined.
- Form the Crust: Press the mixture into the bottom of serving cups to form a crust and bake for 10 minutes. Let cool completely.
- Melt the Chocolate: In a saucepan over low heat, melt the chocolate chips, stirring until smooth. Remove from heat and let cool slightly.
- Whip the Cream: In a separate bowl, whip the heavy cream, sugar, and vanilla extract until soft peaks form.
- Combine Ingredients: Gently fold the melted chocolate into the whipped cream until fully incorporated, being careful not to deflate the mixture.
- Fill the Cups: Evenly distribute the mousse over the cooled Oreo crusts in the cups, smoothing the tops.
- Chill: Refrigerate the mousse cups for at least 2 hours before serving to allow them to set properly.
Chef’s Notes & Pro Tips for Flawless Results
- Make-Ahead Instructions: These mousse cups can be prepared a day in advance and stored in the refrigerator, making them perfect for entertaining.
- Storage: Keep covered in the fridge for up to 3 days; for longer storage, consider freezing the mousse (though the texture may change).
- Equipment Recommendations: A hand mixer can save time when whipping cream; a food processor is great for crushing Oreos quickly.
- Customization Options: Experiment with different flavors by adding a splash of coffee or liqueur to the mousse for an adult twist.
Avoid These Common Cooking Mistakes
- Overwhipping the Cream: This can lead to a grainy texture; stop when soft peaks form.
- Not Letting the Chocolate Cool: Adding hot chocolate to whipped cream can cause it to deflate; allow it to cool slightly before mixing.
- Skipping the Chilling Step: This is crucial for the mousse to set properly; don’t rush it!
- Using Warm Butter in the Crust: This can make the crust too greasy; ensure the butter is melted but not hot.
- Not Crushing Oreos Finely Enough: Large chunks can lead to an uneven crust; aim for a fine crumb.
- Using the Wrong Type of Chocolate: Semi-sweet chocolate is recommended for the right balance of sweetness; avoid milk chocolate for a richer flavor.
- Not Measuring Ingredients Accurately: This can affect the texture and flavor; use proper measuring tools for best results.
Creative Variations & Customizations
- Mint Oreo Mousse Cups: Use mint-flavored Oreos and add a few drops of peppermint extract to the mousse for a refreshing twist.
- Peanut Butter Swirl: Fold in creamy peanut butter into the mousse for a deliciously nutty flavor.
- Fruit-Infused Mousse: Add pureed strawberries or raspberries to the mousse for a fruity variation.
- Vegan Version: Substitute heavy cream with coconut cream and use dairy-free chocolate for a vegan-friendly dessert.
- Seasonal Spices: Incorporate cinnamon or nutmeg into the mousse for a warm, spiced flavor during the holidays.
Perfect Pairings: What to Serve With Oreo Chocolate Mousse Cups
- Fresh Berries: The tartness of strawberries or raspberries contrasts beautifully with the sweetness of the mousse.
- Vanilla Ice Cream: A scoop of creamy vanilla ice cream adds an extra layer of indulgence.
- Chocolate Sauce: Drizzle over the mousse for an added touch of decadence.
- Coffee: A cup of coffee balances the sweetness and enhances the chocolate flavor.
- Mint Leaves: Garnish with fresh mint for a refreshing touch that brightens the dessert.
- Cheesecake Bites: Serve alongside mini cheesecake bites for a delightful dessert platter.
- Dessert Wine: Pair with a sweet dessert wine for a sophisticated finish.
- Whipped Cream: Offer a side of whipped cream for those who love extra fluffiness.
Storage & Meal Prep Instructions
- Refrigeration: Store mousse cups covered in the fridge for up to 3 days. Ensure they are well-sealed to prevent absorption of odors.
- Freezing: For longer storage, freeze the mousse cups, but be aware that the texture may change upon thawing.
- Reheating: If frozen, thaw in the refrigerator overnight before serving; do not refreeze once thawed.
Nutrition Facts & Health Insights
| Nutrient | Amount per Serving |
|---|---|
| Serving Size | 1 mousse cup |
| Calories | 350 |
| Sugar | 25 grams |
| Sodium | 150 milligrams |
| Fat | 25 grams |
| Saturated Fat | 15 grams |
| Unsaturated Fat | 5 grams |
| Trans Fat | 0 grams |
| Carbohydrates | 30 grams |
| Fiber | 1 gram |
| Protein | 4 grams |
| Cholesterol | 60 milligrams |
Health Insights: The heavy cream provides a source of calcium, while the chocolate offers antioxidants. Enjoy in moderation as part of a balanced diet.
Frequently Asked Questions
- Can I use milk instead of heavy cream? No, milk will not provide the same rich texture; heavy cream is essential for the mousse’s consistency.
- How long can I store the mousse cups? They can be stored in the refrigerator for up to 3 days; for longer storage, consider freezing.
- Can I make these mousse cups gluten-free? Yes, simply use gluten-free Oreos in the crust.
- What if I don’t have chocolate chips? You can use chopped chocolate bars as a substitute; just ensure they are semi-sweet.
- How can I make the mousse less sweet? Reduce the amount of sugar in the recipe or use dark chocolate for a richer flavor.
- Can I add flavors to the mousse? Yes, you can incorporate extracts like almond or coffee for added depth.
- What if my mousse doesn’t set? Ensure you chilled it long enough; if it’s still soft, it may need more time in the refrigerator.
- Can I use a different type of cookie for the crust? Absolutely! Any chocolate cookie can work, but Oreos provide the best flavor and texture.
Final Inspiration & Kitchen Confidence
As you prepare these Oreo Chocolate Mousse Cups, remember that cooking is not just about following a recipe; it’s about creating memories and sharing joy with those you love. Celebrate your achievements in the kitchen, and don’t hesitate to experiment with flavors and presentations. Each mousse cup you create is a testament to your culinary skills and creativity. So, gather your ingredients, unleash your inner chef, and indulge in the creamy bliss of these delightful treats!
Print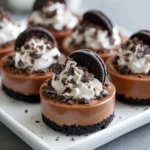
Oreo Chocolate Mousse Cups: Indulge in Creamy Bliss!
- Total Time: 2 hours 40 minutes
- Yield: 4 servings 1x
- Diet: Vegetarian
Description
Oreo Chocolate Mousse Cups are a decadent dessert that combines the rich, velvety texture of chocolate mousse with the delightful crunch of Oreo cookies. Each spoonful offers a harmonious blend of creamy sweetness and a hint of cocoa, making it an irresistible treat for chocolate lovers.
Ingredients
- Chocolate Mousse:
- 1 cup heavy cream
- 1/2 cup semi-sweet chocolate chips
- 1/4 cup granulated sugar
- 1 teaspoon vanilla extract
- Oreo Crust:
- 15 Oreo cookies, crushed
- 4 tablespoons unsalted butter, melted
- Garnish:
- Whipped cream
- Chocolate shavings
- Whole Oreo cookies
Instructions
- Preheat your oven to 350°F (175°C).
- In a bowl, combine crushed Oreo cookies and melted butter, mixing until well combined.
- Press the mixture into the bottom of serving cups to form a crust and bake for 10 minutes. Let cool.
- In a saucepan over low heat, melt the chocolate chips, stirring until smooth. Remove from heat and let cool slightly.
- In a separate bowl, whip the heavy cream, sugar, and vanilla extract until soft peaks form.
- Gently fold the melted chocolate into the whipped cream until fully incorporated.
- Evenly distribute the mousse over the cooled Oreo crusts in the cups.
- Chill in the refrigerator for at least 2 hours before serving.
Notes
- Make-ahead: These mousse cups can be prepared a day in advance and stored in the refrigerator.
- Storage: Keep covered in the fridge for up to 3 days.
- Substitutions: Use gluten-free Oreos for a gluten-free version or substitute dark chocolate for a richer flavor.
- Prep Time: 30 minutes
- Cook Time: 10 minutes
- Category: desserts
- Method: baking
- Cuisine: American
Nutrition
- Serving Size: 1 mousse cup
- Calories: 350
- Sugar: 25 grams
- Sodium: 150 milligrams
- Fat: 25 grams
- Saturated Fat: 15 grams
- Unsaturated Fat: 5 grams
- Trans Fat: 0 grams
- Carbohydrates: 30 grams
- Fiber: 1 gram
- Protein: 4 grams
- Cholesterol: 60 milligrams
Keywords: Oreo Chocolate Mousse Cups, chocolate mousse, Oreo dessert, easy mousse recipe, no-bake dessert, creamy chocolate dessert, party dessert, chocolate lovers, indulgent treats, Oreo crust, whipped cream, chocolate shavings, make-ahead dessert


