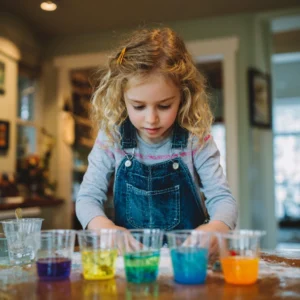
Introduction to No-Mess Science Experiments for Kids
As busy moms and professionals, finding engaging activities for your kids can be a challenge, especially when you want to keep the mess to a minimum. No-Mess Science Experiments for Kids are the perfect solution! These fun and easy projects allow children to explore scientific concepts without the hassle of extensive cleanup. With just a few simple materials, you can spark your child’s curiosity and creativity while ensuring a stress-free experience for you.
Why You’ll Love This No-Mess Science Experiments for Kids
No-Mess Science Experiments for Kids are not only entertaining but also educational. They encourage creativity, are budget-friendly, and can be done in the comfort of your home. These experiments are designed to be simple enough for kids to follow, making them perfect for busy families looking for quick and engaging activities.
Materials Needed for No-Mess Science Experiments for Kids
To get started with your no-mess science experiments, gather the following materials:
- Clear plastic cups – 5 (for mixing and observing)
- Food coloring – 3 colors (to create vibrant reactions)
- Water – 1 liter (the base for your experiments)
- Baking soda – 1 cup (for the fizzing reaction)
- Vinegar – 1 cup (to create the bubbling effect)
- Dish soap – 1 tablespoon (to enhance the fizz)
- Paper towels – 1 roll (for any minor spills)
For a printable full list of materials, see below.
Tools Required for No-Mess Science Experiments for Kids
You will need the following tools to conduct your experiments:
- Measuring cups (to ensure accurate measurements)
- Spoon (for mixing ingredients)
- Dropper (to add ingredients precisely)
- Tray or baking sheet (to contain any spills and keep your workspace tidy)
How to Make No-Mess Science Experiments for Kids
Follow these step-by-step instructions to conduct your no-mess science experiments:
- Gather Materials: Gather all materials and tools on a flat surface to ensure everything is within reach.
- Prepare the Cups: Fill each plastic cup with water, leaving some space at the top to prevent overflow.
- Add Food Coloring: Add a few drops of different food coloring to each cup to create colorful mixtures.
- Make Baking Soda Paste: In a separate cup, mix baking soda with a little water to create a paste.
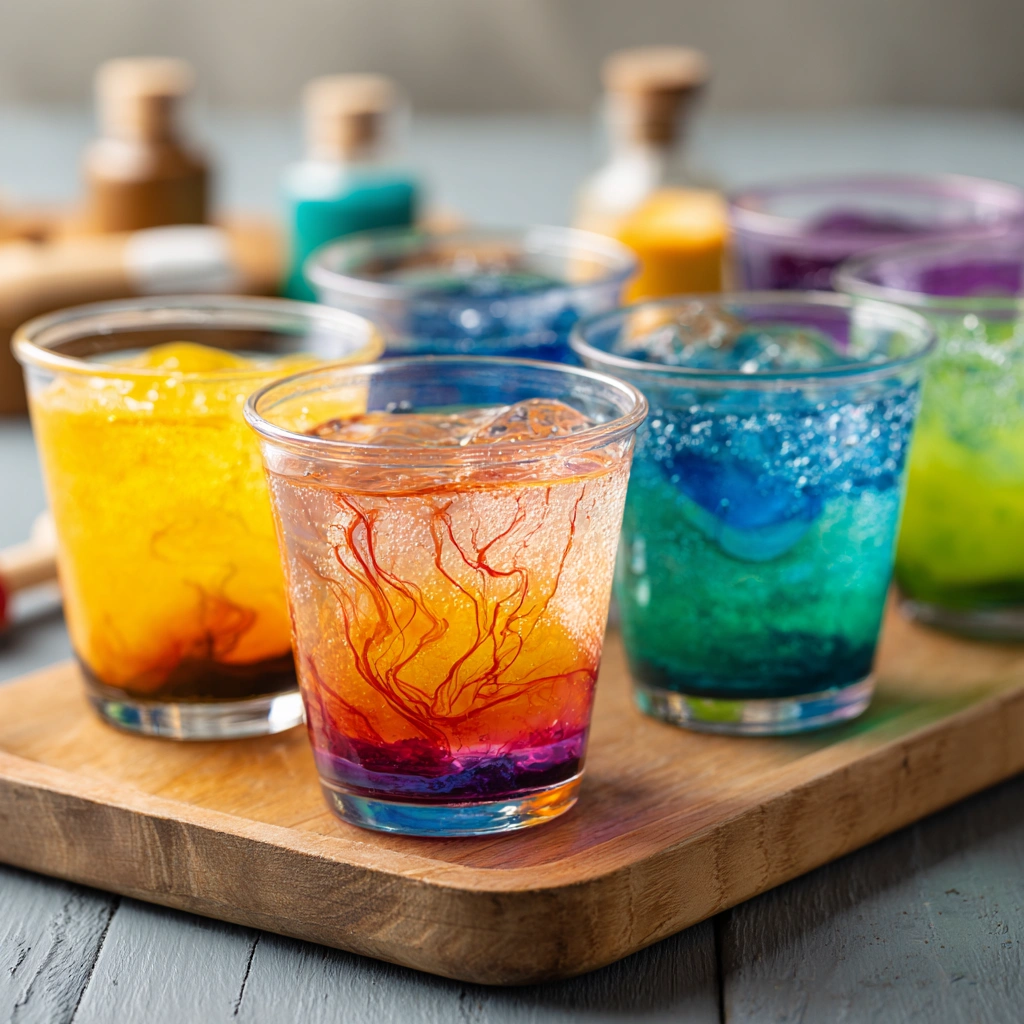
- Observe the Reaction: Using a dropper, add the baking soda paste to the colored water and observe the reaction as it fizzes.
- Prepare Vinegar Mixture: In another cup, pour vinegar and add a drop of dish soap to enhance the fizzing effect.
- Combine Mixtures: Slowly pour the vinegar mixture into the colored water and watch the exciting fizzing reaction unfold.
- Clean Up: Use paper towels to clean up any spills, if necessary. The tray will help contain any mess!
Tips for Best Results
- Use a tray to contain any spills and make cleanup easier.
- Experiment with different colors and amounts of baking soda and vinegar for varied reactions.
- Always supervise children during experiments to ensure safety.
Project Variations
- Color Combinations: Try mixing different food colors to create new shades.
- Seasonal Themes: Adapt the experiments for holidays by using themed colors (e.g., red and green for Christmas).
- Science Extensions: Discuss the science behind the reactions, such as acid-base reactions, to enhance learning.
Decoration and Usage Ideas
Once your experiments are complete, consider these ideas for using the finished craft:
- Display the Results: Use the colorful mixtures as a centerpiece for a science-themed party.
- Educational Play: Incorporate the experiments into a home school curriculum or science fair project.
- Gift Ideas: Package the materials in a fun kit for a birthday gift or playdate activity.
FAQs about No-Mess Science Experiments for Kids
Q: Are these experiments safe for young children?
A: Yes, but always supervise children closely and ensure they do not ingest any materials used in the experiments.
Q: How long do these experiments take?
A: The total time for preparation and execution is approximately 40 minutes.
Q: Can I use other colors or materials?
A: Absolutely! Feel free to experiment with different colors and safe household materials.
Final Thoughts
No-Mess Science Experiments for Kids are a fantastic way to engage your children in learning while keeping the mess to a minimum. These fun and easy projects not only foster creativity but also provide valuable educational experiences. So gather your materials, set up your workspace, and watch as your kids delight in the wonders of science. Remember, the joy of discovery is just a few experiments away!
Why You’ll Love This No-Mess Science Experiments for Kids
As a busy mom, I know how precious time can be. Between juggling work, family, and household chores, finding activities that are both fun and educational for my kids can feel overwhelming. That’s why I absolutely love No-Mess Science Experiments for Kids. These projects are not only entertaining but also provide a wonderful opportunity for my children to learn about science in a hands-on way.
One of my favorite memories is when my kids and I conducted our first no-mess experiment. We gathered our materials, and I could see their eyes light up with excitement. The best part? There was no need to worry about cleaning up a huge mess afterward! The simplicity of these experiments means that we can focus on the fun and learning without the stress of extensive cleanup.
These experiments are budget-friendly, which is a huge plus for families like mine. With just a few inexpensive materials, we can create vibrant reactions and explore scientific concepts together. Plus, they can be done right at home, making them perfect for those rainy days when outdoor play isn’t an option.
What I love most is how easy these projects are for kids to follow. They can take the lead, which boosts their confidence and creativity. I often find myself stepping back and letting them experiment, guiding them only when necessary. It’s a joy to watch them discover the wonders of science while I enjoy a moment of peace, knowing they are engaged and learning.
So, if you’re looking for quick and engaging activities that will keep your kids entertained and educated, look no further than these no-mess science experiments. They truly are a win-win for busy families!
Materials Needed for No-Mess Science Experiments for Kids
To get started with your No-Mess Science Experiments for Kids, gather the following materials:
- Clear plastic cups – 5 (for mixing and observing)
- Food coloring – 3 colors (to create vibrant reactions)
- Water – 1 liter (the base for your experiments)
- Baking soda – 1 cup (for the fizzing reaction)
- Vinegar – 1 cup (to create the bubbling effect)
- Dish soap – 1 tablespoon (to enhance the fizz)
- Paper towels – 1 roll (for any minor spills)
These materials are not only easy to find but also budget-friendly, making it simple for busy moms like us to dive into some fun science projects with our kids. I remember the first time I gathered these items; it felt like preparing for a mini adventure! The anticipation of what was to come made the experience even more exciting for my children.
For a printable full list of materials, see below.
Tools Required for No-Mess Science Experiments for Kids
You will need the following tools to conduct your experiments:
- Measuring cups (to ensure accurate measurements)
- Spoon (for mixing ingredients)
- Dropper (to add ingredients precisely)
- Tray or baking sheet (to contain any spills and keep your workspace tidy)
When I first started doing No-Mess Science Experiments for Kids with my children, I quickly learned that having the right tools made all the difference. I remember rummaging through my kitchen drawers, gathering measuring cups and spoons, feeling like a scientist preparing for a big experiment. It was such a thrill to see my kids so eager to dive into the fun!
The measuring cups are essential for ensuring that we get the right amounts of baking soda and vinegar, which is crucial for those exciting fizzing reactions. I often let my kids take charge of measuring, which not only teaches them about science but also helps them practice their math skills in a fun way.
The dropper is another favorite tool of ours. It allows my kids to add ingredients with precision, making them feel like real scientists. I love watching their faces light up as they carefully drop the baking soda paste into the colored water, eagerly anticipating the reaction.
Lastly, using a tray or baking sheet is a game-changer for keeping our workspace tidy. I can’t tell you how many times I’ve been grateful for that simple step! It contains any spills and makes cleanup a breeze, allowing us to focus on the joy of discovery rather than worrying about messes.
So gather these tools, and get ready for some no-mess fun! Your kids will love the hands-on experience, and you’ll appreciate the ease of cleanup.
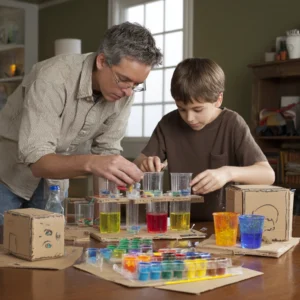
How to Make No-Mess Science Experiments for Kids
Follow these step-by-step instructions to conduct your No-Mess Science Experiments for Kids:
Step 1: Gather Materials
Gather all materials and tools on a flat surface to ensure everything is within reach. I find that having everything organized makes the process smoother and more enjoyable for my kids.
Step 2: Prepare the Cups
Fill each plastic cup with water, leaving some space at the top to prevent overflow. This step is crucial, as it sets the stage for the colorful reactions to come. I love watching my kids carefully pour the water, their excitement building with each cup filled!
Step 3: Add Food Coloring
Add a few drops of different food coloring to each cup to create colorful mixtures. This is where the magic begins! The vibrant colors swirl together, and my kids can’t help but giggle at the sight. It’s a simple yet captivating way to introduce them to the world of colors and science.
Step 4: Make Baking Soda Paste
In a separate cup, mix baking soda with a little water to create a paste. This step is a great opportunity for kids to practice their mixing skills. I often let them take turns stirring, and it’s delightful to see their teamwork in action!
Step 5: Observe the Reaction
Using a dropper, add the baking soda paste to the colored water and observe the reaction as it fizzes. This moment is always filled with awe and wonder! The fizzing action is not only fun to watch but also a fantastic way to explain the science behind chemical reactions.
Step 6: Prepare Vinegar Mixture
In another cup, pour vinegar and add a drop of dish soap to enhance the fizzing effect. The anticipation builds as my kids know the next step will be even more exciting. The dish soap adds an extra layer of fun, creating a bubbly explosion!
Step 7: Combine Mixtures
Slowly pour the vinegar mixture into the colored water and watch the exciting fizzing reaction unfold. This is the grand finale! I love seeing my kids’ faces light up as the colors mix and the fizzing intensifies. It’s a moment of pure joy and discovery!
Step 8: Clean Up
Use paper towels to clean up any spills, if necessary. The tray will help contain any mess! I always remind my kids that cleaning up is part of the fun. Plus, it teaches them responsibility and teamwork as we tackle the cleanup together.
Tips for Best Results
As I’ve dived into the world of No-Mess Science Experiments for Kids, I’ve picked up a few tips that have made our crafting sessions even more enjoyable and successful. Here are my top recommendations:
- Use a tray: This is a game-changer! Placing all your cups and materials on a tray helps contain any spills and makes cleanup a breeze. I can’t tell you how many times I’ve been grateful for this simple step. It allows us to focus on the fun without worrying about messes!
- Experiment with colors: Don’t be afraid to mix things up! Try using different food coloring combinations and varying amounts of baking soda and vinegar. Each experiment can yield unique results, and my kids love seeing how the colors change and react differently. It’s like a mini science fair every time!
- Supervise closely: While these experiments are designed to be safe, it’s always important to keep an eye on the kids. I make sure to supervise them during the experiments to ensure they’re following the steps correctly and staying safe. Plus, it gives me a chance to join in on the fun and share in their excitement!
By following these tips, you’ll set the stage for a successful and enjoyable science experience. Remember, the goal is to have fun while learning, so embrace the joy of discovery with your kids!
Project Variations
One of the things I love most about No-Mess Science Experiments for Kids is how versatile they can be! Once you get the hang of the basic experiments, there are so many fun variations to explore. Here are a few ideas that have worked wonderfully for my family:
- Color Combinations: Encourage your kids to mix different food colors to create new shades. It’s fascinating to see how primary colors blend into secondary colors, and it opens up a world of creativity. I remember one afternoon when my kids mixed blue and yellow to create a vibrant green. Their excitement was contagious, and it sparked a discussion about color theory!
- Seasonal Themes: Adapt the experiments for holidays by using themed colors. For instance, during Christmas, we use red and green food coloring to create festive fizzing reactions. It’s a delightful way to celebrate the season while engaging in educational play. I love how these simple adaptations can make the experiments feel special and relevant!
- Science Extensions: Take the learning a step further by discussing the science behind the reactions. Explain concepts like acid-base reactions and how they create fizzing. I often find that my kids are curious about the “why” behind the experiments, and diving deeper into the science enhances their understanding and appreciation. It’s a great way to turn a fun activity into a mini science lesson!
These variations not only keep the experiments fresh and exciting but also provide opportunities for deeper learning and creativity. I encourage you to try them out and see how your kids respond. You might just discover a new favorite way to explore science together!
Decoration and Usage Ideas
Once your No-Mess Science Experiments for Kids are complete, the fun doesn’t have to end there! I love finding creative ways to use the colorful results of our experiments. Here are some delightful ideas that have worked wonders for my family:
- Display the Results: Use the vibrant mixtures as a centerpiece for a science-themed party. I remember hosting a birthday party for my son, and we set up a table with our colorful experiments on display. The kids were fascinated, and it sparked conversations about science and creativity. It’s a fantastic way to showcase their hard work and make them feel proud of their creations!
- Educational Play: Incorporate the experiments into a home school curriculum or science fair project. I often use our no-mess experiments as a springboard for deeper learning. We discuss the science behind the reactions, and it becomes a fun way to reinforce concepts they’re learning in school. It’s amazing how much more engaged they are when they can see science in action!
- Gift Ideas: Package the materials in a fun kit for a birthday gift or playdate activity. I’ve found that kids love receiving DIY science kits, and it’s a great way to encourage their curiosity. I often put together a little bag with all the necessary materials and instructions, and it’s always a hit at parties. It’s a thoughtful gift that keeps on giving, as they can enjoy the experiments long after the party is over!
These decoration and usage ideas not only extend the life of your experiments but also create opportunities for more learning and fun. I encourage you to get creative and see how you can incorporate your colorful creations into everyday life. The joy of discovery is truly endless!
FAQs about No-Mess Science Experiments for Kids
Q: Are these experiments safe for young children?
A: Yes, but always supervise children closely and ensure they do not ingest any materials used in the experiments. I always remind my kids that while we’re having fun, safety comes first!
Q: How long do these experiments take?
A: The total time for preparation and execution is approximately 40 minutes. I find that this timeframe is perfect for keeping my kids engaged without losing their interest. It’s just enough time for them to dive into the science without feeling rushed!
Q: Can I use other colors or materials?
A: Absolutely! Feel free to experiment with different colors and safe household materials. I love encouraging my kids to think outside the box. One time, we even used glitter to add a little sparkle to our experiments, and it made the reactions even more exciting!
Final Thoughts
No-Mess Science Experiments for Kids are a fantastic way to engage your children in learning while keeping the mess to a minimum. As a busy mom, I truly appreciate how these fun and easy projects allow my kids to explore scientific concepts without the stress of extensive cleanup. Each experiment is a delightful journey into the world of science, sparking curiosity and creativity in my little ones.
I’ve seen firsthand how these activities not only entertain but also provide valuable educational experiences. Watching my children’s faces light up as they witness the fizzing reactions and vibrant colors is a joy that never gets old. It’s moments like these that remind me of the importance of hands-on learning and the joy of discovery.
So gather your materials, set up your workspace, and prepare for some no-mess fun! Embrace the excitement of experimentation and let your kids take the lead. Remember, the joy of discovery is just a few experiments away! You’ll create lasting memories while nurturing their love for science, and that’s a win-win for busy families like ours.
Print
No-Mess Science Experiments for Kids: Fun and Easy Projects!
Description
This project features a series of no-mess science experiments that are fun and easy for kids to do, allowing them to explore scientific concepts without the hassle of cleanup.
Instructions
- Gather all materials and tools on a flat surface.
- Fill each plastic cup with water, leaving some space at the top.
- Add a few drops of different food coloring to each cup.
- In a separate cup, mix baking soda with a little water to create a paste.
- Using a dropper, add the baking soda paste to the colored water and observe the reaction.
- In another cup, pour vinegar and add a drop of dish soap.
- Slowly pour the vinegar mixture into the colored water and watch the fizzing reaction.
- Use paper towels to clean up any spills, if necessary.
Keywords: No-Mess Science Experiments, Kids Science Projects, Easy Science Activities, Fun Learning Activities