Introduction to No-Bake Samoa Bars
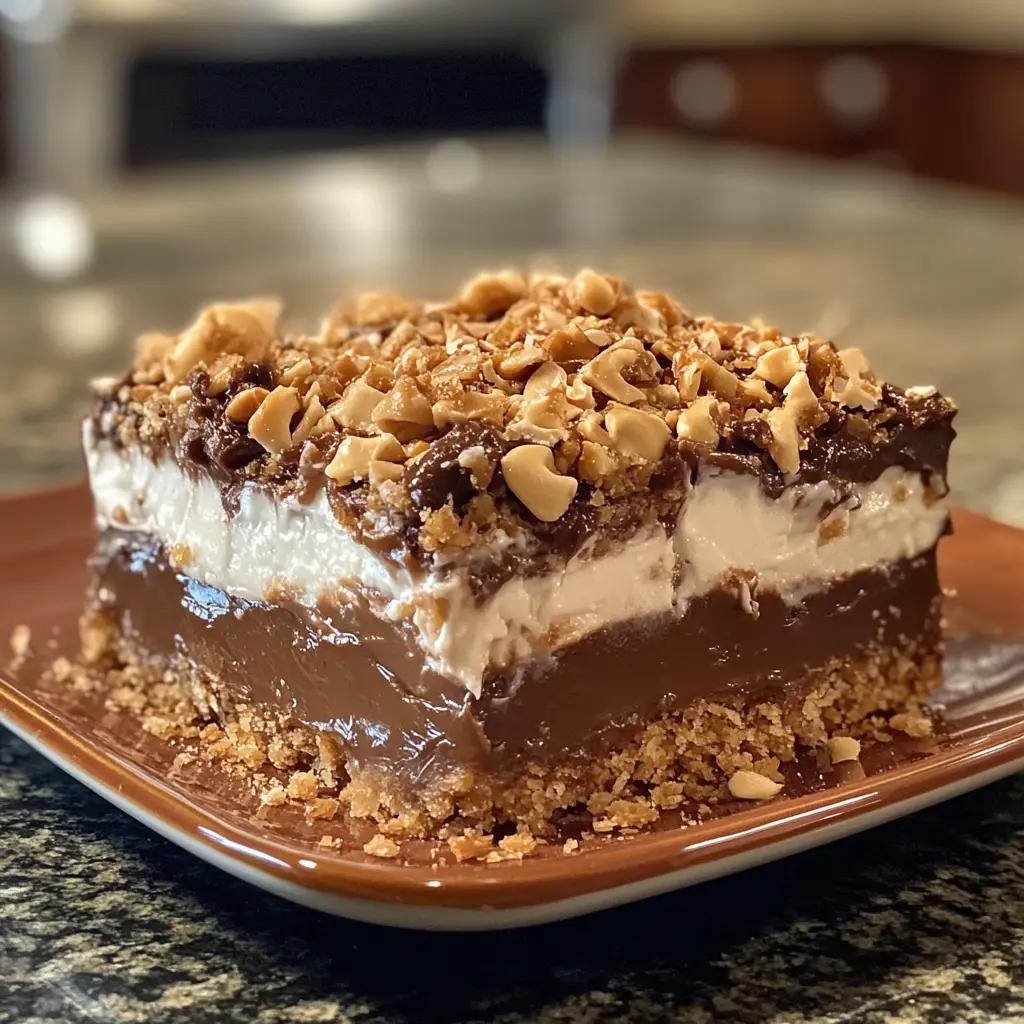
As a passionate home cook, I often find myself reminiscing about the sweet treats that bring back fond memories. One such delight is the No-Bake Samoa Bars. These bars are a delightful homage to the classic Girl Scout cookie, the Samoa. With their rich layers of chocolate, caramel, and coconut, they transport me back to my childhood, where every bite felt like a celebration.
What I love most about these bars is their simplicity. You don’t need to turn on the oven, which is a blessing on hot summer days or when I’m just not in the mood to deal with the heat. Instead, I can whip up these delicious bars in no time, making them perfect for last-minute gatherings or a cozy night in. Plus, they’re a hit with friends and family alike, often disappearing faster than I can say “Samoa!”
In this recipe, I’ll share not just the steps to create these mouthwatering bars but also some personal tips and tricks I’ve picked up along the way. Whether you’re a seasoned baker or a novice in the kitchen, I promise you’ll find joy in making these treats. So, grab your ingredients, and let’s embark on this sweet culinary adventure together!
Ingredients for No-Bake Samoa Bars
Before diving into the delightful world of No-Bake Samoa Bars, let’s gather our ingredients. I always believe that quality matters, so I recommend using the best ingredients you can find. This not only enhances the flavor but also makes the experience of making these bars even more enjoyable. Here’s what you’ll need:
Main Ingredients
- 1 cup of graham cracker crumbs: You can crush them yourself or buy pre-crushed. I love the texture of homemade crumbs!
- ½ cup of unsweetened cocoa powder: This adds a rich chocolate flavor. Look for high-quality cocoa for the best results.
- ½ cup of melted butter: I prefer unsalted butter for better control over the sweetness.
- 1 cup of sweetened shredded coconut: Toasting it lightly before adding gives a wonderful depth of flavor.
- 1 cup of caramel sauce: You can use store-bought or make your own. Homemade caramel is a game-changer!
- ½ cup of chocolate chips: Semi-sweet or dark chocolate works beautifully here. I often mix both for a richer taste.
Optional Add-ons
- 1 teaspoon of vanilla extract: A splash of vanilla can elevate the flavor profile.
- Sea salt: A pinch sprinkled on top before serving can enhance the sweetness and add a delightful contrast.
- Chopped nuts: Pecans or walnuts can add a nice crunch if you’re feeling adventurous!
Gathering these ingredients is like preparing for a little adventure in my kitchen. Each item plays a role in creating the perfect balance of flavors and textures. So, take a moment to enjoy the process of selecting your ingredients, and let’s get ready to create something truly special!
How to Prepare No-Bake Samoa Bars
Now that we have our ingredients ready, it’s time to roll up our sleeves and dive into the fun part—preparing our No-Bake Samoa Bars! I find that cooking is like a dance; each step flows into the next, creating a beautiful rhythm. Let’s get started!
Step 1: Prepare the Base Layer
First things first, we need to create a solid foundation for our bars. In a mixing bowl, combine the graham cracker crumbs, cocoa powder, and melted butter. Stir until everything is well mixed and resembles wet sand. This mixture will form the base layer of our bars.
Tips for Step 1
- Make sure your butter is melted but not too hot; you don’t want to cook the crumbs!
- Press the mixture firmly into the bottom of a lined baking dish. I like to use the back of a measuring cup for an even layer.
Step 2: Make the Caramel Coconut Topping
Next, let’s whip up that delicious caramel coconut topping! In a saucepan over medium heat, combine the caramel sauce and shredded coconut. Stir continuously until the mixture is warm and well combined. This step fills your kitchen with a heavenly aroma that’s hard to resist!
Tips for Step 2
- If you’re using store-bought caramel, consider adding a splash of vanilla extract for an extra flavor boost.
- Don’t rush this step; take your time to ensure the coconut is evenly coated in caramel.
Step 3: Assemble the Bars
Now comes the fun part—assembling our bars! Pour the caramel coconut mixture over the prepared base layer. Use a spatula to spread it evenly, making sure every corner is covered. This layer is where the magic happens, and I can already taste the deliciousness!
Tips for Step 3
- For a smoother finish, lightly spray your spatula with cooking spray before spreading the topping.
- Let the bars chill in the refrigerator for at least 30 minutes to set properly.
Step 4: Drizzle with Chocolate
Finally, it’s time to add the finishing touch—chocolate! Melt your chocolate chips in a microwave-safe bowl, heating in 30-second intervals and stirring in between. Once melted, drizzle the chocolate over the top of the bars using a fork or a piping bag for a more artistic touch.
Tips for Step 4
- For a beautiful presentation, try to create a zigzag pattern with the chocolate drizzle.
- Let the chocolate set before cutting the bars into squares. Patience is key here!
And there you have it! Each step brings us closer to those delightful No-Bake Samoa Bars. I can’t wait for you to experience the joy of making and sharing these treats. Let’s keep the momentum going and move on to the next section!
Equipment Needed for No-Bake Samoa Bars
Before we dive into the delicious world of No-Bake Samoa Bars, let’s make sure we have the right tools at our disposal. Having the right equipment can make the process smoother and more enjoyable. Here’s what you’ll need:
- Mixing Bowls: A couple of medium-sized mixing bowls will do the trick. I love using glass bowls because they’re easy to clean and you can see the ingredients mixing together!
- Spatula: A sturdy spatula is essential for mixing and spreading the layers. If you have a silicone spatula, it’s perfect for scraping every last bit of that delicious caramel coconut topping!
- Baking Dish: A 9×9 inch square baking dish works best for this recipe. If you don’t have one, any similar-sized dish will work. Just make sure to line it with parchment paper for easy removal.
- Microwave-Safe Bowl: This is where you’ll melt your chocolate chips. If you prefer, you can also use a double boiler on the stove.
- Measuring Cups and Spoons: Accurate measurements are key to achieving the perfect balance of flavors. I always keep a set handy!
- Plastic Wrap or Foil: To cover the bars while they chill in the fridge, ensuring they stay fresh and delicious.
With these tools in hand, you’re all set to create your No-Bake Samoa Bars! Remember, cooking is all about improvisation, so feel free to use what you have. Let’s keep the momentum going and move on to the next delicious step!
Variations of No-Bake Samoa Bars
As I’ve experimented with my No-Bake Samoa Bars, I’ve discovered that there are so many fun ways to switch things up! Each variation brings a new twist to the classic recipe, making it even more exciting to share with friends and family. Here are a few of my favorite variations:
- Nutty Samoa Bars: For a delightful crunch, add chopped nuts like pecans or almonds to the caramel coconut topping. The added texture complements the chewy coconut beautifully!
- Peanut Butter Samoa Bars: If you’re a peanut butter lover like me, swirl in some creamy peanut butter into the chocolate drizzle. It adds a rich, nutty flavor that pairs perfectly with the sweetness of the bars.
- Minty Samoa Bars: A few drops of peppermint extract in the chocolate drizzle can transform these bars into a refreshing minty treat. It’s like a celebration of flavors in every bite!
- Gluten-Free Samoa Bars: Swap out the graham cracker crumbs for gluten-free alternatives, like almond flour or gluten-free cookie crumbs. This way, everyone can enjoy these delicious bars!
These variations not only keep things interesting but also allow you to cater to different tastes and dietary preferences. I love how a simple tweak can create a whole new experience. So, don’t hesitate to get creative and make these bars your own!
Cooking Notes for No-Bake Samoa Bars
As I’ve made my fair share of No-Bake Samoa Bars, I’ve picked up a few cooking notes that can help you achieve the best results. These little tips can make a big difference in your final product, so let’s dive in!
- Chill Time: Patience is key! Allow the bars to chill in the refrigerator for at least 2 hours before cutting. This helps them set properly and makes slicing easier.
- Storage: Store your bars in an airtight container in the fridge. They can last up to a week, but I doubt they’ll last that long once you share them with friends!
- Layering: Make sure each layer is evenly spread. This ensures that every bite is a perfect mix of chocolate, caramel, and coconut. I like to use a spatula to smooth out the layers.
- Chocolate Drizzle: If you find your chocolate is too thick for drizzling, add a teaspoon of coconut oil to thin it out. This will give you a beautiful, glossy finish!
These cooking notes are like little nuggets of wisdom I’ve gathered over time. They help me create the perfect No-Bake Samoa Bars every time. I hope they inspire you to make your own delicious batch! Now, let’s keep the momentum going and explore some serving suggestions!
Serving Suggestions for No-Bake Samoa Bars
When it comes to serving my No-Bake Samoa Bars, I love to get a little creative! Presentation can elevate the experience, making these treats even more delightful. Here are some of my favorite serving suggestions that I think you’ll enjoy:
- On a Platter: Arrange the bars on a beautiful serving platter, garnished with toasted coconut flakes or a sprinkle of sea salt. It adds a touch of elegance and makes them look irresistible!
- With Ice Cream: Serve a bar alongside a scoop of vanilla or coconut ice cream. The creamy texture pairs perfectly with the chewy bars, creating a heavenly dessert experience.
- As Party Favors: Cut the bars into smaller squares and package them in cute little boxes or bags. They make fantastic party favors for birthdays or gatherings, and everyone loves a sweet treat to take home!
- With Fresh Fruit: Pair the bars with fresh fruit like strawberries or raspberries. The tartness of the fruit balances the sweetness of the bars beautifully, making for a refreshing contrast.
These serving suggestions not only enhance the visual appeal but also add layers of flavor to your No-Bake Samoa Bars. I love how a simple presentation can turn a delicious treat into a memorable experience. So, gather your friends and family, and enjoy these bars in style!
Tips for Making No-Bake Samoa Bars
As I’ve whipped up countless batches of No-Bake Samoa Bars, I’ve gathered a treasure trove of tips that can help you create the perfect treat every time. These little nuggets of wisdom can make your baking experience smoother and more enjoyable. Here are my top tips:
- Use Fresh Ingredients: Always check the freshness of your coconut and chocolate. Fresh ingredients make a world of difference in flavor!
- Don’t Rush the Chilling: Allow the bars to chill for at least 2 hours. This helps them set properly, making them easier to cut and more enjoyable to eat.
- Experiment with Flavors: Feel free to add your favorite flavors! A dash of cinnamon or a hint of almond extract can elevate the taste to new heights.
- Keep It Clean: Use parchment paper to line your baking dish. It makes for easy removal and keeps your bars looking neat and tidy.
- Get Creative with Toppings: Besides chocolate drizzle, consider adding crushed nuts or a sprinkle of sea salt on top for an extra crunch and flavor contrast.
These tips are like little secrets I’ve learned along my culinary journey. They help me create No-Bake Samoa Bars that are not only delicious but also visually appealing. I hope they inspire you to make your own batch with confidence and joy!
Breakdown of Time for No-Bake Samoa Bars
When it comes to making No-Bake Samoa Bars, I love how quick and easy the process is! It’s perfect for those days when I want something sweet without spending hours in the kitchen. Here’s a simple breakdown of the time you’ll need:
- Prep Time: About 20 minutes. This includes gathering your ingredients, mixing the base, and preparing the caramel coconut topping. It’s a fun and engaging process that flies by!
- Chill Time: At least 2 hours. This is the hardest part for me—waiting! But it’s essential for the bars to set properly, so don’t skip this step.
- Total Time: Approximately 2 hours and 20 minutes. Most of this time is just letting the bars chill, so you can use it to relax or prepare for your next culinary adventure!
With this time breakdown, you can easily plan when to whip up these delightful bars. I often find myself making them in the afternoon, so they’re ready for dessert after dinner. It’s a sweet way to end the day, and I can’t wait for you to experience it too!
Nutritional Information for No-Bake Samoa Bars
As a passionate home cook, I always find it helpful to know the nutritional content of the treats I make. While No-Bake Samoa Bars are undeniably indulgent, they can also be enjoyed in moderation as part of a balanced diet. Here’s a general breakdown of the nutritional information per bar, assuming you cut the batch into 16 squares:
- Calories: Approximately 180 calories
- Fat: 9 grams (with about 5 grams of saturated fat)
- Carbohydrates: 24 grams
- Fiber: 1 gram
- Sugar: 12 grams
- Protein: 2 grams
Keep in mind that these values can vary based on the specific ingredients you use, such as the type of chocolate or caramel sauce. If you’re looking to lighten things up, consider using a sugar-free caramel or reducing the amount of chocolate drizzle. I love how these bars can be customized to fit different dietary needs while still delivering that delicious flavor we all crave!
Enjoying a No-Bake Samoa Bar is like taking a bite of nostalgia, and knowing the nutritional information helps me savor each moment even more. So, whether you’re treating yourself or sharing with friends, these bars are sure to bring joy to your kitchen!
Frequently Asked Questions about No-Bake Samoa Bars
As I’ve shared my love for No-Bake Samoa Bars, I’ve often found myself answering a few common questions from fellow home cooks. It’s always a joy to connect with others who share my passion for baking! Here are some frequently asked questions that might help you on your journey to making these delightful treats:
Can I make No-Bake Samoa Bars ahead of time?
Absolutely! In fact, I often make them a day in advance. They actually taste even better after chilling overnight, as the flavors meld together beautifully. Just be sure to store them in an airtight container in the fridge to keep them fresh!
What can I use instead of graham cracker crumbs?
If you’re looking for alternatives, you can use crushed cookies like digestive biscuits or even gluten-free options like almond flour or gluten-free cookie crumbs. Each option brings its own unique flavor and texture, so feel free to experiment!
How do I store leftover bars?
To keep your No-Bake Samoa Bars fresh, store them in an airtight container in the refrigerator. They can last up to a week, but I doubt they’ll stick around that long! If you want to keep them for longer, you can freeze them for up to three months. Just make sure to wrap them well!
Can I use homemade caramel sauce?
Yes, yes, yes! Homemade caramel sauce adds a special touch to these bars. I love making my own because it allows me to control the sweetness and flavor. Just be sure to let it cool slightly before mixing it with the coconut!
What if I don’t have chocolate chips?
No worries! You can use any type of chocolate you have on hand, whether it’s chocolate bars, cocoa powder, or even white chocolate. Just melt it down and drizzle it over the bars for that delicious finishing touch!
These questions reflect the curiosity and creativity that come with baking. I hope my answers inspire you to dive into making your own No-Bake Samoa Bars with confidence. Remember, cooking is all about having fun and making it your own! Now, let’s wrap up our sweet adventure with a final note on these delightful treats.
Conclusion on No-Bake Samoa Bars
As I reflect on my journey of creating No-Bake Samoa Bars, I can’t help but smile at the joy they bring. These bars are not just a treat; they’re a celebration of flavors that come together in perfect harmony. The rich chocolate, gooey caramel, and chewy coconut create a delightful experience that’s hard to resist.
What I love most about this recipe is its simplicity. With no baking required, it’s an accessible treat for everyone, from seasoned bakers to kitchen novices. Plus, the ability to customize the bars with different flavors and ingredients makes them a versatile option for any occasion. Whether you’re hosting a gathering, celebrating a special moment, or simply indulging in a sweet craving, these bars are sure to impress.
So, gather your ingredients, roll up your sleeves, and dive into the delightful world of No-Bake Samoa Bars. I promise you’ll find joy in every step of the process, and the smiles on your friends’ and family’s faces will be the sweetest reward of all. Happy cooking!


