No-Bake Pink Velvet Cheesecake Bites: Creamy Bliss Awaits!
Sensory-Rich Introduction with Immediate Craving
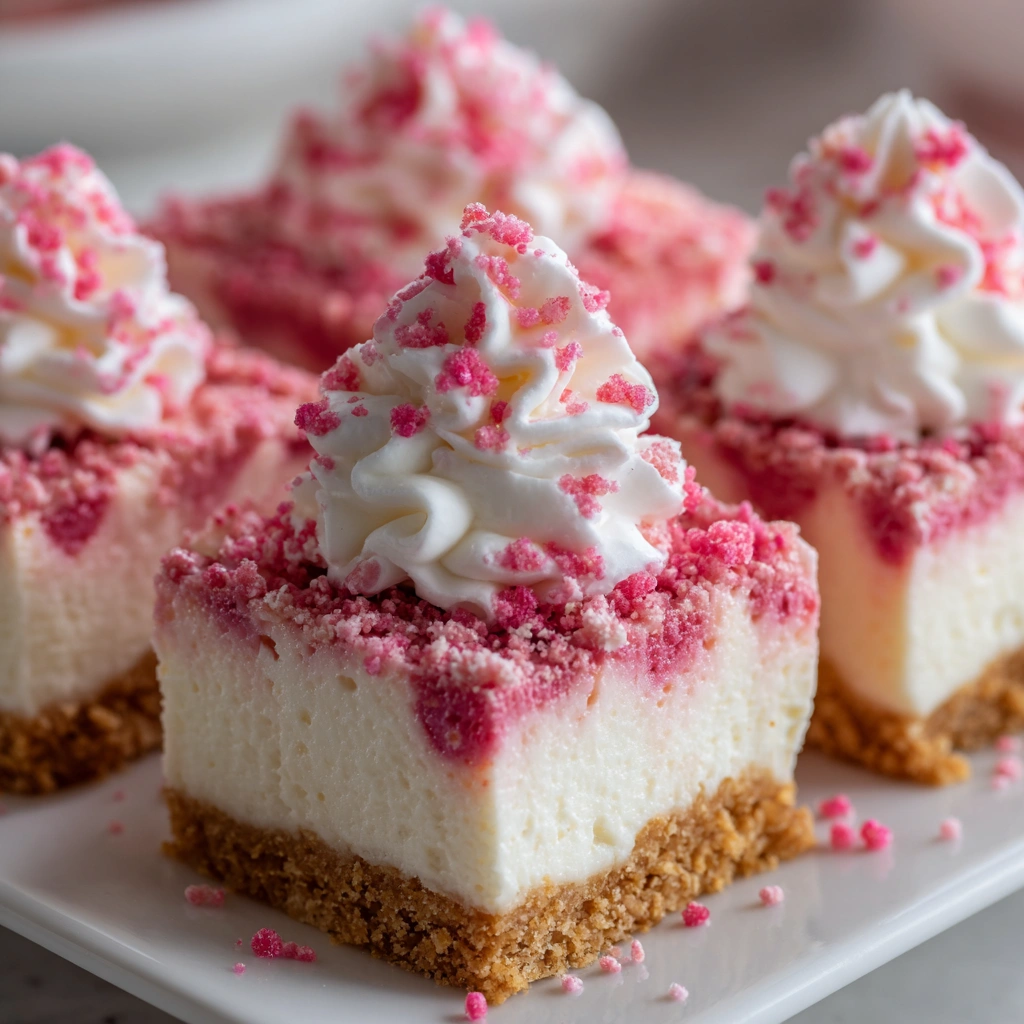
Imagine a dessert that not only tantalizes your taste buds but also captivates your eyes. The No-Bake Pink Velvet Cheesecake Bites are a feast for the senses, with their vibrant pink hue and creamy texture that melts in your mouth. Each bite is a delightful blend of rich cream cheese, a hint of vanilla, and a subtle tang that lingers long after the last morsel. This dessert is perfect for celebrations, whether it’s a baby shower, birthday party, or simply a sweet treat to brighten your day. I remember the first time I made these bites for a friend’s gathering; the joy on everyone’s faces as they savored the creamy bliss was unforgettable. These cheesecake bites are not just a dessert; they are a moment of happiness shared with loved ones.
Why You’ll Love This No-Bake Pink Velvet Cheesecake Bites
- Texture Contrast: The creamy filling contrasts beautifully with the crunchy graham cracker crust, creating a delightful mouthfeel.
- Flavor Balance: The sweetness of the cheesecake is perfectly balanced by the slight tang of cream cheese, making each bite irresistible.
- Versatility: These bites can be customized with different colors and toppings, making them suitable for any occasion.
- Ease of Preparation: With no baking required, these cheesecake bites are quick and simple to make, perfect for novice bakers.
- Universal Appeal: Loved by both kids and adults, these bites are a hit at any gathering, ensuring everyone leaves with a smile.
Essential Tools & Preparation Strategy
- Mixing Bowls: Essential for combining ingredients smoothly; opt for glass or stainless steel for easy cleaning.
- Electric Mixer: Needed to achieve a creamy texture for the filling; a hand mixer works well if you don’t have a stand mixer.
- Spatula: Useful for spreading the filling evenly over the crust; a silicone spatula is ideal for scraping down the sides.
- 9-inch Square Baking Dish: The perfect size for setting the cheesecake bites; consider using a glass dish for easy visibility.
- Plastic Wrap: Important for covering the dish while chilling; ensure it’s tightly sealed to prevent moisture loss.
- Knife: Required for cutting the cheesecake into bite-sized pieces; a sharp knife ensures clean edges for a professional look.
- Measuring Cups and Spoons: Accurate measurements are crucial for the perfect balance of flavors.
- Parchment Paper (optional): Lining the baking dish can make removal easier, especially if you want to serve the bites on a platter.
Ingredients & Their Roles in This No-Bake Pink Velvet Cheesecake Bites
Crust
- Graham Cracker Crumbs: Provides a crunchy base that complements the creamy filling.
- Granulated Sugar: Adds sweetness to the crust, enhancing the overall flavor.
- Unsalted Butter: Binds the crust ingredients together and adds richness.
Filling
- Cream Cheese: The star ingredient, providing a rich and creamy texture.
- Powdered Sugar: Sweetens the filling without adding graininess.
- Heavy Cream: Contributes to the lightness and fluffiness of the cheesecake.
- Vanilla Extract: Enhances the flavor profile with a warm, aromatic note.
- Pink Food Coloring: Adds a playful touch, making the dessert visually appealing.
Garnish
- Whipped Cream: Adds a light, airy texture on top of the bites.
- Pink Sprinkles: Provides a festive look, perfect for celebrations.
Step-by-Step Guide to Perfect No-Bake Pink Velvet Cheesecake Bites
- Prepare the Crust: In a medium bowl, combine graham cracker crumbs, granulated sugar, and melted butter until well mixed.
- Form the Crust: Press the mixture firmly into the bottom of a 9-inch square baking dish to create a solid base.
- Mix the Filling: In a large mixing bowl, beat the softened cream cheese until smooth and creamy.
- Combine Ingredients: Add powdered sugar, heavy cream, vanilla extract, and pink food coloring to the cream cheese, mixing until fully combined and fluffy.
- Spread the Filling: Pour the cheesecake filling evenly over the crust, smoothing the top with a spatula for an even finish.
- Chill: Cover the dish with plastic wrap and refrigerate for at least 4 hours or until set.
- Cut into Bites: Once set, use a sharp knife to cut into bite-sized squares.
- Garnish and Serve: Top each square with whipped cream and pink sprinkles before serving.
Chef’s Notes & Pro Tips for Flawless Results
- Make-Ahead Instructions: These cheesecake bites can be made up to 2 days in advance and stored in the refrigerator for optimal flavor.
- Storage: Keep leftovers in an airtight container in the fridge for up to 5 days to maintain freshness.
- Equipment Recommendations: A stand mixer can save time and effort when mixing the filling.
- Customization Options: Feel free to experiment with different food coloring or toppings, such as crushed nuts or fruit.
Avoid These Common Cooking Mistakes
- Not Softening the Cream Cheese: This can lead to a lumpy filling. Always let it sit at room temperature for at least 30 minutes.
- Overmixing the Filling: This can cause the cheesecake to become too airy and lose its dense texture. Mix just until combined.
- Skipping the Chilling Time: Not allowing the cheesecake to set properly can result in a runny filling. Be patient and chill for at least 4 hours.
- Using Too Much Food Coloring: This can alter the flavor. Start with a small amount and add more as needed.
- Not Pressing the Crust Firmly: A loose crust can crumble when cutting. Ensure it’s compacted well.
- Cutting Too Soon: This can cause the bites to fall apart. Wait until they are fully set.
- Not Using a Sharp Knife: A dull knife can make cutting messy. Use a sharp knife for clean edges.
Creative Variations & Customizations
- Gluten-Free Version: Substitute graham cracker crumbs with gluten-free alternatives.
- Dairy-Free Option: Use a dairy-free cream cheese alternative for a vegan-friendly treat.
- Seasonal Flavors: Add seasonal spices like cinnamon or nutmeg for a festive twist.
- Fruit-Infused: Incorporate pureed strawberries or raspberries into the filling for added flavor.
- Chocolate Drizzle: Top with melted chocolate for a decadent finish.
Perfect Pairings: What to Serve With No-Bake Pink Velvet Cheesecake Bites
- Fresh Strawberries: Their tartness complements the sweetness of the cheesecake.
- Vanilla Ice Cream: Adds an extra layer of creaminess and indulgence.
- Chocolate Sauce: A drizzle enhances the dessert’s richness.
- Coffee or Tea: Balances the sweetness and provides a comforting beverage option.
- Mint Leaves: A refreshing garnish that adds a pop of color and flavor.
- Sparkling Beverages: Perfect for celebrations, adding a festive touch.
- Assorted Cookies: Create a delightful dessert platter for variety.
- Fruit Salad: A light and refreshing side that contrasts the richness of the cheesecake.
Storage & Meal Prep Instructions
- Refrigeration: Store in an airtight container in the fridge for up to 5 days.
- Freezing: For longer storage, freeze the bites in a single layer, then transfer to a freezer-safe container for up to 2 months.
- Reheating: Thaw in the refrigerator overnight before serving; do not refreeze once thawed.
Nutrition Facts & Health Insights
| Nutrient | Amount per Serving (1 bite-sized square) |
|---|---|
| Calories | 150 |
| Sugar | 10 grams |
| Sodium | 120 milligrams |
| Fat | 10 grams |
| Saturated Fat | 6 grams |
| Unsaturated Fat | 3 grams |
| Trans Fat | 0 grams |
| Carbohydrates | 15 grams |
| Fiber | 0 grams |
| Protein | 2 grams |
| Cholesterol | 30 milligrams |
Health Benefits of Key Ingredients
- Cream Cheese: Provides calcium and protein, essential for bone health.
- Graham Crackers: A source of whole grains, offering fiber and energy.
- Heavy Cream: Contains healthy fats that can support satiety.
Frequently Asked Questions
- Can I use low-fat cream cheese? Yes, but it may alter the texture slightly.
- How long do these bites last in the fridge? They can be stored for up to 5 days.
- Can I make these bites without food coloring? Absolutely! They will still taste delicious.
- What can I substitute for heavy cream? You can use coconut cream for a dairy-free option.
- Is it necessary to chill the cheesecake? Yes, chilling is crucial for the filling to set properly.
- Can I use a different type of crust? Yes, feel free to experiment with cookie crusts or nut-based crusts.
- How do I know when the cheesecake is set? It should be firm to the touch and hold its shape when cut.
- Can I add fruit to the filling? Yes, pureed fruit can be mixed in for added flavor.
Final Inspiration & Kitchen Confidence
As you embark on making these No-Bake Pink Velvet Cheesecake Bites, remember that cooking is an art, and every creation is a step towards mastering your skills. Celebrate your achievements, no matter how small, and share your delicious results with friends and family. You’ve got this! Now, gather your ingredients and let the creamy bliss await!
Print
No-Bake Pink Velvet Cheesecake Bites: Creamy Bliss Awaits!
- Total Time: 4 hours 20 minutes
- Yield: 16 servings 1x
- Diet: Vegetarian
Description
Indulge in the velvety smoothness of these No-Bake Pink Velvet Cheesecake Bites, where each bite melts in your mouth, leaving a delightful sweetness that lingers. The rich cream cheese base is perfectly complemented by a hint of vanilla and a subtle tang, while the vibrant pink hue adds a playful touch to your dessert table.
Ingredients
- Crust:
- 1 cup graham cracker crumbs
- 1/4 cup granulated sugar
- 1/2 cup unsalted butter, melted
- Filling:
- 16 oz cream cheese, softened
- 1 cup powdered sugar
- 1/2 cup heavy cream
- 1 tsp vanilla extract
- 1 tbsp pink food coloring
- Garnish:
- Whipped cream
- Pink sprinkles
Instructions
- In a medium bowl, combine graham cracker crumbs, granulated sugar, and melted butter until well mixed.
- Press the mixture firmly into the bottom of a 9-inch square baking dish to form the crust.
- In a large mixing bowl, beat the softened cream cheese until smooth and creamy.
- Add powdered sugar, heavy cream, vanilla extract, and pink food coloring to the cream cheese, mixing until fully combined and fluffy.
- Spread the cheesecake filling evenly over the crust, smoothing the top with a spatula.
- Cover the dish with plastic wrap and refrigerate for at least 4 hours or until set.
- Once set, cut into bite-sized squares and top with whipped cream and pink sprinkles before serving.
Notes
- Make-ahead: These cheesecake bites can be made up to 2 days in advance and stored in the refrigerator.
- Storage: Keep leftovers in an airtight container in the fridge for up to 5 days.
- Substitutions: Use gluten-free graham crackers for a gluten-free version or swap cream cheese for a dairy-free alternative.
- Prep Time: 20 minutes
- Cook Time: 0 minutes
- Category: desserts
- Method: no-bake
- Cuisine: American
Nutrition
- Serving Size: 1 bite-sized square (approx. 1.5 oz)
- Calories: 150
- Sugar: 10 grams
- Sodium: 120 milligrams
- Fat: 10 grams
- Saturated Fat: 6 grams
- Unsaturated Fat: 3 grams
- Trans Fat: 0 grams
- Carbohydrates: 15 grams
- Fiber: 0 grams
- Protein: 2 grams
- Cholesterol: 30 milligrams
Keywords: No-Bake Pink Velvet Cheesecake Bites, cheesecake bites, no-bake desserts, pink velvet cheesecake, easy cheesecake recipe, party desserts, creamy cheesecake, dessert bites, festive treats, sweet snacks, no-bake recipes, simple desserts, kid-friendly desserts


