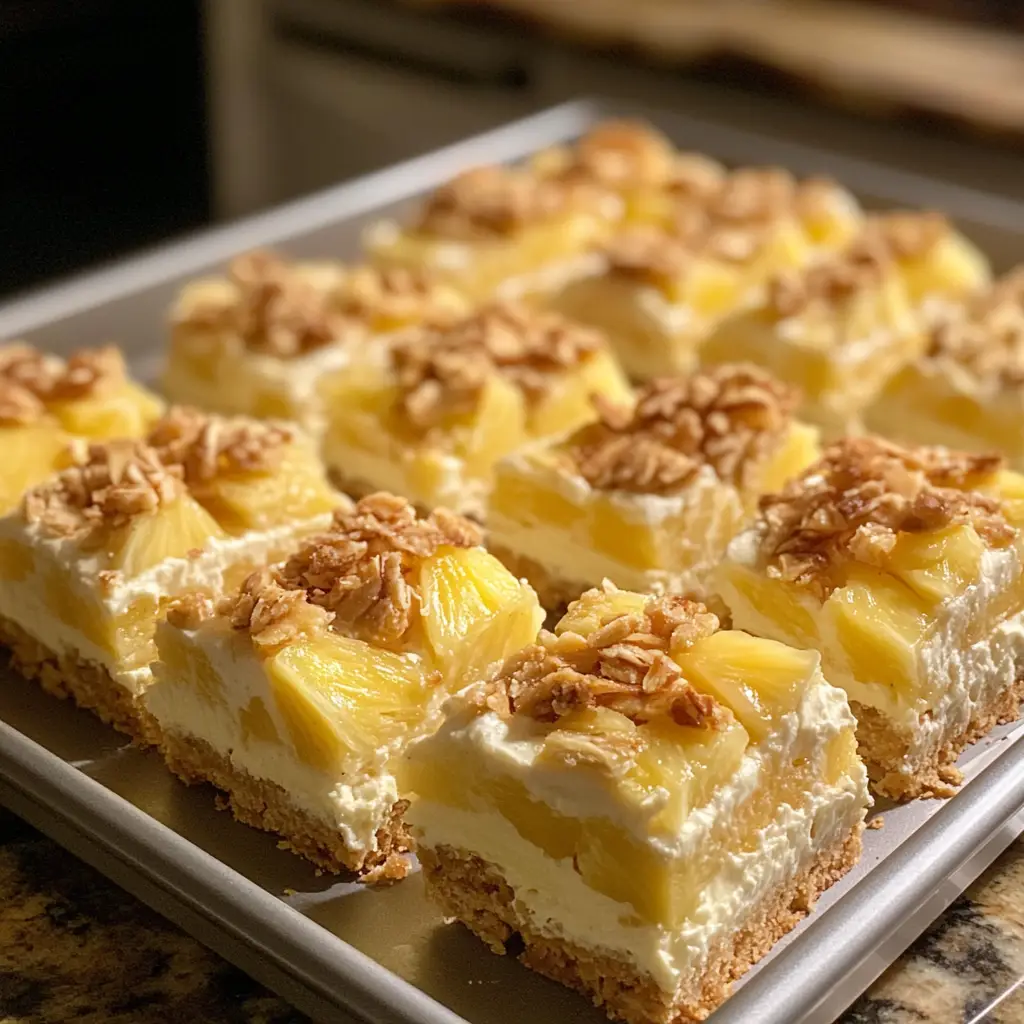
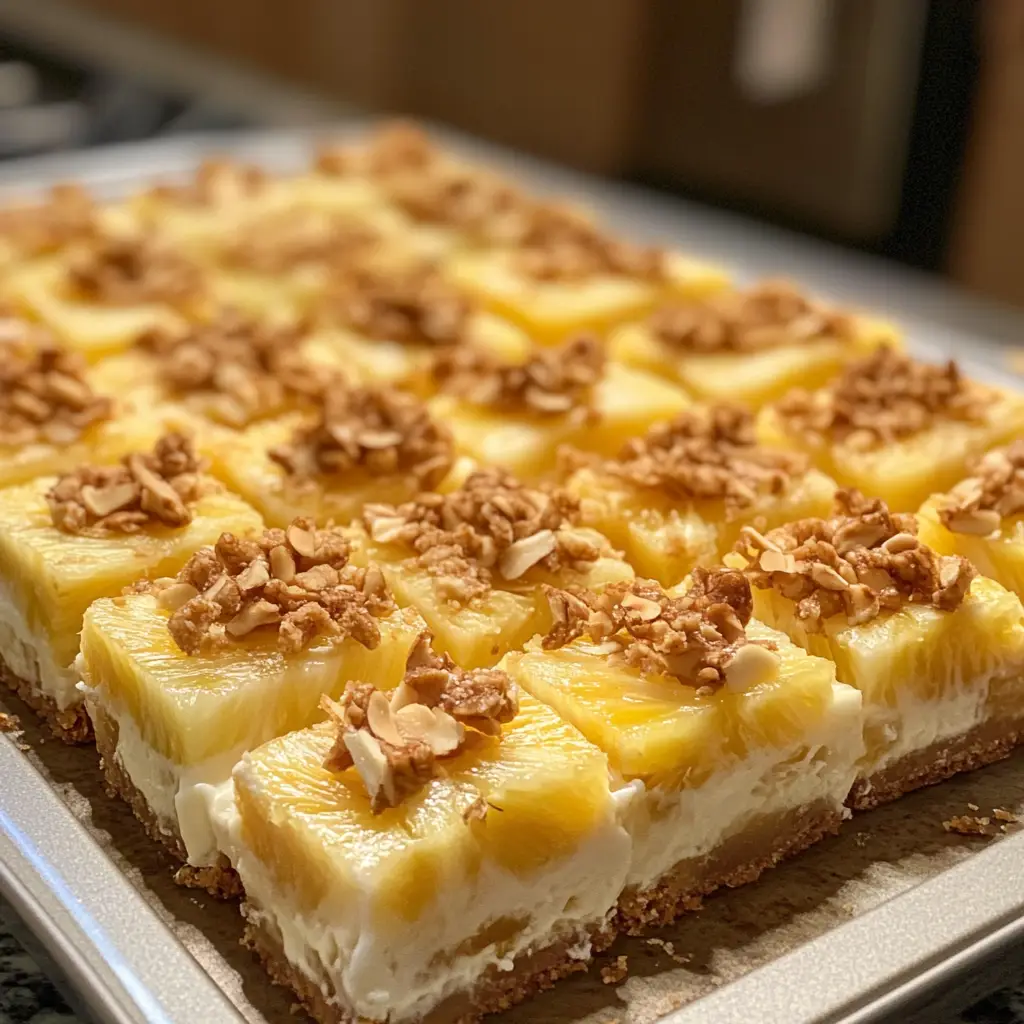
Introduction to No-Bake Pineapple Dream Bars Recipe
As a passionate home cook, I find joy in creating desserts that not only taste amazing but also bring a smile to the faces of my loved ones. One of my all-time favorite treats is the No-Bake Pineapple Dream Bars. This delightful dessert is like a tropical vacation on a plate! The combination of creamy filling, crunchy crust, and sweet pineapple is simply irresistible.
Let me take you back to a sunny afternoon when I first stumbled upon this recipe. I was hosting a small gathering, and I wanted to impress my friends with something unique. I remembered my grandmother’s love for pineapple desserts and decided to give it a whirl. The moment I took that first bite, I was transported to a beachside paradise, with the sun shining and waves crashing in the background. It was a hit! Everyone was asking for seconds, and I knew I had found a keeper.
What I love most about this No-Bake Pineapple Dream Bars recipe is its simplicity. You don’t need to turn on the oven, which is a blessing during those hot summer months. Plus, it’s a great way to use fresh or canned pineapple, making it versatile for any season. Whether you’re hosting a barbecue, a birthday party, or just want a sweet treat after dinner, these bars are perfect for any occasion.
In this article, I’ll share my tried-and-true recipe, along with tips and tricks that I’ve learned along the way. So, grab your apron, and let’s dive into the world of No-Bake Pineapple Dream Bars. Trust me, your taste buds will thank you!
Ingredients for No-Bake Pineapple Dream Bars Recipe
Before we dive into the delightful process of making No-Bake Pineapple Dream Bars, let’s gather our ingredients. I always believe that the quality of ingredients can make or break a recipe. So, I recommend using fresh, ripe pineapple if you can find it. However, canned pineapple works just as well and is super convenient. Here’s what you’ll need:
Main Ingredients
- 1 ½ cups of graham cracker crumbs
- ½ cup of unsalted butter, melted
- 1 cup of powdered sugar
- 8 oz cream cheese, softened
- 1 cup of heavy whipping cream
- 1 can (20 oz) crushed pineapple, drained
- 1 tsp vanilla extract
When I make these bars, I always opt for unsalted butter. It allows me to control the saltiness of the dessert. Also, using full-fat cream cheese gives the filling that rich, creamy texture that we all crave. If you’re feeling adventurous, try using flavored cream cheese for a twist!
Optional Add-ons
- 1 cup of shredded coconut (for a tropical flair)
- Chopped nuts (like pecans or walnuts, for added crunch)
- Fresh pineapple chunks (for garnish)
- Whipped cream (for serving)
These optional add-ons can elevate your No-Bake Pineapple Dream Bars to a whole new level. I love adding shredded coconut for that extra tropical vibe. It reminds me of my childhood vacations to the beach, where the air was filled with the scent of coconut and saltwater. Feel free to mix and match these add-ons based on your preferences!
Now that we have our ingredients ready, let’s move on to the fun part—preparing these delicious bars!
How to Prepare No-Bake Pineapple Dream Bars Recipe
Now that we have our ingredients ready, it’s time to roll up our sleeves and get to the fun part—preparing these delightful No-Bake Pineapple Dream Bars! I promise, the process is as enjoyable as the end result. Let’s dive in!
Step 1: Prepare the Crust
First things first, we need to create a delicious crust that will hold all that creamy goodness. In a mixing bowl, combine the graham cracker crumbs and melted butter. Stir until the crumbs are evenly coated and resemble wet sand.
Tips for Step 1
- For an extra flavor boost, consider adding a pinch of cinnamon to the crust mixture. It adds a warm, cozy touch!
- Press the mixture firmly into the bottom of a greased 9×9-inch baking dish. I like to use the bottom of a measuring cup to get an even layer.
Step 2: Make the Pineapple Filling
Next up is the star of the show—the pineapple filling! In a large bowl, beat the softened cream cheese and powdered sugar together until smooth and creamy. Then, gently fold in the drained crushed pineapple and vanilla extract. Finally, whip the heavy cream until stiff peaks form and fold it into the pineapple mixture.
Tips for Step 2
- Make sure your cream cheese is at room temperature. This helps it blend smoothly without lumps.
- Be gentle when folding in the whipped cream. You want to keep that light, airy texture!
Step 3: Assemble the Bars
Now it’s time to bring everything together! Spread the pineapple filling evenly over the crust. Use a spatula to smooth it out, making sure every corner is filled with that luscious mixture.
Tips for Step 3
- For a decorative touch, sprinkle some shredded coconut or chopped nuts on top before chilling. It adds a nice crunch!
- Don’t worry if it looks a bit messy at this stage; it will all come together beautifully once it’s set.
Step 4: Chill and Set
Finally, cover the dish with plastic wrap and pop it in the refrigerator. Let it chill for at least 4 hours, or overnight if you can wait that long. This step is crucial for the bars to firm up and hold their shape.
Tips for Step 4
- If you’re in a hurry, you can place the dish in the freezer for about 1-2 hours. Just keep an eye on it to avoid freezing!
- Once set, use a sharp knife to cut the bars into squares. Wipe the knife with a damp cloth between cuts for clean edges.
And there you have it! Your No-Bake Pineapple Dream Bars are ready to be enjoyed. I can already imagine the smiles on your friends’ faces as they take that first bite. Let’s move on to the next section where we’ll discuss the equipment needed for this delightful recipe!
Equipment Needed for No-Bake Pineapple Dream Bars Recipe
Before we dive into the kitchen, let’s gather the essential tools for making these scrumptious No-Bake Pineapple Dream Bars. Having the right equipment on hand makes the process smoother and more enjoyable. Here’s what you’ll need:
- Mixing Bowls: A couple of medium-sized mixing bowls will do the trick. I love using glass bowls because they’re easy to clean and you can see the ingredients mixing together.
- Measuring Cups and Spoons: Accurate measurements are key to a successful recipe. Make sure you have both dry and liquid measuring cups handy.
- Electric Mixer: A hand mixer or stand mixer is perfect for beating the cream cheese and whipping the cream. If you don’t have one, a whisk will work, but it’ll take a bit more elbow grease!
- Spatula: A rubber spatula is essential for folding in the whipped cream and spreading the filling evenly over the crust.
- Baking Dish: A 9×9-inch baking dish is ideal for this recipe. If you don’t have one, a similar-sized dish or even a pie pan can work in a pinch.
- Plastic Wrap: This will help cover the dish while the bars chill in the refrigerator, keeping them fresh and preventing any odors from seeping in.
With these tools at your disposal, you’re all set to create your No-Bake Pineapple Dream Bars. Remember, cooking is all about improvisation, so feel free to use what you have on hand. Now, let’s move on to the delicious variations you can try with this recipe!
Variations of No-Bake Pineapple Dream Bars Recipe
One of the things I adore about the No-Bake Pineapple Dream Bars is their versatility. You can easily switch things up to suit your taste or the occasion. Here are a few fun variations that I’ve tried and loved:
- Coconut Cream Dream Bars: Swap out half of the cream cheese for coconut cream. This adds a rich coconut flavor that pairs beautifully with the pineapple. It’s like a tropical getaway in every bite!
- Berry Bliss Bars: Mix in some fresh berries, like strawberries or blueberries, into the pineapple filling. The burst of color and flavor will make your bars even more delightful and visually appealing.
- Chocolate Drizzle: For the chocolate lovers out there, melt some dark chocolate and drizzle it over the top before serving. The combination of chocolate and pineapple is surprisingly delicious!
- Nutty Crunch Bars: Add a layer of chopped nuts, like almonds or macadamia nuts, to the crust for an extra crunch. It adds texture and a nutty flavor that complements the creamy filling.
These variations not only keep things exciting but also allow you to personalize your No-Bake Pineapple Dream Bars. I love experimenting with different flavors, and I encourage you to do the same! The possibilities are endless, and each twist brings a new adventure to your kitchen. Now, let’s move on to some cooking notes that will help you perfect this recipe!
Cooking Notes for No-Bake Pineapple Dream Bars Recipe
As I’ve whipped up these No-Bake Pineapple Dream Bars time and time again, I’ve gathered a few cooking notes that can help you achieve the best results. These little tips can make a big difference in your final product!
- Ingredient Temperature: Always ensure your cream cheese is at room temperature before mixing. This helps it blend smoothly, avoiding any lumps in your filling.
- Draining Pineapple: If you’re using canned pineapple, make sure to drain it well. Excess liquid can make your filling too runny, which we definitely want to avoid!
- Chilling Time: Patience is key! Allowing the bars to chill for a full 4 hours or overnight ensures they set properly. Trust me, the wait is worth it!
- Storage: These bars can be stored in the refrigerator for up to a week. Just make sure to cover them well to keep them fresh and delicious.
- Serving: For a fun presentation, consider garnishing with fresh pineapple chunks or a sprinkle of toasted coconut right before serving. It adds a lovely touch!
With these cooking notes in mind, you’re well on your way to creating the perfect No-Bake Pineapple Dream Bars. I can’t wait for you to experience the joy of sharing these delightful treats with your family and friends! Now, let’s explore some serving suggestions to elevate your dessert experience even further.
Serving Suggestions for No-Bake Pineapple Dream Bars Recipe
Now that your No-Bake Pineapple Dream Bars are ready to dazzle, let’s talk about how to serve them for maximum enjoyment! Presentation can elevate any dessert, and these bars are no exception. Here are some of my favorite serving suggestions that will make your bars even more delightful:
- Chilled Perfection: Serve the bars straight from the refrigerator. The coolness enhances the refreshing pineapple flavor, making each bite a tropical escape.
- Garnish with Fresh Fruit: Top each bar with a slice of fresh pineapple or a few berries. This not only adds a pop of color but also a burst of freshness that complements the creamy filling.
- Whipped Cream Delight: A dollop of whipped cream on top can take these bars to the next level. It adds a light, airy texture that pairs beautifully with the rich filling.
- Toasted Coconut Sprinkles: For an extra tropical touch, sprinkle some toasted coconut flakes on top. The nutty flavor and crunch will make your bars even more irresistible!
- Serve with a Side: Consider pairing the bars with a scoop of vanilla ice cream or a refreshing sorbet. The contrast of temperatures and textures will delight your taste buds!
These serving suggestions not only enhance the visual appeal but also add layers of flavor to your No-Bake Pineapple Dream Bars. I love to get creative with my presentations, and I encourage you to do the same! Your friends and family will be impressed, and you’ll feel like a culinary superstar. Now, let’s move on to some handy tips for making these bars even better!
Tips for Making No-Bake Pineapple Dream Bars Recipe
As I’ve crafted my No-Bake Pineapple Dream Bars over the years, I’ve picked up a few handy tips that can make your experience even smoother and more enjoyable. These little nuggets of wisdom can help you avoid common pitfalls and elevate your dessert game. Here’s what I’ve learned:
- Prep Ahead: If you’re planning to serve these bars at a gathering, consider making them a day in advance. This allows the flavors to meld beautifully and ensures they’re perfectly chilled when it’s time to serve.
- Experiment with Flavors: Don’t hesitate to play around with different flavor combinations. Adding a splash of lime juice or zest can brighten the pineapple flavor and give it a refreshing twist!
- Use Quality Ingredients: Investing in high-quality cream cheese and fresh pineapple can make a noticeable difference in taste. It’s worth it for that creamy, dreamy filling!
- Keep It Cool: If you live in a warm climate, consider placing the bars in the freezer for a short time before serving. This will keep them firm and make cutting easier.
- Get Creative with Toppings: Don’t be afraid to get creative with your toppings! Try adding a drizzle of honey or a sprinkle of cinnamon for an extra layer of flavor that will wow your guests.
With these tips in your back pocket, you’re all set to make the most out of your No-Bake Pineapple Dream Bars experience. I can’t wait for you to share these delightful treats with your loved ones and create your own sweet memories in the kitchen!
Breakdown of Time for No-Bake Pineapple Dream Bars Recipe
As a home cook, I know that time management is key in the kitchen. When it comes to making No-Bake Pineapple Dream Bars, it’s all about balancing prep time and chilling time. Here’s a quick breakdown to help you plan your baking adventure:
- Prep Time: Approximately 20 minutes. This includes gathering your ingredients, preparing the crust, and making the pineapple filling. It’s a breeze, and you’ll be amazed at how quickly it comes together!
- Chilling Time: At least 4 hours. This is the most crucial part, as it allows the bars to set properly. If you can, I recommend letting them chill overnight for the best results.
- Total Time: About 4 hours and 20 minutes. While the active time is short, the waiting is what makes these bars so deliciously firm and ready to impress!
With this time breakdown, you can easily fit making these No-Bake Pineapple Dream Bars into your day. Just remember to plan ahead for that chilling time, and you’ll be rewarded with a delightful dessert that’s sure to be a hit! Now, let’s take a look at the nutritional information to keep everything balanced.
Nutritional Information for No-Bake Pineapple Dream Bars Recipe
As a passionate home cook, I believe that enjoying dessert doesn’t have to come with guilt. While No-Bake Pineapple Dream Bars are a sweet treat, it’s always good to know what we’re indulging in. Here’s a general breakdown of the nutritional information per serving, assuming you cut the bars into 12 squares:
- Calories: Approximately 200
- Fat: 12g
- Saturated Fat: 7g
- Cholesterol: 30mg
- Sodium: 150mg
- Carbohydrates: 22g
- Fiber: 1g
- Sugar: 10g
- Protein: 2g
These bars are rich and creamy, thanks to the cream cheese and heavy whipping cream. However, they also provide a delightful burst of flavor from the pineapple, making them a refreshing option. If you’re looking to lighten them up, consider using low-fat cream cheese or reducing the amount of sugar. Remember, balance is key, and enjoying a sweet treat every now and then is part of a happy, healthy lifestyle!
Frequently Asked Questions about No-Bake Pineapple Dream Bars Recipe
As I’ve shared my No-Bake Pineapple Dream Bars with friends and family, I’ve noticed a few common questions pop up. It’s always great to clarify any doubts, especially when it comes to creating such a delightful dessert. Here are some frequently asked questions that I hope will help you on your culinary journey:
Can I use fresh pineapple instead of canned?
Absolutely! Fresh pineapple adds a vibrant flavor and texture to the bars. Just make sure to chop it finely and drain any excess juice to avoid a runny filling. I love using fresh pineapple when it’s in season; it really enhances the tropical vibe!
How long do these bars last in the fridge?
These No-Bake Pineapple Dream Bars can be stored in the refrigerator for up to a week. Just make sure to cover them well with plastic wrap or store them in an airtight container to keep them fresh. Trust me, they won’t last long once your family gets a taste!
Can I make these bars gluten-free?
Yes, you can! Simply substitute the graham cracker crumbs with gluten-free alternatives, like crushed gluten-free cookies or almond flour. This way, everyone can enjoy the deliciousness without worry!
What if I don’t have heavy whipping cream?
If you don’t have heavy whipping cream, you can use whipped topping as a substitute. Just fold it into the pineapple mixture instead of whipping it yourself. While it may change the texture slightly, it will still taste delightful!
Can I freeze the No-Bake Pineapple Dream Bars?
Yes, you can freeze these bars! Just cut them into squares and place them in an airtight container. They can be frozen for up to three months. When you’re ready to enjoy, simply thaw them in the refrigerator for a few hours before serving. It’s a great way to have a sweet treat on hand for unexpected guests!
These FAQs should help clear up any uncertainties you might have about making your No-Bake Pineapple Dream Bars. I love sharing this recipe, and I hope it brings as much joy to your kitchen as it has to mine. Now, let’s wrap things up with a sweet conclusion!
Conclusion on No-Bake Pineapple Dream Bars Recipe
As I reflect on my culinary journey with the No-Bake Pineapple Dream Bars, I can’t help but smile. This recipe is more than just a dessert; it’s a celebration of flavors, memories, and the joy of sharing with loved ones. The creamy, dreamy filling combined with the crunchy crust creates a delightful contrast that keeps everyone coming back for more.
What I love most about these bars is their simplicity. With just a handful of ingredients and no need for baking, they’re perfect for any occasion—be it a summer barbecue, a birthday party, or a cozy family dinner. Plus, the versatility of the recipe allows you to customize it to your taste, making it a canvas for your creativity.
Whether you choose to stick to the classic version or experiment with fun variations, these No-Bake Pineapple Dream Bars are sure to impress. They’re a sweet reminder that cooking can be both easy and rewarding. So, gather your ingredients, roll up your sleeves, and dive into this tropical treat. I promise, your taste buds will thank you, and your friends and family will be singing your praises!