Sensory-Rich Introduction with Immediate Craving
Imagine biting into a No Bake Cake Batter Protein Ball—the moment your teeth sink in, you’re greeted with a creamy, dreamy texture that melts in your mouth. The rich essence of cake batter dances on your palate, while the delightful crunch of rainbow sprinkles adds a playful twist. It’s like a mini celebration in every bite, reminiscent of the joyous chaos of childhood birthday parties.
As a child, I remember sneaking spoonfuls of cake batter when my mom wasn’t looking, the sweet, buttery flavor igniting a sense of pure bliss. Those moments were filled with laughter, frosting-covered faces, and the anticipation of a delicious cake. These protein balls capture that same spirit, allowing you to indulge in the nostalgia of sweet treats without the guilt. They’re a delightful reminder that we can enjoy the flavors we love while nourishing our bodies.
These protein balls are perfect for any occasion—whether you need a quick post-workout snack to refuel, an afternoon pick-me-up to power through the day, or a healthier dessert option for gatherings. They’re not just a treat; they’re a celebration of the joy that food can bring, connecting us to our past while fueling our present. So, let’s roll up our sleeves and create these little bites of happiness!
Why You’ll Love This No Bake Cake Batter Protein Balls
Let me tell you, these No Bake Cake Batter Protein Balls are not just another snack; they are a delightful experience that will have you coming back for more! Here’s why they’ve become a staple in my kitchen:
- Texture Contrast: The chewy oats combined with the creamy almond butter create a satisfying mouthfeel that’s both hearty and indulgent. Each bite offers a delightful contrast that keeps you reaching for just one more.
- Flavor Balance: The sweetness of honey or maple syrup, paired with the aromatic vanilla extract, perfectly complements the nutty almond flour. It’s a harmonious blend that dances on your taste buds, reminiscent of licking the bowl after baking a cake!
- Versatility: One of the best parts? These protein balls are easily customizable! Swap out almond butter for peanut butter, or add in your favorite mix-ins like dried fruits or nuts to suit your personal preferences. The possibilities are endless!
- Ease of Preparation: No baking required! Just mix, roll, and chill for a quick and simple treat that fits seamlessly into your busy lifestyle. I often whip up a batch while my coffee brews in the morning—talk about multitasking!
- Universal Appeal: These protein balls are kid-friendly and suitable for various diets, making them a hit with everyone. Whether you’re serving them at a family gathering or packing them in lunchboxes, they’re sure to please both kids and adults alike.
With all these fantastic qualities, it’s no wonder these No Bake Cake Batter Protein Balls have become a beloved treat in my home. They’re not just snacks; they’re a celebration of flavor, texture, and the joy of cooking. Now, let’s dive into the essential ingredients that make this deliciousness possible!
Essential Tools & Preparation Strategy
Before diving into the delightful world of No Bake Cake Batter Protein Balls, let’s gather our essential tools. Having the right equipment not only makes the process smoother but also ensures that your protein balls turn out perfectly every time. Trust me, I’ve learned this the hard way!
- Mixing Bowl: A large mixing bowl is essential for combining your dry and wet ingredients thoroughly. I recommend using a glass or stainless steel bowl for easy mixing and cleaning.
- Measuring Cups: Accurate measurements are crucial for achieving the right texture. Invest in a good set of measuring cups and spoons; they will be your best friends in the kitchen!
- Spatula: A sturdy spatula is perfect for mixing and folding in ingredients without damaging the texture of your protein balls. I always opt for a silicone spatula for its flexibility and ease of use.
- Baking Sheet: You’ll need a baking sheet lined with parchment paper to chill your protein balls. This prevents sticking and makes cleanup a breeze.
- Parchment Paper: A must-have for lining your baking sheet. It’s a simple step that saves you from a sticky situation!
- Refrigerator: This is where the magic happens! Chilling the protein balls for at least 30 minutes is key to achieving the right firmness.
- Optional: If you prefer a finer texture, a food processor can be a great addition to your toolkit. Just pulse the oats and almond flour for a smoother base.
With these tools at your disposal, you’re well on your way to creating a batch of No Bake Cake Batter Protein Balls that will have everyone asking for seconds. Now, let’s move on to the ingredients that will bring this delicious treat to life!
Ingredients & Their Roles in This No Bake Cake Batter Protein Balls
Understanding the ingredients that go into your No Bake Cake Batter Protein Balls is key to mastering this delightful treat. Each component plays a vital role in achieving that perfect balance of flavor, texture, and nutrition. Let’s break it down!
Base Ingredients
- Rolled oats: These little gems provide a chewy texture and are packed with fiber, making them a wholesome base for our protein balls. They not only add substance but also help keep you feeling full longer.
- Vanilla protein powder: This ingredient is a game-changer! It adds a boost of protein to your snack while enhancing the cake batter flavor, making each bite taste like a sweet indulgence.
- Almond flour: Contributing a nutty flavor and a slightly grainy texture, almond flour is a fantastic gluten-free option that complements the other ingredients beautifully.
Wet Ingredients
- Almond butter: Acting as a binding agent, almond butter adds creaminess and richness to the mixture. It’s the secret ingredient that helps hold everything together while providing healthy fats.
- Honey or maple syrup: These natural sweeteners not only sweeten the mixture but also help bind the ingredients together, creating a cohesive and delicious treat. Plus, they add a touch of flavor that’s hard to resist!
- Vanilla extract: A splash of vanilla extract enhances the overall flavor profile, giving your protein balls that classic cake batter essence that we all love.
Add-ins
- Mini chocolate chips: These little morsels provide bursts of sweetness and texture, making each bite even more enjoyable. They’re like tiny surprises that elevate the flavor experience!
- Rainbow sprinkles: Not only do they add a fun visual appeal, but they also bring a playful element to your protein balls, reminding us of the joy of celebrating with cake.
Substitutions
If you have dietary restrictions or simply want to switch things up, here are some great options:
- For a nut-free version, substitute almond butter with sunflower seed butter.
- Try using peanut butter for a different flavor profile that still packs a protein punch.
- Sunflower seed butter is another excellent alternative that offers a unique taste while keeping it nut-free.
With these ingredients, you’re well on your way to creating No Bake Cake Batter Protein Balls that are not only delicious but also nutritious. Let’s move on to the step-by-step guide to bring this delightful treat to life!
Step-by-Step Guide to Perfect No Bake Cake Batter Protein Balls
Now that we have our ingredients ready, it’s time to roll up our sleeves and get to the fun part—making these No Bake Cake Batter Protein Balls! Follow this simple step-by-step guide, and you’ll have a batch of delicious treats in no time. Trust me, the process is as enjoyable as the end result!
- Combine the Dry Ingredients: In a large mixing bowl, combine 1 cup of rolled oats, 1/2 cup of vanilla protein powder, and 1/4 cup of almond flour. Use a whisk to mix them together thoroughly, ensuring there are no clumps. The aroma of the oats and protein powder will start to fill your kitchen, making your mouth water in anticipation!
- Mix the Wet Ingredients: In a separate bowl, mix together 1/4 cup of almond butter, 1/4 cup of honey (or maple syrup), and 1 teaspoon of vanilla extract until smooth. I like to use a fork for this step; it helps to get everything well combined and creamy. The sweet scent of vanilla will transport you back to those childhood baking days!
- Combine Wet and Dry: Pour the wet mixture into the dry ingredients and stir until fully combined. You want to make sure every bit of the dry mix is moistened. Don’t be afraid to get in there with a spatula or your hands—this is where the magic happens!
- Add the Fun: Gently fold in 1/4 cup of mini chocolate chips and 1/4 cup of rainbow sprinkles until evenly distributed. This is the moment when your mixture transforms into a colorful, festive treat that’s just begging to be rolled into balls!
- Form the Balls: Using your hands, form the mixture into small balls, about 1 inch in diameter. If the mixture feels too sticky, dampen your hands slightly with water to make rolling easier. Each ball should feel firm yet slightly soft, just like a perfect cake batter!
- Chill Out: Place the protein balls on a baking sheet lined with parchment paper. Refrigerate for at least 30 minutes to firm up. This step is crucial; it helps the balls hold their shape and enhances the flavors as they meld together.
- Store and Enjoy: Once set, transfer the protein balls to an airtight container and store them in the refrigerator. They’ll keep fresh for up to a week, but I doubt they’ll last that long—they’re just too irresistible!
And there you have it! A simple, fun, and rewarding process that results in delicious No Bake Cake Batter Protein Balls. Now, let’s move on to some chef’s notes and pro tips to ensure your protein balls are nothing short of perfection!
Chef’s Notes & Pro Tips for Flawless Results
As someone who has spent countless hours in the kitchen perfecting my recipes, I’m excited to share some of my best tips to ensure your No Bake Cake Batter Protein Balls turn out perfectly every time. These little nuggets of joy deserve all the love and attention!
- Make-Ahead Instructions: One of the best things about these protein balls is that they can be prepared in advance. Whip up a batch and store them in the fridge for up to one week. This way, you’ll always have a nutritious snack on hand, ready to fuel your day!
- Storage Tips: If you want to keep these treats for longer, freeze them in a single layer on a baking sheet. Once they’re firm, transfer them to a freezer-safe bag for up to three months. Just grab a few whenever you need a quick snack—no thawing required!
- Equipment Recommendations: For uniform ball sizes, I highly recommend using a cookie scoop. It not only makes the process quicker but also ensures that each protein ball is the same size, which is perfect for portion control (and makes them look extra appealing!).
- Customization Options: Don’t be afraid to get creative! Experiment with different add-ins like dried fruits, nuts, or even a sprinkle of cinnamon for varied flavors. You can tailor these protein balls to suit your taste preferences or dietary needs, making them a versatile snack for everyone.
With these tips in your back pocket, you’re well-equipped to create No Bake Cake Batter Protein Balls that are not only delicious but also perfectly suited to your lifestyle. Now, let’s tackle some common mistakes to avoid, ensuring your protein balls are a hit every time!
Avoid These Common Cooking Mistakes
Even the most seasoned cooks can run into a few hiccups when making No Bake Cake Batter Protein Balls. To help you achieve the best results, I’ve compiled a list of common mistakes to avoid. Trust me, I’ve made these blunders myself, and learning from them has made all the difference!
- Not measuring ingredients accurately: This is a biggie! Using the wrong amounts can lead to a dry or overly sticky mixture. Always use measuring tools to ensure precision—your taste buds will thank you!
- Skipping refrigeration: If you skip this crucial step, your protein balls may fall apart. Refrigerate for at least 30 minutes to allow them to firm up properly. It’s worth the wait!
- Using too much liquid: Adding too much almond butter or sweetener can make the mixture too wet. Start with less and adjust as needed. You want a sticky but manageable consistency that holds together well.
- Not mixing thoroughly: Incomplete mixing can result in uneven flavor and texture. Make sure all ingredients are well combined for a consistent taste in every bite. Don’t be shy—get in there and mix it up!
- Overmixing: While thorough mixing is important, overmixing can lead to a tough texture. Mix just until combined to keep your protein balls soft and chewy.
- Using old or stale ingredients: Fresh ingredients are key to great flavor and texture. Always check the expiration dates on your oats, nut butters, and sweeteners to ensure you’re using the best quality.
- Not using parchment paper: This can cause sticking and make cleanup a nightmare. Always line your baking sheet with parchment paper to prevent any sticky situations!
By keeping these common pitfalls in mind, you’ll be well on your way to creating No Bake Cake Batter Protein Balls that are not only delicious but also perfectly textured. Now, let’s explore some creative variations and customizations to make these treats even more exciting!
Creative Variations & Customizations
One of the best things about No Bake Cake Batter Protein Balls is their versatility! You can easily customize them to suit your taste preferences or dietary needs. Here are some fun and creative variations to consider:
- Nut-Free Version: If you need to avoid nuts, simply substitute almond butter with sunflower seed butter. This swap not only keeps the recipe nut-free but also adds a unique flavor that pairs beautifully with the other ingredients.
- Chocolate Lovers: For those who can’t resist chocolate, add 2 tablespoons of cocoa powder to the base for a rich chocolate cake batter flavor. You can also swap the mini chocolate chips for dark chocolate chunks for an extra indulgent treat!
- Seasonal Twist: Embrace the flavors of fall by incorporating 1 teaspoon of pumpkin spice into the mixture. This will give your protein balls a warm, cozy flavor that’s perfect for autumn snacking.
- Protein Boost: Want to amp up the nutrition? Add 2 tablespoons of chia seeds or flaxseeds to the mixture. These tiny powerhouses are packed with omega-3 fatty acids and fiber, making your protein balls even more wholesome.
- Fruit Infusion: Mix in 1/4 cup of dried fruits like cranberries or apricots for added sweetness and a chewy texture. This not only enhances the flavor but also adds a pop of color to your protein balls!
Feel free to experiment with these variations or come up with your own! The beauty of No Bake Cake Batter Protein Balls lies in their adaptability, allowing you to create a snack that’s uniquely yours. Now, let’s explore what to serve with these delightful treats!
Perfect Pairings: What to Serve With No Bake Cake Batter Protein Balls
Now that you’ve whipped up a batch of No Bake Cake Batter Protein Balls, it’s time to think about how to elevate your snacking experience! These delightful treats are versatile and can be paired with a variety of foods and beverages to create a balanced and satisfying snack. Here are some of my favorite pairings that will complement the flavors and textures of your protein balls:
- Almond Milk: A nutritious beverage that perfectly complements the protein balls. The creamy texture of almond milk enhances the cake batter flavor, making it a delightful duo.
- Fresh Fruit: Pair your protein balls with fresh strawberries or bananas for a balanced snack. The natural sweetness and juiciness of the fruit provide a refreshing contrast to the chewy texture of the balls.
- Greek Yogurt: Adding a dollop of Greek yogurt not only brings creaminess but also boosts the protein content. It’s a delicious way to enjoy your protein balls while adding a tangy flavor.
- Oatmeal: Crushed protein balls make a fun topping for your morning oatmeal. Sprinkle them on top for added texture and a burst of cake batter flavor that will make breakfast feel like a treat!
- Smoothie Bowls: For a nutritious breakfast or snack, use your protein balls as a topping for smoothie bowls. They add a delightful crunch and flavor that pairs beautifully with the creamy smoothie base.
- Herbal Tea: Enjoy your protein balls with a cup of herbal tea for a relaxing afternoon snack. The warm, soothing flavors of tea complement the sweetness of the protein balls, creating a cozy experience.
- Parties: These protein balls make for a healthier dessert option at gatherings. Kids and adults alike will love the fun flavors, and you can feel good about serving a nutritious treat!
- Lunchboxes: Pack these protein balls in lunchboxes for a sweet yet nutritious treat that kids will enjoy. They’re perfect for after-school snacks or as a pick-me-up during the day.
With these perfect pairings, you can enjoy your No Bake Cake Batter Protein Balls in a variety of delicious ways. Whether you’re looking for a quick snack or a fun addition to your meals, these combinations will enhance your experience and keep you satisfied!
Storage & Meal Prep Instructions
Now that you’ve created your delicious No Bake Cake Batter Protein Balls, it’s important to know how to store them properly to maintain their freshness and flavor. Here are my go-to tips for storage and meal prep that will keep your protein balls ready to enjoy whenever you need a quick snack!
- Refrigeration: Store your protein balls in an airtight container in the fridge for up to one week. This keeps them fresh and ensures they maintain their delightful texture. I like to use a glass container with a tight-fitting lid to prevent any moisture from getting in.
- Freezing: If you want to keep your protein balls for longer, freeze them in a single layer on a baking sheet. Once they’re firm, transfer them to a freezer-safe bag for up to three months. This way, you can grab a few whenever you need a quick energy boost without worrying about them going bad!
- Reheating: The best part? No reheating is necessary! You can enjoy your protein balls straight from the fridge or freezer. If you prefer them a bit softer, let them sit at room temperature for a few minutes before indulging.
With these simple storage and meal prep instructions, you’ll always have a stash of No Bake Cake Batter Protein Balls on hand, ready to satisfy your cravings and fuel your day. Now, let’s dive into the nutrition facts and health insights to see just how beneficial these treats can be!
Nutrition Facts & Health Insights
Understanding the nutritional value of your No Bake Cake Batter Protein Balls is essential for making informed choices about your snacks. Each protein ball is not only delicious but also packed with nutrients that can support your health and wellness goals. Here’s a detailed breakdown of the nutrition per protein ball:
| Nutrient | Amount per Protein Ball |
|---|---|
| Calories | 120 |
| Sugar | 5 grams |
| Sodium | 50 milligrams |
| Fat | 6 grams |
| Saturated Fat | 1 gram |
| Unsaturated Fat | 5 grams |
| Trans Fat | 0 grams |
| Carbohydrates | 12 grams |
| Fiber | 2 grams |
| Protein | 5 grams |
| Cholesterol | 0 milligrams |
Now, let’s explore the health benefits of some key ingredients in these delightful protein balls:
- Rolled Oats: A fantastic source of dietary fiber, rolled oats help keep you feeling full and satisfied. They also provide essential vitamins and minerals, including B vitamins, iron, and magnesium, which are vital for energy production and overall health.
- Almond Butter: Packed with healthy fats, protein, and vitamin E, almond butter supports heart health and provides a creamy texture that enhances the flavor of your protein balls. The monounsaturated fats found in almond butter can help lower bad cholesterol levels.
- Vanilla Protein Powder: This ingredient not only boosts the protein content of your snack but also aids in muscle recovery and growth. Protein is essential for maintaining muscle mass, especially if you’re active or looking to build strength.
- Honey or Maple Syrup: These natural sweeteners provide a quick source of energy while also containing antioxidants that can help combat inflammation. They add a touch of sweetness without the refined sugars found in many processed snacks.
- Rainbow Sprinkles: While they may seem like a fun addition, sprinkles can also bring a bit of joy to your snack time! Just be mindful of the quantity to keep the sugar content in check.
With these nutritional insights, you can enjoy your No Bake Cake Batter Protein Balls knowing that they not only satisfy your sweet tooth but also contribute to your overall health. Now that you’re equipped with this knowledge, let’s move on to some frequently asked questions to address any lingering curiosities!
Frequently Asked Questions
As you embark on your journey to create the perfect No Bake Cake Batter Protein Balls, you might have a few questions. Don’t worry; I’ve got you covered! Here are some of the most common queries I’ve encountered, along with my expert answers:
- Can I use a different type of protein powder?
Absolutely! You can use any flavor of protein powder you prefer, such as chocolate or plant-based options. Just keep in mind that it may alter the flavor profile slightly, but it’s a great way to customize your protein balls to your taste! - How long do these protein balls last in the fridge?
When stored in an airtight container, your No Bake Cake Batter Protein Balls will stay fresh in the fridge for up to one week. They make for a perfect grab-and-go snack! - Can I make these vegan?
Yes, you can easily make these protein balls vegan! Simply substitute honey with maple syrup or agave nectar, and use a plant-based protein powder. You’ll still get that delicious cake batter flavor without any animal products! - What can I substitute for almond flour?
If you need a substitute for almond flour, you can use oat flour or coconut flour. Just keep in mind that coconut flour is more absorbent, so you may need to adjust the liquid ingredients slightly. - How do I know if the mixture is too wet or dry?
The mixture should be sticky but manageable. If it’s too wet and doesn’t hold its shape, add a bit more rolled oats or almond flour. If it’s too dry and crumbly, add a splash of almond butter or a bit of honey to bring it together. - Can I add more sweetener if I prefer a sweeter taste?
Absolutely! Feel free to adjust the sweetness to your liking. Just remember to add it gradually, tasting as you go, to avoid making the mixture overly sweet. - What’s the best way to store these for meal prep?
For meal prep, store your protein balls in an airtight container in the fridge for up to one week. If you want to keep them longer, freeze them in a single layer on a baking sheet, then transfer to a freezer-safe bag for up to three months. - Can I use regular flour instead of almond flour?
While you can technically use regular flour, I wouldn’t recommend it for this recipe. Almond flour adds a unique flavor and texture that enhances the overall experience. If you’re looking for a gluten-free option, stick with almond flour or try oat flour instead!
With these answers in hand, you’re well-equipped to tackle any challenges that may arise while making your No Bake Cake Batter Protein Balls. Now, let’s wrap things up with some final inspiration and kitchen confidence!
Final Inspiration & Kitchen Confidence
As you stand in your kitchen, ready to whip up a batch of No Bake Cake Batter Protein Balls, I want to take a moment to celebrate the joy of creating healthy treats. There’s something truly magical about transforming simple ingredients into delicious snacks that not only satisfy your cravings but also nourish your body. Each time you make these protein balls, you’re not just following a recipe; you’re embarking on a culinary adventure that brings a little bit of happiness into your day.
Remember, cooking is a journey, and every attempt—whether it’s a success or a learning experience—builds your confidence in the kitchen. Don’t be afraid to experiment, make mistakes, and discover what works best for you. Each batch of No Bake Cake Batter Protein Balls is an opportunity to express your creativity and share a piece of yourself with those you love.
So, I encourage you to dive in, have fun, and let your kitchen be a place of joy and exploration. And once you’ve created your delicious protein balls, don’t keep them to yourself! Share your creations and variations with friends and family, inspiring others to enjoy these delightful, guilt-free snacks. Who knows? You might just spark a new trend in healthy snacking among your loved ones!
Now, go ahead and roll those protein balls, and let the sweet aroma of nostalgia fill your kitchen. Happy cooking!
Print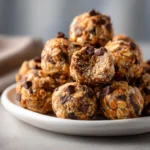
No Bake Cake Batter Protein Balls: Irresistibly Creamy Treat!
- Total Time: 45 minutes
- Yield: 12 protein balls 1x
- Diet: Gluten-Free, Vegetarian
Description
These No Bake Cake Batter Protein Balls are a delightful treat that combines the rich, creamy flavor of cake batter with a satisfying chewy texture. Each bite is a sweet explosion of vanilla and sprinkles, reminiscent of childhood birthday parties, making them a perfect guilt-free indulgence.
Ingredients
- Base:
- 1 cup rolled oats
- 1/2 cup vanilla protein powder
- 1/4 cup almond flour
- Wet Ingredients:
- 1/4 cup almond butter
- 1/4 cup honey or maple syrup
- 1 teaspoon vanilla extract
- Add-ins:
- 1/4 cup mini chocolate chips
- 1/4 cup rainbow sprinkles
Instructions
- In a large mixing bowl, combine the rolled oats, vanilla protein powder, and almond flour.
- In a separate bowl, mix together the almond butter, honey (or maple syrup), and vanilla extract until smooth.
- Pour the wet mixture into the dry ingredients and stir until fully combined.
- Fold in the mini chocolate chips and rainbow sprinkles until evenly distributed.
- Using your hands, form the mixture into small balls, about 1 inch in diameter.
- Place the protein balls on a baking sheet lined with parchment paper and refrigerate for at least 30 minutes to firm up.
- Once set, transfer to an airtight container and store in the refrigerator.
Notes
- These protein balls can be made ahead of time and stored in the refrigerator for up to one week.
- For longer storage, freeze the balls in a single layer and then transfer to a freezer-safe bag for up to three months.
- Substitute almond butter with peanut butter or sunflower seed butter for different flavor profiles.
- Prep Time: 15 minutes
- Cook Time: 0 minutes
- Category: snacks
- Method: no-bake
- Cuisine: American
Nutrition
- Serving Size: 1 protein ball
- Calories: 120
- Sugar: 5 grams
- Sodium: 50 milligrams
- Fat: 6 grams
- Saturated Fat: 1 gram
- Unsaturated Fat: 5 grams
- Trans Fat: 0 grams
- Carbohydrates: 12 grams
- Fiber: 2 grams
- Protein: 5 grams
- Cholesterol: 0 milligrams
Keywords: No Bake Cake Batter Protein Balls, protein snacks, healthy treats, no bake desserts, gluten-free snacks, easy protein balls, cake batter flavor, quick snacks, energy bites, healthy dessert recipes, vegetarian snacks, kid-friendly treats, meal prep snacks, almond butter recipes