Introduction to Monster Marshmallow Treats
Welcome to the whimsical world of Monster Marshmallow Treats! If you’re looking for a fun and easy Halloween DIY craft that the whole family can enjoy, you’ve come to the right place. These delightful treats are not only simple to make, but they also spark creativity and laughter as you decorate your very own spooky monsters. Imagine the joy on your kids’ faces as they create their unique designs, transforming ordinary marshmallows into colorful, goofy creatures. So, roll up your sleeves, gather your supplies, and let’s dive into this sweet adventure together!
Why You’ll Love This Monster Marshmallow Treats
These Monster Marshmallow Treats are the perfect blend of fun and simplicity! They’re budget-friendly, making them an ideal choice for family gatherings or classroom parties. Plus, the joy of crafting together fosters creativity and strengthens bonds with your kids. As you dip, decorate, and laugh, you’ll create not just treats, but cherished memories. It’s a delightful way to unwind and embrace the Halloween spirit!
Materials and Tools Needed for Monster Marshmallow Treats
Before we jump into crafting our Monster Marshmallow Treats, let’s gather all the materials and tools you’ll need. Each item plays a crucial role in bringing your spooky snacks to life!
- Large marshmallows: These fluffy delights are the base of our monsters. Their size makes them perfect for decorating and easy for little hands to hold.
- Chocolate melts: Choose vibrant colors like green or purple to create your monster’s gooey topping. They melt smoothly and add a delicious flavor!
- Edible eyes: These little gems are what give your monsters personality! They come in various sizes and colors, making your creations even more fun.
- Colored sprinkles: Sprinkles add a festive touch and a pop of color. They’re perfect for creating unique designs and adding texture.
- Chocolate chips or candy: Use these for mouths to give your monsters a variety of expressions. You can mix and match for extra creativity!
- Wooden skewers or lollipop sticks: These make handling the treats a breeze. They’re also great for little hands to hold onto while munching.
- Parchment paper: This is essential for setting your dipped marshmallows. It prevents sticking and makes cleanup a snap!
- Microwave-safe bowl: You’ll need this for melting your chocolate. Make sure it’s sturdy enough to handle the heat!
Gathering these materials not only sets the stage for a fun crafting session but also ensures that you have everything you need to create your deliciously spooky treats. Happy crafting!
How to Make Monster Marshmallow Treats
Get ready for a spooktacular time as we dive into the fun process of making Monster Marshmallow Treats! This is where the magic happens, and I can’t wait to share each step with you. These treats are not only easy to make, but they also allow for endless creativity. So, gather your little ghouls and goblins, and let’s get crafting!
Step 1: Melt the Chocolate
First things first, we need to melt our chocolate melts. Grab a microwave-safe bowl and pour in your chosen chocolate melts—green for a classic monster look or purple for something a bit more whimsical. Microwave them in short bursts of 30 seconds, stirring in between until they’re smooth and glossy. Be careful, though! The bowl can get hot, so use oven mitts or a towel to protect your hands. The aroma of melting chocolate is simply divine, and it sets the stage for our monster creations!
Step 2: Dip the Marshmallows
Now, it’s time to dip! Take a large marshmallow and hold it by the bottom. Dip the top into the melted chocolate, letting the excess drip off. You want an even coating, so give it a little twist as you pull it out. This is where the fun begins—watch as the marshmallow transforms into a gooey monster head! If you’re feeling adventurous, you can even dip the sides for extra chocolatey goodness.
Step 3: Set the Marshmallows
Once dipped, place your marshmallow on a piece of parchment paper. This will keep them from sticking and make cleanup a breeze. Let them sit for a few minutes until the chocolate starts to set. You’ll know they’re ready when the chocolate feels firm to the touch. This is a great time to sneak a taste of the leftover chocolate—just a little reward for your hard work!
Step 4: Decorate Your Monsters
Here comes the best part—decorating! While the chocolate is still wet, it’s time to add those adorable edible eyes. Stick them on and watch your marshmallows come to life! You can also sprinkle on colored sprinkles for a festive touch or use chocolate chips or candy for mouths. Let your imagination run wild! Each monster can have its own personality, and I love seeing the unique designs my kids come up with.
Step 5: Add Sticks for Easy Handling
To make these treats easy to hold, insert a wooden skewer or lollipop stick into the bottom of each marshmallow. This is especially helpful for little hands! Just be sure to supervise younger children while they’re using the sticks. It’s all about making this a safe and fun experience for everyone involved.
Step 6: Cool and Serve
Finally, let your Monster Marshmallow Treats cool completely until the chocolate hardens. This usually takes about 15-20 minutes. Once they’re ready, arrange them on a festive platter and get ready to impress your family and friends! The sight of these colorful, goofy monsters will surely bring smiles all around. Plus, they make for a delightful addition to any Halloween gathering!
Tips for Best Results
- Experiment with different colors of chocolate melts for a variety of monster designs. The more colorful, the more fun!
- Use different candies for mouths to create unique expressions. Think gummy worms, mini marshmallows, or even fruit slices!
- For a fun twist, add a drizzle of contrasting chocolate over the set treats. It adds a delightful touch and makes them look extra special.
- Make these treats in advance and store them in an airtight container. They’ll stay fresh and ready for your Halloween festivities!
Theme and Design Variations
Let your creativity shine with these fun theme and design variations for your Monster Marshmallow Treats! Here are some ideas to inspire your spooky snack creations:
- Spooky Halloween Theme: Go for classic orange and black colors to capture the essence of Halloween. Think of a pumpkin-inspired monster with orange chocolate and black sprinkles!
- Pastel Colors: For a whimsical twist, use pastel colors like light pink, blue, and yellow. These are perfect for a springtime or Easter-themed treat!
- Mini Versions: Create bite-sized treats by using mini marshmallows. They’re perfect for little hands and make for a fun party snack!
- Seasonal Candies: Incorporate seasonal candies like candy corn or gummy worms to add a festive touch. These can be used for mouths or as additional decorations!
With these variations, you can make your Monster Marshmallow Treats uniquely yours, ensuring that every batch is a delightful surprise!
Display and Use Ideas
Now that you’ve created your delightful Monster Marshmallow Treats, it’s time to showcase them! Here are some fun ideas for using, displaying, or gifting your spooky snacks:
- Serve on a festive platter: Arrange your treats on a colorful Halloween-themed platter to impress your guests at parties.
- Classroom treats: These make for fun and engaging snacks during Halloween celebrations at school. Kids will love them!
- Gift in a decorated box: Surprise friends and family by packaging your treats in a cute, decorated box. It’s a sweet gesture that’s sure to bring smiles!
- Colorful centerpiece: Display your Monster Marshmallow Treats in a jar as a vibrant centerpiece for fall gatherings. It adds a playful touch to your decor!
FAQs about Monster Marshmallow Treats
As you embark on your Monster Marshmallow Treats adventure, you might have a few questions. Don’t worry; I’ve got you covered! Here are some common queries that fellow crafters often ask:
- Can I use different types of chocolate? Absolutely! You can use white, dark, or any flavored chocolate melts to create your monster masterpieces. Each type adds its own unique flavor and look!
- How long do these treats last? If stored in an airtight container, your Monster Marshmallow Treats can last up to a week. Just make sure to keep them in a cool, dry place to maintain their deliciousness!
- Are these treats safe for young children? Yes, they are! However, adult supervision is recommended, especially when it comes to handling skewers and melted chocolate. Safety first, so everyone can enjoy the fun!
- Can I make these treats in advance? Definitely! You can prepare them a day or two ahead of time. Just store them properly, and they’ll be ready to impress your guests when the time comes!
- What if I don’t have edible eyes? No worries! You can use mini chocolate chips, M&Ms, or even small pieces of fruit to create eyes. Get creative with what you have on hand!
With these answers, you’re all set to create your own delightful Monster Marshmallow Treats. Happy crafting!
Final Thoughts
Creating Monster Marshmallow Treats is not just about making delicious snacks; it’s about the joy of crafting together and the laughter shared along the way. I hope you feel inspired to gather your family and dive into this fun Halloween DIY craft. The satisfaction of seeing your unique creations come to life is truly magical! Don’t forget to share your spooky masterpieces with friends and family—let’s spread the Halloween cheer! I can’t wait to hear about your monster designs and the smiles they bring. Happy crafting, and enjoy every gooey, chocolatey bite!
Print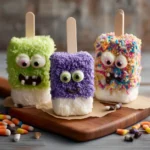
Monster Marshmallow Treats: Create Fun Halloween Snacks Together!
Description
Create spooky and fun Monster Marshmallow Treats that are perfect for Halloween celebrations. These treats are easy to make and can be a fun activity for kids and adults alike!
Instructions
- Start by melting the chocolate melts in a microwave-safe bowl according to package instructions.
- Once melted, dip the top of each marshmallow into the melted chocolate, allowing excess to drip off.
- Place the dipped marshmallow on parchment paper to set.
- While the chocolate is still wet, add edible eyes and any other decorations like sprinkles or candy for mouths.
- Insert a wooden skewer or lollipop stick into the bottom of each marshmallow for easy handling.
- Let the treats cool completely until the chocolate hardens.
- Serve your Monster Marshmallow Treats on a platter and enjoy!
- Category: Food Craft
Keywords: Monster Marshmallow Treats, Halloween snacks, easy Halloween recipes, kids crafts, spooky treats