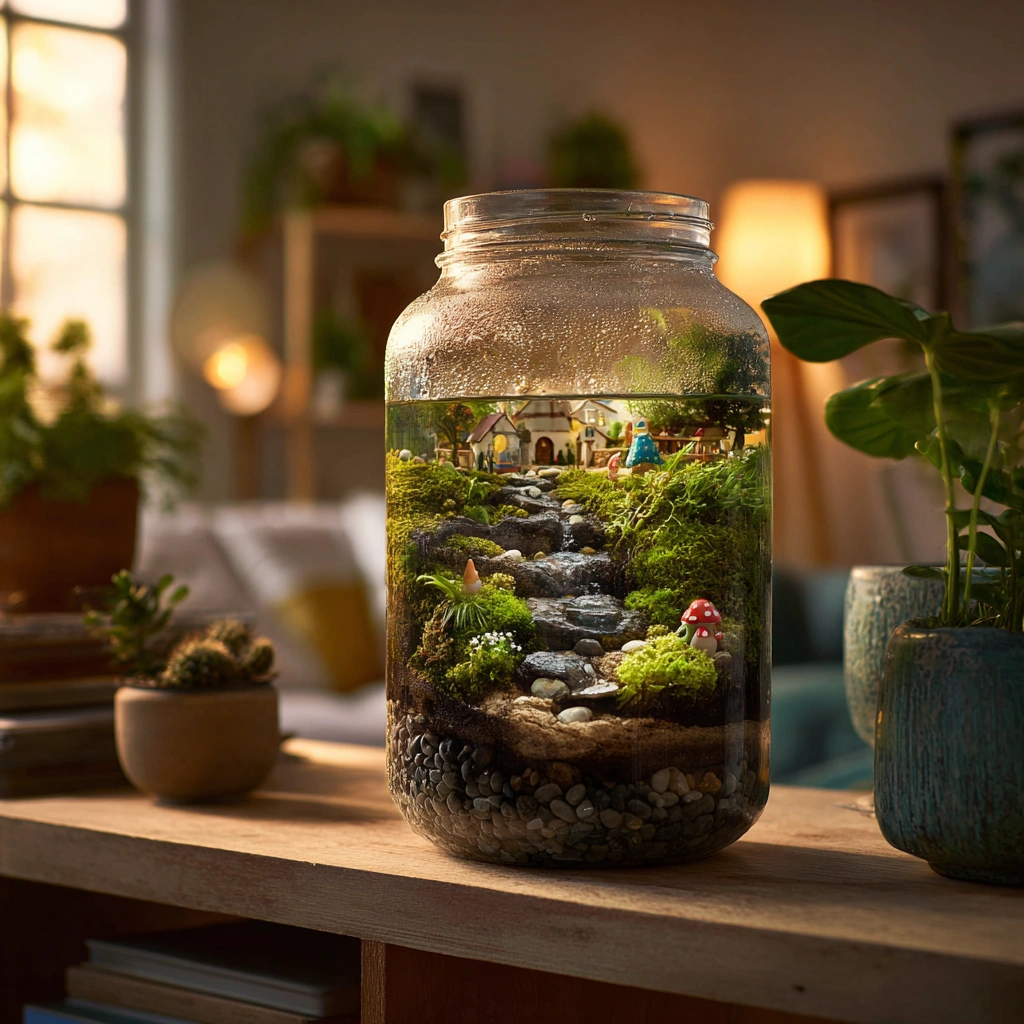
Introduction to Mini Water Cycle Terrarium
Creating a mini water cycle terrarium is not just a fun DIY project; it’s a wonderful way to bring a piece of nature into your home. I remember the first time I crafted one—it felt like I was inviting a little slice of the outdoors right into my living room. This self-sustaining ecosystem beautifully illustrates the water cycle while adding a unique decorative touch to any space.
As a busy mom, I often find myself juggling multiple responsibilities, and finding time for a creative outlet can be a challenge. However, this project is perfect for those of us who crave a bit of artistry in our lives. With just a few materials and some simple steps, you can craft a stunning terrarium that will captivate your family and friends. It’s a delightful way to unwind after a hectic day, and I promise you’ll feel a sense of accomplishment as you watch your little ecosystem thrive.
What I love most about the mini water cycle terrarium is how it serves as both a decorative piece and an educational tool. It’s a fantastic way to teach children about nature and the environment, sparking their curiosity about how ecosystems work. Plus, it’s a great conversation starter when guests come over. They’ll be amazed at the beauty and functionality of your creation!
So, if you’re looking for a project that combines creativity, education, and a touch of nature, the mini water cycle terrarium is the way to go. Let’s dive into the materials and tools you’ll need to get started on this enchanting journey!
Why You’ll Love This Mini Water Cycle Terrarium
The mini water cycle terrarium is a delightful blend of creativity, affordability, and simplicity. I remember the first time I crafted one; it felt like I was bringing a tiny piece of nature into my home. As a busy mom, I often find it challenging to carve out time for myself, but this project was a breath of fresh air. It allowed me to express my artistic side while also being an eco-friendly craft.
One of the things I love most about this terrarium is how it serves as a beautiful conversation starter. When friends come over, they can’t help but admire the little ecosystem I’ve created. It’s not just a decorative piece; it’s a living reminder of the water cycle and the importance of nature. Plus, it’s a fantastic way to teach my kids about the environment. They love watching the plants grow and learning how the water cycle works right in our living room!
Another reason you’ll adore this project is its ease of maintenance. I’ve made terrariums that have lasted for months with minimal care. Just a little watering every couple of weeks and a quick check on the moisture level, and I’m good to go. This makes it a perfect project for busy lifestyles like ours. You can create something stunning without the stress of constant upkeep.
So, if you’re looking for a fun, educational, and visually appealing craft, the mini water cycle terrarium is the way to go. It’s a project that not only beautifies your space but also brings a sense of calm and connection to nature. Trust me, once you start, you’ll find it hard to stop at just one!
Materials Needed for Mini Water Cycle Terrarium
To create your mini water cycle terrarium, gather the following materials:
- Glass container (1): This will house your terrarium and allow you to see the beautiful ecosystem inside. I love using a clear glass jar because it gives a perfect view of the layers and plants.
- Small pebbles (1 cup): These provide drainage at the bottom of the container. They’re like the foundation of your little ecosystem, ensuring that excess water doesn’t drown your plants.
- Activated charcoal (1/2 cup): This keeps the water fresh and prevents odors. It’s a magical ingredient that helps maintain a healthy environment for your plants.
- Potting soil (1 cup): The base for your plants to grow. I always choose a good quality potting mix to give my plants the best chance to thrive.
- Small plants (e.g., moss, succulents) (2-3): Choose plants that thrive in humid environments. I love using moss because it adds a lush, green look, but succulents are also a great choice for their unique shapes.
- Water (as needed): To hydrate your plants. Just a little goes a long way, so be careful not to overdo it!
- Decorative elements (optional, e.g., small figurines): Personalize your terrarium with fun decorations. I often add tiny fairy figurines or colorful stones to give it a whimsical touch.
For a printable full list of materials, see below.
Tools Required for Mini Water Cycle Terrarium
To create your mini water cycle terrarium, you will need the following tools:
- Small shovel or spoon: This handy tool is perfect for layering the materials inside your glass container. I often use a small spoon because it allows me to be precise when adding the pebbles, charcoal, and soil.
- Watering can or spray bottle: A gentle watering can or a spray bottle is essential for hydrating your plants without overwhelming them. I prefer a spray bottle for its fine mist, which helps distribute water evenly without disturbing the soil.
- Scissors: These are great for trimming plants to fit your design. I always keep a pair handy to ensure my plants look neat and well-shaped. It’s amazing how a little trim can make a big difference in the overall appearance!
- Gloves (optional): While not necessary, wearing gloves can protect your hands, especially when handling activated charcoal. I sometimes use them to avoid any irritation, but I also enjoy the tactile experience of working with the materials directly.
Having the right tools makes the crafting process smoother and more enjoyable. I remember the first time I attempted this project without gloves, and I ended up with charcoal dust all over my hands! So, if you prefer to keep things tidy, don’t hesitate to use gloves. Now, let’s get ready to dive into the fun part—making your mini water cycle terrarium!
How to Make Mini Water Cycle Terrarium
Follow these step-by-step instructions to create your mini water cycle terrarium. I promise, it’s easier than you might think, and the results are absolutely rewarding!
Step 1: Clean Your Glass Container
Start by cleaning your glass container thoroughly to ensure a clear view of your terrarium. I like to use warm, soapy water and give it a good rinse. A clean container not only looks better but also helps your plants thrive!
Step 2: Add Pebbles for Drainage
Add a layer of small pebbles to the bottom of the container. This will help with drainage and prevent water from pooling at the bottom. Think of the pebbles as the foundation of your little ecosystem, ensuring that your plants have a healthy environment to grow in.
Step 3: Sprinkle Activated Charcoal
Sprinkle a layer of activated charcoal over the pebbles. This will help keep the water fresh and prevent any unpleasant odors. It’s like giving your terrarium a breath of fresh air! I always find it fascinating how such a small amount can make such a big difference.
Step 4: Layer Potting Soil
Add a layer of potting soil on top of the charcoal. This is where your plants will grow. I usually make sure to use a good quality potting mix, as it provides the nutrients your plants need to flourish.
Step 5: Plant Your Small Plants
Carefully plant your small plants into the soil, arranging them as desired. Make sure to leave enough space for each plant to grow. I love to mix different types of plants for a more dynamic look, but you can stick to one type if you prefer a more uniform appearance.
Step 6: Water the Plants
Lightly water the plants using a watering can or spray bottle. Be careful not to overwater. I find that a gentle mist works wonders, ensuring the soil is moist but not soggy. Remember, less is more!
Step 7: Add Decorative Elements
If desired, add any decorative elements such as small figurines or stones to personalize your terrarium. This is where you can let your creativity shine! I often add tiny fairy figurines or colorful stones to give it a whimsical touch.
Step 8: Cover the Terrarium
Cover the terrarium with a lid or plastic wrap to create a humid environment for your plants. This step is crucial for maintaining the moisture levels, especially if you’re using plants that thrive in humidity.
Step 9: Find the Perfect Spot
Place your terrarium in a location with indirect sunlight to ensure your plants thrive. I usually put mine on a shelf where it can get some light but isn’t exposed to harsh rays. This way, my little ecosystem can flourish without overheating!
Tips for Best Results
Creating a mini water cycle terrarium is a rewarding experience, but there are a few tips I’ve learned along the way that can help ensure your little ecosystem thrives. Here are my top suggestions:
- Choose plants that thrive in humid environments: For the best results, opt for plants like moss or small succulents that love moisture. I’ve found that these types of plants not only look beautiful but also flourish in the humid conditions of a terrarium.
- Monitor the moisture level: It’s essential to keep an eye on the moisture inside your terrarium. If you notice condensation forming on the glass, it’s a sign that it might be too humid. In that case, simply remove the lid for a few hours to let some moisture escape. I’ve made the mistake of leaving the lid on too long, and my plants ended up too soggy!
- Use a variety of plants for visual interest: Mixing different types of plants can create a more dynamic and visually appealing terrarium. I love combining textures and colors to make my terrarium pop. Just be sure to choose plants with similar care needs to keep things simple.
- Keep the terrarium out of direct sunlight: While your plants need light, too much direct sunlight can lead to overheating and damage. I usually place my terrarium in a spot with bright, indirect light. This way, my plants get the light they need without the risk of wilting.
By following these tips, you’ll set your mini water cycle terrarium up for success. I’ve seen my terrariums flourish with just a little attention and care, and I can’t wait for you to experience the joy of watching your own ecosystem thrive!
Project Variations
Feel free to get creative with your mini water cycle terrarium! One of the things I love most about this project is how versatile it can be. Here are some fun variations to consider that can add a personal touch to your terrarium:
- Style Variations: Experiment with different types of glass containers, such as jars, bowls, or even vintage vases, for unique looks. I once used a large mason jar, and it turned out beautifully! The shape of the container can dramatically change the overall aesthetic of your terrarium.
- Color Changes: Incorporate colored pebbles or soil for a pop of color. I love using bright blue or green pebbles to create a vibrant contrast against the greenery of the plants. It’s a simple way to make your terrarium stand out and reflect your personal style.
- Seasonal Adaptations: Change the decorative elements to reflect the seasons. For instance, you can add small pumpkins or autumn leaves for fall, or tiny snowflakes and festive ornaments for winter. I enjoy switching out the decorations to keep my terrarium feeling fresh and in tune with the changing seasons.
These variations not only enhance the visual appeal of your mini water cycle terrarium but also allow you to express your creativity. I encourage you to let your imagination run wild and make this project truly your own. The possibilities are endless, and each terrarium can tell a different story!
Decoration and Usage Ideas
Your mini water cycle terrarium is not just a beautiful craft; it can serve multiple purposes in your home and beyond. I’ve found so many delightful ways to incorporate my terrarium into my daily life, and I can’t wait to share them with you!
- Home Decor: One of the simplest yet most effective ways to showcase your terrarium is by placing it on a coffee table, shelf, or desk. It adds a natural touch to any space and can brighten up a room. I love having mine on the living room shelf, where it catches the light and becomes a focal point. It’s amazing how a little greenery can transform a space!
- Gift Idea: If you’re looking for a thoughtful gift for friends or family, consider creating a mini water cycle terrarium for them. It’s a unique and personal present that shows you care. I’ve made a few as housewarming gifts, and they’ve always been a hit! You can even customize the decorations to match the recipient’s style or interests.
- Educational Tool: Your terrarium can also serve as an educational tool, especially for children. It’s a fantastic way to teach them about ecosystems and the water cycle in a hands-on manner. I often sit down with my kids and explain how the water cycle works while we observe the plants. It sparks their curiosity and encourages them to learn more about nature!
These ideas not only enhance the functionality of your mini water cycle terrarium but also allow you to share the joy of crafting with others. Whether you’re decorating your home, giving a heartfelt gift, or educating the next generation, your terrarium will surely bring smiles and inspiration. So, get creative and enjoy the many ways you can use your beautiful creation!
FAQs about Mini Water Cycle Terrarium
Q: How often should I water my terrarium?
A: Water your terrarium lightly every couple of weeks, depending on the moisture level. I’ve found that it’s best to check the soil; if it feels dry to the touch, it’s time for a little hydration. Just remember, less is more when it comes to watering!
Q: Can I use any type of plants?
A: It’s best to choose plants that thrive in humid environments, such as moss or small succulents. I’ve experimented with various plants, and I’ve had the most success with those that naturally enjoy moisture. They not only look great but also flourish in the terrarium’s environment!
Q: How do I maintain my terrarium?
A: Maintaining your terrarium is quite simple! Monitor the moisture level regularly, trim any overgrown plants to keep things tidy, and ensure it’s placed in indirect sunlight. I like to check mine every week or so, and it’s amazing how a little attention can keep it thriving!
Final Thoughts
Creating a mini water cycle terrarium is not just a craft; it’s a journey into the beauty of nature. I can’t tell you how fulfilling it is to watch my little ecosystem flourish right before my eyes. Each time I glance at my terrarium, I’m reminded of the delicate balance of nature and the joy of nurturing something living.
This project allows you to express your creativity while also providing a calming and educational experience. I’ve found that taking the time to craft my terrarium is a wonderful way to unwind after a busy day. It’s like a mini escape into a world of greenery and tranquility, where I can forget about my to-do list for a while.
As you watch your terrarium thrive, you’ll feel a sense of accomplishment and connection to the environment. It’s amazing how something so small can bring such joy and inspiration into your home. I often find myself sharing my terrarium journey with friends and family, and it sparks delightful conversations about nature and sustainability.
So gather your materials, unleash your creativity, and enjoy the process of making your very own mini water cycle terrarium! Whether you’re crafting it for yourself, as a gift, or as a teaching tool for your children, I promise you’ll find joy in every step. Embrace the beauty of nature and let your terrarium be a reflection of your unique style and love for the environment!
Print
“Mini Water Cycle Terrarium: Create Your Own Unique Decor!”
Description
This DIY project allows you to create a mini water cycle terrarium, a self-sustaining ecosystem that showcases the water cycle in a beautiful and decorative way.
Instructions
- Start by cleaning your glass container thoroughly.
- Add a layer of small pebbles to the bottom for drainage.
- Sprinkle a layer of activated charcoal over the pebbles to keep the water fresh.
- Add a layer of potting soil on top of the charcoal.
- Plant your small plants into the soil, arranging them as desired.
- Water the plants lightly using a watering can or spray bottle.
- Add any decorative elements you wish to include.
- Cover the terrarium with a lid or plastic wrap to create a humid environment.
- Place your terrarium in a location with indirect sunlight.
Keywords: Mini Water Cycle Terrarium, DIY Terrarium, Home Decor, Eco-Friendly Craft