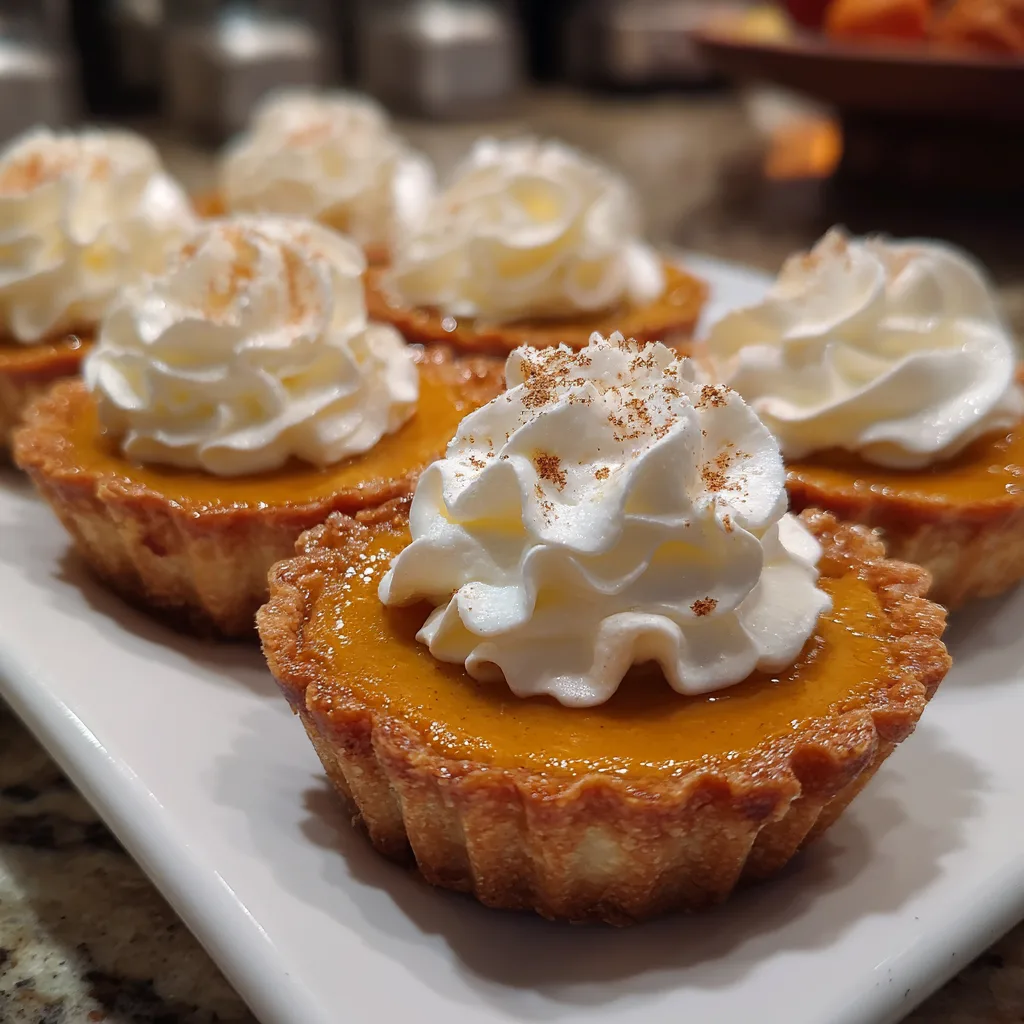
Introduction to Mini Pumpkin Pies with Whipped Cream
As the leaves turn and the air gets crisp, I find myself craving the warm, comforting flavors of fall. That’s where these delightful Mini Pumpkin Pies with Whipped Cream come in! They’re not just a treat; they’re a quick solution for busy days when you want to impress your loved ones without spending hours in the kitchen. With their adorable size and rich flavor, these mini pies are perfect for gatherings or a cozy night in. Trust me, once you try them, they’ll become a staple in your fall dessert repertoire!
Why You’ll Love This Mini Pumpkin Pies with Whipped Cream
These Mini Pumpkin Pies with Whipped Cream are a dream come true for busy moms and professionals alike. They’re incredibly easy to whip up, taking just about 50 minutes from start to finish. The taste? Oh, it’s like a warm hug on a chilly day! Plus, their bite-sized nature makes them perfect for sharing, ensuring everyone gets a little taste of fall magic. You’ll love how they bring smiles to the table!
Ingredients for Mini Pumpkin Pies with Whipped Cream
Gathering the right ingredients is the first step to creating these delightful Mini Pumpkin Pies with Whipped Cream. Here’s what you’ll need:
- Pumpkin puree: The star of the show! You can use canned or fresh puree for a richer flavor.
- Sugar: This sweetens the filling, balancing the spices and pumpkin’s natural earthiness.
- Cinnamon: A warm spice that adds depth and a cozy aroma to your pies.
- Nutmeg: Just a pinch enhances the fall flavor profile, giving it that classic pumpkin pie taste.
- Ginger: Adds a zesty kick that complements the sweetness beautifully.
- Salt: A little salt enhances all the flavors, making them pop!
- Eggs: These help bind the filling together, giving it a smooth, creamy texture.
- Heavy cream: Essential for whipping up that luscious topping that makes these pies irresistible.
- Vanilla extract: A splash of vanilla adds a lovely aroma and rounds out the flavors.
- Mini pie crusts: You can use store-bought for convenience or make your own for a personal touch.
For those who want to experiment, consider adding a pinch of cloves for extra spice or using a gluten-free crust to accommodate dietary needs. The exact quantities for each ingredient are available at the bottom of the article for easy printing!
How to Make Mini Pumpkin Pies with Whipped Cream
Making these Mini Pumpkin Pies with Whipped Cream is a delightful journey that fills your kitchen with the scents of fall. Follow these simple steps, and you’ll have a batch of these adorable treats ready in no time!
Step 1: Preheat the Oven
First things first, preheat your oven to 350°F (175°C). Preheating is crucial because it ensures that your pies bake evenly. A hot oven helps the filling set properly, giving you that perfect texture. Trust me, you don’t want to skip this step!
Step 2: Prepare the Pumpkin Filling
In a mixing bowl, combine the pumpkin puree, sugar, cinnamon, nutmeg, ginger, and salt. Stir until everything is well blended. This is where the magic begins! For a smooth filling, make sure there are no lumps. If you’re using fresh pumpkin puree, it can add a richer flavor that’s simply divine.
Step 3: Add Eggs and Mix
Next, crack in the eggs and whisk the mixture until it’s smooth and creamy. This step is essential for binding the filling together. You want a velvety consistency that will hold up beautifully in the crust. Don’t rush; take your time to ensure everything is well incorporated!
Step 4: Fill the Mini Pie Crusts
Now it’s time to fill those mini pie crusts! Carefully pour the pumpkin filling into each crust, filling them about three-quarters full. This helps prevent any spills while baking. If you’re using store-bought crusts, they usually come in a convenient size that fits perfectly!
Step 5: Bake the Pies
Place the filled mini pies in the preheated oven and bake for 25-30 minutes. To check if they’re done, gently jiggle the pan. If the filling is set and doesn’t wobble too much, they’re ready! The aroma wafting through your kitchen will be irresistible!
Step 6: Whip the Cream
While the pies are baking, it’s time to whip the cream! In a separate bowl, beat the heavy cream with vanilla extract until soft peaks form. This means the cream should hold its shape but still be light and fluffy. Timing is key here; over-whipping can turn it into butter!
Step 7: Top and Serve
Once the pies have cooled, it’s time for the grand finale! Top each mini pie with a generous dollop of whipped cream. For a festive touch, you can sprinkle a little cinnamon on top. Serve them on a beautiful platter, and watch your loved ones’ faces light up with joy!
Tips for Success
- Use room temperature eggs for a smoother filling.
- Don’t overfill the crusts; leave some space for the filling to expand.
- For a richer flavor, consider using fresh pumpkin puree instead of canned.
- Chill the whipped cream before whipping for better volume.
- Experiment with spices to find your perfect flavor balance!
Equipment Needed
- Mixing bowl: A large bowl for combining ingredients. A sturdy plastic or glass bowl works well.
- Whisk: Essential for mixing the filling and whipping cream. A hand mixer can speed up the process.
- Measuring cups and spoons: For accurate ingredient measurements. Use a kitchen scale for precision.
- Mini pie pan: Perfect for baking these adorable pies. A muffin tin can be a great alternative!
Variations of Mini Pumpkin Pies with Whipped Cream
- Chocolate Chip Mini Pumpkin Pies: Add a handful of mini chocolate chips to the filling for a delightful twist that chocolate lovers will adore.
- Maple Pumpkin Pies: Substitute sugar with maple syrup for a deeper, more complex sweetness that pairs beautifully with pumpkin.
- Vegan Mini Pumpkin Pies: Use coconut cream instead of heavy cream and flax eggs as a substitute for regular eggs to create a delicious vegan version.
- Gluten-Free Mini Pumpkin Pies: Opt for gluten-free pie crusts to accommodate those with gluten sensitivities while still enjoying the same great taste.
- Spiced Pumpkin Pies: Experiment with additional spices like cloves or allspice for a more aromatic flavor profile that captures the essence of fall.
Serving Suggestions for Mini Pumpkin Pies with Whipped Cream
- Pair with a warm cup of spiced chai or apple cider for a cozy fall experience.
- Serve alongside a fresh fruit salad to balance the richness of the pies.
- Garnish with a sprinkle of cinnamon or nutmeg for an extra festive touch.
- Present on a decorative platter with autumn leaves for a charming display.
FAQs about Mini Pumpkin Pies with Whipped Cream
Can I make Mini Pumpkin Pies with Whipped Cream ahead of time?
Absolutely! These mini pies can be made a day in advance. Just store them in the refrigerator after they cool. This makes them a perfect option for busy days or holiday gatherings!
What can I use instead of heavy cream for the whipped topping?
If you’re looking for a lighter option, you can use whipped coconut cream or a dairy-free whipped topping. Both will still give you that delightful finish without the heaviness of heavy cream.
How do I know when the pies are done baking?
To check if your Mini Pumpkin Pies with Whipped Cream are done, gently jiggle the pan. If the filling is set and doesn’t wobble too much, they’re ready to come out of the oven!
Can I freeze Mini Pumpkin Pies with Whipped Cream?
Yes, you can freeze the mini pies! Just make sure they are completely cooled before wrapping them tightly in plastic wrap. Thaw them in the refrigerator before serving, and add the whipped cream just before enjoying.
What’s the best way to store leftover pies?
Store any leftover Mini Pumpkin Pies with Whipped Cream in an airtight container in the refrigerator. They should stay fresh for up to three days, but trust me, they won’t last that long!
Final Thoughts
Creating these Mini Pumpkin Pies with Whipped Cream is more than just baking; it’s about sharing joy and warmth with those you love. The delightful aroma that fills your kitchen as they bake is a reminder of cozy fall days spent with family. Each bite is a little piece of happiness, perfect for any gathering or a quiet evening at home. I hope this recipe brings as much joy to your table as it has to mine. So, roll up your sleeves, gather your loved ones, and let the magic of these mini pies fill your hearts with warmth this season!
Print
Mini Pumpkin Pies with Whipped Cream: A Delightful Treat!
- Total Time: 50 minutes
- Yield: 12 mini pies 1x
- Diet: Vegetarian
Description
Mini Pumpkin Pies with Whipped Cream are a delightful and festive dessert perfect for fall celebrations.
Ingredients
- 1 cup pumpkin puree
- 1/2 cup sugar
- 1/2 teaspoon cinnamon
- 1/4 teaspoon nutmeg
- 1/4 teaspoon ginger
- 1/4 teaspoon salt
- 2 large eggs
- 1 cup heavy cream
- 1 teaspoon vanilla extract
- Mini pie crusts (store-bought or homemade)
Instructions
- Preheat the oven to 350°F (175°C).
- In a mixing bowl, combine pumpkin puree, sugar, cinnamon, nutmeg, ginger, and salt.
- Add eggs to the mixture and whisk until smooth.
- Pour the pumpkin filling into the mini pie crusts.
- Bake for 25-30 minutes or until the filling is set.
- While the pies are baking, whip the heavy cream with vanilla extract until soft peaks form.
- Once the pies are cool, top each with a dollop of whipped cream.
- Serve and enjoy!
Notes
- For a richer flavor, use fresh pumpkin puree instead of canned.
- These pies can be made a day in advance and stored in the refrigerator.
- Feel free to add a pinch of cloves for extra spice.
- Prep Time: 20 minutes
- Cook Time: 30 minutes
- Category: Dessert
- Method: Baking
- Cuisine: American
Nutrition
- Serving Size: 1 mini pie
- Calories: 180
- Sugar: 12g
- Sodium: 150mg
- Fat: 10g
- Saturated Fat: 6g
- Unsaturated Fat: 4g
- Trans Fat: 0g
- Carbohydrates: 20g
- Fiber: 1g
- Protein: 2g
- Cholesterol: 40mg
Keywords: Mini Pumpkin Pies, Pumpkin Dessert, Whipped Cream, Fall Treats