Introduction to Mini Cup Candy Ornaments
Welcome to the delightful world of Mini Cup Candy Ornaments! If you’re looking for a fun and simple way to add a sweet touch to your holiday decor, you’ve come to the right place. This DIY project is not only easy to tackle, but it also brings joy and creativity to your home. Imagine the smiles on your kids’ faces as they fill these tiny cups with colorful candies! Plus, these charming ornaments make perfect gifts for friends and family. Let’s embark on this crafty adventure together and create something truly special this holiday season!
Why You’ll Love This Mini Cup Candy Ornaments
Creating Mini Cup Candy Ornaments is a delightful way to unleash your creativity while spending quality time with loved ones. This project is not only easy on the wallet but also incredibly fun! It’s a fantastic opportunity to bond with your kids, allowing them to express their artistic flair. Plus, the joy of seeing these sweet ornaments hanging on your tree will fill your home with warmth and festive cheer!
Materials and Tools Needed for Mini Cup Candy Ornaments
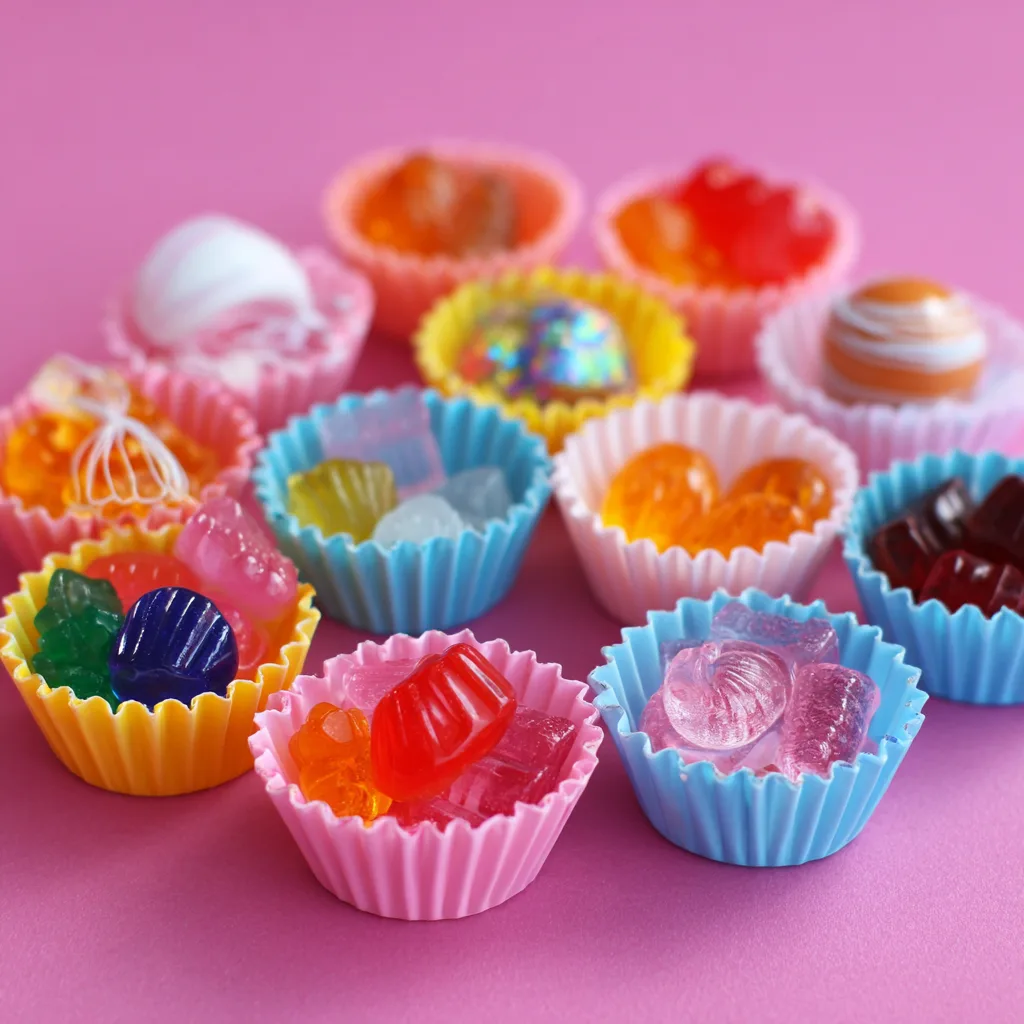
Before we dive into crafting our Mini Cup Candy Ornaments, let’s gather our materials! You’ll need mini plastic or paper cups, which serve as the adorable base for our sweet creations. Assorted candies like gummies, chocolates, and mints will fill these cups with color and flavor, making them irresistible!
Next, grab some ribbon or string for hanging—this adds a charming touch and makes it easy to display your ornaments. You’ll also need glue or double-sided tape to secure everything in place, along with scissors for cutting the ribbon. Lastly, decorative stickers or markers are optional but highly encouraged for personalizing your ornaments. These materials are not only easy to find but also budget-friendly, making this project perfect for everyone!
How to Make Mini Cup Candy Ornaments
Now that we have our materials ready, it’s time to dive into the fun part—making our Mini Cup Candy Ornaments! This step-by-step guide will walk you through the process, ensuring that you create adorable decorations that will bring smiles to everyone’s faces. Let’s get started!
Step 1: Gather Your Materials
Before we unleash our creativity, let’s set the stage! Having a clean workspace is essential for a smooth crafting experience. Clear off a table or countertop and lay out all your materials—mini cups, assorted candies, ribbon, glue, scissors, and any decorative items you want to use. When everything is within reach, the crafting process feels like a breeze, and you can focus on the fun part—creating! Plus, it keeps the mess to a minimum, which is always a win in my book!
Step 2: Fill the Mini Cups
Now comes the sweet part! Take your assorted candies and start filling each mini cup. I like to mix different types of candies for a colorful surprise. Just remember to leave a little space at the top; we don’t want any candy overflow! The sight of those vibrant candies peeking out is like a little treasure waiting to be discovered. You can even let your kids choose their favorite candies, making it a fun and interactive experience!
Step 3: Prepare the Ribbon
Next, let’s get our ribbon ready! Cut a piece of ribbon or string about 12 inches long. This length is perfect for hanging your ornaments. I often let my kids pick out their favorite colors, which adds a personal touch to each ornament. It’s amazing how something as simple as ribbon can bring so much character to our creations! Plus, it’s a great way to teach kids about measuring and cutting safely.
Step 4: Attach the Ribbon
Time to make our ornaments hang! Use glue or double-sided tape to attach one end of the ribbon to the inside rim of the cup. Make sure it’s secure; we want these ornaments to stay put when they’re hanging on the tree. I always find it helpful to press down for a few seconds to ensure a good bond. It’s like giving your ornament a little hug! This step is crucial for ensuring that your Mini Cup Candy Ornaments are ready to shine!
Step 5: Secure the Ribbon
Now, fold the ribbon over the top of the cup and secure it with more glue or tape. This step is essential because it creates the loop for hanging. I like to double-check that everything is tight and secure. The anticipation builds as you see your ornament taking shape, and I can’t help but smile at how cute they look! If you find that the ribbon is slipping, don’t hesitate to add a bit more glue for extra security.
Step 6: Personalize Your Ornaments
Let’s add a dash of creativity! If you want to make your ornaments truly unique, decorate the outside of the cup with stickers or markers. This is where the fun really begins! I love seeing my kids’ imaginations run wild as they create their designs. Whether it’s festive drawings or cheerful messages, these personal touches make each ornament special. You can even write the year on them to create a lovely keepsake for years to come!
Step 7: Allow to Dry
Before we can hang our sweet creations, we need to let the glue dry completely. This step is important to ensure everything stays in place. I usually take this time to clean up our workspace and admire our handiwork. The soft shimmer of the candies under the light feels magical, and I can’t wait to see them hanging on our tree! Once they’re dry, you’ll be ready to display your Mini Cup Candy Ornaments with pride!
Tips for Best Results
- Choose colorful and festive candies for a vibrant look that will catch everyone’s eye.
- Use themed cups, like holiday designs, for added charm and to match your decor.
- Create a variety of ornaments with different candy types to make your display more exciting.
- Opt for clear cups to showcase the colorful candies inside, making each ornament a delightful surprise!
Theme and Design Variations
- Use red and green for a classic Christmas theme that brings festive cheer to your home.
- Try pastel colors for a springtime look, perfect for Easter or baby showers.
- Incorporate Halloween colors like orange, black, and purple for spooky treats that delight kids and adults alike.
- Create a birthday version with colorful sprinkles and birthday-themed cups, making every celebration sweeter!
Display and Use Ideas
Now that you’ve created your delightful Mini Cup Candy Ornaments, it’s time to showcase them! Here are some fun and creative ways to display or gift your sweet creations:
- Hang them on your Christmas tree for a sweet touch that will bring smiles to everyone who sees them.
- Use them as festive table centerpieces, adding a pop of color and charm to your holiday gatherings.
- Gift them in a decorative box for friends and family, making your presents extra special and delicious!
- Incorporate them into holiday gift baskets, adding a personal and tasty touch to your gifts.
FAQs about Mini Cup Candy Ornaments
- Q: What types of candies work best?
A: Colorful gummies, chocolates, and mints are great choices for a festive look. They not only add vibrant colors but also a variety of flavors that everyone will enjoy! - Q: Can kids help with this project?
A: Yes! This project is suitable for all ages with adult supervision, especially when using scissors and glue. It’s a wonderful way to engage kids in crafting while having fun together! - Q: How long do these ornaments last?
A: If kept in a cool, dry place, they can last for several weeks. Just be sure to avoid direct sunlight to keep those candies looking fresh and colorful! - Q: Can I use homemade candies?
A: Absolutely! Homemade candies can add a personal touch to your Mini Cup Candy Ornaments. Just ensure they are properly stored to maintain freshness. - Q: How can I make these ornaments more eco-friendly?
A: Consider using biodegradable cups and natural candies. You can also decorate with recycled materials, making your crafting experience both fun and sustainable!
Final Thoughts
Creating Mini Cup Candy Ornaments is not just a craft; it’s a joyful experience that brings families together. The satisfaction of seeing your colorful creations hanging on the tree or being gifted to loved ones is truly heartwarming. I encourage you to gather your materials, unleash your creativity, and dive into this delightful project. Don’t forget to share your results with friends and family—there’s nothing quite like the joy of crafting together! So, let’s spread some sweetness this holiday season with these charming ornaments!
Print
Mini Cup Candy Ornaments: Create Sweet Holiday Decor Today!
Description
Create adorable mini cup candy ornaments that add a sweet touch to your holiday decor. These charming ornaments are perfect for hanging on your tree or giving as gifts.
Instructions
- Start by filling each mini paper cup with your choice of assorted candies.
- Once filled, use glue or double-sided tape to secure the top of the cup closed.
- Cut a length of ribbon or string, and tie it around the top of the cup to create a hanging loop.
- If desired, decorate the outside of the cups with markers or stickers for a personalized touch.
- Hang your mini cup candy ornaments on the tree or use them as festive decorations around your home.
- Category: Holiday Decor
Keywords: Mini Cup Candy Ornaments, Holiday Decor, DIY Ornaments, Sweet Decorations