Introduction to Meyer Lemon Sticky Buns Recipe
As a passionate home cook, I find joy in creating dishes that not only satisfy the palate but also warm the heart. One of my all-time favorites is the Meyer Lemon Sticky Buns. These delightful treats are a perfect blend of sweet and tangy, making them a standout at any brunch or family gathering. The first time I made these sticky buns, I was captivated by the bright, zesty flavor of Meyer lemons. Their unique sweetness adds a refreshing twist that elevates the traditional sticky bun experience.
Picture this: a lazy Sunday morning, the sun streaming through the kitchen window, and the aroma of freshly baked buns wafting through the air. It’s a scene that brings a smile to my face every time. I remember the first time I served these to my family. As they took their first bites, their eyes lit up with delight. The combination of soft, pillowy dough and the luscious lemon glaze was a hit! It was a moment of pure joy, and I knew I had stumbled upon something special.
What I love most about this recipe is its versatility. You can enjoy these sticky buns for breakfast, as a sweet snack, or even as a dessert. They are perfect for sharing, and I often find myself making a double batch to ensure there are enough to go around. Plus, they are surprisingly easy to make, even for those who might be intimidated by baking. With just a few simple ingredients and some love, you can create a batch that will impress everyone.
So, if you’re ready to embark on a culinary adventure that will fill your kitchen with warmth and happiness, let’s dive into the world of Meyer Lemon Sticky Buns. Trust me, your taste buds will thank you!
Ingredients for Meyer Lemon Sticky Buns Recipe
Before we roll up our sleeves and get baking, let’s gather all the ingredients we’ll need for these delightful Meyer Lemon Sticky Buns. I always believe that quality ingredients make a world of difference in the final product. So, let’s make sure we have everything ready to go!
Main Ingredients
- 4 cups all-purpose flour, plus extra for dusting
- 1/4 cup granulated sugar
- 1 packet (2 1/4 teaspoons) active dry yeast
- 1 cup whole milk, warmed to about 110°F (43°C)
- 1/2 cup unsalted butter, melted
- 2 large eggs
- 1 teaspoon salt
- 1 tablespoon Meyer lemon zest (about 1 lemon)
- 1/2 cup brown sugar, packed
- 1/4 cup Meyer lemon juice (freshly squeezed)
- 1 teaspoon vanilla extract
When it comes to the Meyer lemons, I highly recommend using fresh ones if you can find them. Their unique flavor is what makes these sticky buns truly shine. If you can’t find Meyer lemons, regular lemons will work, but the taste will be a bit more tart.
Optional Add-ons
- 1/2 cup chopped pecans or walnuts for added crunch
- 1/2 cup raisins or dried cranberries for a fruity twist
- 1 teaspoon ground cinnamon for a warm spice note
- Powdered sugar for dusting before serving
Feel free to get creative with these optional add-ons! I often toss in some chopped nuts or dried fruit, depending on what I have on hand. It’s all about making this recipe your own and adding those personal touches that make it special.
Now that we have our ingredients lined up like soldiers ready for battle, let’s move on to the next exciting step: preparing the dough!
How to Prepare Meyer Lemon Sticky Buns Recipe
Now that we have our ingredients ready, it’s time to roll up our sleeves and dive into the fun part—preparing the Meyer Lemon Sticky Buns! I love this part because it’s where the magic happens. The dough transforms into something soft and fluffy, and the filling brings that delightful zing. Let’s get started!
Step 1: Making the Dough
First things first, we need to make the dough. In a large mixing bowl, combine the warm milk and sugar. Sprinkle the yeast on top and let it sit for about 5-10 minutes until it becomes frothy. This is a crucial step because it activates the yeast, which helps our buns rise beautifully.
Next, add the melted butter, eggs, salt, and Meyer lemon zest to the yeast mixture. Stir everything together until well combined. Gradually add the flour, one cup at a time, mixing until a soft dough forms. You might need to use your hands to knead the dough for about 5-7 minutes until it’s smooth and elastic. Trust me, this is a workout, but it’s worth it!
Tips for Step 1
- Make sure your milk is warm, not hot. If it’s too hot, it can kill the yeast.
- Don’t rush the kneading process. The more you knead, the better the texture of your buns!
- If the dough is too sticky, add a little more flour, but be careful not to overdo it.
Step 2: Preparing the Filling
While the dough is rising, let’s prepare the filling. In a small bowl, mix together the brown sugar, Meyer lemon juice, and vanilla extract. This mixture will create a sweet and tangy filling that will make your sticky buns irresistible. If you’re adding any optional ingredients like nuts or dried fruit, now’s the time to toss them in!
Once everything is combined, set it aside. The filling will soak into the dough as it bakes, creating that gooey goodness we all love.
Tips for Step 2
- Feel free to adjust the sweetness by adding more or less brown sugar based on your taste.
- Experiment with different add-ins! Each time I make these, I try something new.
Step 3: Assembling the Buns
After about an hour, your dough should have doubled in size. Punch it down gently to release the air. On a floured surface, roll the dough into a rectangle, about 1/4 inch thick. Spread the filling evenly over the dough, leaving a small border around the edges.
Now comes the fun part! Starting from one long side, roll the dough tightly into a log. Once you have a nice log, slice it into 12 equal pieces. Place the buns in a greased baking dish, cut side up, and cover them with a clean kitchen towel. Let them rise for another 30 minutes.
Tips for Step 3
- Use a sharp knife or dental floss to cut the dough. It makes cleaner cuts!
- Don’t worry if they don’t look perfect. They’ll rise and look beautiful once baked.
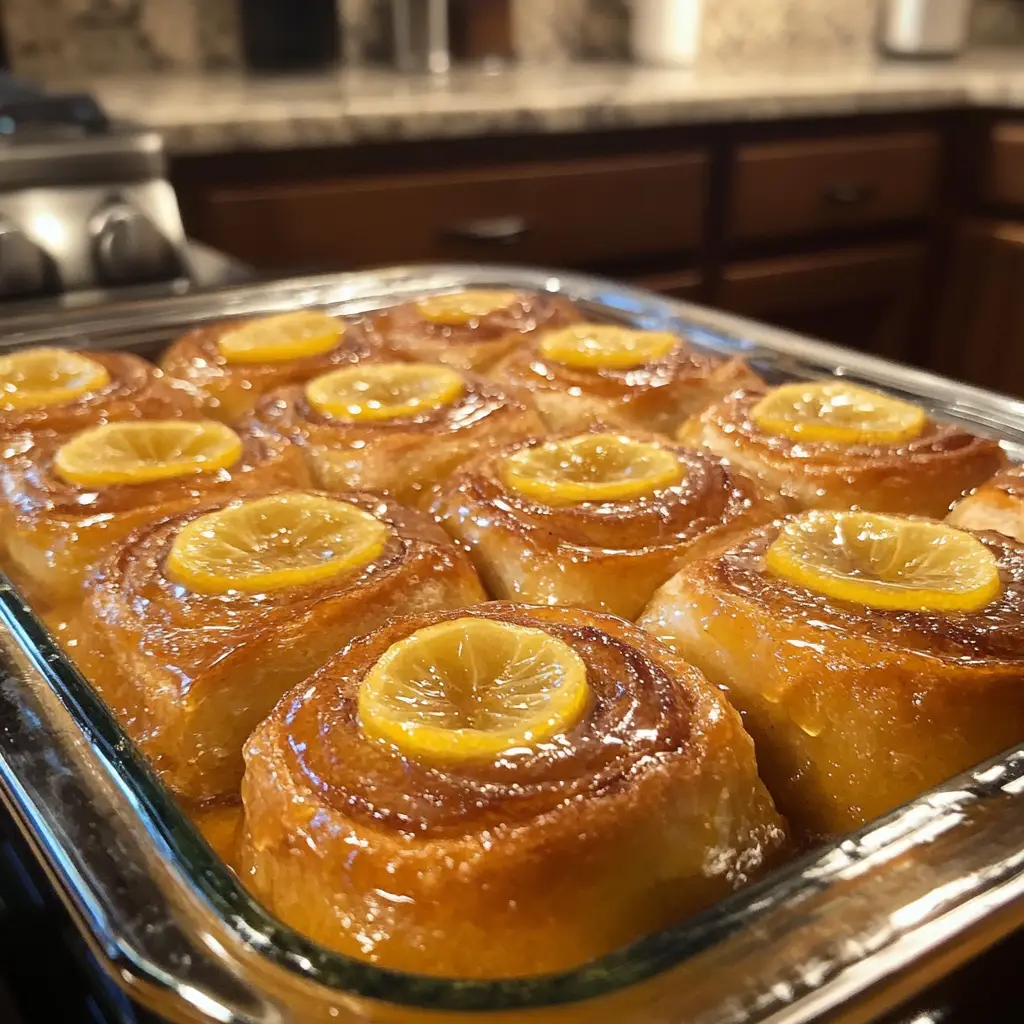
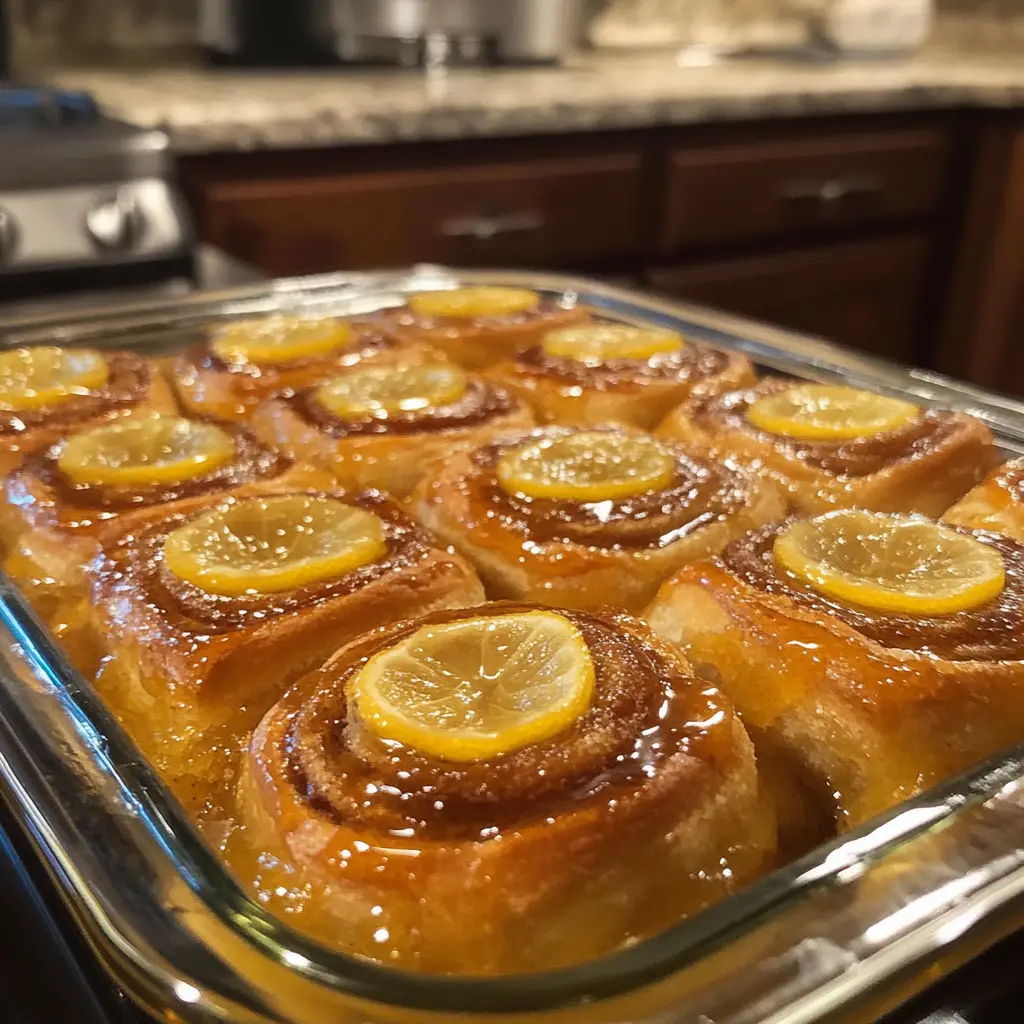
Step 4: Baking the Buns
Preheat your oven to 350°F (175°C). Once the buns have risen, it’s time to bake them! Pop the baking dish into the oven and let them bake for about 25-30 minutes, or until they are golden brown and your kitchen smells heavenly.
While they’re baking, you can prepare a simple glaze by mixing powdered sugar with a bit of Meyer lemon juice. Drizzle this over the buns once they come out of the oven for that extra zing!
Tips for Step 4
- Keep an eye on the buns as they bake. Ovens can vary, and you don’t want them to overbake.
- Let them cool for a few minutes before adding the glaze. This way, it won’t melt away!
And there you have it! Your Meyer Lemon Sticky Buns are ready to be devoured. I can’t wait for you to experience the joy of pulling apart those warm, gooey buns. Trust me, they’ll be a hit!
Equipment Needed for Meyer Lemon Sticky Buns Recipe
Before we dive into the baking process, let’s make sure we have all the right tools at our fingertips. Having the right equipment can make a world of difference in your baking experience. Here’s what you’ll need to whip up these delightful Meyer Lemon Sticky Buns:
- Mixing Bowls: A large mixing bowl for the dough and a smaller one for the filling. If you don’t have a mixing bowl, any large container will do!
- Measuring Cups and Spoons: Accurate measurements are key in baking. If you don’t have these, you can use a kitchen scale for precision.
- Rolling Pin: This is essential for rolling out the dough. If you don’t have one, a clean wine bottle can work in a pinch!
- Sharp Knife or Dental Floss: For slicing the rolled dough into buns. A sharp knife is great, but dental floss can make for a clean cut without squishing the dough.
- Baking Dish: A 9×13 inch baking dish works perfectly. If you don’t have one, any oven-safe dish that can hold the buns will suffice.
- Kitchen Towel: To cover the buns while they rise. A clean dish towel or even plastic wrap can work if you don’t have one handy.
- Oven Mitts: Safety first! Protect your hands when taking the hot buns out of the oven.
With these tools in your arsenal, you’re all set to create some mouthwatering Meyer Lemon Sticky Buns. Remember, it’s not just about the equipment; it’s about the love and care you put into your baking. Let’s keep the momentum going and get ready for the next steps!
Variations of Meyer Lemon Sticky Buns Recipe
As a home cook, I love to experiment with recipes, and these Meyer Lemon Sticky Buns are no exception! While the classic version is absolutely delightful, there are so many fun variations to try. Each twist brings a new flavor profile that can surprise and delight your taste buds. Here are a few of my favorite variations:
- Blueberry Meyer Lemon Sticky Buns: Add a cup of fresh or frozen blueberries to the filling for a burst of fruity goodness. The combination of blueberries and Meyer lemons is simply divine!
- Chocolate Chip Meyer Lemon Sticky Buns: For a sweet twist, sprinkle some mini chocolate chips into the filling. The rich chocolate pairs beautifully with the zesty lemon.
- Maple Pecan Meyer Lemon Sticky Buns: Swap out the brown sugar for maple syrup in the filling and add chopped pecans. This variation gives a warm, nutty flavor that’s perfect for fall.
- Spiced Meyer Lemon Sticky Buns: Add a teaspoon of ground ginger or nutmeg to the dough for a warm spice note. It’s a cozy twist that’s perfect for chilly mornings.
Feel free to mix and match these ideas or come up with your own! The beauty of baking is that it allows for creativity. Each time I make these sticky buns, I try to incorporate something new, and it always turns out delicious. So, don’t be afraid to let your imagination run wild!
Cooking Notes for Meyer Lemon Sticky Buns Recipe
As I’ve learned through my culinary adventures, a few cooking notes can make all the difference when it comes to baking these Meyer Lemon Sticky Buns. Here are some tips that I’ve gathered over time to ensure your baking experience is as smooth as butter:
- Room Temperature Ingredients: Make sure your eggs and butter are at room temperature before you start. This helps the dough come together more easily and creates a better texture.
- Don’t Rush the Rising: Allow the dough to rise in a warm, draft-free area. If your kitchen is chilly, you can turn on the oven for a minute, then turn it off and place the dough inside to rise. Patience is key!
- Check for Doneness: Every oven is different, so keep an eye on your buns as they bake. They should be golden brown on top and sound hollow when tapped. If you have a thermometer, the internal temperature should reach about 190°F (88°C).
- Storage Tips: If you have leftovers (which is rare in my house!), store them in an airtight container at room temperature for up to two days. You can also freeze them for up to a month. Just reheat them in the oven for a few minutes before serving.
These little notes have helped me perfect my Meyer Lemon Sticky Buns over the years. I hope they guide you on your baking journey, too! Remember, every batch is a chance to learn and grow as a home cook. Happy baking!
Serving Suggestions for Meyer Lemon Sticky Buns Recipe
Now that your Meyer Lemon Sticky Buns are baked to golden perfection, it’s time to think about how to serve them! I always find that presentation can elevate the experience, making it even more delightful for family and friends. Here are some of my favorite serving suggestions that add a special touch:
- Warm and Fresh: Serve the sticky buns warm right out of the oven. The gooey glaze and soft texture are best enjoyed fresh. A little warmth brings out the flavors beautifully!
- With a Side of Fresh Fruit: Pair the buns with a colorful fruit salad or slices of fresh berries. The bright colors and natural sweetness complement the tangy lemon perfectly.
- Drizzle with Extra Glaze: For an extra indulgent treat, drizzle more Meyer lemon glaze over the top just before serving. It adds a lovely shine and enhances the lemony flavor.
- Accompanied by Coffee or Tea: These sticky buns make a fantastic pairing with a hot cup of coffee or a soothing herbal tea. The warmth of the drink balances the sweetness of the buns.
- Dust with Powdered Sugar: A light dusting of powdered sugar just before serving adds a touch of elegance. It’s like a little snow on top of your delicious creation!
These serving suggestions not only enhance the visual appeal but also create a delightful experience for everyone at the table. I love to gather my family around, share stories, and enjoy these sticky buns together. It’s all about creating memories, one delicious bite at a time!
Tips for Perfect Meyer Lemon Sticky Buns Recipe
As I’ve baked these Meyer Lemon Sticky Buns time and time again, I’ve gathered a treasure trove of tips that can help you achieve perfection in your own kitchen. Here are some of my favorite nuggets of wisdom to ensure your sticky buns turn out just right:
- Measure Accurately: Baking is a science, so precise measurements are crucial. Use a kitchen scale if you have one, or make sure to spoon and level your flour for the best results.
- Don’t Skip the Rise: Allowing the dough to rise properly is key to achieving that fluffy texture. If you’re in a hurry, try placing the dough in a warm spot, like near a sunny window.
- Use Fresh Ingredients: Fresh yeast and high-quality Meyer lemons make a world of difference. The vibrant flavor of fresh lemons will elevate your sticky buns to a whole new level.
- Experiment with Flavors: Don’t hesitate to play around with the filling! Adding spices or different fruits can create a unique twist that keeps things exciting.
- Cool Before Glazing: Let the buns cool for a few minutes before drizzling the glaze. This way, the glaze will sit beautifully on top instead of melting away.
With these tips in your back pocket, you’re well on your way to creating Meyer Lemon Sticky Buns that will impress everyone. Remember, baking is all about having fun and enjoying the process. Happy baking!
Breakdown of Time for Meyer Lemon Sticky Buns Recipe
As a home cook, I know that time management is key when it comes to baking. Understanding how long each step takes can help you plan your baking adventure more effectively. Here’s a quick breakdown of the time you’ll need for the Meyer Lemon Sticky Buns:
- Prep Time: Approximately 20 minutes. This includes gathering your ingredients, mixing the dough, and preparing the filling.
- Rising Time: About 1 hour and 30 minutes. This is the time needed for the dough to rise twice, allowing it to become fluffy and airy.
- Cooking Time: 25-30 minutes. This is the time it takes for the buns to bake to golden perfection in the oven.
- Total Time: Roughly 2 hours and 20 minutes. This includes all prep, rising, and baking time.
Keep in mind that while the rising time may seem lengthy, it’s mostly hands-off. You can use this time to clean up your kitchen or prepare a delicious cup of coffee to enjoy with your sticky buns later. Trust me, the wait will be worth it when you pull those warm, gooey buns out of the oven!
Nutritional Information for Meyer Lemon Sticky Buns Recipe
As a passionate home cook, I always find it helpful to know the nutritional content of the dishes I prepare. While these Meyer Lemon Sticky Buns are a delightful treat, it’s good to be aware of what’s in them. Here’s a general breakdown of the nutritional information per serving (one sticky bun), keeping in mind that actual values may vary based on specific ingredients and portion sizes:
- Calories: Approximately 250-300 calories
- Protein: 4-5 grams
- Fat: 10-12 grams
- Carbohydrates: 38-40 grams
- Fiber: 1-2 grams
- Sugar: 10-12 grams
- Sodium: 150-200 mg
These sticky buns are a delightful indulgence, and while they do contain sugar and fat, they also provide a burst of flavor and joy that’s hard to resist. I always believe in balance, so enjoying these buns as an occasional treat can be part of a healthy lifestyle. Plus, the bright Meyer lemon flavor adds a refreshing twist that makes them feel a bit lighter!
So, whether you’re sharing them with family or savoring one with your morning coffee, these Meyer Lemon Sticky Buns are sure to bring a smile to your face. Enjoy every delicious bite!
Frequently Asked Questions about Meyer Lemon Sticky Buns Recipe
As I’ve shared my Meyer Lemon Sticky Buns recipe with friends and family, I’ve noticed a few common questions pop up. It’s always great to clarify any doubts, especially when it comes to baking. So, let’s dive into some frequently asked questions to help you on your baking journey!
Can I use regular lemons instead of Meyer lemons?
Absolutely! While Meyer lemons have a sweeter and less acidic flavor, regular lemons can be used in a pinch. Just keep in mind that the buns may be a bit more tart. If you love that zesty kick, go for it!
How do I store leftover sticky buns?
If you happen to have any leftovers (which is rare in my house!), store them in an airtight container at room temperature for up to two days. You can also freeze them for up to a month. Just reheat them in the oven for a few minutes to bring back that fresh-baked goodness!
Can I make the dough ahead of time?
Yes! You can prepare the dough and let it rise, then punch it down and refrigerate it overnight. Just make sure to bring it back to room temperature before rolling it out and continuing with the recipe. This can save you time on busy mornings!
What if my dough doesn’t rise?
If your dough doesn’t rise, it could be due to inactive yeast. Make sure your yeast is fresh and that the milk is warm, not hot. If you suspect your yeast is old, it’s best to start with a new packet. Don’t be discouraged; baking is all about learning!
Can I add different fillings to the sticky buns?
Definitely! The filling is where you can get creative. I love adding nuts, dried fruits, or even chocolate chips for a fun twist. Feel free to experiment with flavors that you enjoy!
How can I make the glaze thicker?
If you prefer a thicker glaze, simply add more powdered sugar until you reach your desired consistency. You can also reduce the amount of Meyer lemon juice to achieve a thicker texture. It’s all about finding that perfect balance!
These questions are just a few of the many that can arise while baking these delightful Meyer Lemon Sticky Buns. I hope this section helps clear up any uncertainties and inspires you to get baking! Remember, every question is a step toward becoming a more confident home cook. Happy baking!
Conclusion on Meyer Lemon Sticky Buns Recipe
As I wrap up this delightful journey into the world of Meyer Lemon Sticky Buns, I can’t help but feel a sense of warmth and joy. This recipe is more than just a collection of ingredients and steps; it’s a celebration of flavors, memories, and the simple pleasure of baking. The sweet and tangy notes of Meyer lemons create a unique twist that elevates these sticky buns to a whole new level of deliciousness.
What I love most about this recipe is its ability to bring people together. Whether it’s a cozy brunch with family or a gathering of friends, these sticky buns are sure to be the star of the show. The soft, pillowy texture combined with the gooey glaze makes each bite a little piece of heaven. Plus, the versatility of the recipe allows you to customize it to your liking, making it a canvas for your culinary creativity.
So, if you’re looking to impress your loved ones or simply treat yourself to something special, I wholeheartedly encourage you to give this Meyer Lemon Sticky Buns recipe a try. With a little patience and a lot of love, you’ll create a batch that not only tastes amazing but also fills your home with the comforting aroma of freshly baked goodness. Happy baking, and may your kitchen be filled with laughter and joy!