Introduction to Melted Wax Paper Leaf Suncatchers
Welcome to the colorful world of Melted Wax Paper Leaf Suncatchers! This delightful DIY project captures the essence of fall, allowing you to bring the vibrant hues of autumn right into your home. I can’t tell you how rewarding it feels to create something beautiful with your own hands, especially when crafting with kids or friends. It’s simple, fun, and a fantastic way to bond while exploring creativity. Plus, these suncatchers are a safe Halloween decoration that adds a warm glow to any room. Let’s dive into this crafty adventure together!
Why You’ll Love This Melted Wax Paper Leaf Suncatcher
This Melted Wax Paper Leaf Suncatcher project is a delightful blend of creativity and simplicity. It’s an affordable way to engage with your kids, turning a regular afternoon into a fun-filled crafting session. I love how it encourages relaxation and sparks imagination, allowing everyone to express their artistic side. Plus, the joy of seeing your colorful creations dance in the sunlight is simply magical!
Materials and Tools Needed for Melted Wax Paper Leaf Suncatchers
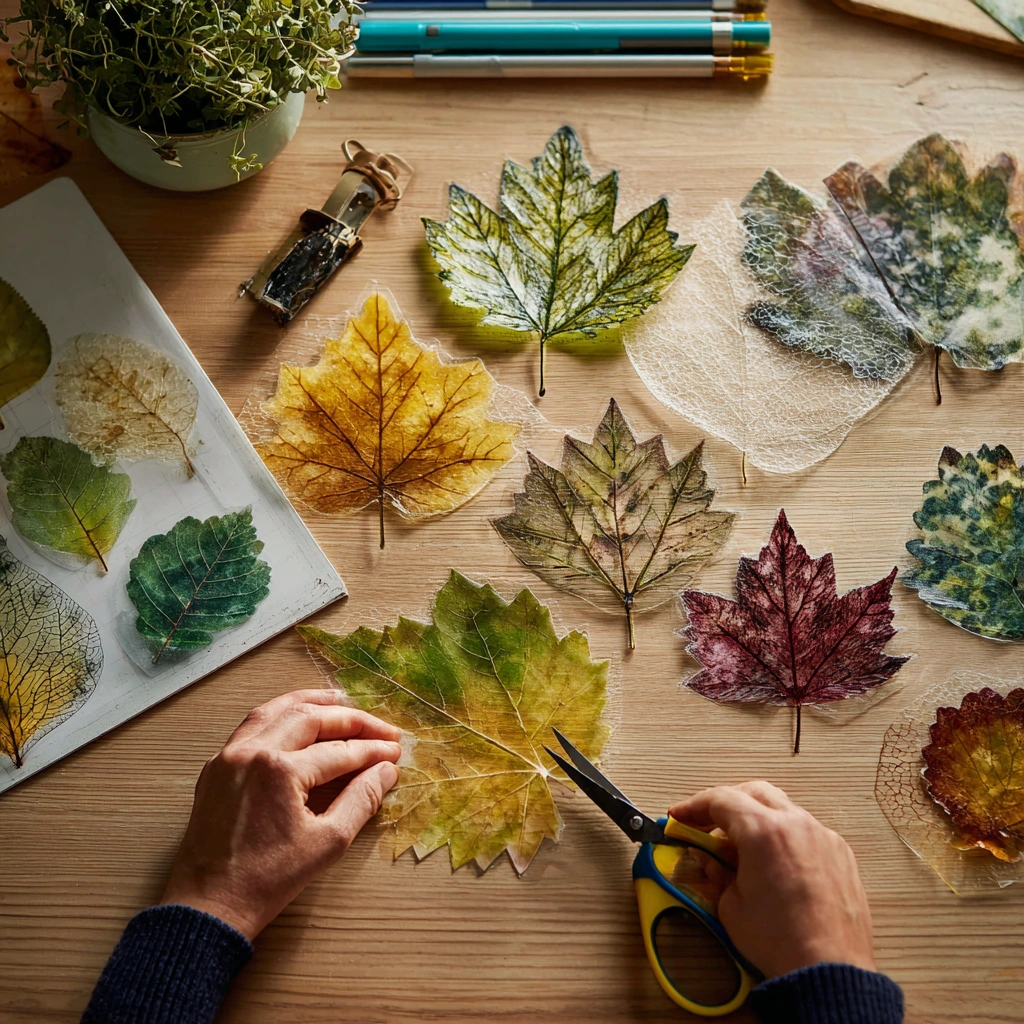
To create your stunning Melted Wax Paper Leaf Suncatchers, you’ll need a few essential materials. First up is wax paper, the star of our project, which will beautifully encase the leaves. Next, gather some leaves—real ones from your backyard or artificial ones from a craft store work perfectly. An iron and ironing board are crucial for melting the wax, so make sure they’re ready to go. Scissors will help you cut out your designs, while string or fishing line will allow you to hang your creations. If you want to add a splash of color, grab some crayons to shave for extra flair!
How to Make Melted Wax Paper Leaf Suncatchers
Creating your Melted Wax Paper Leaf Suncatchers is a delightful process that brings the beauty of fall right into your home. Let’s get started on this fun adventure together!
Step 1: Gather Your Materials
Before we dive into crafting, it’s essential to gather all your materials. Having everything ready makes the process smoother and more enjoyable. Trust me, there’s nothing worse than scrambling for supplies halfway through! You’ll need:
- Wax paper
- Leaves (real or artificial)
- Iron
- Ironing board
- Scissors
- String or fishing line (for hanging)
- Optional: Crayons (for added color)
Each item plays a vital role in our craft. The wax paper is the canvas, while the leaves add that beautiful touch of nature. If you choose to use crayons, they’ll bring a splash of color that makes your suncatchers pop!
Step 2: Prepare the Leaves
Now, let’s talk about leaves! You can use real leaves from your yard or artificial ones from the craft store. If you’re using real leaves, make sure they’re clean and dry. I love the way the intricate veins of a leaf show through the wax paper, creating a stunning effect. Choose a variety of shapes and sizes to make your suncatchers visually interesting! Remember, the more diverse your leaves, the more dynamic your final piece will be.
Step 3: Create Your Design
Here comes the fun part! Lay your leaves between two sheets of wax paper. If you’re feeling adventurous, grab some crayons and shave a few bits onto the leaves before sealing them. The crayon shavings will melt and create a beautiful, colorful backdrop. It’s like painting with nature! Arrange the leaves in a way that speaks to you—there are no rules here, just your creativity shining through. You can even layer different colors of crayon shavings for a more vibrant effect!
Step 4: Ironing the Wax Paper
Time to bring out the iron! Preheat it to a low setting without steam. Carefully place the top sheet of wax paper over your leaves and press down gently with the iron. I always find it magical to watch the wax melt and seal the leaves inside. Just a few seconds is all it takes! Remember, this step requires adult supervision, especially if kids are helping. Safety first! Make sure to keep your fingers clear of the hot iron, and always have a safe workspace.
Step 5: Cut Out Your Shapes
Once the wax paper has cooled slightly, it’s time to cut out your shapes. You can go for classic leaf shapes, circles, or even fun designs like pumpkins or ghosts for Halloween! The soft shimmer of the wax paper under the light is simply enchanting. Use scissors to carefully cut around your designs, and don’t worry about being perfect—each piece will have its own charm! If you want to add a little flair, consider cutting out shapes that reflect the season, like acorns or apples.
Step 6: Hang Your Suncatchers
Finally, it’s time to display your beautiful creations! Use string or fishing line to hang your suncatchers in a sunny window. Watching the sunlight filter through the colors is a reward in itself. It’s like bringing a piece of fall into your home, and I can’t help but smile every time I see them dancing in the light! You can also use them as decorations for a fall party or even as gifts for friends and family.
And there you have it! Your very own Melted Wax Paper Leaf Suncatchers, ready to brighten up your space. This project is not only a fun way to celebrate the season but also a wonderful opportunity to create lasting memories with your loved ones.
Tips for Best Results
- Always supervise children when using the iron to ensure safety.
- If the wax paper doesn’t seal properly, simply re-iron it for a few more seconds.
- Experiment with different leaf shapes and colors for unique designs.
- For added texture, try layering various sizes of leaves.
- Don’t hesitate to mix crayon colors for a vibrant effect!
Theme and Design Variations
- For a Halloween twist, use black and orange leaves or crayon shavings to create spooky suncatchers.
- Try a winter theme by using white and blue crayon shavings with snowflake-shaped cutouts.
- Incorporate metallic colors like gold and silver for a festive holiday look.
- For a kid-friendly version, let children choose their favorite colors and shapes, encouraging their creativity.
- Mix and match leaf types—combine large maple leaves with tiny ferns for a dynamic display.
Display and Use Ideas
Your Melted Wax Paper Leaf Suncatchers are not just beautiful; they’re versatile too! Here are some creative ways to display and use them:
- Hang them in windows to catch the sunlight and create a warm, colorful glow.
- Use them as unique decorations for fall-themed parties or school events.
- Gift them to friends or family as a heartfelt, handmade present.
- Incorporate them into your autumn home decor by placing them on mantels or tables.
FAQs about Melted Wax Paper Leaf Suncatchers
Can I use any type of leaves for this project?
Absolutely! You can use real leaves from your yard or artificial ones from a craft store. Just make sure they’re clean and dry if you’re using real leaves. The more variety, the better your suncatchers will look!
What if I don’t have an iron?
If you don’t have an iron, you can try using a hair straightener on a low setting. Just be careful and test it out first to ensure it melts the wax paper without damaging it!
How do I clean up after using crayon shavings?
Crayon shavings can be a bit messy, but they’re easy to clean! Just use a damp cloth to wipe down your workspace. If any shavings get on the floor, a quick sweep or vacuum will do the trick!
Can I hang these suncatchers outside?
While they’re designed for indoor use, you can hang them outside, but be cautious of the weather. Direct sunlight and moisture can affect the wax, so it’s best to keep them indoors where they can shine!
How long will my suncatchers last?
With proper care, your Melted Wax Paper Leaf Suncatchers can last for several weeks. However, they may fade over time, especially if exposed to direct sunlight. Enjoy them while they’re vibrant!
Final Thoughts
Creating your own Melted Wax Paper Leaf Suncatchers is not just a craft; it’s a joyful experience that brings the beauty of fall into your home. The satisfaction of seeing your colorful creations dance in the sunlight is truly magical! I encourage you to gather your loved ones, dive into this fun project, and let your creativity shine. Don’t forget to share your results with friends and family—there’s nothing like inspiring others to join in on the crafting fun! Happy crafting, and may your suncatchers brighten your days this fall!
Print
Melted Wax Paper Leaf Suncatchers: Create a Fall Masterpiece Today!
Description
Create beautiful and colorful suncatchers using melted wax paper and leaves, perfect for capturing the essence of fall.
Instructions
- Gather your leaves and place them between two sheets of wax paper.
- If using crayons, shave some crayon shavings and sprinkle them between the leaves for added color.
- Preheat your iron to a low setting without steam.
- Carefully place the top sheet of wax paper over the leaves and press down with the iron for a few seconds until the wax melts and seals the leaves inside.
- Allow the wax paper to cool slightly, then cut out the desired shapes (like leaves or circles).
- Use string or fishing line to hang your suncatchers in a sunny window.
- Category: Craft
Keywords: Melted Wax Paper, Leaf Suncatchers, Fall Crafts, DIY Suncatchers