
Introduction to Super-Bouncy Ball
Welcome to the colorful world of DIY crafting! Today, I’m thrilled to share how to create your very own super-bouncy ball. This project is not only simple and fun, but it also brings a sense of joy and accomplishment as you watch your creation come to life. Imagine the laughter and excitement as your kids bounce their vibrant balls around the house! It’s a fantastic way to bond, unleash creativity, and enjoy some quality family time. Plus, the satisfaction of making something from scratch is truly rewarding. Let’s jump into this delightful DIY adventure!
Why You’ll Love This Super-Bouncy Ball
Creating your own super-bouncy ball is a delightful experience that combines creativity and fun! It’s an affordable project that requires minimal materials, making it perfect for busy moms and teachers. Plus, it’s a fantastic way to bond with your kids while engaging in a hands-on activity. Watching their faces light up as they bounce their colorful creations is priceless. This DIY craft not only sparks joy but also fosters relaxation and creativity!
Materials and Tools Needed for Super-Bouncy Ball
Before we dive into the fun of making our super-bouncy ball, let’s gather our materials! Here’s what you’ll need:
- White school glue: This is the base of our bouncy ball, providing the sticky texture that holds everything together. It’s safe and easy to find at any craft store or even your local supermarket.
- Liquid starch: This magical ingredient helps create that satisfying bounce! It reacts with the glue to form a stretchy, pliable mixture. You can often find it in the laundry aisle.
- Food coloring: Want to add a splash of color? Food coloring is perfect for personalizing your bouncy ball. You can use any colors you love, and it’s a fun way to get creative!
- Mixing bowl: A good-sized bowl is essential for combining your ingredients. Choose one that’s easy to clean, as things might get a little sticky!
- Spoon: You’ll need a spoon for mixing. A sturdy one will help you combine the glue and starch effectively.
- Measuring cups: While we won’t be using exact measurements, having measuring cups on hand can help you gauge how much glue and starch to use.
- Plastic gloves (optional): If you want to keep your hands clean while crafting, plastic gloves are a great option. They can help you avoid any sticky situations!
Gathering these materials is part of the fun! Plus, most of them are budget-friendly and can be found around your home or at local stores. Now that we have everything ready, let’s get crafting!
How to Make Super-Bouncy Ball
Creating your very own super-bouncy ball is not just a fun project; it’s a delightful journey into the world of DIY crafting! I remember the first time I made one with my kids. The excitement in their eyes as we mixed the ingredients was priceless. So, let’s dive into the steps to make this colorful DIY fun together!
Step 1: Combine the Base Ingredients
Start by grabbing your mixing bowl. In it, combine a generous amount of white school glue with liquid starch. These two ingredients are the magic behind your bouncy ball! The glue provides the sticky base, while the starch helps create that satisfying bouncy texture. As you mix, you’ll notice the ingredients start to come together, forming a gooey concoction that’s just begging to be played with!
Step 2: Add Color
Now comes the fun part—adding color! A few drops of food coloring will transform your mixture into a vibrant masterpiece. Stir it in and watch as the colors swirl together, creating a unique hue just for you. This is where you can let your creativity shine! Want a bright pink ball? Go for it! Or maybe a deep blue? The choice is yours, and it’s a fantastic way to personalize your super-bouncy ball.
Step 3: Knead the Mixture
Once your mixture starts to thicken, it’s time to get your hands in there! Put on some plastic gloves if you’d like, and knead the mixture until it forms a ball. This step is crucial because it helps develop the bouncy texture. You’ll know it’s ready when it feels firm and holds its shape. It’s a bit like making dough, and trust me, the tactile experience is half the fun!
Step 4: Shape Your Ball
Now that you have a nice, kneaded ball, it’s time to roll it into a smooth shape. Make sure it’s compact and bouncy—this is where the magic happens! If you find it’s a bit lumpy, just keep rolling it between your hands until it’s perfectly round. The satisfaction of creating a perfectly shaped ball is truly rewarding!
Step 5: Let It Firm Up
Finally, let your bouncy ball sit for a few minutes to firm up. This step is essential for achieving optimal bounciness. While you wait, you can admire your colorful creation and think about all the fun you’re going to have with it. Once it’s ready, you’ll be amazed at how high it can bounce!
And there you have it! Your very own super-bouncy ball, ready for hours of fun. I can’t wait to see how your creations turn out. Remember, crafting is all about enjoying the process, so have fun with it!
Tips for Best Results
- Experiment with different colors by mixing food coloring to create unique shades for your super-bouncy ball.
- Try adding glitter for a sparkly effect! It’s a fun way to make your ball stand out.
- Make multiple balls in different sizes for varied bounciness—this adds an exciting twist to your playtime!
- Store your bouncy ball in a cool, dry place to maintain its shape and ensure it stays bouncy for longer.
Theme and Design Variations
Now that you’ve mastered the art of making a super-bouncy ball, let’s explore some fun theme and design variations to keep the creativity flowing! Here are a few ideas to inspire your next crafting session:
- Neon colors: Bright, vibrant shades are perfect for a summer theme. Think hot pink, electric blue, and neon green for a fun, eye-catching look!
- Pastel shades: Soft colors like lavender, mint green, and baby blue create a gentle, springtime vibe that’s perfect for Easter or just a cheerful day.
- Holiday-themed colors: Get festive with red and green for Christmas or orange and black for Halloween. These colors can add a seasonal touch to your bouncy balls!
- Glow-in-the-dark: Use glow-in-the-dark food coloring for nighttime fun! Imagine bouncing your glowing creations in the dark—what a magical experience!
These variations not only make your super-bouncy ball unique but also allow for endless creative possibilities. So gather your materials and let your imagination run wild!
Display and Use Ideas
Now that you’ve crafted your very own super-bouncy ball, it’s time to think about how to use, display, or even gift your colorful creation! Here are some fun ideas to inspire you:
- Desk toy: Use your bouncy ball as a fun desk toy or stress reliever. It’s perfect for a quick bounce during a busy workday!
- Gift idea: These vibrant balls make great gifts for friends or classmates on their birthdays. Who wouldn’t love a personalized bouncy ball?
- Colorful display: Create a stunning display in a glass jar for home decor. It adds a pop of color to any room!
- Games: Use your bouncy ball in games like catch or as part of a DIY obstacle course. It’s a fantastic way to get everyone moving and having fun!
With these ideas, your super-bouncy ball will not only bring joy but also add a splash of creativity to your everyday life!
FAQs about Super-Bouncy Ball
Here are some common questions you might have about making your very own super-bouncy ball. I hope these answers help you on your crafting journey!
- Q: How long does it take to make a super-bouncy ball?
A: The entire process takes about 30 minutes, including drying time. It’s a quick and fun project that you can easily fit into your day! - Q: Can I use other types of glue?
A: White school glue works best for this project, but feel free to experiment with other types if you prefer. Just keep in mind that the texture and bounciness may vary! - Q: Is this project safe for kids?
A: Yes, this DIY craft is safe for kids, but adult supervision is recommended when using glue and starch. Always make sure to wash hands after crafting to keep everything tidy! - Q: What if my bouncy ball doesn’t bounce well?
A: If your super-bouncy ball isn’t bouncing as expected, it might need more kneading or a little extra time to firm up. Just give it a bit more love, and it should bounce back! - Q: Can I make larger or smaller bouncy balls?
A: Absolutely! You can adjust the size of your bouncy ball by using more or less of the mixture. Just remember that larger balls may take a bit longer to firm up!
Final Thoughts
Creating your very own super-bouncy ball is not just a craft; it’s a joyful experience filled with laughter and creativity! I hope you enjoyed every step of the process, from mixing the ingredients to watching your colorful ball come to life. There’s something magical about bouncing your handmade creation, and I can’t wait to hear about your adventures with it! So gather your family, dive into this fun DIY project, and don’t forget to share your results. Let’s spread the joy of crafting together!
Print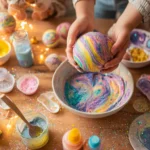
Super-Bouncy Ball: Create Your Own Colorful DIY Fun Today!
Description
Make your very own super-bouncy ball using simple materials and enjoy hours of fun with this colorful DIY project!
Instructions
- In a mixing bowl, combine 1/2 cup of white school glue with 1/4 cup of liquid starch.
- Add a few drops of food coloring to the mixture and stir until well combined.
- Once the mixture starts to thicken, use your hands to knead it until it forms a ball.
- Roll the mixture into a smooth ball shape, ensuring it’s compact and bouncy.
- Let the ball sit for a few minutes to firm up before playing with it.
- Category: Kids Craft
Keywords: DIY super-bouncy ball, colorful bouncy ball, kids craft project


