Introduction to Lemon Rolls Recipe
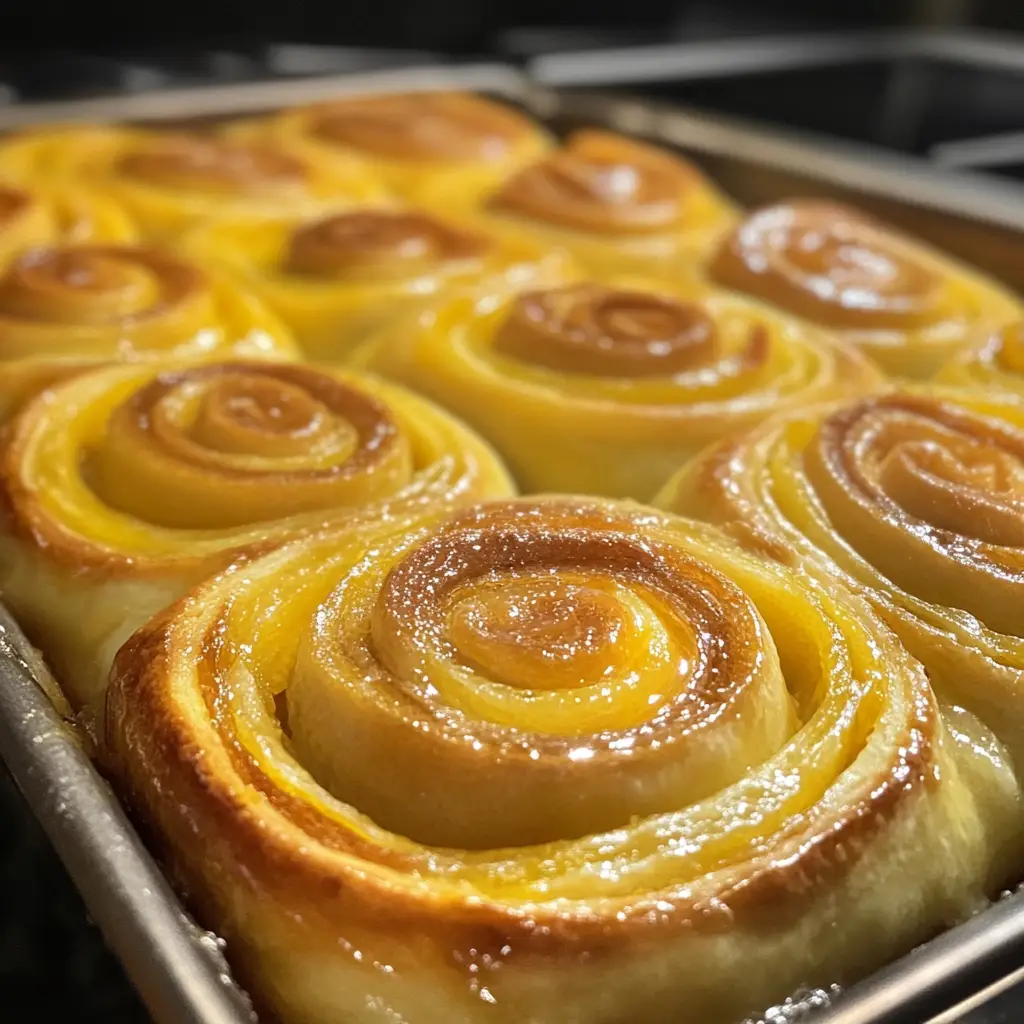
Ah, lemon rolls! Just the thought of them brings a smile to my face. I remember the first time I tasted these delightful treats at a family gathering. The sweet, tangy aroma wafted through the air, wrapping around me like a warm hug. I was instantly hooked! The soft, fluffy rolls filled with zesty lemon filling and topped with a sweet glaze felt like a burst of sunshine on a cloudy day.
As a passionate home cook, I love experimenting with flavors, and lemon has always held a special place in my heart. It’s bright, refreshing, and adds a zing to any dish. When I decided to create my own lemon rolls recipe, I wanted to capture that same joy I felt years ago. I wanted to share a recipe that not only tastes amazing but also brings people together, just like that first bite did for me.
These lemon rolls are perfect for any occasion—be it a cozy brunch, a festive holiday, or simply a treat for yourself after a long day. They are easy to make and can be enjoyed warm from the oven or at room temperature. Plus, the best part? You can customize them to your liking! Whether you prefer a little extra lemon zest or a drizzle of icing, the possibilities are endless.
So, grab your apron and let’s dive into this delightful lemon rolls recipe. I promise you, each bite will transport you to a sunny lemon grove, and you’ll be left craving more!
Ingredients for Lemon Rolls Recipe
Before we embark on our lemony adventure, let’s gather all the ingredients we’ll need. I always believe that the quality of ingredients can make or break a recipe. So, I recommend using fresh, organic lemons whenever possible. They not only taste better but also add a vibrant color to your rolls. Now, let’s break it down!
Main Ingredients
- 4 cups all-purpose flour
- 1/4 cup granulated sugar
- 1 packet (2 1/4 teaspoons) active dry yeast
- 1 cup warm milk (about 110°F or 43°C)
- 1/2 cup unsalted butter, melted
- 2 large eggs
- 1/2 teaspoon salt
- 1/4 cup fresh lemon juice (about 2 lemons)
- Zest of 2 lemons
Optional Add-ons
- 1/2 cup raisins or dried cranberries for a fruity twist
- 1/4 teaspoon ground cinnamon for a hint of warmth
- 1/2 cup chopped nuts (like walnuts or pecans) for added crunch
- Extra lemon zest for a more intense lemon flavor
Feel free to mix and match these optional add-ons to suit your taste. I often toss in some dried cranberries for a pop of color and sweetness. It’s like a little surprise in every bite! Remember, cooking is all about creativity, so don’t hesitate to make this recipe your own.
How to Prepare Lemon Rolls Recipe
Now that we have our ingredients ready, it’s time to roll up our sleeves and get cooking! Making lemon rolls is a delightful process that fills your kitchen with the most amazing scents. I can almost smell the sweet lemony goodness already! Let’s break it down step by step.
Step 1: Prepare the Dough
First things first, we need to create a soft and fluffy dough. In a large mixing bowl, combine the warm milk and sugar. Sprinkle the yeast on top and let it sit for about 5-10 minutes until it becomes frothy. This is a crucial step, as it activates the yeast and gets our dough rising!
Tips for Step 1
- Make sure your milk is warm, not hot. If it’s too hot, it can kill the yeast!
- Use a whisk to mix the ingredients well. It helps to incorporate air, making the dough lighter.
Step 2: Make the Lemon Filling
While the dough is rising, let’s whip up that zesty lemon filling! In a small bowl, mix together the fresh lemon juice, lemon zest, and a bit of sugar. This mixture will be the star of our rolls, so don’t skimp on the zest!
Tips for Step 2
- Use a microplane to zest the lemons. It gives you the finest zest and releases all those lovely oils!
- Adjust the sugar in the filling based on your taste. If you love a tangy kick, feel free to reduce the sugar a bit.
Step 3: Roll and Cut the Dough
Once the dough has risen and doubled in size, it’s time to roll it out! On a floured surface, gently knead the dough for a minute or two. Then, roll it out into a rectangle about 1/4 inch thick. Spread the lemon filling evenly over the dough, leaving a small border around the edges. Now, roll it up tightly from one end to the other, like a cozy sleeping bag!
Tips for Step 3
- Use a bench scraper to help lift the dough as you roll. It makes the process smoother!
- Don’t worry if the filling oozes out a bit; it just adds to the deliciousness!
Step 4: Bake the Lemon Rolls
Preheat your oven to 350°F (175°C). Slice the rolled dough into 12 equal pieces and place them in a greased baking dish. Cover them with a clean kitchen towel and let them rise for another 30 minutes. Once they’ve puffed up, pop them in the oven and bake for about 25-30 minutes until golden brown.
Tips for Step 4
- Keep an eye on the rolls as they bake. Every oven is different, and you want them just golden, not too dark!
- For an extra touch, you can brush melted butter on top right after they come out of the oven.
Step 5: Prepare the Glaze
While the rolls are baking, let’s make the glaze! In a small bowl, whisk together powdered sugar and a splash of lemon juice until smooth. The glaze should be thick but pourable. Once the rolls are out of the oven and slightly cooled, drizzle the glaze over the top. It’s the finishing touch that makes these rolls irresistible!
Tips for Step 5
- If you want a thicker glaze, add more powdered sugar. For a thinner glaze, add a bit more lemon juice.
- Feel free to add a pinch of salt to the glaze. It balances the sweetness beautifully!
Equipment Needed for Lemon Rolls Recipe
Before we dive into the baking magic, let’s gather the essential tools that will help us create these delightful lemon rolls. Having the right equipment makes the process smoother and more enjoyable. Here’s what you’ll need:
- Mixing Bowls: A large bowl for the dough and a smaller one for the lemon filling. If you don’t have a mixing bowl, any large container will do!
- Whisk: Perfect for mixing the yeast and sugar with warm milk. If you don’t have a whisk, a fork works just fine.
- Rolling Pin: This is essential for rolling out the dough. If you don’t have one, a clean wine bottle can serve as a great substitute!
- Baking Dish: A 9×13 inch dish works well for baking the rolls. If you don’t have one, any oven-safe dish will do, just make sure it’s greased.
- Bench Scraper: This handy tool helps lift and cut the dough. If you don’t have one, a sharp knife can do the trick.
- Kitchen Towel: Use this to cover the rolls while they rise. A clean dishcloth will work just as well.
- Oven Mitts: Safety first! Protect your hands when taking the rolls out of the oven.
With these tools in hand, you’re all set to embark on your lemony adventure! Remember, cooking is about creativity, so feel free to improvise with what you have. Let’s get rolling!
Variations of Lemon Rolls Recipe
As I’ve explored the world of lemon rolls, I’ve discovered that there are so many fun ways to put a twist on this classic recipe! Each variation brings its own unique flavor and flair, making it a delightful adventure in the kitchen. Here are a few of my favorite variations that you might want to try:
- Blueberry Lemon Rolls: Add a cup of fresh or frozen blueberries to the lemon filling. The sweet burst of blueberries pairs beautifully with the tangy lemon, creating a delightful contrast.
- Lavender Lemon Rolls: For a floral twist, mix in a teaspoon of culinary lavender into the lemon filling. It adds a lovely aroma and a hint of sophistication to your rolls.
- Chocolate Chip Lemon Rolls: Who says lemon rolls can’t be indulgent? Sprinkle some mini chocolate chips over the lemon filling before rolling. The combination of chocolate and lemon is surprisingly delicious!
- Nutty Lemon Rolls: Incorporate chopped almonds or pistachios into the filling for a crunchy texture. The nuts add a delightful crunch that complements the soft rolls.
These variations are just the tip of the iceberg! Feel free to get creative and mix in your favorite flavors. Cooking is all about experimenting, and I love how each twist can make the recipe feel brand new. So, don’t be afraid to let your imagination run wild and create your own signature lemon rolls!
Cooking Notes for Lemon Rolls Recipe
As I’ve baked these lemon rolls time and time again, I’ve gathered a few cooking notes that can help you achieve the best results. These little tips can make a big difference in your baking journey!
- Room Temperature Ingredients: Make sure your eggs and butter are at room temperature before you start. This helps the dough come together more smoothly and rise better.
- Don’t Rush the Rising: Allow the dough to rise until it has doubled in size. Patience is key! A well-risen dough leads to fluffy rolls.
- Check for Doneness: When baking, look for a golden-brown color on top. You can also tap the bottom of a roll; if it sounds hollow, it’s done!
- Store Properly: If you have leftovers (which is rare!), store them in an airtight container at room temperature for up to two days. You can also freeze them for later enjoyment!
- Experiment with Flavors: Don’t hesitate to adjust the lemon filling or glaze to suit your taste. A little extra lemon juice or zest can elevate the flavor even more!
These cooking notes are like little nuggets of wisdom I’ve picked up along the way. They help ensure that every batch of lemon rolls turns out just as delightful as the last. Happy baking!
Serving Suggestions for Lemon Rolls Recipe
Now that our lemon rolls are baked to golden perfection, it’s time to think about how to serve them! I love to get creative with presentation because it adds an extra touch of joy to the experience. Here are some of my favorite serving suggestions that will make your lemon rolls shine:
- Warm and Fresh: Serve the rolls warm right out of the oven. The sweet glaze will melt slightly, creating a gooey, irresistible topping that everyone will love!
- With a Side of Fresh Fruit: Pair your lemon rolls with a colorful fruit salad. The bright flavors of berries, melons, and citrus complement the tangy lemon perfectly.
- Accompanied by Tea or Coffee: Enjoy these rolls with a cup of your favorite tea or coffee. The warm beverages enhance the flavors and create a cozy atmosphere.
- As a Brunch Centerpiece: Arrange the rolls on a beautiful platter for a brunch gathering. Add some fresh mint leaves or edible flowers for a pop of color and elegance.
- Drizzled with Extra Glaze: For those who can’t get enough sweetness, drizzle a little extra glaze over the top just before serving. It’s a delightful finishing touch!
These serving suggestions are just a starting point! Feel free to mix and match based on your occasion or personal taste. The joy of cooking is all about sharing and creating memorable moments, and these lemon rolls are sure to be a hit at any gathering!
Tips for Perfect Lemon Rolls Recipe
As I’ve baked these lemon rolls countless times, I’ve gathered a treasure trove of tips that can help you achieve perfection in every batch. These little nuggets of wisdom can elevate your baking game and ensure your rolls are as delightful as can be!
- Measure Accurately: Use a kitchen scale for precise measurements, especially for flour. Too much flour can lead to dense rolls, while too little can make them too sticky.
- Don’t Skip the Kneading: Kneading the dough is essential for developing gluten, which gives the rolls their fluffy texture. Aim for about 5-7 minutes of kneading until the dough is smooth and elastic.
- Use Fresh Ingredients: Fresh yeast and lemons make a world of difference. Always check the expiration date on your yeast, and opt for vibrant, fragrant lemons for the best flavor.
- Let Them Cool: Allow the rolls to cool slightly before glazing. This prevents the glaze from melting away and ensures a beautiful finish.
- Experiment with Temperature: If your kitchen is cool, consider placing the dough in a warm spot to rise. A slightly warm oven (turned off) can be a great place for the dough to double in size.
These tips are like little secrets I’ve learned along my baking journey. They help ensure that each batch of lemon rolls is not only delicious but also a joy to make. So, roll up your sleeves and let’s create some lemony magic!
Breakdown of Time for Lemon Rolls Recipe
As a passionate home cook, I know that time management is key in the kitchen. When it comes to making these delightful lemon rolls, it’s helpful to have a clear idea of how long each step will take. Here’s a quick breakdown of the time you’ll need to whip up these zesty treats:
- Prep Time: Approximately 20 minutes. This includes gathering your ingredients, preparing the dough, and making the lemon filling.
- Rising Time: About 1 hour. This is the time needed for the dough to rise and double in size, so be patient! It’s worth the wait for those fluffy rolls.
- Cooking Time: 25-30 minutes. This is the time it takes to bake the rolls to golden perfection in the oven.
- Total Time: Roughly 1 hour and 50 minutes. This includes prep, rising, and baking time, giving you a delicious batch of lemon rolls to enjoy!
Having this time breakdown helps me plan my baking sessions better. I often use the rising time to clean up my kitchen or prepare a cup of tea to enjoy with the rolls later. It’s all about making the most of your time while creating something delicious!
Nutritional Information for Lemon Rolls Recipe
As a passionate home cook, I always find it helpful to know the nutritional content of the dishes I prepare. It allows me to enjoy my culinary creations while being mindful of what I’m eating. Here’s a general breakdown of the nutritional information for one lemon roll, assuming the recipe yields 12 rolls:
- Calories: Approximately 200 calories
- Protein: 3 grams
- Fat: 7 grams
- Carbohydrates: 30 grams
- Sugar: 8 grams
- Fiber: 1 gram
Keep in mind that these values can vary based on the specific ingredients you use and any optional add-ons you choose to include. For instance, adding nuts or dried fruits will increase the calorie count and nutritional value. I love to enjoy these lemon rolls as an occasional treat, and knowing the nutritional information helps me balance my meals throughout the day. Remember, it’s all about moderation and savoring each delightful bite!
Frequently Asked Questions about Lemon Rolls Recipe
As I’ve shared my lemon rolls recipe with friends and family, I’ve noticed a few common questions pop up. It’s always great to clarify any doubts and help fellow home cooks enjoy this delightful treat. Here are some frequently asked questions about making lemon rolls, along with my answers:
Can I make the dough ahead of time?
Absolutely! You can prepare the dough in advance and let it rise in the refrigerator overnight. Just make sure to cover it tightly with plastic wrap. When you’re ready to bake, take it out, let it come to room temperature, and then proceed with the rolling and cutting steps. It’s a great time-saver!
What if I don’t have fresh lemons?
If fresh lemons aren’t available, you can use bottled lemon juice as a substitute. However, I recommend using fresh lemons whenever possible for the best flavor. If you do use bottled juice, make sure it’s 100% lemon juice without any added sugars or preservatives.
Can I freeze the lemon rolls?
Yes, you can freeze the rolls! After baking and cooling them completely, place them in an airtight container or freezer bag. They can be frozen for up to three months. When you’re ready to enjoy them, simply thaw at room temperature and reheat in the oven for a few minutes to restore their fluffy texture.
How do I store leftover lemon rolls?
To keep your lemon rolls fresh, store them in an airtight container at room temperature for up to two days. If you want to keep them longer, freezing is the best option. Just remember to let them cool completely before storing!
Can I make these rolls gluten-free?
Yes, you can! Substitute the all-purpose flour with a gluten-free flour blend that is suitable for baking. Just be sure to check the package instructions for any additional ingredients or adjustments needed. I’ve had success with gluten-free blends, and they can be just as delicious!
These questions are just a few of the common inquiries I’ve encountered while sharing my lemon rolls recipe. I hope my answers help you feel more confident in your baking journey. Remember, cooking is all about experimenting and having fun, so don’t hesitate to reach out if you have more questions or need tips along the way!
Conclusion on Lemon Rolls Recipe
As I wrap up this delightful journey through my lemon rolls recipe, I can’t help but feel a sense of joy and satisfaction. These rolls are more than just a treat; they are a celebration of flavors, memories, and the simple pleasure of baking. The soft, fluffy texture combined with the zesty lemon filling creates a symphony of taste that dances on your palate.
What I love most about this recipe is its versatility. Whether you’re hosting a brunch, enjoying a quiet afternoon with a cup of tea, or simply treating yourself after a long day, these lemon rolls fit perfectly into any occasion. Plus, the ability to customize them with various add-ons means you can make them uniquely yours!
So, I encourage you to gather your ingredients, roll up your sleeves, and dive into this lemony adventure. Each bite will remind you of sunny days and sweet moments shared with loved ones. I hope you find as much joy in making and sharing these lemon rolls as I have. Happy baking!