
Layered Oreo Pudding Dessert Cups: Creamy, Decadent Bliss!
Sensory-Rich Introduction with Immediate Craving
Imagine a warm summer evening, the sun setting in a golden hue, and the laughter of friends filling the air. You reach for a dessert that promises to be the highlight of the night: Layered Oreo Pudding Dessert Cups. As you take your first spoonful, the creamy chocolate pudding melds with the crunchy, buttery Oreo layer, creating a symphony of textures that dance on your palate. The sweetness is perfectly balanced with a hint of vanilla, making each bite a moment of pure bliss. This dessert is not just a treat; it’s a celebration of life’s sweetest moments, perfect for birthdays, picnics, or simply a cozy night in.
Why You’ll Love This Layered Oreo Pudding Dessert Cups
- Texture Contrast: The combination of creamy pudding, crunchy Oreos, and fluffy whipped topping creates an irresistible texture experience.
- Flavor Balance: The rich chocolate flavor is complemented by the sweetness of the whipped topping and the slight bitterness of the Oreos, making it a well-rounded dessert.
- Versatility: Perfect for any occasion, from casual family dinners to elegant parties, this dessert can be dressed up or down.
- Ease of Preparation: With no baking required, this recipe is quick and simple, making it accessible for bakers of all skill levels.
- Universal Appeal: Loved by kids and adults alike, this dessert is a guaranteed crowd-pleaser that satisfies chocolate cravings.
Essential Tools & Preparation Strategy
- Mixing Bowls: Essential for combining ingredients without mess; opt for glass or stainless steel for durability.
- Whisk: Needed for achieving a smooth pudding consistency; a balloon whisk works best for aerating.
- Spatula: Useful for folding whipped topping without deflating it; a silicone spatula is ideal for scraping bowls clean.
- Measuring Cups: Ensures accurate ingredient quantities for best results; consider a set with both dry and liquid measurements.
- Serving Cups: Ideal for layering and presenting the dessert attractively; clear cups showcase the beautiful layers.
- Refrigerator: Necessary for chilling the dessert to enhance flavors and texture; ensure it’s set to the right temperature.
- Food Processor (optional): For quickly crushing Oreos if you prefer a finer texture; alternatively, a zip-top bag and rolling pin work well.
Ingredients & Their Roles in This Layered Oreo Pudding Dessert Cups
- For the Pudding:
- Whole Milk (2 cups): Provides the creamy base for the pudding.
- Instant Chocolate Pudding Mix (1 package): Thickens and flavors the pudding, creating a rich chocolate experience.
- For the Oreo Layer:
- Crushed Oreo Cookies (1 package): Adds a crunchy texture and chocolate flavor.
- Unsalted Butter (1/2 cup, melted): Binds the crushed cookies together, creating a cohesive layer.
- For the Whipped Topping:
- Whipped Topping (1 container): Adds lightness and creaminess to the dessert.
- Vanilla Extract (1 teaspoon): Enhances the overall flavor profile with a hint of warmth.
Substitutions: For a gluten-free option, use gluten-free Oreo cookies. You can also substitute the whipped topping with homemade whipped cream for a fresher taste.
Step-by-Step Guide to Perfect Layered Oreo Pudding Dessert Cups
- Prepare the Pudding: In a medium bowl, whisk together the cold milk and instant chocolate pudding mix for 2 minutes until thickened.
- Make the Oreo Layer: In a separate bowl, combine the crushed Oreo cookies and melted butter, mixing until the cookies are evenly coated.
- Prepare the Whipped Topping: In another bowl, fold the vanilla extract into the thawed whipped topping until well combined.
- Layer the Ingredients: In serving cups, start with a layer of the crushed Oreo mixture at the bottom.
- Add Pudding Layer: Spoon a layer of chocolate pudding over the Oreo layer, smoothing it out evenly.
- Top with Whipped Topping: Add a layer of whipped topping on top of the pudding.
- Repeat Layers: Continue layering the crushed Oreo mixture, pudding, and whipped topping until the cups are filled, finishing with whipped topping.
- Chill: Place the dessert cups in the refrigerator for at least 2 hours before serving to allow the flavors to meld.
Chef’s Notes & Pro Tips for Flawless Results
- Make-Ahead Instructions: This dessert can be made a day in advance, allowing the flavors to develop even further.
- Storage: Store leftovers in an airtight container in the fridge for up to 3 days.
- Equipment Recommendations: A food processor can make crushing Oreos easier, but a zip-top bag and rolling pin work just as well.
- Customization Options: Feel free to add layers of fruit, such as strawberries or bananas, for a fresh twist.
Avoid These Common Cooking Mistakes
- Not Whisking Long Enough: This can lead to a runny texture. Ensure you whisk for the full 2 minutes.
- Overmixing the Whipped Topping: This can cause it to become grainy. Fold gently until just combined.
- Using Warm Milk: This can prevent the pudding from thickening properly. Always use cold milk.
- Not Chilling Long Enough: The dessert won’t set properly. Chill for at least 2 hours.
- Using Stale Cookies: This can affect the flavor and texture. Use fresh Oreo cookies.
- Skipping the Butter in the Oreo Layer: This can lead to a dry crust. Always mix with melted butter.
- Not Layering Properly: This can affect the presentation. Layer carefully for a beautiful look.
Creative Variations & Customizations
- Peanut Butter Oreo Pudding Cups: Add a layer of peanut butter between the pudding and whipped topping for a nutty twist.
- Mint Chocolate Oreo Cups: Use mint-flavored Oreos and add a drop of peppermint extract to the whipped topping.
- Seasonal Fruit Layers: Incorporate layers of fresh berries or bananas for a fruity contrast.
- Vegan Version: Substitute dairy milk with almond or coconut milk and use vegan whipped topping and cookies.
- Coffee Lovers Delight: Add a layer of coffee-flavored pudding for a mocha-inspired dessert.
Perfect Pairings: What to Serve With Layered Oreo Pudding Dessert Cups
- Fresh Berries: Their tartness contrasts beautifully with the sweetness of the dessert.
- Vanilla Ice Cream: Adds an extra layer of creaminess and indulgence.
- Chocolate Shavings: For an elegant touch that enhances the chocolate flavor.
- Chocolate Sauce: A drizzle adds richness and visual appeal.
- Whipped Cream: For those who love extra fluffiness.
- Coffee or Espresso: A delightful after-dinner treat that complements the dessert.
- Nuts: A selection of nuts adds a crunchy texture contrast.
- Mini Dessert Cups: Perfect for parties, allowing guests to enjoy individual servings.
Storage & Meal Prep Instructions
- Refrigerator Storage: Keep the dessert cups in the fridge for up to 3 days in an airtight container.
- Freezer Storage: While not recommended for this dessert due to texture changes, if necessary, freeze for up to 1 month. Thaw in the fridge before serving.
- Reheating Methods: This dessert is best served chilled and does not require reheating.
Nutrition Facts & Health Insights
| Nutrient | Amount per Serving |
|---|---|
| Serving Size | 1 dessert cup |
| Calories | 350 |
| Sugar | 25 grams |
| Sodium | 200 milligrams |
| Fat | 18 grams |
| Saturated Fat | 10 grams |
| Unsaturated Fat | 5 grams |
| Trans Fat | 0 grams |
| Carbohydrates | 45 grams |
| Fiber | 2 grams |
| Protein | 4 grams |
| Cholesterol | 30 milligrams |
Health Insights: The dessert provides a delightful treat while offering a balance of carbohydrates and fats. Enjoy in moderation as part of a balanced diet.
Frequently Asked Questions
- Can I use low-fat milk instead of whole milk?Yes, but the pudding may be less creamy.
- How long can I store the dessert?Up to 3 days in the refrigerator.
- Can I make this dessert gluten-free?Yes, by using gluten-free Oreo cookies.
- What if I don’t have instant pudding mix?You can make homemade pudding, but the texture will differ.
- Can I use homemade whipped cream?Absolutely! Just ensure it’s stabilized for best results.
- How can I make this dessert more chocolatey?Add chocolate syrup between layers or use chocolate-flavored whipped topping.
- Is it possible to make this dessert vegan?Yes, with appropriate substitutions for milk, cookies, and whipped topping.
- What can I do if my pudding doesn’t thicken?Ensure you whisk for the full time and use cold milk.
Final Inspiration & Kitchen Confidence
As you prepare your Layered Oreo Pudding Dessert Cups, remember that cooking is not just about following a recipe; it’s about creating memories and sharing joy. Celebrate your achievements in the kitchen, and don’t hesitate to experiment with flavors and textures. Each dessert you create is a step towards becoming a more confident cook. So gather your ingredients, unleash your creativity, and indulge in the sweet satisfaction of your delicious creation!
Print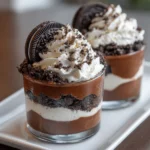
Layered Oreo Pudding Dessert Cups: Creamy, Decadent Bliss!
- Total Time: 2 hours 20 minutes
- Yield: 6 servings 1x
- Diet: Vegetarian
Description
Indulge in the rich, creamy layers of chocolate pudding and crushed Oreo cookies, creating a delightful contrast of textures. Each spoonful offers a perfect balance of sweetness and a hint of vanilla, making it a decadent treat for any occasion.
Ingredients
- For the Pudding:
- 2 cups whole milk
- 1 package (3.9 oz) instant chocolate pudding mix
- For the Oreo Layer:
- 1 package (15.25 oz) Oreo cookies, crushed
- 1/2 cup unsalted butter, melted
- For the Whipped Topping:
- 1 container (8 oz) whipped topping, thawed
- 1 teaspoon vanilla extract
Instructions
- In a medium bowl, whisk together the milk and instant chocolate pudding mix for 2 minutes until thickened.
- In a separate bowl, combine the crushed Oreo cookies and melted butter, mixing until the cookies are evenly coated.
- In another bowl, fold the vanilla extract into the whipped topping until well combined.
- In serving cups, layer the crushed Oreo mixture at the bottom, followed by a layer of chocolate pudding, and then a layer of whipped topping.
- Repeat the layers until the cups are filled, finishing with a layer of whipped topping on top.
- Chill the dessert cups in the refrigerator for at least 2 hours before serving to allow the flavors to meld.
Notes
- This dessert can be made a day in advance and stored in the refrigerator.
- Store leftovers in an airtight container in the fridge for up to 3 days.
- For a gluten-free option, use gluten-free Oreo cookies.
- Prep Time: 20 minutes
- Cook Time: 0 minutes
- Category: desserts
- Method: no-bake
- Cuisine: American
Nutrition
- Serving Size: 1 dessert cup
- Calories: 350
- Sugar: 25 grams
- Sodium: 200 milligrams
- Fat: 18 grams
- Saturated Fat: 10 grams
- Unsaturated Fat: 5 grams
- Trans Fat: 0 grams
- Carbohydrates: 45 grams
- Fiber: 2 grams
- Protein: 4 grams
- Cholesterol: 30 milligrams
Keywords: Layered Oreo Pudding Dessert Cups, chocolate pudding, Oreo dessert, no-bake dessert, easy dessert recipe, creamy dessert, party dessert, layered dessert, quick dessert, chocolate lovers, sweet treats, dessert cups, kid-friendly dessert


