Sensory-Rich Introduction with Immediate Craving
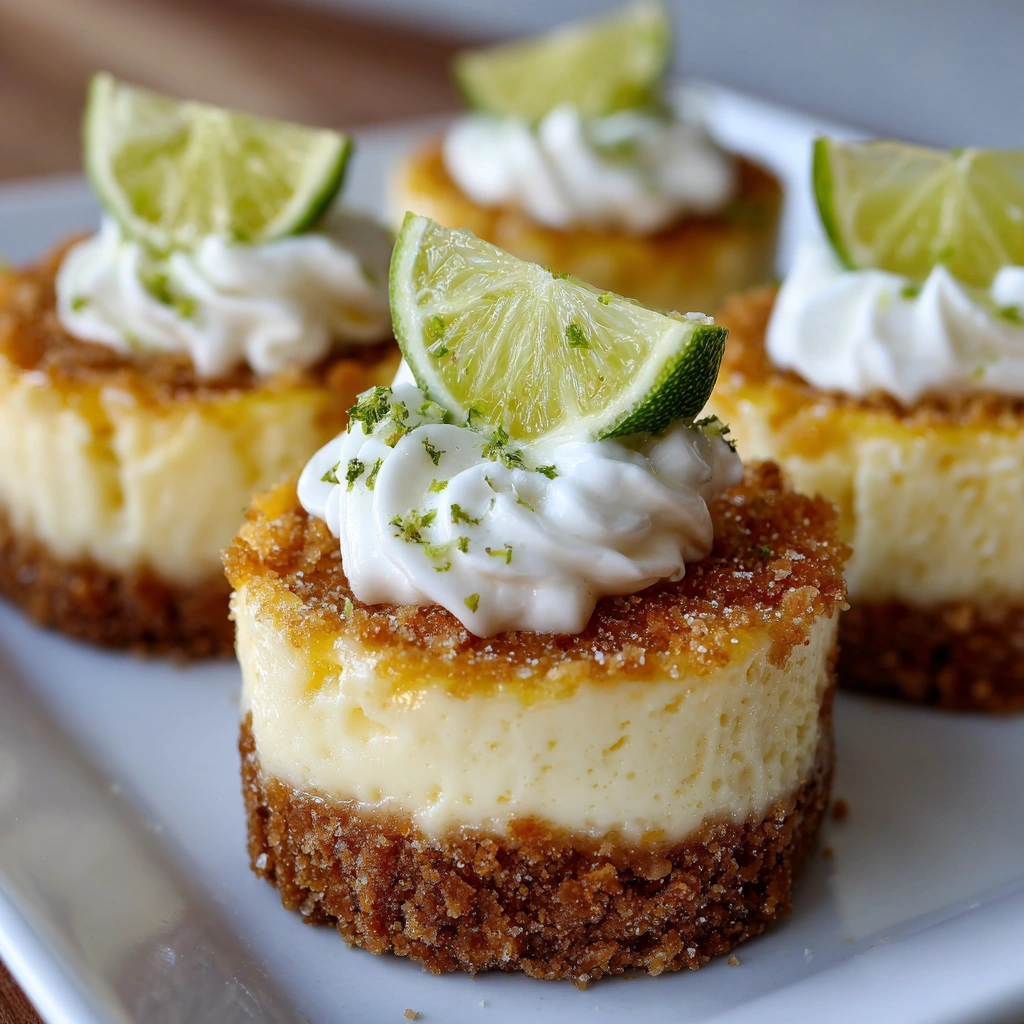
Imagine sinking your teeth into a Key Lime Mini Cheesecake, where the creamy texture envelops your palate, and the zesty key lime flavor dances on your taste buds. The buttery graham cracker crust provides a satisfying crunch, creating a delightful contrast that makes each bite a little piece of heaven. The aroma of fresh key limes wafts through the air, instantly transporting you to sun-soaked beaches and warm summer days.
Growing up, my family had a tradition of gathering every summer for a big barbecue, and no feast was complete without my grandmother’s famous key lime pie. I can still picture her in the kitchen, the sun streaming through the window, as she expertly whipped up the filling, her laughter mixing with the sound of the mixer. Those moments were filled with joy, and the first bite of her pie was always a celebration of summer. It’s this nostalgia that inspired me to create these mini cheesecakes, capturing that same essence in a bite-sized treat.
These Key Lime Mini Cheesecakes are not just desserts; they are a gateway to cherished memories and joyful gatherings. Whether it’s a summer barbecue, a birthday party, or a holiday celebration, these little delights are perfect for any occasion. Their vibrant color and refreshing flavor make them a standout dessert that will have everyone reaching for seconds. So, let’s dive into this recipe and bring a taste of summer to your table!
Why You’ll Love This Key Lime Mini Cheesecakes
Let me tell you, there’s something truly magical about these Key Lime Mini Cheesecakes that makes them a must-try for any dessert lover. Each bite is a delightful experience, and here’s why you’ll fall head over heels for them:
- Texture Contrast: The creamy filling paired with a crunchy graham cracker crust creates a delightful mouthfeel that keeps you coming back for more. It’s like a little party in your mouth, where the smoothness of the cheesecake meets the satisfying crunch of the crust.
- Flavor Balance: The tartness of fresh key lime perfectly complements the sweetness of the cheesecake, striking a harmonious balance that dances on your taste buds. It’s refreshing without being overly sweet, making it the ideal treat for any occasion.
- Versatility: These mini cheesecakes are suitable for various occasions, from casual get-togethers to elegant dinner parties. They’re the perfect dessert to impress your guests, and trust me, they’ll be asking for the recipe!
- Ease of Preparation: With simple steps and accessible ingredients, these mini cheesecakes are perfect for bakers of all skill levels. Even if you’re a novice in the kitchen, you’ll find that whipping up these treats is a breeze.
- Universal Appeal: Whether you’re a citrus lover or a cheesecake enthusiast, these mini cheesecakes have something for everyone. They’re light, refreshing, and utterly delicious, making them a crowd-pleaser at any gathering.
So, if you’re looking for a dessert that combines ease, flavor, and a touch of nostalgia, look no further than these Key Lime Mini Cheesecakes. They’re sure to become a favorite in your household, just like they are in mine!
Essential Tools & Preparation Strategy
Before diving into the delightful world of Key Lime Mini Cheesecakes, let’s gather our tools and set the stage for success. Having the right equipment not only makes the process smoother but also enhances the final outcome. Trust me, a well-prepared kitchen is half the battle won!
Essential Tools
- Mixing Bowls: A must-have for combining ingredients smoothly; essential for both crust and filling.
- Electric Mixer: This handy tool ensures a lump-free, creamy filling. If you’re feeling adventurous, a whisk can give you a good workout!
- Muffin Tin: Necessary for shaping the mini cheesecakes. Consider using silicone molds for easy removal and a fun presentation.
- Parchment Paper: Prevents sticking and makes removal easier. If you’re out, a light spray of cooking oil will do the trick.
- Measuring Cups and Spoons: Accurate measurements are key to baking success. Digital scales can also be a great investment for precision.
- Rubber Spatula: Perfect for scraping down the sides of the bowl to ensure every bit of goodness is mixed in. A wooden spoon can serve as an alternative if needed.
Preparation Strategy
Now that we have our tools ready, let’s talk about how to prepare for this zesty adventure:
- Preheat Your Oven: Always start by preheating your oven to 325°F (160°C). This ensures even baking and helps achieve that perfect texture.
- Organize Your Ingredients: Measure out all your ingredients before you start. This not only saves time but also prevents any last-minute scrambling.
- Soften Your Cream Cheese: Take your cream cheese out of the fridge at least 30 minutes before you start. This will help you achieve a smooth, creamy filling without lumps.
- Prepare Your Muffin Tin: Line your muffin tin with paper liners or grease it well. This will make removing the mini cheesecakes a breeze!
With these tools and preparation strategies in place, you’re well on your way to creating a batch of Key Lime Mini Cheesecakes that will impress everyone at your next gathering. Let’s get baking!
Ingredients & Their Roles in This Key Lime Mini Cheesecakes
Understanding the ingredients in your Key Lime Mini Cheesecakes is essential for achieving that perfect balance of flavor and texture. Each component plays a vital role in creating these delightful treats, so let’s break them down!
Crust Ingredients
- Graham Cracker Crumbs: These little gems provide the base and crunch for our mini cheesecakes. Their slightly sweet and nutty flavor complements the zesty filling beautifully.
- Granulated Sugar: A touch of sweetness is essential for the crust, enhancing the overall flavor and helping to bind the crumbs together.
- Unsalted Butter: This rich ingredient binds the crumbs together while adding a luscious, buttery flavor that elevates the crust to new heights.
Filling Ingredients
- Cream Cheese: The star of the show! Cream cheese provides the creamy texture that makes these mini cheesecakes so irresistible. It’s the foundation of our filling.
- Granulated Sugar: Just like in the crust, sugar sweetens the filling, balancing the tartness of the key lime juice.
- Eggs: These act as a binder, giving structure to the filling and helping it set perfectly during baking.
- Sour Cream: Adding a delightful tanginess, sour cream enhances the creaminess of the filling while contributing to its overall flavor profile.
- Fresh Key Lime Juice: This is where the magic happens! Fresh key lime juice provides that signature zesty flavor that makes these mini cheesecakes so refreshing.
- Key Lime Zest: A sprinkle of zest enhances the citrus aroma and flavor, making each bite burst with freshness.
Topping Ingredients
- Whipped Cream: A dollop of whipped cream adds a light, airy finish that perfectly complements the creamy filling.
- Key Lime Slices: Not only do they add a pop of color, but they also serve as a beautiful garnish that hints at the zesty flavor within.
With these ingredients, you’re well on your way to creating Key Lime Mini Cheesecakes that are not only delicious but also a feast for the senses. Each component works harmoniously to deliver a dessert that’s creamy, zesty, and utterly delightful!
Step-by-Step Guide to Perfect Key Lime Mini Cheesecakes
Now that we have our ingredients and tools ready, it’s time to bring these Key Lime Mini Cheesecakes to life! Follow this step-by-step guide, and you’ll be well on your way to creating a dessert that’s sure to impress.
- Preheat the Oven: Start by preheating your oven to 325°F (160°C). This is crucial for ensuring even baking and achieving that perfect texture.
- Prepare the Crust: In a medium bowl, combine 1 cup of graham cracker crumbs, 1/4 cup of granulated sugar, and 1/2 cup of melted unsalted butter until well mixed. The mixture should resemble wet sand.
- Form the Crust: Press the mixture firmly into the bottom of a lined muffin tin, creating a crust about 1/4 inch thick. Make sure to pack it down well for a sturdy base.
- Bake the Crust: Bake the crusts for 8-10 minutes until lightly golden. This step adds a lovely crunch and flavor to the crust. Once done, remove from the oven and let them cool.
- Make the Filling: In a large mixing bowl, beat 16 oz of softened cream cheese until smooth. This is where the magic begins, so take your time to ensure it’s creamy and lump-free.
- Add the Sweetness and Zest: To the cream cheese, add 1 cup of granulated sugar, 2 large eggs, 1/2 cup of sour cream, 1/4 cup of fresh key lime juice, and 1 tablespoon of key lime zest. Mix until fully combined and creamy. The aroma of fresh key limes will fill your kitchen, and trust me, it’s heavenly!
- Fill the Cups: Pour the filling over the cooled crusts, filling each cup about 3/4 full. This allows room for the cheesecakes to rise slightly while baking.
- Bake the Cheesecakes: Bake for 15-18 minutes, or until the centers are set but still slightly jiggly. This is key to achieving that creamy texture we all love. Once done, remove from the oven and let cool to room temperature.
- Chill Before Serving: Refrigerate the mini cheesecakes for at least 2 hours before serving. This step is essential for the flavors to meld and the texture to set perfectly.
And there you have it! With these simple steps, you’ll create Key Lime Mini Cheesecakes that are not only delicious but also a joy to share with family and friends. Get ready for compliments and requests for the recipe!
Chef’s Notes & Pro Tips for Flawless Results
As you embark on your journey to create these delightful Key Lime Mini Cheesecakes, I want to share some invaluable tips that I’ve gathered over the years. These insights will help you achieve the best possible results, ensuring that your mini cheesecakes are not only delicious but also visually stunning!
Make-ahead Instructions
One of the best things about these mini cheesecakes is that they can be prepared a day in advance. In fact, making them ahead of time allows the flavors to meld beautifully, resulting in an even more delicious dessert. Just be sure to store them in the refrigerator, covered, to keep them fresh!
Storage
If you happen to have leftovers (which is rare, trust me!), keep them in an airtight container in the fridge for up to 3 days. This way, you can enjoy a little taste of summer whenever the craving strikes!
Equipment Recommendations
For ease of preparation, I highly recommend using a hand mixer to whip up the filling. It’s lightweight and easy to handle, making the process a breeze. If you’re planning to make larger batches, a stand mixer can be a great investment, allowing you to mix without the need to hold the bowl.
Customization Options
Don’t be afraid to get creative with your Key Lime Mini Cheesecakes! Experiment with different citrus juices like lemon or orange for a unique twist. You can also add a layer of fruit puree on top, such as raspberry or mango, for a pop of color and flavor that will impress your guests.
With these tips in your back pocket, you’re well-equipped to create Key Lime Mini Cheesecakes that are sure to be a hit at any gathering. Happy baking!
Avoid These Common Cooking Mistakes
As you embark on your journey to create the perfect Key Lime Mini Cheesecakes, it’s essential to be aware of some common pitfalls that can hinder your success. Trust me, I’ve made these mistakes myself, and learning from them has made all the difference in my baking adventures. Here’s a list of things to watch out for:
- Overmixing the Filling: This is a classic mistake that can lead to cracks in your cheesecakes. Mix just until combined to keep the filling smooth and creamy.
- Not Cooling the Crust: A warm crust can cause the filling to melt, resulting in a soggy bottom. Ensure it’s cooled completely before adding the filling.
- Skipping the Refrigeration Step: Cheesecakes need time to set properly. Don’t rush this process; refrigerate for at least 2 hours to achieve the best texture.
- Using Cold Cream Cheese: Cold cream cheese can create lumps in your filling. Always soften it at room temperature for a smooth, creamy consistency.
- Filling Too Full: Overfilling can cause overflow during baking. Fill each cup only 3/4 full to allow for slight rising.
- Baking at Too High a Temperature: This can lead to cracks in your cheesecakes. Stick to the recommended temperature of 325°F (160°C) for even baking.
- Not Using Fresh Key Limes: Bottled juice lacks the vibrant flavor that fresh key limes provide. Always opt for fresh for the best taste and aroma.
By keeping these tips in mind, you’ll be well on your way to creating Key Lime Mini Cheesecakes that are not only delicious but also visually stunning. Happy baking!
Creative Variations & Customizations
One of the best things about Key Lime Mini Cheesecakes is their versatility! You can easily customize them to suit your taste or dietary needs. Here are some creative variations that will take your mini cheesecakes to the next level:
- Gluten-Free Option: If you or your guests are gluten-sensitive, simply swap out regular graham crackers for gluten-free graham crackers. This way, everyone can enjoy these delightful treats without worry!
- Chocolate Drizzle: For a rich twist, consider adding a chocolate ganache topping. Just melt some chocolate with a bit of cream, let it cool slightly, and drizzle it over the cooled mini cheesecakes. The combination of zesty lime and rich chocolate is simply divine!
- Berry Swirl: Incorporate a berry puree, such as raspberry or strawberry, into the filling for added flavor and a pop of color. Swirl it gently into the cheesecake mixture before baking for a beautiful marbled effect.
- Coconut Cream: For a tropical flair, substitute sour cream with coconut cream. This will add a subtle coconut flavor that pairs beautifully with the key lime, making each bite feel like a mini vacation!
- Mini Key Lime Tarts: If you want to change up the presentation, use a tart shell instead of a crust. This gives a different texture and look, while still delivering that delicious key lime flavor.
These variations not only enhance the flavor profile of your Key Lime Mini Cheesecakes but also allow you to express your creativity in the kitchen. So, don’t hesitate to experiment and make this recipe your own!
Perfect Pairings: What to Serve With Key Lime Mini Cheesecakes
When it comes to enjoying your Key Lime Mini Cheesecakes, the right accompaniments can elevate the experience to new heights. Here are some delightful pairings that will complement the zesty flavor and creamy texture of these mini treats:
- Dollop of Whipped Cream: A generous dollop of whipped cream adds a luscious creaminess that beautifully balances the tartness of the key lime. It’s like a soft cloud resting atop your cheesecake!
- Fresh Berries: Bright, juicy strawberries or blueberries provide a fruity contrast that not only enhances the flavor but also adds a pop of color to your dessert plate. The sweetness of the berries pairs perfectly with the tangy cheesecake.
- Lime Glaze: A light drizzle of lime glaze can add an extra layer of sweetness and tang, intensifying the key lime flavor. It’s a simple yet effective way to make your mini cheesecakes even more irresistible!
- Mint Sprig: A fresh mint sprig not only adds a refreshing touch but also enhances the overall flavor profile. It’s a beautiful garnish that makes your dessert look as good as it tastes!
- Tropical Fruit Salad: A vibrant tropical fruit salad, featuring pineapple, mango, and kiwi, complements the zesty flavor of the cheesecakes. The colorful medley adds a refreshing contrast that’s perfect for summer gatherings.
- Iced Tea or Lemonade: Pair your mini cheesecakes with a glass of refreshing iced tea or lemonade. The cool, crisp flavors of these drinks are the perfect accompaniment to the creamy, zesty dessert.
- Coconut Sorbet: For a cool, tropical twist, serve your cheesecakes alongside a scoop of coconut sorbet. The creamy coconut flavor enhances the overall tropical vibe of the dessert.
- Summer Barbecue: These mini cheesecakes are a light dessert option that fits perfectly with outdoor gatherings. Their refreshing taste makes them a hit at summer barbecues, leaving everyone satisfied without feeling weighed down.
With these delightful pairings, your Key Lime Mini Cheesecakes will shine even brighter, creating a memorable dessert experience that your guests will rave about. So, gather your friends and family, and enjoy these treats together!
Storage & Meal Prep Instructions
Once you’ve created your delicious Key Lime Mini Cheesecakes, it’s important to know how to store them properly to maintain their freshness and flavor. Here are some handy tips for storage and meal prep:
Fridge Storage
To keep your mini cheesecakes fresh, store them in an airtight container in the refrigerator. They will stay delicious for up to 3 days. This way, you can enjoy a little taste of summer whenever the craving strikes!
Freezer Storage
If you want to make these delightful treats ahead of time, you can freeze them for up to 2 months. To do this, wrap each mini cheesecake individually in plastic wrap and then place them in a freezer-safe container. This prevents freezer burn and keeps them tasting fresh.
Reheating Methods
When you’re ready to enjoy your frozen Key Lime Mini Cheesecakes, simply thaw them in the fridge overnight. This gentle thawing method helps maintain their creamy texture. Serve them chilled for the best experience, as the coolness enhances the refreshing key lime flavor!
With these storage and meal prep instructions, you can enjoy your Key Lime Mini Cheesecakes at your convenience, making them a perfect treat for any occasion. Happy baking and storing!
Nutrition Facts & Health Insights
Understanding the nutritional value of your Key Lime Mini Cheesecakes is essential, especially if you’re looking to indulge while keeping an eye on your health. Here’s a detailed breakdown of the nutrition per serving, so you can enjoy these delightful treats with confidence!
Nutrition Table
| Nutrient | Per Serving (1 mini cheesecake) |
|---|---|
| Calories | 250 |
| Sugar | 18 grams |
| Sodium | 200 milligrams |
| Fat | 15 grams |
| Saturated Fat | 9 grams |
| Unsaturated Fat | 4 grams |
| Trans Fat | 0 grams |
| Carbohydrates | 25 grams |
| Fiber | 1 gram |
| Protein | 3 grams |
| Cholesterol | 50 milligrams |
Health Benefits
While indulging in desserts is a treat, it’s always nice to know that there are some health benefits to be found in your Key Lime Mini Cheesecakes! Here are a couple of highlights:
- Key Limes: These vibrant little fruits are packed with vitamin C, which is essential for a healthy immune system. Vitamin C also acts as an antioxidant, helping to protect your body from free radicals. Plus, the tartness of key limes adds a refreshing zing that can brighten your day!
- Cream Cheese: This creamy ingredient is a good source of calcium, which is vital for maintaining strong bones and teeth. In moderation, cream cheese can be part of a balanced diet, providing a rich, satisfying flavor that enhances the overall experience of your mini cheesecakes.
So, while these Key Lime Mini Cheesecakes are undeniably a treat, they also offer a few nutritional perks that make them a delightful addition to your dessert repertoire. Enjoy them in moderation, and savor every creamy, zesty bite!
Frequently Asked Questions
As you embark on your journey to create the perfect Key Lime Mini Cheesecakes, you might have a few questions along the way. Don’t worry; I’ve got you covered! Here are some of the most common queries I’ve encountered, along with my expert answers:
- Can I use bottled key lime juice?
While you can use bottled key lime juice in a pinch, I highly recommend using fresh key limes for the best flavor. Fresh juice has a vibrant, zesty taste that bottled varieties often lack. Trust me, your mini cheesecakes will thank you! - How do I prevent cracks in my cheesecakes?
Cracks can be a common issue, but there are a few tricks to avoid them. First, be sure not to overmix your filling, as incorporating too much air can lead to cracks. Also, bake at the recommended temperature of 325°F (160°C) and avoid opening the oven door during baking. Lastly, allow your cheesecakes to cool gradually to room temperature before refrigerating. - What can I substitute for sour cream?
If you’re looking for a substitute for sour cream, you can use Greek yogurt or crème fraîche. Both options will provide a similar tangy flavor and creamy texture, making them excellent alternatives in your Key Lime Mini Cheesecakes. - How long do these mini cheesecakes last?
When stored in an airtight container in the refrigerator, your Key Lime Mini Cheesecakes will stay fresh for up to 3 days. If you have leftovers, they make for a delightful treat later on! - Can I make these without eggs?
Yes, you can make egg-free mini cheesecakes! To replace the eggs, consider using a mixture of 1/4 cup of unsweetened applesauce or 1/4 cup of silken tofu blended until smooth. This will help bind the filling while keeping it creamy. - What’s the best way to soften cream cheese?
The best way to soften cream cheese is to take it out of the fridge and let it sit at room temperature for about 30 minutes before using it. If you’re short on time, you can cut it into small cubes and microwave it for about 10-15 seconds—just be careful not to melt it! - Can I freeze these mini cheesecakes?
Absolutely! You can freeze your Key Lime Mini Cheesecakes for up to 2 months. Just wrap each cheesecake individually in plastic wrap and place them in a freezer-safe container. When you’re ready to enjoy them, thaw them in the fridge overnight. - How do I know when they are done baking?
The key to knowing when your mini cheesecakes are done is to look for a slight jiggle in the center. They should be set around the edges but still have a little movement in the middle. This indicates that they will firm up nicely as they cool.
With these FAQs answered, you’re now equipped with the knowledge to tackle any challenges that may arise while making your Key Lime Mini Cheesecakes. Happy baking, and enjoy the delicious journey ahead!
Final Inspiration & Kitchen Confidence
As you wrap up your delightful journey of creating Key Lime Mini Cheesecakes, remember that baking is not just about following a recipe; it’s a beautiful journey of creativity and joy. Each step you take in the kitchen is an opportunity to express yourself, to experiment, and to create something truly special. So, don’t be afraid to let your personality shine through in your baking!
Once you’ve crafted these zesty little treats, take a moment to celebrate your achievements. Whether it’s your first time baking or you’re a seasoned pro, every mini cheesecake you make is a testament to your skills and passion. Share your creations with friends and family, and watch their faces light up with delight as they take that first bite. There’s nothing quite like the joy of sharing something you’ve made with love!
Now, I invite you to dive into this recipe and give it a try. Don’t forget to share your experiences and any creative twists you’ve added along the way. Join our community of dessert lovers, where we can inspire and support each other in our baking adventures. So, roll up your sleeves, grab those key limes, and let’s make some magic happen in the kitchen!
Print
Key Lime Mini Cheesecakes: Creamy, Zesty Bliss Awaits!
- Total Time: 2 hours 45 minutes
- Yield: 12 mini cheesecakes 1x
- Diet: Vegetarian
Description
These Key Lime Mini Cheesecakes are a delightful balance of creamy richness and zesty citrus flavor. Each bite melts in your mouth, with a buttery graham cracker crust that adds a satisfying crunch, making them the perfect treat for any occasion.
Ingredients
- Crust:
- 1 cup graham cracker crumbs
- 1/4 cup granulated sugar
- 1/2 cup unsalted butter, melted
- Filling:
- 16 oz cream cheese, softened
- 1 cup granulated sugar
- 2 large eggs
- 1/2 cup sour cream
- 1/4 cup fresh key lime juice
- 1 tablespoon key lime zest
- Topping:
- Whipped cream for garnish
- Key lime slices for garnish
Instructions
- Preheat the oven to 325°F (160°C).
- In a medium bowl, combine graham cracker crumbs, sugar, and melted butter. Mix until well combined.
- Press the mixture firmly into the bottom of a lined muffin tin, creating a crust about 1/4 inch thick.
- Bake the crusts for 8-10 minutes until lightly golden. Remove from the oven and let cool.
- In a large mixing bowl, beat the softened cream cheese until smooth.
- Add sugar, eggs, sour cream, key lime juice, and zest. Mix until fully combined and creamy.
- Pour the filling over the cooled crusts, filling each cup about 3/4 full.
- Bake for 15-18 minutes, or until the centers are set but still slightly jiggly.
- Remove from the oven and let cool to room temperature, then refrigerate for at least 2 hours before serving.
Notes
- Make-ahead: These mini cheesecakes can be made a day in advance and stored in the refrigerator.
- Storage: Keep leftovers in an airtight container in the fridge for up to 3 days.
- Substitutions: For a gluten-free option, use gluten-free graham crackers.
- Prep Time: 20 minutes
- Cook Time: 25 minutes
- Category: desserts
- Method: baking
- Cuisine: American
Nutrition
- Serving Size: 1 mini cheesecake
- Calories: 250
- Sugar: 18 grams
- Sodium: 200 milligrams
- Fat: 15 grams
- Saturated Fat: 9 grams
- Unsaturated Fat: 4 grams
- Trans Fat: 0 grams
- Carbohydrates: 25 grams
- Fiber: 1 gram
- Protein: 3 grams
- Cholesterol: 50 milligrams
Keywords: Key Lime Mini Cheesecakes, mini cheesecakes, key lime dessert, easy cheesecake recipe, no-bake cheesecake, summer desserts, citrus desserts, individual desserts, creamy cheesecakes, zesty desserts, party desserts, bite-sized treats, refreshing desserts