Introduction to Huli Huli Chicken Recipe
Ah, Huli Huli Chicken! Just saying the name brings a smile to my face and a rumble to my stomach. This delightful dish has a special place in my heart, and I can’t wait to share it with you. I first stumbled upon this Hawaiian treasure during a family vacation on the beautiful islands. The aroma of grilled chicken wafting through the air was simply irresistible. I remember sitting at a beachside restaurant, the sun setting in a blaze of orange and pink, as I took my first bite. The sweet and tangy flavors danced on my tongue, and I knew I had to recreate this dish at home.
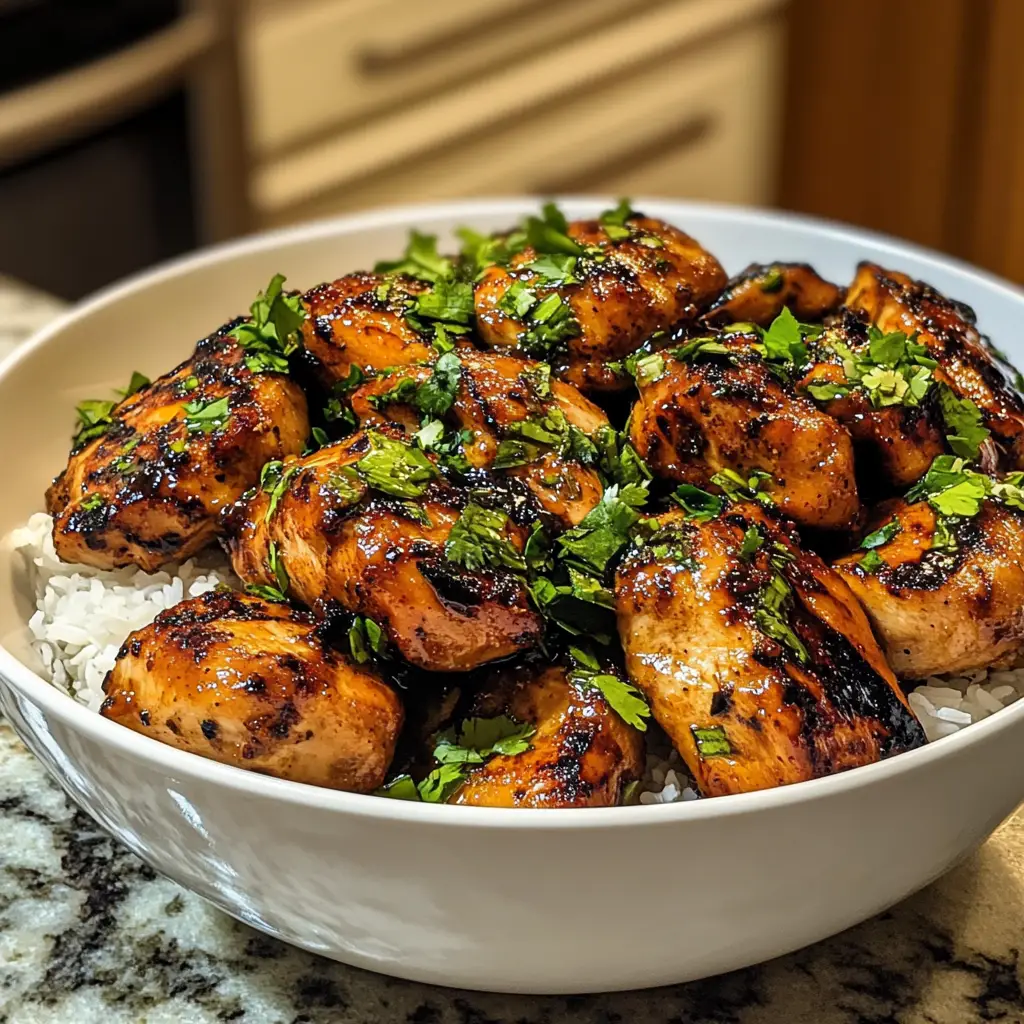
Huli Huli means “turn” in Hawaiian, and it perfectly describes the cooking method used for this dish. Traditionally, the chicken is marinated in a luscious blend of soy sauce, pineapple juice, and ginger, then grilled to perfection. The result? Juicy, tender chicken with a caramelized glaze that makes your taste buds sing! It’s a dish that brings people together, whether it’s a backyard barbecue or a cozy family dinner.
As a passionate home cook, I love how this recipe allows me to infuse my own personality into the dish. I often experiment with different marinades and sides, making it a fun culinary adventure every time I prepare it. Plus, it’s a fantastic way to impress friends and family with minimal effort. So, grab your apron, and let’s dive into the world of Huli Huli Chicken. I promise you won’t regret it!
Ingredients for Huli Huli Chicken Recipe
Before we embark on this delicious journey, let’s gather our ingredients. Having everything ready makes the cooking process smoother and more enjoyable. I always find that when I have my ingredients prepped, it feels like I’m setting the stage for a culinary performance. Here’s what you’ll need for the Huli Huli Chicken Recipe:
Main Ingredients
- 4 boneless, skinless chicken thighs (about 1.5 pounds) – I prefer thighs for their juiciness, but you can use breasts if you like.
- 1/2 cup soy sauce – Opt for low-sodium if you’re watching your salt intake.
- 1/2 cup pineapple juice – Freshly squeezed is best, but store-bought works too.
- 1/4 cup brown sugar – This adds a lovely caramel flavor.
- 2 tablespoons rice vinegar – It gives a nice tang to balance the sweetness.
- 1 tablespoon grated fresh ginger – The zing of ginger is a must!
- 3 cloves garlic, minced – Because who doesn’t love garlic?
- 1 teaspoon sesame oil – This adds a nutty depth to the marinade.
- 1/4 teaspoon black pepper – Just a pinch to enhance the flavors.
Optional Add-ons
- 1 tablespoon sriracha or chili paste – For those who like a little heat!
- Chopped green onions – These make a lovely garnish and add freshness.
- Sesame seeds – A sprinkle on top adds a nice crunch and visual appeal.
- Grilled pineapple slices – These can be served alongside for an extra tropical touch.
When sourcing your ingredients, I always recommend looking for high-quality products. Fresh chicken from a local butcher or farmer’s market can make a world of difference. And if you can find organic soy sauce or fresh ginger, go for it! The better the ingredients, the more delicious your Huli Huli Chicken will be. Now that we have our ingredients ready, let’s move on to the fun part—preparing this mouthwatering dish!
How to Prepare Huli Huli Chicken Recipe
Now that we have our ingredients ready, it’s time to roll up our sleeves and get cooking! Preparing Huli Huli Chicken is a delightful process that fills your kitchen with mouthwatering aromas. I always find that the anticipation of grilling makes the experience even more exciting. Let’s dive into the steps!
Step 1: Marinating the Chicken
First things first, we need to marinate our chicken. This step is crucial as it infuses the meat with all those delicious flavors. In a large bowl, combine the soy sauce, pineapple juice, brown sugar, rice vinegar, ginger, garlic, sesame oil, and black pepper. Whisk it all together until the sugar dissolves.
Next, add the chicken thighs to the marinade, making sure they’re well coated. I like to use a resealable plastic bag for this. It makes it easy to toss the chicken around and ensures every inch is covered. Seal the bag and let it marinate in the fridge for at least 1 hour, but if you can, let it sit overnight. The longer, the better!
Tips for Marinating
- For maximum flavor, aim for at least 4 hours of marinating time.
- Don’t forget to turn the bag occasionally to ensure even marination.
- If you’re short on time, even 30 minutes will still add some flavor!
Step 2: Preparing the Grill
While the chicken is soaking up all those tasty flavors, it’s time to prepare the grill. Preheat your grill to medium-high heat. If you’re using a charcoal grill, let the coals burn until they’re covered with white ash. This ensures a nice, even heat for cooking.
Once heated, oil the grill grates with a paper towel dipped in vegetable oil. This helps prevent the chicken from sticking and makes flipping it a breeze. I always keep a pair of tongs handy for this task!
Tips for Grill Preparation
- Make sure your grill is clean before starting; it helps with flavor and prevents flare-ups.
- If you’re using a gas grill, keep the lid closed as much as possible to maintain heat.
- Consider using a grill mat if you’re worried about small pieces falling through the grates.
Step 3: Cooking the Chicken
Now comes the fun part—cooking the chicken! Remove the chicken from the marinade, letting any excess drip off. Place the chicken on the grill and cook for about 6-7 minutes on each side. You want that beautiful char and caramelization to develop.
Keep an eye on the chicken, as cooking times can vary based on the thickness of the thighs. I always use a meat thermometer to check for doneness; the internal temperature should reach 165°F (75°C).
Tips for Cooking
- Don’t flip the chicken too soon; let it develop a nice crust before turning.
- If you notice flare-ups, move the chicken to a cooler part of the grill.
- For extra flavor, reserve some marinade to baste the chicken while it cooks.
Step 4: Basting and Finishing Touches
As the chicken nears completion, it’s time to add that final touch. If you reserved some marinade, use it to baste the chicken during the last few minutes of cooking. This adds a glossy finish and enhances the flavor. Just remember, don’t baste with the marinade that touched the raw chicken!
Once the chicken is cooked through, remove it from the grill and let it rest for about 5 minutes. This allows the juices to redistribute, making every bite tender and juicy.
Tips for Basting
- Use a clean brush or spoon for basting to avoid cross-contamination.
- For a smoky flavor, consider adding a few wood chips to your grill.
- Feel free to experiment with different herbs or spices in your marinade for a unique twist!
And there you have it! Your Huli Huli Chicken is ready to shine on your dinner table. The combination of sweet, tangy, and savory flavors will surely impress everyone. Let’s move on to the next steps to make this meal even more delightful!
Equipment Needed for Huli Huli Chicken Recipe
Before we dive into the grilling magic, let’s make sure we have the right tools at our disposal. Having the right equipment can make the cooking process smoother and more enjoyable. Here’s a quick list of what you’ll need for the Huli Huli Chicken Recipe:
- Grill: Whether you have a gas or charcoal grill, both work wonderfully for this recipe. If you don’t have a grill, you can use a grill pan on the stovetop or even bake the chicken in the oven at 400°F (200°C).
- Mixing Bowl: A large bowl is essential for mixing the marinade. I love using a glass bowl because it’s easy to clean and lets me see the beautiful colors of the marinade.
- Resealable Plastic Bag: This is perfect for marinating the chicken. If you don’t have one, a covered dish will work just fine.
- Tongs: A good pair of tongs is a must for flipping the chicken on the grill. They help keep your hands safe from the heat!
- Meat Thermometer: This handy tool ensures your chicken is cooked to perfection. It takes the guesswork out of cooking and guarantees juicy results.
- Basting Brush: If you plan to baste the chicken with marinade, a basting brush is ideal. You can also use a spoon if you don’t have one on hand.
With these tools ready, you’re all set to create a delicious Huli Huli Chicken that will have everyone asking for seconds. Remember, cooking is all about improvisation, so feel free to adapt and use what you have available. Now, let’s get back to the fun part—grilling up that chicken!
Variations of Huli Huli Chicken Recipe
As much as I adore the classic Huli Huli Chicken, I love to mix things up and explore different variations. Each twist brings a new flavor profile that keeps my culinary adventures exciting. Here are a few fun variations you might want to try:
- Huli Huli Chicken Skewers: Cut the chicken into bite-sized pieces and thread them onto skewers. This makes for a fun appetizer or party dish. Just be sure to soak wooden skewers in water for about 30 minutes to prevent burning!
- Huli Huli Chicken Salad: After grilling, slice the chicken and toss it on a bed of mixed greens with fresh veggies, avocado, and a light vinaigrette. It’s a refreshing way to enjoy the flavors of Huli Huli Chicken while keeping it light.
- Spicy Huli Huli Chicken: Add more sriracha or chili paste to the marinade for a fiery kick. This variation is perfect for those who love a bit of heat in their meals!
- Huli Huli Chicken Tacos: Shred the grilled chicken and serve it in warm tortillas with pineapple salsa, avocado, and a drizzle of lime crema. It’s a tropical twist that’s sure to impress!
These variations not only keep things interesting but also allow you to cater to different tastes and occasions. I often find that experimenting with new ideas makes cooking even more enjoyable. So, don’t hesitate to get creative and make this recipe your own!
Cooking Notes for Huli Huli Chicken Recipe
As I’ve learned through my culinary adventures, a few cooking notes can make all the difference in achieving that perfect Huli Huli Chicken. Here are some tips that I always keep in mind when preparing this dish:
- Marination Time: While I recommend marinating for at least an hour, longer is always better. If you can, let the chicken soak overnight. This allows the flavors to penetrate deeply, resulting in a more flavorful dish.
- Grill Temperature: Maintaining a consistent medium-high heat is key. If the grill is too hot, the outside may char before the inside is fully cooked. If it’s too low, you won’t get that beautiful caramelization.
- Resting Period: After grilling, let the chicken rest for about 5 minutes. This step is crucial as it allows the juices to redistribute, ensuring every bite is juicy and tender.
- Leftover Marinade: If you have leftover marinade, you can bring it to a boil for a few minutes to kill any bacteria and then use it as a sauce. Just remember to never use it directly on the raw chicken!
- Serving Temperature: Huli Huli Chicken is best served warm. If you’re preparing it ahead of time, keep it covered in a warm oven until you’re ready to serve.
These cooking notes have helped me refine my Huli Huli Chicken over the years. Each tip is a little nugget of wisdom that enhances the overall experience. So, keep these in mind as you embark on your own cooking journey, and I promise you’ll be rewarded with a delicious meal!
Serving Suggestions for Huli Huli Chicken Recipe
Now that your Huli Huli Chicken is grilled to perfection, it’s time to think about how to serve it! Presentation can elevate your dish from delicious to absolutely stunning. I love to get creative with my serving ideas, and here are a few suggestions that will make your meal even more delightful:
- Serve with Coconut Rice: The creamy, slightly sweet flavor of coconut rice pairs beautifully with the tangy chicken. It’s like a tropical vacation on your plate!
- Fresh Fruit Salsa: A vibrant pineapple or mango salsa adds a refreshing touch. The sweetness of the fruit complements the savory chicken perfectly.
- Grilled Vegetables: Toss some bell peppers, zucchini, and corn on the grill alongside the chicken. The charred veggies add color and nutrition to your meal.
- Green Salad: A light salad with mixed greens, avocado, and a citrus vinaigrette balances the richness of the chicken. It’s a great way to add some crunch!
- Huli Huli Chicken Sandwich: Slice the grilled chicken and serve it on a toasted bun with lettuce, tomato, and a drizzle of barbecue sauce for a delicious sandwich option.
These serving suggestions not only enhance the flavors but also create a beautiful spread that will impress your family and friends. I always find that a well-plated meal makes everyone feel special. So, don’t hesitate to mix and match these ideas to create your perfect Huli Huli Chicken experience!
Tips for Perfecting Huli Huli Chicken Recipe
As I’ve cooked Huli Huli Chicken time and time again, I’ve gathered a treasure trove of tips that can elevate your dish to new heights. These little nuggets of wisdom can make all the difference in achieving that perfect balance of flavors and textures. Here are my top tips for perfecting your Huli Huli Chicken:
- Use Fresh Ingredients: Fresh chicken, ripe pineapples, and high-quality soy sauce can significantly enhance the flavor. I always opt for organic or locally sourced ingredients when possible.
- Experiment with Marinades: Don’t be afraid to tweak the marinade! Adding a splash of orange juice or a hint of honey can create a unique twist that keeps things exciting.
- Monitor Cooking Time: Every grill is different, so keep an eye on your chicken. Use a meat thermometer to ensure it reaches 165°F (75°C) for perfectly cooked, juicy meat.
- Let It Rest: After grilling, allow the chicken to rest for a few minutes. This step is crucial for juicy, tender bites, as it lets the juices redistribute throughout the meat.
- Garnish Creatively: A sprinkle of chopped green onions or sesame seeds right before serving adds a pop of color and flavor. It’s the finishing touch that makes your dish look and taste gourmet!
By incorporating these tips into your cooking routine, you’ll be well on your way to mastering the art of Huli Huli Chicken. Each tip is a small step toward creating a dish that not only tastes amazing but also brings joy to your dining table. Happy cooking!
Breakdown of Time for Huli Huli Chicken Recipe
Time is of the essence in the kitchen, and knowing how long each step takes can help you plan your meal perfectly. I always find it helpful to break down the time needed for each part of the Huli Huli Chicken Recipe. Here’s a quick overview:
- Prep Time: 15 minutes – This includes gathering your ingredients, mixing the marinade, and marinating the chicken. If you can, let the chicken marinate longer for even better flavor!
- Cooking Time: 15-20 minutes – This is the time spent grilling the chicken to juicy perfection. Keep an eye on it to ensure it cooks evenly.
- Total Time: 30-35 minutes – This is the total time from start to finish, not including the optional overnight marination. If you let it marinate overnight, just add that time to your planning!
By keeping this time breakdown in mind, you can easily fit Huli Huli Chicken into your busy schedule. Whether it’s a weeknight dinner or a weekend gathering, this dish is quick to prepare and sure to impress!
Nutritional Information for Huli Huli Chicken Recipe
As a passionate home cook, I always pay attention to the nutritional value of the meals I prepare. Huli Huli Chicken is not only delicious but also offers a balanced profile of nutrients. Here’s a quick breakdown of the nutritional information per serving (based on a serving size of one chicken thigh, approximately 4 ounces):
- Calories: 220
- Protein: 24g
- Fat: 10g
- Carbohydrates: 8g
- Sugar: 5g
- Sodium: 600mg
This dish is a great source of protein, making it perfect for a satisfying meal. The combination of chicken and the flavorful marinade provides a delightful balance of sweet and savory without overwhelming your diet. If you’re looking to reduce sodium, consider using low-sodium soy sauce and adjusting the amount of brown sugar. I love how this recipe allows me to enjoy a tasty meal while still being mindful of nutrition!
Frequently Asked Questions about Huli Huli Chicken Recipe
As I’ve shared my love for Huli Huli Chicken, I often get questions from fellow home cooks eager to try this delightful dish. It’s always exciting to see others dive into the world of flavors and grilling! Here are some of the most common questions I receive, along with my answers to help you on your culinary journey:
Can I use chicken breasts instead of thighs?
Absolutely! While I prefer chicken thighs for their juiciness, chicken breasts can work just as well. Just keep an eye on the cooking time, as breasts may cook faster. Aim for that same internal temperature of 165°F (75°C) to ensure they’re perfectly cooked.
How long should I marinate the chicken?
For the best flavor, I recommend marinating the chicken for at least 1 hour. However, if you can let it sit overnight, that’s even better! The longer the chicken marinates, the more flavorful it becomes.
Can I bake Huli Huli Chicken instead of grilling it?
Yes, you can! If grilling isn’t an option, preheat your oven to 400°F (200°C) and bake the marinated chicken on a lined baking sheet for about 25-30 minutes, or until it reaches the desired internal temperature. You won’t get the same smoky flavor, but it will still be delicious!
What can I serve with Huli Huli Chicken?
There are so many delicious options! I love serving it with coconut rice, grilled vegetables, or a fresh salad. You can also try it in tacos or sandwiches for a fun twist. The possibilities are endless!
Can I make the marinade ahead of time?
Definitely! You can prepare the marinade a day in advance and store it in the fridge. Just remember to give it a good stir before adding the chicken. This makes meal prep a breeze!
These FAQs are just a glimpse into the wonderful world of Huli Huli Chicken. I hope they inspire you to try this recipe and make it your own. Cooking is all about exploration and creativity, so don’t hesitate to ask more questions or share your experiences!
Conclusion on Huli Huli Chicken Recipe
As I wrap up my culinary journey with Huli Huli Chicken, I can’t help but feel a sense of joy and satisfaction. This recipe is more than just a dish; it’s a celebration of flavors, culture, and togetherness. The sweet and tangy marinade, combined with the smoky char from the grill, creates a symphony of taste that dances on your palate. It’s a dish that invites laughter, stories, and cherished memories around the dinner table.
What I love most about Huli Huli Chicken is its versatility. Whether you’re hosting a summer barbecue, preparing a cozy family dinner, or simply craving something delicious, this recipe fits the bill perfectly. Plus, it’s easy to customize, allowing you to add your own flair and creativity. With just a few simple ingredients and steps, you can impress your loved ones and make any meal feel special.
So, I encourage you to give this Huli Huli Chicken Recipe a try. Embrace the process, enjoy the aromas wafting through your kitchen, and savor every bite. Cooking is an adventure, and I hope this dish becomes a beloved part of your culinary repertoire. Happy cooking, and may your kitchen always be filled with love and laughter!


