Introduction to Homemade Scented Candles
Welcome to the delightful world of Homemade Scented Candles! There’s something truly magical about crafting your own candles, filling your space with warm, inviting aromas that reflect your personality. This DIY project is not only simple and fun, but it also offers a wonderful opportunity to bond with family or friends. Imagine the joy of creating unique scents that brighten your home or make perfect gifts! With just a few materials and a sprinkle of creativity, you can transform ordinary wax into beautiful, fragrant treasures that bring comfort and cheer to any occasion.
Why You’ll Love This Homemade Scented Candles
Making Homemade Scented Candles is a delightful blend of creativity and relaxation. It’s an affordable way to add a personal touch to your home decor while enjoying the soothing process of candle making. Plus, it’s a fantastic bonding activity with kids, sparking their imagination as they choose scents and colors. The satisfaction of lighting a candle you crafted yourself is simply unmatched, filling your space with warmth and joy!
Materials and Tools Needed for Homemade Scented Candles
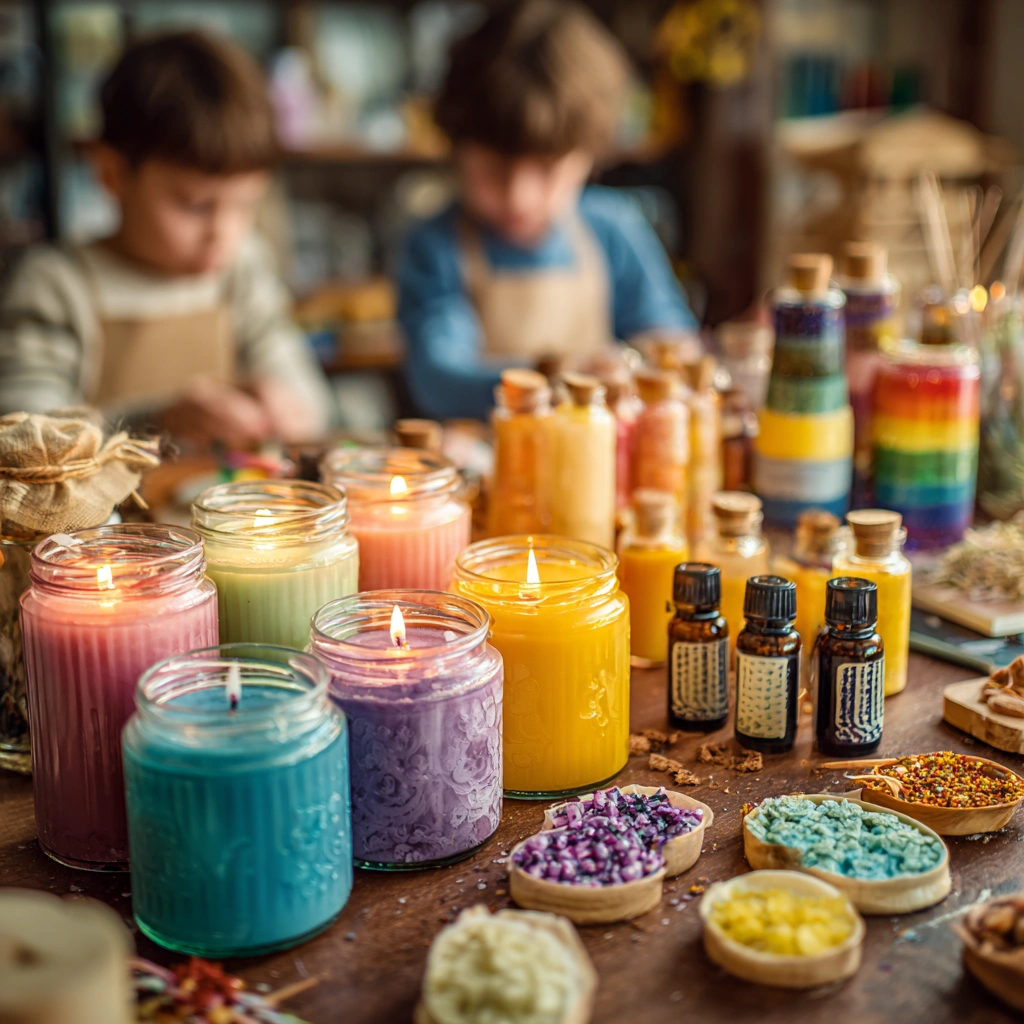
To embark on your Homemade Scented Candles adventure, you’ll need a few essential materials and tools. First up is the wax—choose from soy, beeswax, or paraffin, depending on your preference for eco-friendliness or scent throw. Candle wicks are crucial for a steady burn, while essential oils or fragrance oils allow you to customize your candle’s aroma. If you want to add a splash of color, grab some color dye!
A double boiler or microwave-safe container is necessary for melting the wax safely. Don’t forget candle molds or jars to shape your creations! A thermometer helps ensure the wax is at the right temperature, and a stirring stick is perfect for mixing in scents and colors. Scissors will come in handy for trimming wicks, and safety gloves are a smart choice if you’re worried about hot wax splashes. With these materials, you’re all set to create beautiful, fragrant candles that will light up your home!
How to Make Homemade Scented Candles
Creating your own Homemade Scented Candles is a delightful journey that transforms simple ingredients into fragrant treasures. Let’s dive into the step-by-step process, where each step is filled with creativity and joy!
Step 1: Prepare Your Workspace
Before we get started, let’s set up a clean and safe area for our candle-making adventure. Cover your work surface with newspaper or an old tablecloth to catch any spills. This not only protects your space but also makes cleanup a breeze! Gather all your materials—wax, wicks, essential oils, and jars—so everything is within reach. Having everything organized keeps the kids engaged and excited about the process. Plus, it’s a great way to teach them about preparation and safety!
Step 2: Measure Your Wax
Now, let’s talk wax! The amount you need depends on the size of your molds or jars. A fun way to estimate is to fill your container with water, then pour that water into a measuring cup to see how much wax you’ll need. This little trick not only saves time but also involves the kids in the planning process. They’ll love being part of the decision-making, and it’s a great math lesson too!
Step 3: Melt the Wax
Time to melt! You can use a double boiler or a microwave-safe container. If you’re using a microwave, heat the wax in short bursts, stirring in between to ensure even melting. Keep an eye on the temperature; you want it to be around 170°F. Watching the wax transform from solid to liquid is like witnessing a magical potion come to life! Just remember, safety first—use gloves if you’re worried about burns, and keep little hands at a safe distance.
Step 4: Add Scents and Colors
Here comes the fun part! Once your wax is melted, it’s time to add your chosen essential oils or fragrance oils. I love mixing lavender with a hint of vanilla for a cozy vibe. If you want to add color, now’s the time to stir in your dye. The vibrant hues swirling in the wax are like a mini art project! Just make sure to mix well so the scent and color are evenly distributed. This is where your creativity shines—experiment with different combinations to create a signature scent!
Step 5: Secure the Wick
Next, let’s get that wick in place. Use a wick holder or a dab of melted wax to secure the wick in the center of your jar or mold. This step is crucial because a centered wick ensures an even burn. I often let my kids help with this part; it’s a great way for them to feel involved in the process! Plus, it teaches them about the importance of precision in crafting.
Step 6: Pour the Wax
Carefully pour the melted wax into your mold or jar, making sure the wick stays centered. Pour slowly to avoid bubbles, which can ruin the smooth finish of your candle. As the wax flows, the warm scent fills the air, creating an inviting atmosphere. It’s like a warm hug in a jar! If you’re feeling adventurous, you can layer different colors of wax for a beautiful ombre effect.
Step 7: Cool and Trim
Once you’ve poured the wax, it’s time to let it cool and harden completely. This can take a few hours, so be patient! Once it’s solid, trim the wick to about 1/4 inch above the wax surface. This little snip helps your candle burn evenly and prevents excessive soot. I always find it satisfying to see the finished product take shape, and the anticipation of lighting it for the first time is thrilling!
Step 8: Decorate and Enjoy
Finally, let’s add a personal touch! You can label your candles with fun names or decorate the jars with ribbons or stickers. This is a perfect opportunity for kids to express their creativity. Once you’re done, light your candle and enjoy the cozy glow and delightful scent. Or, wrap them up as gifts for friends and family—who wouldn’t love a Homemade Scented Candle? The joy of gifting something you made yourself is truly special!
Tips for Best Results
- Always monitor the temperature of the wax to prevent overheating, which can affect scent throw.
- If you notice bubbles forming while pouring, gently tap the sides of the jar to release them.
- For a stronger scent, add more essential oils, but be cautious not to exceed recommended amounts.
- Experiment with layering different colors for a stunning visual effect.
- Remember to keep a fire extinguisher nearby when working with hot wax for safety.
Theme and Design Variations
- Autumn Harvest: Use warm colors like orange, red, and yellow, and add cinnamon or apple pie scents for a cozy fall vibe.
- Winter Wonderland: Create icy blue and white candles with peppermint or pine scents to evoke the magic of winter.
- Spring Floral: Opt for pastel colors and floral scents like lavender or rose for a fresh, springtime feel.
- Kids’ Fun: Let kids choose bright colors and playful scents like bubblegum or cotton candy, and decorate jars with stickers or drawings.
- Holiday Cheer: Craft candles in festive colors like red and green, infused with scents like gingerbread or holiday spice for a perfect gift!
Display and Use Ideas
- Home Decor: Place your Homemade Scented Candles on a decorative tray or in a cozy nook to create a warm ambiance in your living space.
- School Crafts: Use them as unique gifts for teachers or classmates during the holiday season, showcasing your creativity.
- Holiday Displays: Arrange candles in festive groupings on your dining table or mantel to enhance your seasonal decor.
- Self-Care Moments: Light a candle during a relaxing bath or while reading to create a soothing atmosphere.
FAQs about Homemade Scented Candles
1. Can I use any type of wax for my candles?
Absolutely! You can choose from soy, beeswax, or paraffin wax. Soy wax is a popular choice for its eco-friendliness and clean burn, while beeswax offers a natural honey scent. Paraffin is budget-friendly and widely available. Each type has its unique benefits, so feel free to experiment!
2. How do I know how much essential oil to add?
A good rule of thumb is to use about 1 ounce of essential oil per pound of wax. However, you can adjust this based on your scent preference. Just remember, a little goes a long way, so start small and add more if needed!
3. What should I do if my candle has air bubbles?
If you notice air bubbles forming, don’t worry! Gently tap the sides of the jar or mold after pouring to release them. You can also use a heat gun to smooth the surface if needed. It’s all part of the learning process!
4. Can I add decorations to my candles?
Definitely! You can add dried flowers, herbs, or even glitter to your candles for a decorative touch. Just make sure any additions are safe to burn and won’t create a fire hazard. This is a fun way to personalize your Homemade Scented Candles!
5. How should I store my candles?
Store your candles in a cool, dry place away from direct sunlight. This helps preserve their scent and color. If you’re gifting them, consider wrapping them in tissue paper or placing them in a decorative box to keep them safe and stylish!
Final Thoughts
Creating Homemade Scented Candles is not just a craft; it’s a joyful experience that fills your home with warmth and delightful aromas. The satisfaction of lighting a candle you made yourself is truly unmatched! I encourage you to gather your materials, invite your kids or friends, and dive into this fun project. Don’t forget to share your results and unique scent combinations with others! Whether for yourself or as heartfelt gifts, your homemade candles will surely bring smiles and cozy vibes to everyone around you. Happy crafting!
Print
Homemade Scented Candles: Ignite Your Creativity with Fun Recipes!
Description
Create your own beautiful and fragrant scented candles at home using simple ingredients and techniques. This DIY project allows you to customize scents and colors to match your style and preferences.
Instructions
- Prepare your workspace by covering surfaces and gathering all materials.
- Measure the amount of wax needed based on the size of your molds or jars.
- Melt the wax using a double boiler or microwave, monitoring the temperature with a thermometer.
- Once melted, add your chosen essential oils or fragrance oils and color dye, stirring well.
- Secure the wick in the center of the mold or jar using a wick holder or adhesive.
- Carefully pour the melted wax into the mold or jar, ensuring the wick remains centered.
- Allow the candle to cool and harden completely, which may take several hours.
- Trim the wick to about 1/4 inch above the wax surface.
- Label and decorate your candles if desired, then enjoy or gift them!
- Category: Home Decor
Keywords: Homemade Scented Candles, DIY Candles, Candle Making, Scented Candles, Craft Project


