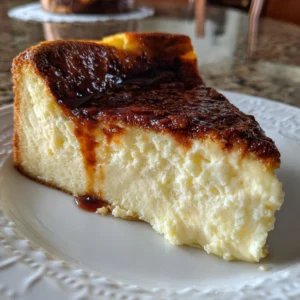
Sensory-Rich Introduction with Immediate Craving
Imagine biting into a Homemade Lemon Crumb Bar—the first thing you notice is the golden crust, perfectly baked to a light crispness that crumbles delightfully at the touch. As you sink your teeth into the creamy lemon filling, a refreshing burst of citrus dances on your palate, balancing the sweetness of the crumbly topping that melts in your mouth. The aroma of freshly squeezed lemons fills the air, inviting everyone in the house to gather around and indulge in this zesty treat.
This recipe holds a special place in my heart, passed down from my grandmother who would whip up these bars every summer for our family picnics. I can still picture her in the kitchen, the sun streaming through the window, as she expertly zested lemons and mixed the ingredients with a smile. Those gatherings were filled with laughter, stories, and the joy of sharing something homemade. Each bite of her lemon bars was a reminder of those sunny days spent together, and now, I carry on that tradition, creating new memories with my own family.
There’s something magical about sharing homemade treats with loved ones. The joy of watching their faces light up as they take that first bite is priceless. These Homemade Lemon Crumb Bars are perfect for any occasion—whether it’s a summer picnic, a birthday party, or simply a refreshing dessert after a hearty meal. They bring a taste of sunshine to any gathering, making them a delightful addition to your dessert repertoire.
Why You’ll Love This Homemade Lemon Crumb Bars
Let me tell you, there are so many reasons to fall in love with these Homemade Lemon Crumb Bars. Each bite is a delightful experience that will have you coming back for more!
- Texture Contrast: The combination of a buttery crust, creamy filling, and crunchy topping creates a delightful mouthfeel. It’s like a symphony of textures in your mouth—each layer plays its part beautifully, from the crispness of the crust to the smoothness of the filling and the satisfying crunch of the topping.
- Flavor Balance: The sweet and tart lemon filling perfectly complements the rich crumb topping. It’s a harmonious blend that dances on your taste buds, making it hard to resist just one more square. The zing of the lemon is brightened by the sweetness of the sugar, creating a flavor profile that’s both refreshing and indulgent.
- Versatility: These bars are ideal for various occasions, from casual gatherings to elegant dinners. Whether you’re hosting a summer barbecue or a cozy family dinner, they fit right in. You can even dress them up with a dusting of powdered sugar or a dollop of whipped cream for a more sophisticated presentation!
- Ease of Preparation: The simple steps make it accessible for bakers of all skill levels. Even if you’re a novice in the kitchen, you’ll find that this recipe is straightforward and forgiving. Plus, the satisfaction of pulling a batch of these beauties from the oven is unmatched!
- Universal Appeal: This dessert pleases both citrus lovers and those who prefer sweet treats. It’s a crowd-pleaser that can win over even the most discerning palates. I’ve seen kids and adults alike devour these bars with glee, proving that good food truly brings people together.
So, whether you’re looking to impress guests or simply treat yourself, these Homemade Lemon Crumb Bars are sure to become a favorite in your dessert rotation. Trust me, once you try them, you’ll understand why they hold such a special place in my heart!
Essential Tools & Preparation Strategy
Before we dive into the delightful process of making Homemade Lemon Crumb Bars, let’s gather our essential tools. Having the right equipment not only makes the process smoother but also enhances your overall baking experience. Trust me, a well-prepared kitchen is half the battle won!
- Mixing Bowls: A set of mixing bowls in various sizes is essential for efficiently combining your ingredients. I recommend using glass or stainless steel bowls, as they are durable and easy to clean.
- Whisk: A good whisk is necessary for achieving a smooth lemon filling. It helps incorporate air into the mixture, giving it that light and fluffy texture we all love.
- Baking Pan: A 9×9 inch baking pan is ideal for even baking and easy cutting. If you have a glass or ceramic pan, it can also help you monitor the browning of your crust.
- Measuring Cups and Spoons: Accurate measurements are crucial for success in baking. Invest in a set of dry and liquid measuring cups, as well as a set of measuring spoons for precision.
- Rubber Spatula: This handy tool is perfect for scraping down the sides of bowls and spreading mixtures evenly. It’s a must-have for ensuring that no ingredient goes to waste!
- Cooling Rack: Allowing your bars to cool on a rack prevents sogginess by promoting even airflow. This is key to achieving that perfect texture.
- Parchment Paper (optional): Lining your baking pan with parchment paper can make for easy removal of the bars once they’re baked. It’s a simple trick that saves you from the dreaded sticking!
- Zester: A zester is essential for extracting fresh lemon zest to enhance flavor. The zest adds aromatic depth that elevates your lemon filling to new heights.
With these tools at your disposal, you’ll be well-equipped to tackle the delightful task of creating Homemade Lemon Crumb Bars. Remember, preparation is key, so take a moment to gather everything before you start. Happy baking!
Ingredients & Their Roles in This Homemade Lemon Crumb Bars
Understanding the ingredients in your Homemade Lemon Crumb Bars is key to mastering this delightful recipe. Each component plays a vital role in creating the perfect balance of flavor and texture. Let’s break it down!
For the Crust:
- All-purpose flour: Provides structure, ensuring that your crust holds together beautifully while still being tender.
- Granulated sugar: Adds sweetness, balancing the tartness of the lemon filling and enhancing the overall flavor.
- Unsalted butter: Contributes richness and flavor, creating that melt-in-your-mouth texture we all crave.
- Salt: Enhances overall taste, bringing out the flavors of the other ingredients and adding depth to the crust.
For the Lemon Filling:
- Eggs: Bind the filling and provide richness, giving it a smooth and creamy consistency.
- Granulated sugar: Sweetens the tartness of the lemon, creating a harmonious balance that’s not overly sour.
- All-purpose flour: Thickens the filling, ensuring it sets properly and holds its shape when cut.
- Fresh lemon juice: Provides the signature zesty flavor that makes these bars so refreshing and bright.
- Lemon zest: Adds aromatic depth, infusing the filling with an intense lemon fragrance that elevates the entire dessert.
For the Crumb Topping:
- Rolled oats: Adds texture and chewiness, creating a delightful contrast to the creamy filling.
- Brown sugar: Offers a deeper sweetness, enhancing the flavor profile of the topping and giving it a lovely caramel note.
- All-purpose flour: Binds the topping, ensuring it holds together while still being crumbly.
- Cinnamon: Adds warmth and flavor complexity, complementing the lemon and making each bite even more enjoyable.
- Unsalted butter: Creates a rich, crumbly texture, making the topping irresistible and perfectly golden.
With these ingredients, you’re well on your way to creating Homemade Lemon Crumb Bars that are not only delicious but also a joy to share with family and friends. Each component works together to create a dessert that’s truly special!
Step-by-Step Guide to Perfect Homemade Lemon Crumb Bars
Now that you’re ready to embark on this zesty adventure, let’s dive into the step-by-step process of creating these delightful Homemade Lemon Crumb Bars. Each step is designed to ensure that you achieve that perfect balance of buttery crust, creamy filling, and crumbly topping. Trust me, the aroma wafting through your kitchen will have everyone eagerly awaiting a taste!
- Preheat the oven to 350°F (175°C). This is crucial for ensuring that your crust bakes evenly and achieves that lovely golden hue.
- In a mixing bowl, combine 1 ½ cups flour, ½ cup sugar, ½ cup softened butter, and ¼ teaspoon salt. Mix until crumbly. You want a texture that resembles coarse sand—this will form the base of your bars.
- Press the mixture into the bottom of a greased 9×9 inch baking pan to form the crust. Use your fingers or the back of a measuring cup to ensure it’s evenly distributed.
- Bake the crust for 15 minutes or until lightly golden. Keep an eye on it; you want it just golden enough to provide a sturdy base without overbaking.
- In another bowl, whisk together 2 large eggs, 1 cup sugar, 2 tablespoons flour, 1/3 cup freshly squeezed lemon juice, and 1 tablespoon lemon zest until smooth. The mixture should be bright and fragrant, a true testament to the fresh lemons!
- Pour the lemon filling over the baked crust and return to the oven for 20 minutes, or until the filling is set and slightly firm to the touch. You’ll know it’s ready when it jiggles just a little in the center.
- While the filling bakes, prepare the crumb topping by mixing 1 cup rolled oats, ½ cup brown sugar, ½ cup flour, and ½ teaspoon cinnamon in a bowl. Stir in ½ cup melted butter until crumbly. This topping is what makes these bars truly irresistible!
- Sprinkle the crumb topping over the lemon filling and bake for an additional 10-15 minutes, or until the topping is golden brown. The contrast of textures is what makes each bite so satisfying.
- Allow to cool completely before cutting into squares and serving. Patience is key here; cutting too soon can lead to a crumbly mess!
As you follow these steps, remember that baking is as much about the journey as it is about the destination. Enjoy the process, and don’t hesitate to dance a little in the kitchen while you wait for those bars to bake!
Chef’s Notes & Pro Tips for Flawless Results
As you embark on your journey to create these delightful Homemade Lemon Crumb Bars, I want to share some of my favorite tips and tricks that will help you achieve flawless results every time. Trust me, these little nuggets of wisdom can make all the difference!
- Make-ahead instructions: If you want to enhance the flavor of your bars, consider preparing them a day in advance. This allows the flavors to meld beautifully, resulting in an even more delicious treat. Just store them in the refrigerator, and they’ll be ready to impress your guests the next day!
- Storage: Keep any leftovers in an airtight container in the fridge for up to 5 days. This way, you can enjoy a zesty treat whenever the craving strikes. Just be sure to let them come to room temperature before serving for the best texture!
- Equipment recommendations: For quick and efficient crust preparation, consider using a food processor. It saves time and ensures that your butter is evenly distributed throughout the flour, resulting in a perfectly crumbly crust.
- Customization options: Don’t be afraid to get creative! Experiment with different citrus juices like lime or orange for a unique twist on the classic lemon flavor. You can also add chopped nuts to the topping for an extra crunch that complements the creamy filling beautifully.
With these tips in your back pocket, you’ll be well on your way to mastering the art of Homemade Lemon Crumb Bars. Remember, baking is all about having fun and making it your own, so let your creativity shine!
Avoid These Common Cooking Mistakes
As you embark on your journey to create the perfect Homemade Lemon Crumb Bars, it’s essential to be aware of some common pitfalls that can hinder your baking success. Trust me, I’ve made these mistakes myself, and learning from them has made me a better baker. Here are the key things to watch out for:
- Overbaking: This is a classic mistake that leads to dryness. Keep a close eye on your bars as they bake, especially during the last few minutes. You want them to be set but still slightly jiggly in the center. A golden color on the topping is your cue to take them out!
- Not cooling completely: If you cut into your bars before they’ve cooled fully, they may crumble and fall apart. Allow them to cool completely in the pan on a wire rack. Patience is key here; it’s worth the wait for those perfect squares!
- Using bottled lemon juice: While it may be convenient, bottled lemon juice lacks the bright, fresh flavor that real lemons provide. Always opt for freshly squeezed lemon juice to elevate your bars to the next level of deliciousness.
- Skipping the zest: The zest is where a lot of the lemon’s aromatic oils reside, adding depth and complexity to your filling. Don’t skip this step; it’s essential for achieving that vibrant lemon flavor!
- Incorrect measurements: Baking is a science, and precise measurements are crucial for the right texture. Use proper measuring cups and spoons, and don’t be tempted to eyeball it—trust me, it can make a big difference!
- Not greasing the pan: If you forget to grease your baking pan or line it with parchment paper, your bars may stick, making it difficult to cut and serve. Always take this extra step to ensure easy removal.
- Using cold butter: Cold butter can affect the texture of your crumb topping, making it less crumbly and more dense. Make sure your butter is softened to room temperature for the best results.
- Rushing the cooling process: I know it’s tempting to dig in right away, but rushing the cooling can lead to messy cuts and a less-than-perfect presentation. Allow your bars to cool completely before slicing for clean, beautiful squares.
By keeping these common mistakes in mind, you’ll be well on your way to mastering the art of Homemade Lemon Crumb Bars. Remember, every baking experience is a learning opportunity, so don’t be discouraged if things don’t go perfectly the first time. Happy baking!
Creative Variations & Customizations
One of the best things about Homemade Lemon Crumb Bars is their versatility! You can easily customize this recipe to suit your taste preferences or dietary needs. Here are some creative variations that will keep your baking exciting and delicious:
- Gluten-Free Version: If you’re looking to make these bars gluten-free, simply substitute the all-purpose flour with a gluten-free flour blend. This way, everyone can enjoy the zesty goodness without worry!
- Berry Lemon Crumb Bars: For a burst of color and flavor, add fresh berries such as blueberries, raspberries, or strawberries to the lemon filling. The sweet-tart berries complement the lemon beautifully, creating a delightful twist on the classic recipe.
- Coconut Lemon Bars: If you love coconut, consider incorporating shredded coconut into the crumb topping. This addition adds a tropical flair and a chewy texture that pairs wonderfully with the creamy lemon filling.
- Lemon Lavender Bars: For a sophisticated touch, infuse the lemon filling with culinary lavender. The floral notes will elevate the flavor profile, making these bars a unique and elegant dessert option.
- Chocolate Drizzle: For those who can’t resist chocolate, top your bars with a drizzle of melted chocolate. This decadent addition adds richness and a delightful contrast to the bright lemon flavor.
Feel free to mix and match these variations to create your own signature version of Homemade Lemon Crumb Bars. The possibilities are endless, and each variation brings its own unique charm to this beloved dessert!
Perfect Pairings: What to Serve With Homemade Lemon Crumb Bars
When it comes to enjoying your Homemade Lemon Crumb Bars, the right accompaniments can elevate the experience to new heights. Here are some delightful pairings that will complement the zesty flavors of your bars and make your dessert spread truly unforgettable:
- Whipped Cream: A dollop of freshly whipped cream adds a luscious creaminess that beautifully balances the tartness of the lemon. It’s like a cloud of sweetness that enhances every bite!
- Vanilla Ice Cream: The cold, creamy texture of vanilla ice cream provides a delightful temperature contrast to the warm, zesty bars. It’s a classic pairing that never disappoints!
- Fresh Berries: Serve your bars with a side of fresh berries—think strawberries, blueberries, or raspberries. They not only enhance the flavor but also add a pop of color that makes your dessert visually appealing.
- Herbal Tea: A warm cup of herbal tea, such as chamomile or mint, complements the citrus flavor and offers a soothing experience. It’s the perfect way to wind down after a meal.
- Light Salad: For a refreshing side, consider serving a light salad with your bars. A simple mix of greens, citrus segments, and a light vinaigrette can balance the sweetness and provide a refreshing contrast.
- Lemonade: For a citrus overload that’s perfect for summer, pair your bars with a glass of homemade lemonade. The bright, tangy flavors will harmonize beautifully with the lemony goodness of the bars.
- Powdered Sugar: A light dusting of powdered sugar on top of your bars not only adds a touch of sweetness but also creates a beautiful presentation that’s sure to impress your guests.
- Yogurt: A side of creamy yogurt offers a healthy touch and a delightful texture contrast. You can even mix in a bit of honey or lemon zest for added flavor!
These pairings will not only enhance the enjoyment of your Homemade Lemon Crumb Bars but also create a delightful experience for your guests. So, gather your loved ones, serve up these delicious bars, and enjoy the perfect combinations that make every bite a celebration!
Storage & Meal Prep Instructions
Once you’ve baked your delicious Homemade Lemon Crumb Bars, you’ll want to ensure they stay fresh and tasty for as long as possible. Here are some simple storage and meal prep instructions to help you enjoy these zesty treats at their best!
- Fridge Storage: Keep your bars in an airtight container in the refrigerator for up to 5 days. This will help maintain their freshness and flavor, allowing you to enjoy a delightful treat whenever the craving strikes.
- Freezer Storage: If you want to save some for later, wrap the bars individually in plastic wrap or aluminum foil and place them in a freezer-safe container. They can be frozen for up to 3 months. This is a great option for meal prep or for when you want to have a sweet treat on hand without the hassle of baking again!
- Reheating Methods: When you’re ready to enjoy your frozen bars, simply thaw them in the fridge overnight. You can serve them chilled for a refreshing dessert or let them come to room temperature for a softer texture. Either way, they’ll be just as delicious as when they were freshly baked!
By following these storage and meal prep instructions, you can savor the delightful flavors of your Homemade Lemon Crumb Bars for days to come. So go ahead, bake a batch, and enjoy the zesty goodness whenever you please!
Nutrition Facts & Health Insights
Understanding the nutritional value of your Homemade Lemon Crumb Bars can help you enjoy them guilt-free while appreciating their health benefits. Here’s a detailed look at the nutrition per serving, along with some insights into the health benefits of the key ingredients.
| Nutrient | Amount per Serving |
|---|---|
| Calories | 180 |
| Sugar | 12 grams |
| Sodium | 50 milligrams |
| Fat | 8 grams |
| Saturated Fat | 5 grams |
| Unsaturated Fat | 2 grams |
| Trans Fat | 0 grams |
| Carbohydrates | 25 grams |
| Fiber | 1 gram |
| Protein | 2 grams |
| Cholesterol | 30 milligrams |
Now, let’s talk about the health benefits of some of the star ingredients in these bars:
- Lemons: Packed with vitamin C, lemons are known for their immune-boosting properties. They also contain antioxidants that help fight free radicals in the body, promoting overall health and wellness.
- Oats: A fantastic source of dietary fiber, oats can help lower cholesterol levels and support heart health. They also provide sustained energy, making them a great addition to your diet.
By enjoying these Homemade Lemon Crumb Bars, you’re not only treating yourself to a delicious dessert but also reaping the benefits of wholesome ingredients. So go ahead, indulge in a square (or two) and feel good about it!
Frequently Asked Questions
As you embark on your journey to create the perfect Homemade Lemon Crumb Bars, you may have some questions along the way. Don’t worry; I’ve got you covered! Here are some of the most frequently asked questions, along with helpful answers to guide you through the process.
- Can I use a different type of citrus juice?
Absolutely! While lemon juice is the star of this recipe, you can experiment with other citrus juices like lime, orange, or grapefruit. Just keep in mind that the flavor profile will change, so adjust the sugar accordingly to balance the tartness. - How can I make these bars vegan?
To make these bars vegan, substitute the eggs with a flaxseed meal or chia seed mixture (1 tablespoon of flaxseed or chia seeds mixed with 2.5 tablespoons of water equals one egg). Additionally, use a plant-based butter alternative in the crust and topping. - What’s the best way to cut the bars without them crumbling?
To achieve clean cuts, allow the bars to cool completely in the pan before slicing. Use a sharp knife and wipe it clean between cuts to prevent sticking. For an even cleaner cut, you can refrigerate the bars for a bit before slicing. - Can I double the recipe for a larger batch?
Yes, you can double the recipe! Just be sure to use a larger baking pan (like a 9×13 inch pan) and adjust the baking time accordingly. Keep an eye on the bars as they bake, as they may need a few extra minutes. - How do I know when the filling is set?
The filling is set when it is slightly firm to the touch and jiggles just a little in the center. It should not be liquidy. A toothpick inserted into the filling should come out clean or with just a few moist crumbs. - What can I substitute for eggs in the filling?
If you’re looking for an egg substitute, you can use 1/4 cup of unsweetened applesauce or 1/4 cup of silken tofu blended until smooth. Both options will help bind the filling while keeping it creamy. - Can I use frozen lemons for juice and zest?
While fresh lemons are always best for flavor, you can use frozen lemons if necessary. Just make sure to thaw them completely before juicing and zesting. The flavor may not be as vibrant, but it will still work in a pinch! - How do I prevent the topping from becoming too hard?
To keep the topping from becoming overly hard, avoid overbaking it. Keep an eye on it during the last few minutes of baking, and remove it from the oven as soon as it turns golden brown. Additionally, using melted butter in the topping helps maintain a crumbly texture.
With these answers in hand, you’re well-equipped to tackle any challenges that may arise while making your Homemade Lemon Crumb Bars. Remember, baking is all about experimentation and having fun, so don’t hesitate to make this recipe your own!
Final Inspiration & Kitchen Confidence
As you stand in your kitchen, surrounded by the delightful aroma of freshly baked Homemade Lemon Crumb Bars, take a moment to celebrate the joy of baking. There’s something truly magical about transforming simple ingredients into a delicious treat that brings smiles to the faces of those you love. Each square you cut is not just a dessert; it’s a piece of your heart, a token of your effort, and a way to share happiness with others.
Creating these bars is an achievement worth acknowledging. You’ve followed the steps, measured the ingredients, and poured your passion into this recipe. Whether it’s your first time baking or you’re a seasoned pro, every attempt in the kitchen is a step towards mastering your culinary skills. Remember, it’s not just about the end result; it’s about the memories you create along the way, the laughter shared, and the stories told over a plate of homemade goodness.
So, I encourage you to try this recipe and let your kitchen be filled with the zesty brightness of lemon and the warmth of freshly baked treats. Don’t forget to share your experiences with friends and family—whether it’s a photo of your beautiful bars or a story about how they turned out. Your journey in baking can inspire others to step into the kitchen and create their own delicious memories. Happy baking, and may your Homemade Lemon Crumb Bars bring joy to your table!
Print
Homemade Lemon Crumb Bars: Zesty, Creamy Delight Awaits!
- Total Time: 1 hour 5 minutes
- Yield: 16 servings 1x
- Diet: Vegetarian
Description
Homemade Lemon Crumb Bars offer a delightful balance of zesty lemon flavor and creamy texture, all enveloped in a buttery crumb crust. Each bite delivers a refreshing burst of citrus that dances on the palate, complemented by the crumbly, melt-in-your-mouth topping.
Ingredients
- For the crust:
- 1 ½ cups all-purpose flour
- ½ cup granulated sugar
- ½ cup unsalted butter, softened
- ¼ teaspoon salt
- For the lemon filling:
- 2 large eggs
- 1 cup granulated sugar
- 2 tablespoons all-purpose flour
- 1/3 cup freshly squeezed lemon juice
- 1 tablespoon lemon zest
- For the crumb topping:
- 1 cup rolled oats
- ½ cup brown sugar
- ½ cup all-purpose flour
- ½ teaspoon cinnamon
- ½ cup unsalted butter, melted
Instructions
- Preheat the oven to 350°F (175°C).
- In a mixing bowl, combine 1 ½ cups flour, ½ cup sugar, ½ cup softened butter, and ¼ teaspoon salt. Mix until crumbly.
- Press the mixture into the bottom of a greased 9×9 inch baking pan to form the crust.
- Bake the crust for 15 minutes or until lightly golden.
- In another bowl, whisk together 2 eggs, 1 cup sugar, 2 tablespoons flour, 1/3 cup lemon juice, and 1 tablespoon lemon zest until smooth.
- Pour the lemon filling over the baked crust and return to the oven for 20 minutes, or until the filling is set and slightly firm to the touch.
- While the filling bakes, prepare the crumb topping by mixing oats, brown sugar, ½ cup flour, and cinnamon in a bowl. Stir in melted butter until crumbly.
- Sprinkle the crumb topping over the lemon filling and bake for an additional 10-15 minutes, or until the topping is golden brown.
- Allow to cool completely before cutting into squares and serving.
Notes
- These bars can be made a day in advance and stored in the refrigerator for optimal flavor.
- Store leftovers in an airtight container in the fridge for up to 5 days.
- For a gluten-free version, substitute all-purpose flour with a gluten-free flour blend.
- Prep Time: 20 minutes
- Cook Time: 45 minutes
- Category: desserts
- Method: baking
- Cuisine: American
Nutrition
- Serving Size: 1 square (approximately 2x2 inches)
- Calories: 180
- Sugar: 12 grams
- Sodium: 50 milligrams
- Fat: 8 grams
- Saturated Fat: 5 grams
- Unsaturated Fat: 2 grams
- Trans Fat: 0 grams
- Carbohydrates: 25 grams
- Fiber: 1 gram
- Protein: 2 grams
- Cholesterol: 30 milligrams
Keywords: Homemade Lemon Crumb Bars, lemon dessert, citrus bars, easy lemon recipe, summer dessert, buttery crumb topping, zesty lemon filling, refreshing dessert, sweet and tart, homemade treats, baking recipes, lemon zest, lemon juice, dessert bars