
Introduction to Glue Suncatchers
Creating a warm and inviting home often involves adding personal touches that reflect your style and creativity. One delightful way to do this is by making Glue Suncatchers. These colorful decorations not only brighten up your windows but also provide a fun and engaging activity for busy moms and professionals alike.
As I began my journey into the world of Glue Suncatchers, I was amazed at how such a simple project could bring so much joy. The vibrant colors and playful designs transformed my ordinary windows into a canvas of light and creativity. I remember the first time I hung my suncatchers; the sunlight streamed through, casting beautiful patterns that danced across my living room walls. It was a moment of pure magic!
Whether you’re looking to add a splash of color to your home or seeking a creative outlet, Glue Suncatchers are the perfect project to unleash your artistic side. They are not only easy to make but also allow for endless creativity. You can experiment with different shapes, colors, and designs, making each suncatcher uniquely yours.
So, let’s dive into the world of DIY décor and discover how to make these stunning suncatchers! I promise you, it will be a rewarding experience that brings a smile to your face and a burst of color to your home.
Why You’ll Love This Glue Suncatchers
One of the things I absolutely adore about Glue Suncatchers is how they allow me to express my creativity without putting a dent in my budget. As a busy mom, I often find myself juggling multiple responsibilities, and it can be tough to find time for crafting. However, this project is refreshingly simple and requires minimal materials, making it perfect for anyone with a packed schedule.
When I first started making these suncatchers, I was amazed at how quickly I could create something beautiful. With just a bottle of clear glue, some food coloring, and a few other supplies, I was able to transform my kitchen table into a vibrant art studio. The best part? I could involve my kids in the process, turning it into a fun family activity. We laughed, experimented with colors, and shared our creative ideas, which made the experience even more special.
The satisfaction of seeing my finished suncatchers hanging in the window is truly unmatched. Each time the sunlight streams through, it fills my home with colorful patterns that dance across the walls. It’s a reminder that even in the chaos of daily life, I can carve out moments of joy and creativity. Whether you’re a seasoned crafter or just starting out, I promise you’ll find joy in this easy and affordable project.
So, if you’re looking for a way to brighten up your home and unleash your artistic side, I wholeheartedly encourage you to try making Glue Suncatchers. You’ll not only create stunning decorations but also enjoy the process of crafting something uniquely yours!
Materials Needed for Glue Suncatchers
To create your beautiful Glue Suncatchers, you will need the following materials:
- Clear glue – 1 bottle: This will be the base for your suncatchers.
- Food coloring – various colors: Use different colors to create vibrant designs.
- Wax paper – 1 sheet: This will serve as the surface for your suncatchers.
- Scissors – 1 pair: For cutting shapes if desired.
- Paintbrush – 1: To apply the colored glue onto the wax paper.
Gathering these materials is part of the fun! I remember the excitement of picking out my favorite colors of food coloring, imagining the beautiful suncatchers I would create. It’s amazing how something so simple can spark so much creativity!
*For a printable full list of materials, see below.*
Tools Required for Glue Suncatchers
In addition to the materials, you will need a few basic tools to help you create your stunning Glue Suncatchers. I found that having the right tools on hand made the crafting process smoother and more enjoyable.
- Mixing bowl – 1: This is essential for mixing the glue and food coloring together. I love using a bowl that I don’t mind getting a little messy, as crafting can sometimes be a bit of a splatter-fest!
- Stirring stick – 1: A simple stick or even a spoon works perfectly for mixing the glue and color thoroughly. I often use a wooden stick, which gives me a good grip and makes it easy to blend the colors.
These tools are easy to find around the house, making this project even more accessible! I remember rummaging through my kitchen drawers to gather everything I needed. It felt like a mini treasure hunt, and I was excited to get started on my crafting adventure.
Having these tools ready not only streamlines the process but also allows you to focus on unleashing your creativity. So, gather your mixing bowl and stirring stick, and let’s get ready to make some beautiful suncatchers!
How to Make Glue Suncatchers
Creating your own Glue Suncatchers is a delightful process that I found to be both simple and rewarding. Here’s how you can make your own stunning decorations step by step:
Step 1: Prepare Your Workspace
First things first, I always make sure to lay down a sheet of wax paper on a flat surface. This not only protects my work area but also provides a perfect base for my suncatchers. I remember the first time I did this; it felt like setting the stage for a beautiful performance!
Step 2: Mix the Glue and Color
Next, I grab my mixing bowl and pour in some clear glue. Then, I add a few drops of food coloring. The moment I start stirring, I can’t help but feel excited as the colors swirl together. It’s like watching a mini art show right in my bowl! Make sure to stir well until the color is evenly distributed; this is key to achieving vibrant suncatchers.
Step 3: Apply the Colored Glue
Now comes the fun part! Using a paintbrush, I carefully apply the colored glue onto the wax paper in my desired shapes. I let my imagination run wild—sometimes I create flowers, other times abstract designs. The beauty of this project is that there are no rules! I encourage you to get creative and enjoy the process.
Step 4: Allow to Dry
Once I’ve finished applying the glue, I let it dry completely. This can take several hours, so I usually place it in a well-ventilated area to speed up the drying process. I often find myself checking back every so often, eagerly anticipating the moment I can peel off my creation!
Step 5: Peel Off the Suncatcher
After the glue has dried, it’s time for the big reveal! I carefully peel the suncatcher off the wax paper, and I can’t help but feel a sense of accomplishment. Each piece is unique, and I love seeing how the colors blend and shine.
Step 6: Hang and Enjoy
Finally, I hang my suncatcher in a sunny window. Watching the light shine through and illuminate the colors is truly magical. It’s a simple yet beautiful way to brighten up my home and bring a smile to my face every day. I hope you enjoy this process as much as I do!
Tips for Best Results
As I delved deeper into making Glue Suncatchers, I discovered a few tips that truly enhanced my crafting experience and the final results. I want to share these insights with you, so you can create stunning suncatchers that will brighten your home!
- Experiment with different colors and shapes: Don’t be afraid to mix and match! I found that using unexpected color combinations led to some of my favorite designs. For instance, pairing bright yellows with deep blues created a striking contrast that caught the eye. You can also try different shapes—think outside the box! Instead of just circles, I’ve made stars, hearts, and even abstract forms.
- Try layering different colors: One of the most exciting techniques I stumbled upon was layering colors. By applying one color and letting it dry slightly before adding another, I created a beautiful depth in my suncatchers. It’s like painting a sunset; the layers of color blend together to create something truly vibrant and unique.
- Use a variety of tools: While a paintbrush is great, I found that using different tools can create interesting textures. For example, I used a sponge to dab on some glue, which resulted in a fun, bubbly effect. You can also try using cotton swabs or even your fingers to apply the glue for a more hands-on approach!
- Ensure the glue is applied evenly: This tip is crucial! I learned the hard way that uneven application can lead to weak spots in your suncatchers. Take your time and apply the glue in a smooth, even layer. It might take a little practice, but the results will be worth it!
By keeping these tips in mind, you’ll be well on your way to creating beautiful Glue Suncatchers that not only brighten your windows but also bring a sense of joy and accomplishment to your crafting journey. Happy crafting!
Project Variations
One of the most exciting aspects of making Glue Suncatchers is the endless possibilities for creativity! I found that experimenting with different variations not only kept the project fresh but also allowed me to express my artistic flair in unique ways. Here are some fun ideas to inspire your crafting journey:
- Seasonal Themes: I love creating suncatchers that reflect the changing seasons or upcoming holidays. For winter, I made delicate snowflakes that sparkled in the sunlight, while in spring, I crafted vibrant flowers that brought a cheerful touch to my home. You can easily adapt your designs to celebrate holidays like Halloween with spooky shapes or Thanksgiving with autumn leaves!
- Color Combinations: Mixing and matching colors can lead to stunning results! I often play around with gradients, blending one color into another for a beautiful ombre effect. For instance, I created a sunset-inspired suncatcher by transitioning from warm oranges to deep purples. Don’t be afraid to get creative—try unexpected color pairings that catch your eye!
- Shape Variations: Using cookie cutters or templates can add a fun twist to your suncatchers. I’ve made hearts for Valentine’s Day, stars for a dreamy night sky, and even animal shapes for a playful touch. The possibilities are truly endless! You can also create abstract shapes by freehanding your designs, which adds a personal touch to each piece.
By exploring these variations, you’ll not only enhance your crafting experience but also create a collection of beautiful Glue Suncatchers that reflect your personality and style. So gather your materials, let your imagination run wild, and enjoy the process of creating something truly special!
Decoration and Usage Ideas
Once your Glue Suncatchers are complete, the fun doesn’t stop there! I’ve discovered so many creative ways to display and use these beautiful creations that truly brighten up my home. Here are some ideas to inspire you:
- Hang them in windows: This is the most obvious and rewarding way to showcase your suncatchers. I love hanging mine in various windows around the house, where they catch the sunlight and create a stunning display of colors. It’s like having a piece of art that changes with the light throughout the day!
- Use them as colorful decorations for parties or events: If you’re hosting a gathering, consider using your suncatchers as vibrant decorations. I’ve used them to add a festive touch to birthday parties and family celebrations. They can be hung from ceilings, placed on tables, or even used as part of a backdrop. The cheerful colors instantly elevate the atmosphere!
- Gift them to friends and family: One of the most heartwarming ways to share your creations is by gifting them as personalized keepsakes. I’ve made suncatchers for my friends and family, and they always appreciate the thought and effort that goes into a handmade gift. You can even customize them with colors or shapes that reflect the recipient’s personality!
- Create a mobile: For a whimsical touch, consider hanging multiple suncatchers together to create a mobile. I’ve done this in my kids’ playroom, and it adds a playful element to the space. You can use fishing line or string to suspend the suncatchers at different heights, allowing them to sway gently in the breeze.
These decoration and usage ideas not only enhance the beauty of your Glue Suncatchers but also allow you to share your creativity with others. I encourage you to explore these options and find the perfect way to showcase your stunning creations. Happy decorating!
FAQs about Glue Suncatchers
As I dove into the world of Glue Suncatchers, I found myself with a few questions along the way. I know many of you might have similar queries, so I’ve compiled some frequently asked questions to help guide you on your crafting journey!
Q: How long does it take for the glue to dry?
A: The drying time can vary, but it typically takes several hours for the glue to dry completely. I usually set mine aside for at least four hours to ensure they are fully cured. It’s always worth the wait to see the final result!
Q: Can I use other types of glue?
A: While clear glue works best for achieving that beautiful, translucent effect, you can experiment with other types of craft glue. Just keep in mind that results may vary, and some glues might not dry as clear or flexible as the clear glue does.
Q: Are Glue Suncatchers safe for children?
A: Yes, they are generally safe for children, but it’s important to supervise young ones during the crafting process. I always make sure to keep materials out of reach when I’m not crafting with my kids. It’s a fun activity, but safety first!
By addressing these common questions, I hope to ease any concerns you might have and encourage you to dive into making your own Glue Suncatchers. Remember, crafting is all about having fun and expressing yourself, so don’t hesitate to explore and enjoy the process!
Final Thoughts
As I reflect on my journey of creating Glue Suncatchers, I realize that this craft is so much more than just a fun activity. It’s a beautiful way to express my creativity and bring a splash of color into my home. Each suncatcher I made holds a story, a moment of joy, and a reminder of the time I spent crafting with my family.
For busy moms like me, finding a quick and fulfilling project can feel like a challenge. However, this DIY décor project is not only easy to execute but also incredibly rewarding. I’ve found that taking just a little time out of my day to create something beautiful can lift my spirits and inspire those around me. It’s a wonderful way to unwind after a hectic day, allowing me to focus on the simple pleasure of crafting.
So, I encourage you to gather your materials and unleash your imagination! Don’t worry about perfection; embrace the process and let your creativity flow. Each suncatcher you create will be a unique reflection of your artistic spirit. Remember, the joy of crafting lies not just in the finished product, but in the moments spent creating it. Whether you hang your suncatchers in your own home or gift them to loved ones, they will surely bring smiles and warmth to those who see them.
Happy crafting, and may your windows be filled with the vibrant colors of your beautiful creations!
Print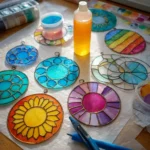
Glue Suncatchers: Create Stunning DIY Décor!
Description
Create beautiful and colorful suncatchers using glue and various materials. These DIY decorations can brighten up any window and add a touch of creativity to your home.
Instructions
- Prepare your workspace by laying down wax paper.
- In a mixing bowl, combine clear glue with a few drops of food coloring.
- Use a paintbrush to apply the colored glue onto the wax paper in your desired shapes.
- Allow the glue to dry completely, which may take several hours.
- Once dry, carefully peel the suncatcher off the wax paper.
- Hang your suncatcher in a sunny window to enjoy the colorful display!
Keywords: Glue Suncatchers, DIY Decor, Colorful Crafts, Window Decorations


