Introduction to Glowing Bouncy Moon Rocks
Welcome to the magical world of Glowing Bouncy Moon Rocks! If you’re looking for a fun and creative way to celebrate Halloween or simply add some whimsical decor to your home, you’ve come to the right place. This DIY project is not only easy to make, but it also provides a fantastic opportunity to bond with your kids while unleashing your inner artist. Imagine the joy on their faces as they watch their moon rocks glow in the dark! It’s a rewarding experience that combines creativity, science, and a sprinkle of Halloween magic.
Why You’ll Love This Glowing Bouncy Moon Rocks
Creating Glowing Bouncy Moon Rocks is a delightful way to spark creativity and imagination in your home. This project is not only easy and affordable, but it also offers a wonderful opportunity to bond with your kids. As you craft together, you’ll share laughter and joy, making memories that will last a lifetime. Plus, the satisfaction of seeing your unique creations glow in the dark is simply magical!
Materials and Tools Needed for Glowing Bouncy Moon Rocks
To embark on your Glowing Bouncy Moon Rocks adventure, you’ll need a few simple materials that are easy to find and budget-friendly. Here’s what you’ll need:
- Flour: This is the base of your moon rocks, providing structure and texture.
- Baking soda: It adds a fun bouncy quality to your rocks, making them feel like real moon rocks!
- White glue: Essential for binding the ingredients together, creating a cohesive dough.
- Glow-in-the-dark paint or powder: This is the star of the show, giving your moon rocks their magical glow.
- Mixing bowl: A must-have for combining all your ingredients.
- Cookie sheet and parchment paper: These will help with drying and make cleanup a breeze.
- Rubber gloves (optional): Perfect for keeping little hands clean while crafting.
Most of these materials can be found at your local craft store or even in your kitchen. Plus, you can opt for eco-friendly glue or paint to make this project even more sustainable. Let’s get crafting!
How to Make Glowing Bouncy Moon Rocks
Creating your own Glowing Bouncy Moon Rocks is not just a fun craft; it’s an adventure that sparks creativity and imagination! Gather your little ones, roll up your sleeves, and let’s dive into this exciting DIY project. I promise, the joy of watching those moon rocks glow in the dark will be worth every minute spent crafting together. Plus, it’s a fantastic way to bond and create lasting memories!
Step 1: Mix the Dry Ingredients
Start by grabbing a mixing bowl and combining flour and baking soda. This step is crucial because it sets the foundation for our moon rocks. The flour gives them structure, while the baking soda adds a fun, bouncy texture. As you mix, feel the soft powder between your fingers—it’s like creating your own little galaxy!
Step 2: Add the Glue
Next, it’s time to incorporate the white glue into your dry mixture. Gradually pour it in while stirring. This is where the magic happens! The glue binds everything together, transforming your powdery mix into a dough. Don’t be afraid to get your hands in there; it’s all part of the fun! Just remember, if you’re crafting with younger kids, rubber gloves can keep those tiny hands clean.
Step 3: Create the Dough
Now, let’s add water slowly while mixing until you achieve a dough-like consistency. You want it to be pliable but not too sticky. If it feels too wet, sprinkle in a bit more flour. This is a great moment to teach kids about textures and how different ingredients interact. The dough should feel soft and slightly tacky, like a fluffy cloud ready to take flight!
Step 4: Add the Glow Factor
Here comes the exciting part—stir in the glow-in-the-dark paint or powder! This is what will give your moon rocks their enchanting glow. As you mix, watch the color transform, and imagine how they’ll light up the night. You can even let the kids choose their favorite colors, making each rock unique. It’s like painting the night sky!
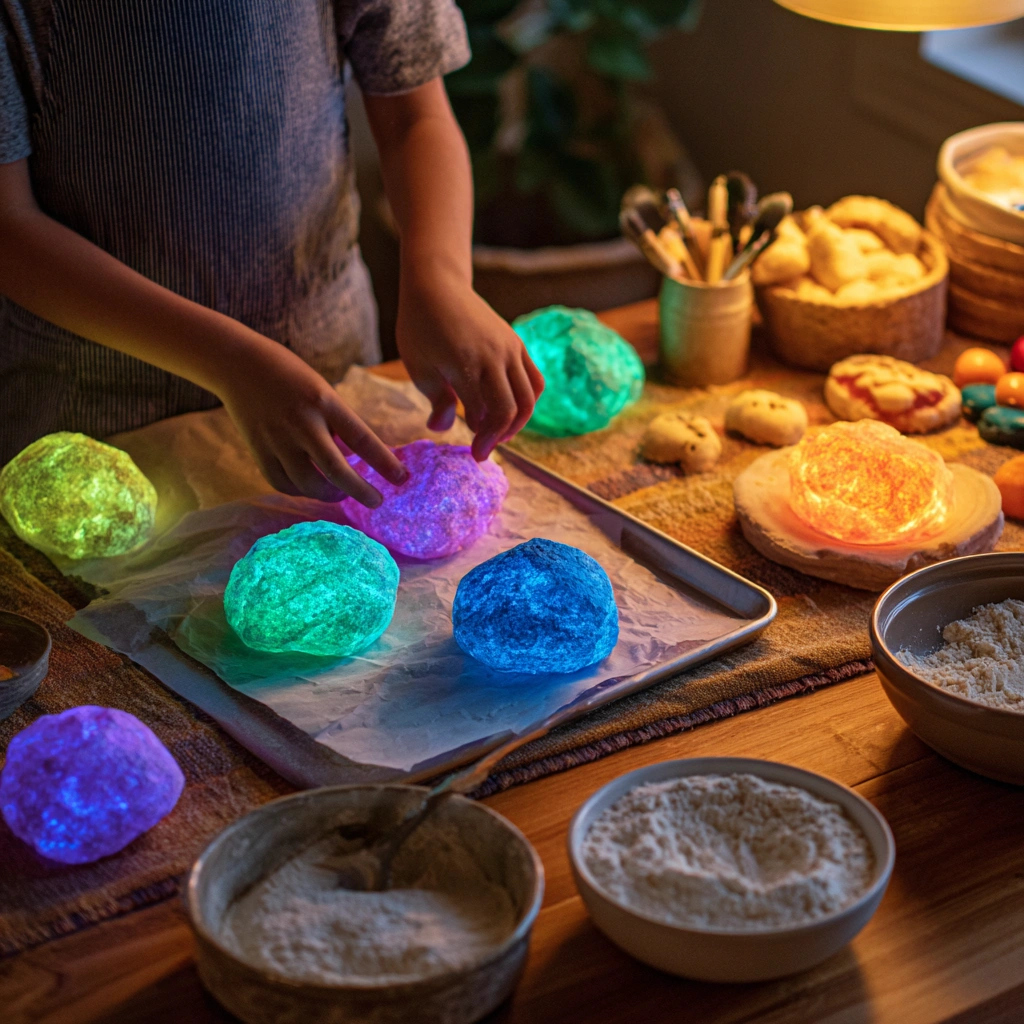
Step 5: Shape the Moon Rocks
Now, take small portions of the dough and shape them into round rocks. You can make them as big or small as you like! I love creating a variety of sizes to mimic real moon rocks. Encourage your kids to get creative—some can be smooth, while others can have craters. This is where their imagination can really shine!
Step 6: Prepare for Drying
Once shaped, place the moon rocks on a cookie sheet lined with parchment paper. This step is essential for easy removal later. The parchment paper prevents sticking, ensuring your moon rocks come off smoothly once they’re dry. Plus, it makes cleanup a breeze—always a win in my book!
Step 7: Drying Time
Finally, allow your moon rocks to dry for at least 24 hours. This is the most challenging part—waiting! But trust me, it’s worth it. As they dry, they’ll become bouncy and ready to glow. You can use this time to plan how you’ll display them or even start on another fun Halloween DIY craft. The anticipation of seeing them glow in the dark is like waiting for a surprise party!
Tips for Best Results
- For a smoother texture, ensure your flour is sifted before mixing.
- If your dough is too sticky, add a little more flour until it’s manageable.
- Always work in a well-ventilated area when using glue and paint.
- Consider adding a sprinkle of glitter for extra sparkle in your moon rocks!
- Store your moon rocks in a dark place to keep their glow vibrant.
Theme and Design Variations
Get creative with your Glowing Bouncy Moon Rocks by exploring different themes and designs! Here are some fun ideas to inspire your crafting:
- Galaxy Glow: Use a mix of blue, purple, and pink glow-in-the-dark paints for a cosmic effect.
- Halloween Spook: Add orange and black colors to create spooky moon rocks perfect for Halloween decor.
- Rainbow Rocks: Let kids choose multiple colors for a vibrant, cheerful look.
- Seasonal Themes: Incorporate colors like red and green for Christmas or pastels for springtime.
- Texture Play: Experiment with adding sand or small pebbles to the mixture for a unique surface feel.
These variations not only make crafting more fun but also allow your moon rocks to fit any occasion or decor style!
Display and Use Ideas
Once your Glowing Bouncy Moon Rocks are ready, the fun doesn’t stop there! Here are some creative ways to use and display your glowing creations:
- Nighttime Decor: Place them in a jar on your nightstand for a magical glow at bedtime.
- Halloween Displays: Scatter them around your home or use them in a spooky centerpiece.
- School Projects: Use them for a space-themed classroom display or science project.
- Gift Ideas: Package them in a cute box as a unique gift for friends or family.
FAQs about Glowing Bouncy Moon Rocks
Can I use different types of glue for this project?
Absolutely! While white glue works best for binding, you can experiment with other types like clear craft glue or even homemade glue. Just ensure it’s safe for kids and non-toxic.
How long do the moon rocks glow in the dark?
The glow duration depends on the quality of the glow-in-the-dark paint or powder you use. Generally, they can glow for several hours after being charged by light. For the best results, expose them to bright light before using!
Are these moon rocks safe for young children?
Yes, they are safe for kids aged 5 and up, especially with adult supervision. Just make sure to use non-toxic materials and work in a well-ventilated area when using glue and paint.
Can I add scents to my moon rocks?
While it’s not common, you can add a few drops of essential oils to the mixture for a fun twist! Just be cautious with the amount, as too much can affect the texture.
What should I do if my moon rocks are too sticky?
If your moon rocks are sticky, simply add a bit more flour to the mixture until you achieve the right consistency. It’s all about finding that perfect balance!
Final Thoughts
Creating your own Glowing Bouncy Moon Rocks is not just a craft; it’s a delightful journey filled with laughter, creativity, and a sprinkle of magic! The satisfaction of watching your unique creations glow in the dark is truly rewarding. I encourage you to gather your family, dive into this fun project, and let your imaginations soar. Don’t forget to share your glowing masterpieces with friends and family—after all, crafting is even more fun when you can inspire others! Happy crafting, and may your moon rocks shine bright!
Print
Glowing Bouncy Moon Rocks: Craft Your Own Fun Space Decor!
Description
Create your own glowing bouncy moon rocks that are perfect for space-themed decor or as a fun toy for kids. These colorful, squishy rocks will light up in the dark and provide hours of entertainment!
Instructions
- In a mixing bowl, combine 1 cup of white glue with 1 cup of liquid starch. Stir until well mixed.
- If you want colored moon rocks, add a few drops of food coloring to the mixture and stir until you achieve your desired color.
- Once the mixture is combined, knead it with your hands until it becomes a smooth, stretchy consistency.
- In a separate bowl, mix glow-in-the-dark paint with a small amount of water to thin it out.
- Roll the kneaded mixture into small balls and then dip them into the glow-in-the-dark paint to coat them evenly.
- Place the coated balls on wax paper or a silicone mat to dry for a few hours.
- Once dry, your glowing bouncy moon rocks are ready to play with or display!
- Category: Crafts
Keywords: Glowing Bouncy Moon Rocks, DIY Space Decor, Kids Craft, Glow-in-the-Dark


