Introduction to Glow In The Dark Clay
In a world where creativity often takes a backseat to busy schedules, finding a fun and engaging craft can be a breath of fresh air. Glow in the dark clay is not just a unique material; it’s a gateway to endless possibilities for home decoration and personalized gifts. Whether you’re a busy mom looking to entertain the kids or a professional seeking a relaxing hobby, this DIY project will ignite your imagination and bring a touch of magic to your creations.
I remember the first time I stumbled upon glow in the dark clay. I was searching for a way to create something special for my children’s room, and the idea of crafting glowing stars and moons felt like a dream come true. The excitement of seeing their faces light up when they saw the glowing creations was priceless! It reminded me that even in our hectic lives, we can carve out moments of joy through crafting.
What I love most about glow in the dark clay is its versatility. You can create anything from whimsical decorations to practical items like night lights. The process is simple, yet the results are stunning. Plus, it’s a wonderful way to spend quality time with family or unwind after a long day. So, let’s dive into the world of glow in the dark clay and discover how to make stunning projects that shine bright!
Why You’ll Love This Glow In The Dark Clay
Glow in the dark clay is a fantastic medium that combines creativity with affordability. I can’t tell you how many times I’ve found myself in a craft store, overwhelmed by choices, but this clay always stands out. It’s simple to use, making it perfect for both beginners and seasoned crafters alike. I remember my first project; I was amazed at how easily I could mold it into shapes that would later glow beautifully in the dark.
One of the best parts about working with glow in the dark clay is the endless possibilities it offers. You can create beautiful pieces that not only light up your space but also serve as thoughtful gifts. I’ve made everything from whimsical stars for my kids’ rooms to elegant ornaments for friends. Each piece carries a personal touch, and the joy of gifting something handmade is truly special.
Plus, the joy of crafting with your hands is a wonderful way to unwind and express yourself. After a long day of juggling work and family, I often find solace in my crafting corner. The tactile experience of kneading the clay and shaping it into something unique is incredibly therapeutic. It’s like a mini escape from the chaos of daily life, allowing me to focus on the moment and let my creativity flow.
So, if you’re looking for a fun and engaging way to spend your time, glow in the dark clay is the perfect choice. Whether you’re crafting solo or involving the kids, you’ll find that the process is just as rewarding as the final product. Let your imagination run wild, and watch as your creations come to life in the dark!
Materials Needed for Glow In The Dark Clay
To get started on your glow in the dark clay projects, you’ll need the following materials:
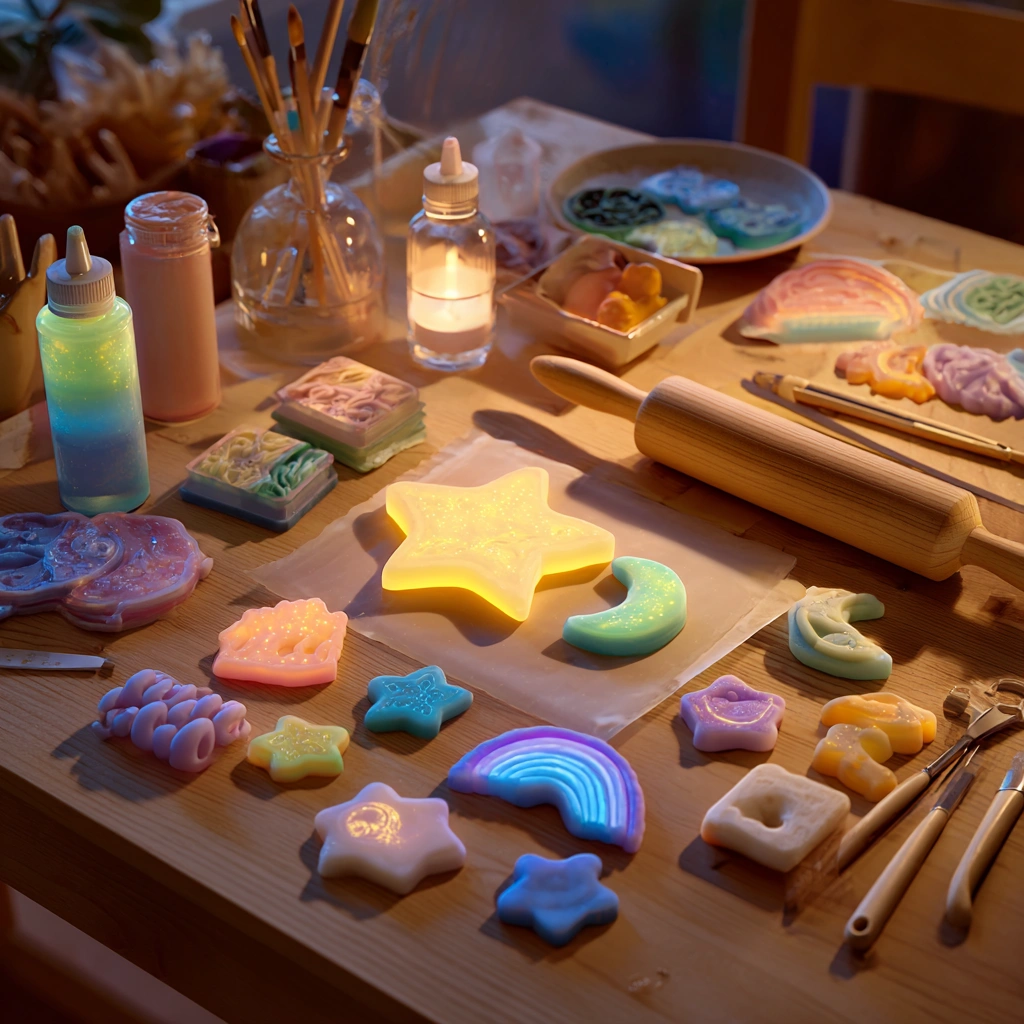
- Glow in the dark clay – 1 pack: This is the star of the show! It’s available in various colors and glows brightly in the dark, making it perfect for all your creative ideas.
- Paintbrush – 1: A handy tool for applying sealant and adding intricate details to your creations. I love using a fine brush to create delicate designs!
- Water – as needed: This is essential for softening the clay if it becomes too dry. Just a little bit goes a long way in making the clay easier to work with.
- Clear sealant spray – 1 can: This protects your finished pieces and enhances their glow, ensuring that your creations shine bright for a long time.
Gathering these materials is part of the fun! I often find myself excitedly picking out colors and imagining the projects I’ll create. And if you’re like me, you might even want to keep a few extra packs of glow in the dark clay on hand for spontaneous crafting sessions!
*For a printable full list of materials, see below.*
Tools Required for Glow In The Dark Clay
To embark on your glow in the dark clay journey, having the right tools is essential. I’ve learned that using the proper tools not only makes the crafting process smoother but also enhances the quality of your creations. Here are the essential tools you’ll need to create your glow in the dark clay projects:
- Rolling pin – 1: This tool is a must-have for rolling out the clay to your desired thickness. I love using a sturdy rolling pin, as it helps me achieve an even surface, making it easier to cut out shapes. Plus, it’s a great way to relieve stress after a long day!
- Craft knife – 1: A sharp craft knife is perfect for cutting shapes and designs from the rolled clay. I remember my first attempt at using one; I was a bit nervous, but with a steady hand, I was able to create intricate designs that truly brought my vision to life. Just be cautious while handling it!
- Oven: This is required for baking the clay to harden it. Following the baking instructions on the package is crucial to avoid burning your creations. I’ve had my share of mishaps, but now I always set a timer to keep track of the baking time!
- Mixing bowl – 1: A handy bowl is essential for kneading and mixing colors if desired. I often use a bowl that’s easy to clean, as I like to experiment with different color combinations. It’s amazing how a little mixing can lead to stunning results!
Having these tools ready will set you up for success in your crafting adventure. I find that the right tools not only make the process enjoyable but also inspire me to try new techniques and designs. So gather your tools, and let’s get crafting with glow in the dark clay!
How to Make Glow In The Dark Clay
Creating with glow in the dark clay is a straightforward process that can be incredibly rewarding. I remember the first time I followed these steps; the excitement of seeing my creations come to life was unforgettable! Here’s how you can make your own stunning projects:
Step 1: Preheat the Oven
Start by preheating the oven to the temperature specified on the clay package. This is an important step, as it ensures that your creations bake evenly. I always double-check the instructions to avoid any mishaps!
Step 2: Knead the Clay
Take a portion of the glow in the dark clay and knead it until soft. This makes it easier to work with and helps to activate the glow properties. I find that kneading is not only essential but also quite therapeutic; it’s a great way to relieve stress!
Step 3: Roll Out the Clay
Using a rolling pin, roll out the clay to your desired thickness. Aim for about 1/4 inch for best results. I love the feeling of the smooth clay beneath the rolling pin, and it’s always exciting to see the colors blend as I roll!
Step 4: Cut Out Shapes
Now comes the fun part! Use a craft knife to cut out shapes or designs from the rolled clay. Get creative with your designs! I often find inspiration from nature or my kids’ drawings, and it’s amazing how a simple shape can turn into something magical.
Step 5: Bake the Clay
Place the cut shapes on a baking sheet and bake them in the oven for the recommended time according to the package instructions. I always set a timer to keep track, as I’ve learned the hard way that it’s easy to lose track of time when you’re having fun!
Step 6: Cool the Pieces
Once baked, allow the clay pieces to cool completely before handling. This is crucial, as the pieces can be quite hot. I usually take this time to clean up my workspace and admire my creations from a distance!
Step 7: Seal Your Creations
Finally, apply a clear sealant spray to protect your creations and enhance their glow. Make sure to do this in a well-ventilated area. I love watching the transformation as the sealant brings out the vibrant colors and makes everything shine!
And there you have it! Following these steps will lead you to beautiful glow in the dark clay projects that you can proudly display or gift to loved ones. Enjoy the process, and let your creativity shine bright!
Tips for Best Results
As I’ve dived deeper into the world of glow in the dark clay, I’ve picked up a few tips that have truly enhanced my crafting experience. Whether you’re a beginner or a seasoned crafter, these insights can help you achieve stunning results:
- Experiment with Mixing Colors: One of the most exciting aspects of working with glow in the dark clay is the ability to mix different colors for unique effects. I often find myself blending shades to create marbled designs or vibrant hues that pop in the dark. Don’t be afraid to play around with combinations; you might just stumble upon a color palette that becomes your new favorite!
- Follow Baking Instructions Carefully: I can’t stress this enough! Following the baking instructions on the clay package is crucial to avoid burning your creations. I’ve had my share of mishaps where I got distracted and ended up with charred pieces. Setting a timer has become my best friend in the kitchen, ensuring that my projects come out perfectly baked every time.
- Store Unused Clay Properly: To keep your glow in the dark clay fresh for future projects, store any unused clay in an airtight container. I learned this the hard way when I left a pack open and found it dried out. Now, I make it a habit to seal my clay tightly after each use, ensuring that it’s ready for my next crafting adventure!
These tips have not only improved my crafting results but have also made the process more enjoyable. Remember, crafting is all about exploration and creativity, so don’t hesitate to try new things and learn from your experiences. Happy crafting!
Project Variations
Get creative with your glow in the dark clay projects! One of the things I love most about crafting is the ability to personalize and adapt my creations. Here are some exciting variations to consider that can take your projects to the next level:
- Style Variations: The beauty of glow in the dark clay lies in its versatility. You can try different shapes like stars, moons, or even abstract designs. I often find inspiration in nature, crafting leaves or flowers that glow softly at night. The possibilities are endless, and each shape can evoke a different feeling or theme!
- Color Changes: Mixing colors is one of my favorite parts of working with this clay. You can create a marbled effect by blending two or more colors together, resulting in stunning pieces that are truly one-of-a-kind. I remember making a beautiful swirl of blue and green for an ocean-themed project, and the result was breathtaking! Don’t hesitate to experiment with multiple colors in one project; it adds depth and character to your creations.
- Seasonal Adaptations: Crafting with glow in the dark clay is a fantastic way to celebrate the seasons! You can create themed decorations for holidays like Halloween or Christmas. Imagine crafting glowing pumpkins for Halloween or shimmering snowflakes for winter festivities. I love how these seasonal pieces can bring a festive touch to my home, and they make for great conversation starters!
These variations not only allow you to express your creativity but also keep your crafting experience fresh and exciting. I encourage you to let your imagination run wild and try out these ideas. You might just discover a new favorite project that lights up your life in more ways than one!
Decoration and Usage Ideas
Once your glow in the dark clay projects are complete, the fun doesn’t stop there! I love finding creative ways to incorporate my handmade pieces into my home and gifting them to friends. Here are some delightful ideas on where and how to use your glowing creations:
- Night Lights: These charming pieces can be transformed into night lights for children’s rooms. Imagine a starry sky made from your clay creations, providing a soothing glow that helps little ones drift off to sleep. I often place them on a shelf or bedside table, and the soft light creates a calming atmosphere.
- Home Decor: Use your glow in the dark clay as unique accents on shelves or tables. I love placing my creations in unexpected spots, like a cozy corner or a windowsill, where they can catch the light during the day and glow at night. It adds a magical touch to my home decor!
- Gifts: Personalized gifts are always a hit! I enjoy creating custom pieces for birthdays or holidays. A handmade glow in the dark ornament or keychain can be a heartfelt gift that shows you care. I’ve seen friends’ faces light up when they receive something made just for them!
- Party Favors: If you’re hosting a gathering, consider making small pieces to give away as party favors. They’re a fun and memorable way to thank your guests for celebrating with you! I often create themed pieces that tie into the occasion, making them even more special.
Each of these ideas allows you to showcase your creativity while adding a magical touch to your surroundings. I find that the glow in the dark clay not only brightens up my home but also sparks joy and conversation among family and friends. So, let your imagination run wild and find the perfect spot for your glowing masterpieces!
FAQs about Glow In The Dark Clay
As I’ve explored the wonderful world of glow in the dark clay, I’ve come across several questions that many crafters, especially busy moms and professionals, often ask. Here are some of the most common FAQs, along with my insights:
Q: Is glow in the dark clay safe for kids?
A: Yes, glow in the dark clay is generally safe for kids, but it’s important to supervise young children during crafting to avoid ingestion. I always make sure to set up a crafting area where I can keep an eye on my little ones while they explore their creativity. It’s a great way to bond and share the joy of crafting!
Q: How long does the glow last?
A: The glow duration depends on the quality of the clay and the amount of light exposure it receives. Typically, the glow lasts for several hours, which is perfect for nighttime decorations. I love watching my kids’ faces light up when they see their creations glowing softly in the dark!
Q: Can I paint over the clay?
A: Yes, you can paint over the clay after it has been baked and sealed. This opens up even more creative possibilities! I often add details or color accents to my pieces after they’ve been baked, which adds a personal touch. Just make sure to use non-toxic paints for safety!
These FAQs reflect some of the common concerns and curiosities that arise when working with glow in the dark clay. I hope my answers help you feel more confident as you embark on your crafting journey. Remember, the most important part is to have fun and let your creativity shine!
Final Thoughts
Crafting with glow in the dark clay is not just a fun activity; it’s a way to express your creativity and bring joy into your home. I’ve found that each project I undertake becomes a cherished memory, whether I’m making decorations for myself or thoughtful gifts for loved ones. The process is rewarding and fulfilling, allowing me to connect with my inner artist while creating something truly unique.
As I reflect on my crafting journey, I realize that it’s not just about the final product. It’s about the moments spent kneading the clay, the laughter shared with my kids as we create together, and the satisfaction of seeing our creations light up the night. Each piece tells a story, and I love how they add a personal touch to my home decor.
So gather your materials, unleash your imagination, and let your creations shine bright! Don’t be afraid to experiment and make mistakes along the way; they often lead to the most delightful surprises. Remember, the best part of crafting is the joy it brings, so enjoy every moment of your DIY journey! Whether you’re a busy mom, a professional, or simply someone looking to unwind, glow in the dark clay offers a wonderful escape into a world of creativity. Happy crafting!
Print
Glow In The Dark Clay: Create Stunning DIY Projects!
Description
This DIY project involves creating stunning crafts using glow in the dark clay, perfect for adding a unique touch to your home decor or gifts.
Instructions
- Preheat the oven to the temperature specified on the clay package.
- Take a portion of the glow in the dark clay and knead it until soft.
- Roll out the clay using a rolling pin to your desired thickness.
- Use a craft knife to cut out shapes or designs from the rolled clay.
- Place the cut shapes on a baking sheet and bake them in the oven for the recommended time.
- Once baked, allow the clay pieces to cool completely.
- Apply a clear sealant spray to protect your creations and enhance their glow.
Keywords: Glow In The Dark Clay, DIY Crafts, Home Decor, Kids Crafts


