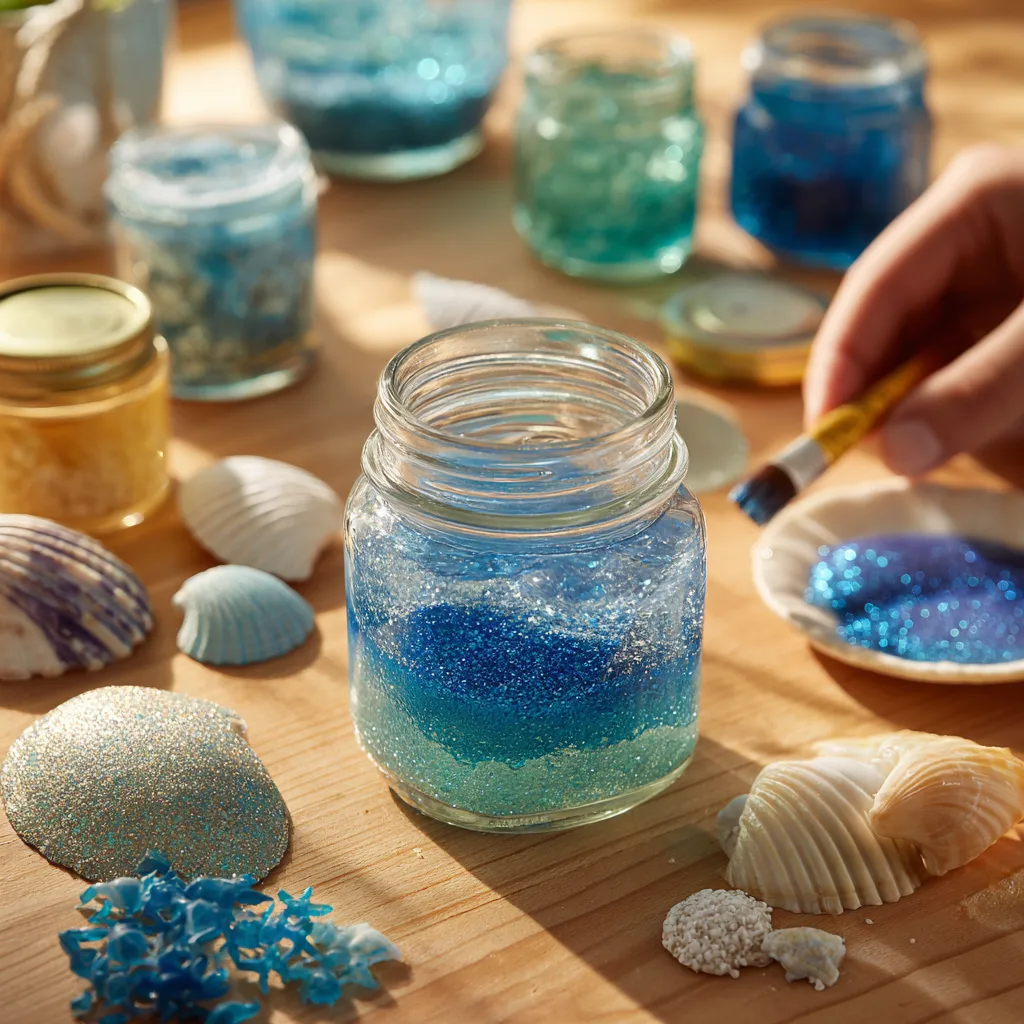
Introduction to Glittery Ocean Jar
Welcome to the enchanting world of the glittery ocean jar! This delightful DIY project is not only a feast for the eyes but also a wonderful way to spark creativity in both kids and adults. Imagine capturing the beauty of the sea in a simple jar, filled with shimmering colors and tiny treasures. It’s a fun, simple, and rewarding craft that brings joy to your home decor while providing a perfect bonding experience with your little ones. So, let’s dive in and create your very own mesmerizing ocean in a jar!
Why You’ll Love This Glittery Ocean Jar
This glittery ocean jar is more than just a craft; it’s a gateway to creativity and relaxation! It’s incredibly easy and affordable, making it perfect for busy moms and teachers looking for a fun activity. Plus, crafting together fosters bonding moments with your kids, as you share laughter and imagination. Watching the glitter swirl is not only mesmerizing but also a calming experience, bringing a touch of the ocean’s magic into your home!
Materials and Tools Needed for Glittery Ocean Jar
Gathering your materials is the first step to creating your stunning glittery ocean jar! Here’s what you’ll need:
- Clear glass jar with lid: This will be the canvas for your ocean masterpiece. Choose a jar that’s easy to handle and has a secure lid to keep everything inside.
- Blue food coloring: This magical ingredient will transform your water into a beautiful ocean hue. Feel free to mix in other colors for a unique twist!
- Water: The base of your ocean jar, it’s essential for creating that shimmering effect.
- Glitter (blue, green, or silver): This is what brings your ocean to life! The sparkle will mimic sunlight dancing on the waves.
- Small seashells or ocean-themed figurines: These treasures add personality and charm to your jar, making it feel like a tiny underwater world.
- Glycerin (optional): If you want a thicker consistency, glycerin is your friend! It helps the glitter float and swirl beautifully.
- Hot glue gun: Use this to secure the lid, ensuring your ocean stays contained. Just be careful with it around little ones!
These materials are not only easy to find but also budget-friendly. You can often find them at your local craft store or even in your kitchen. Let’s get crafting!
How to Make Glittery Ocean Jar
Creating your very own glittery ocean jar is not just a fun craft; it’s a delightful journey into the world of creativity! I remember the first time I made one with my kids. The excitement in their eyes as we transformed a simple jar into a mesmerizing ocean was truly magical. Let’s dive into the steps to make your own glittery ocean jar!
Step 1: Prepare Your Jar
Start by filling your clear glass jar with water, leaving a little space at the top. This water will be the base of your ocean jar. As you pour, imagine the waves gently lapping against the shore. It’s the perfect way to set the stage for your ocean adventure!
Step 2: Add Color
Next, add a few drops of blue food coloring to the water. Stir it gently until you achieve your desired ocean color. This is where the fun begins! You can mix in a bit of green for a tropical vibe or stick with classic blue for a deep-sea feel. The color mixing is a great way to teach kids about shades and hues while having a blast!
Step 3: Thicken the Ocean (Optional)
If you want a thicker consistency, mix in a tablespoon of glycerin. This step is optional, but it gives your ocean jar a lovely, dreamy quality. The glycerin helps the glitter float and swirl beautifully, creating that enchanting ocean effect. Just imagine the soft shimmer of the glitter as it dances in the water!
Step 4: Create the Sparkle
Now, it’s time to sprinkle in your glitter! Choose from blue, green, or silver glitter to create a shimmering effect that mimics sunlight reflecting off the ocean waves. The moment you add the glitter, you’ll see it swirl and twinkle, just like the sea on a sunny day. It’s a sight that will make your heart flutter!
Step 5: Add Ocean Treasures
To enhance the ocean theme, add small seashells or ocean-themed figurines to your jar. These little treasures will make your ocean jar feel like a tiny underwater world. I love watching my kids pick out their favorite shells and toys, each one telling a story of its own. It’s a wonderful way to spark their imagination!
Step 6: Secure the Lid
Carefully screw on the lid to your jar. If you want to ensure it stays secure, use a hot glue gun to seal it in place. Just a quick safety tip: be cautious with the hot glue gun, especially if little hands are around. It’s always best to supervise and help out when needed!
Step 7: Enjoy the Ocean Effect
Finally, give your jar a gentle shake and watch the glitter swirl and settle, creating a mesmerizing ocean effect. It’s like having a piece of the sea right in your home! Encourage your kids to experiment with their jars, shaking them up and watching the magic unfold. Each jar is unique, just like the ocean itself!
Tips for Best Results
- Experiment with different colors of glitter for a unique look. You can mix shades to create a custom ocean vibe!
- Use a larger jar for a more dramatic effect. The bigger the jar, the more ocean magic you can create!
- Consider adding a few drops of essential oil for a pleasant scent. It’s like bringing the fresh ocean breeze into your home!
- Make it a fun group activity by having friends create their own jars. Crafting together is a wonderful way to bond and share ideas!
Theme and Design Variations
- Sunset Ocean Jar: Create a stunning sunset ocean jar by using orange and pink glitter. It’s a beautiful way to capture the colors of a sunset over the sea!
- Glow-in-the-Dark Glitter: For a magical night-time effect, use glow-in-the-dark glitter. Your ocean jar will light up the room, making it a perfect nightlight!
- Holiday-Themed Jar: Get festive by making a holiday-themed jar. Add decorations like mini Christmas trees or snowflakes for a winter wonderland vibe.
- Personalized Kids’ Jars: Encourage kids to personalize their jars with their favorite colors and toys. This way, each jar becomes a unique treasure that reflects their personality!
Display and Use Ideas
Your glittery ocean jar isn’t just a beautiful craft; it’s a versatile piece that can brighten up any space! Here are some fun ways to use, display, or gift your creation:
- Calming Nightlight: Use it as a soothing nightlight in a child’s room. The gentle shimmer of the glitter can create a peaceful atmosphere for bedtime.
- Unique Home Decor: Display your ocean jar on a shelf or coffee table as a stunning home decor piece. It’s a conversation starter that adds a touch of whimsy to your space!
- Thoughtful Gift: Gift your glittery ocean jar to friends or family as a heartfelt handmade present. It’s a lovely way to share a piece of your creativity with loved ones.
- Classroom Craft: Use it in classrooms as a creative project for students. It’s a fun way to teach kids about oceans while encouraging their artistic expression!
FAQs about Glittery Ocean Jar
As you embark on your glittery ocean jar adventure, you might have a few questions. Don’t worry; I’ve got you covered! Here are some common queries that fellow crafters often ask:
- Can I use other colors besides blue? Absolutely! Feel free to experiment with different colors to create your unique ocean jar. Mixing colors can lead to stunning results, so let your creativity flow!
- Is this project safe for young children? Yes, this project is generally safe, but adult supervision is recommended, especially with small items that could be choking hazards. Always keep an eye on little hands while crafting!
- How long will the glitter stay suspended? The glitter will settle over time, but adding glycerin can help it stay suspended longer. It creates a magical effect, making your ocean jar even more enchanting!
- Can I add other decorations to my ocean jar? Definitely! You can personalize your jar with other ocean-themed decorations like tiny fish or starfish. The more, the merrier!
- What if my jar leaks? If you notice any leaks, make sure the lid is tightly secured. Using a hot glue gun to seal it can help prevent any spills, ensuring your ocean stays contained!
Final Thoughts
Creating your glittery ocean jar is not just a craft; it’s a delightful experience filled with joy and creativity! I hope you feel inspired to dive into this project and let your imagination flow. Each jar you create is a unique masterpiece, reflecting your personal touch and creativity. I can’t wait to see how your ocean jars turn out! Don’t forget to share your results and any fun variations you come up with. Let’s spread the magic of crafting together and bring a little piece of the ocean into our homes!
Print
Glittery ocean jar: Create your own mesmerizing ocean in a jar!
Description
Create a stunning glittery ocean jar that captures the beauty of the sea. This DIY project is perfect for adding a touch of whimsy to your home decor or as a fun activity for kids.
Instructions
- Start by filling the glass jar with water, leaving some space at the top.
- Add a few drops of blue food coloring to the water and stir until you achieve your desired ocean color.
- If you want a thicker consistency, mix in a tablespoon of glycerin.
- Sprinkle in your glitter to create a shimmering effect.
- Add small seashells or ocean-themed figurines to the jar.
- Carefully screw on the lid, and if desired, use a hot glue gun to secure it in place.
- Shake the jar gently to see the glitter swirl and settle, creating a mesmerizing ocean effect.
- Category: Home Decor
Keywords: ocean jar, glitter jar, DIY ocean decor, kids craft, home decor