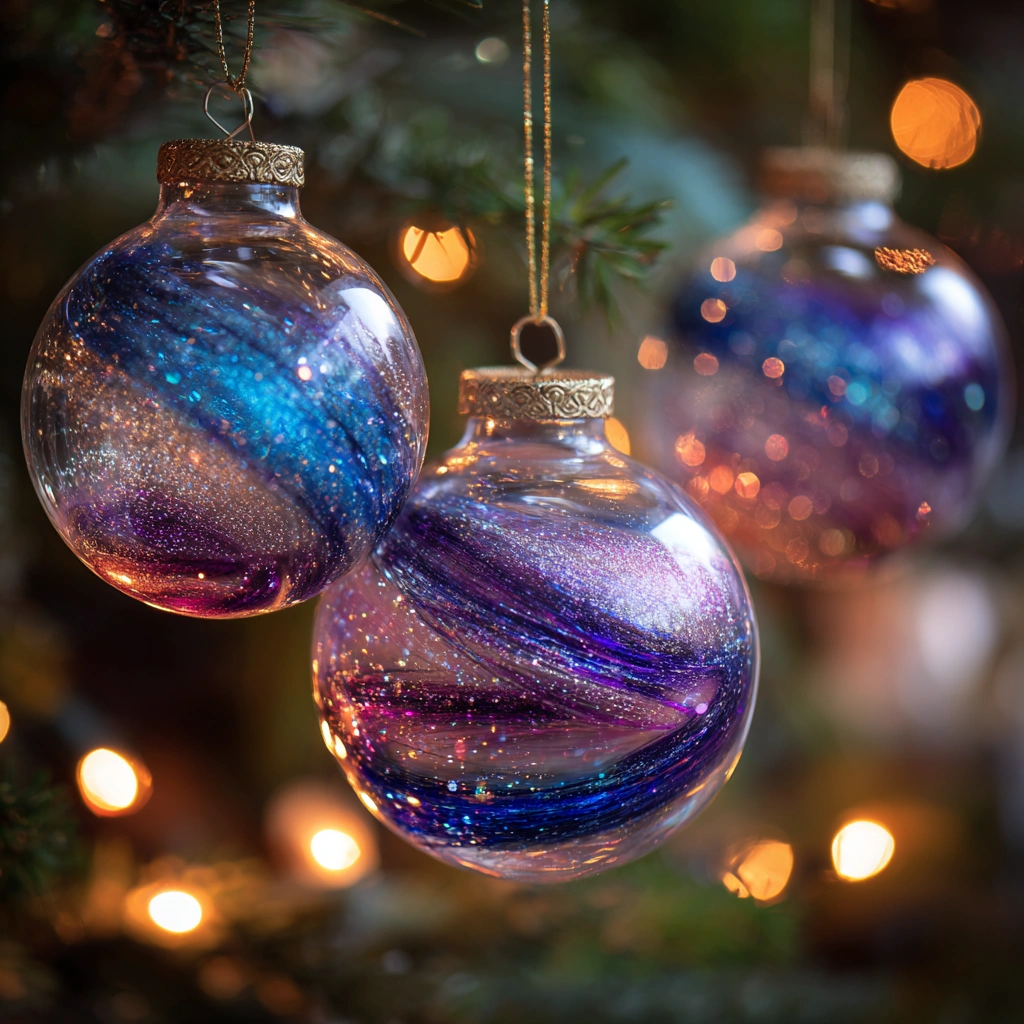
Introduction to Galaxy Glitter Ornaments
Welcome to the enchanting world of Galaxy Glitter Ornaments! If you’re looking for a fun and creative way to add a cosmic touch to your holiday decor, you’ve come to the right place. This DIY craft is not only simple but also incredibly rewarding, making it perfect for crafters of all ages. I remember the joy of crafting these ornaments with my kids, their laughter filling the room as we sprinkled glitter like stardust. So, grab your supplies, and let’s embark on this glittery adventure together!
Why You’ll Love This Galaxy Glitter Ornaments
Creating Galaxy Glitter Ornaments is a delightful experience that brings families together. Not only are they easy and affordable to make, but they also spark creativity in both kids and adults. I love how this craft allows us to unwind while bonding over glitter and glue. Plus, the satisfaction of seeing our unique creations hanging on the tree is simply priceless. It’s a fun way to celebrate the season and make lasting memories!
Materials and Tools Needed for Galaxy Glitter Ornaments
Before we dive into crafting our stunning Galaxy Glitter Ornaments, let’s gather our materials! Here’s what you’ll need:
- Clear glass or plastic ornaments: These serve as the canvas for your cosmic creations. Glass ornaments offer a classic look, while plastic ones are perfect for little hands.
- Glitter (various colors): Choose your favorite colors to create a vibrant galaxy effect. You can even mix different shades for a unique twist!
- Mod Podge or clear glue: This is the magic adhesive that will hold your glitter in place. Non-toxic options are great for crafting with kids.
- Paintbrush: A simple paintbrush helps you apply the glue evenly inside the ornament, ensuring a smooth finish.
- Small funnel: This handy tool makes pouring glitter a breeze, preventing spills and messes.
- String or ribbon for hanging: Choose colorful ribbons to add a festive touch when it’s time to display your ornaments.
- Paper plate or tray: Use this to catch any excess glitter, making cleanup a snap!
Gathering these materials is part of the fun! Plus, many of these items can be found at your local craft store or even around your home, making this project budget-friendly and accessible for everyone.
How to Make Galaxy Glitter Ornaments
Creating your own Galaxy Glitter Ornaments is not just a craft; it’s a delightful journey into the cosmos right from your living room! I remember the first time I made these with my kids. The excitement in their eyes as we transformed simple ornaments into sparkling galaxies was truly magical. So, let’s dive into the steps to make these stunning holiday decorations that will light up your home!
Step 1: Prepare Your Ornament
First things first, let’s get our ornaments ready! Carefully remove the top of your clear glass or plastic ornament. This step is crucial, as it allows us to fill the inside with all that glittery goodness. Just be gentle—no one wants a shattered ornament before the fun even begins!
Step 2: Apply Glue
Now, grab your paintbrush and a bottle of Mod Podge or clear glue. Apply a thin layer of glue inside the ornament. This is where the magic begins! The glue will help the glitter stick, creating that beautiful galaxy effect. I love how the glue glistens as it catches the light, making the whole process feel even more enchanting.
Step 3: Add Glitter
Here comes the fun part! Using a small funnel, pour in your chosen glitter colors. You can mix and match to create your own cosmic masterpiece. As you shake the ornament, watch the glitter swirl and coat the inside. It’s like watching a mini universe come to life! Don’t be afraid to get creative—this is your chance to let your imagination run wild!
Step 4: Remove Excess Glitter
Once your ornament is beautifully coated, it’s time to tap out any excess glitter. Hold the ornament over a paper plate or tray and give it a gentle shake. This step is essential to avoid a glitter explosion later on! The soft shimmer of the glitter left inside will make your ornament look like it’s filled with stardust.
Step 5: Let It Dry
Patience is key here! Let your ornament dry completely before replacing the top. I usually set them aside for about 30 minutes, which gives me just enough time to clean up the glitter mess (because let’s be honest, glitter gets everywhere!). Watching the ornaments dry is like waiting for a star to shine—so worth it!
Step 6: Finish and Hang
Once your ornaments are dry, it’s time to put the tops back on. Then, attach a string or ribbon for hanging. I love using colorful ribbons that match the glitter colors for an extra pop! Now, you can display your galaxy glitter ornaments on your tree or around your home. They’ll add a cosmic touch to your holiday decor that everyone will admire!
And there you have it! A simple, fun, and rewarding project that brings the beauty of the galaxy into your home. I can’t wait to see how your Galaxy Glitter Ornaments turn out!
Tips for Best Results
- Experiment with different color combinations for a unique galaxy effect. Mixing blues, purples, and silvers can create a stunning cosmic vibe!
- Use fine glitter for a more subtle shimmer or chunky glitter for a bold look. Each type brings its own charm to your ornaments.
- Consider adding small stars or sequins inside for extra dimension. It’s like adding little pieces of the universe!
- Make a set of ornaments as a thoughtful gift for friends and family. Who wouldn’t love a personalized galaxy ornament?
Theme and Design Variations
One of the best parts about making Galaxy Glitter Ornaments is the endless possibilities for creativity! Here are some fun theme and design variations to inspire your crafting:
- Winter Wonderland: Create a serene theme with icy blues and whites for a frosty effect that captures the beauty of winter.
- Vibrant Colors: Use bright, bold colors for a fun, kid-friendly version that will surely bring smiles and excitement!
- Monochromatic Scheme: Try a chic, modern look by sticking to one color family, like various shades of purple or blue.
- Holiday Shapes: Incorporate holiday-themed glitter shapes like snowflakes or stars for an extra festive touch that celebrates the season.
These variations not only make your ornaments unique but also allow you to tailor them to your home decor or gifting needs. Let your imagination soar!
Display and Use Ideas
Now that you’ve created your stunning Galaxy Glitter Ornaments, it’s time to showcase your cosmic creations! Here are some fun and festive ways to display and use your ornaments:
- Hang on your Christmas tree for a stunning cosmic effect that will dazzle your guests.
- Use as table centerpieces during holiday gatherings, adding a touch of sparkle to your dining experience.
- Gift as personalized ornaments to friends and family, spreading joy and creativity this holiday season.
- Create a festive garland by stringing multiple ornaments together, perfect for draping across mantels or doorways.
These ideas will not only enhance your holiday decor but also make your Galaxy Glitter Ornaments a cherished part of your celebrations!
FAQs about Galaxy Glitter Ornaments
As you embark on your journey to create stunning Galaxy Glitter Ornaments, you might have a few questions. Don’t worry; I’ve got you covered! Here are some common queries that fellow crafters often ask:
- Can I use plastic ornaments instead of glass?
Yes, plastic ornaments are a fantastic alternative! They are less fragile, making them perfect for kids and ensuring that your crafting experience is worry-free. - What type of glitter works best?
Fine glitter gives a subtle shimmer, while chunky glitter creates a bold look. Choose based on your desired effect—both can create beautiful Galaxy Glitter Ornaments! - How do I clean up glitter spills?
Glitter can be a bit mischievous, but cleaning up is easy! Use a damp cloth to wipe up glitter spills, as it helps to collect the glitter more effectively and keeps your crafting area tidy. - Can I add other decorations inside the ornaments?
Absolutely! Feel free to add small stars, sequins, or even tiny holiday-themed trinkets inside your ornaments for an extra touch of creativity and dimension. - How long do the ornaments last?
With proper care, your Galaxy Glitter Ornaments can last for many holiday seasons! Just be sure to handle them gently and store them safely after the holidays.
These FAQs should help you feel more confident as you create your Galaxy Glitter Ornaments. Happy crafting!
Final Thoughts
Creating Galaxy Glitter Ornaments is not just a craft; it’s a joyful experience that brings families together and fills your home with holiday magic. The satisfaction of seeing your unique creations sparkle and shine is truly rewarding. I encourage you to gather your loved ones, dive into this fun project, and let your creativity soar! Don’t forget to share your results with friends and family—there’s nothing quite like the joy of showing off your cosmic masterpieces. Happy crafting, and may your holidays be filled with glitter and joy!
Print
Galaxy Glitter Ornaments: Create Stunning Holiday Decor Today!
Description
Create beautiful galaxy glitter ornaments that will add a cosmic touch to your holiday decor. These ornaments are easy to make and perfect for all ages!
Instructions
- Remove the top of the ornament carefully.
- Using a paintbrush, apply a thin layer of Mod Podge or clear glue inside the ornament.
- Using a funnel, pour in your chosen glitter colors, shaking the ornament to coat the inside evenly.
- Once coated, tap out any excess glitter onto a paper plate or tray.
- Let the ornament dry completely before replacing the top.
- Attach a string or ribbon for hanging.
- Display your galaxy glitter ornaments on your tree or around your home!
- Category: Holiday Decor
Keywords: Galaxy Glitter Ornaments, Holiday Decor, DIY Ornaments, Glitter Crafts